| Author |
Message |
|
Christoph Allgaier
Location: Stuttgart, Germany Joined: 23 Sep 2007
Posts: 7
|
 Posted: Sat 25 May, 2013 10:43 am Post subject: 1st post - Anglosaxon Broken Back Seax Posted: Sat 25 May, 2013 10:43 am Post subject: 1st post - Anglosaxon Broken Back Seax |
 |
|
Hello myArmoury-Forum,
in my First post I would like to show you guys my recently completed broken back seax.
I traded the blade at the Moesgaard Viking Moot in Aarhus, DK in 2011 and it took me until a few weeks ago to start giving it a grip that the nice blade deserves.
It is made of cattle bone and antler as the end of the grip.
I suspect the blade is from the workshop of Paul Binns, but I'm not sure about that, because as I said it was a trade....
So the next step is to make a nice scabbard for the small seax.....I am hoping, it will not Take me another two years to ;-)
And currently I am working on another Project, which is an Alamannic broad seax.....I Hope I get it done before summer.
Please comment, critisize and make suggestions how I can improve....I am looking forward to your answers!
Greetings, Christoph
 Attachment: 220.44 KB Attachment: 220.44 KB
[ Download ]
Attachment: 215.24 KB
[ Download ]
Attachment: 241.52 KB
[ Download ]
|
|
  |
 |
Jean Thibodeau

|
| Posted: Sun 26 May, 2013 6:27 am Post subject: |
|
|
Really nice work on the handle and maybe you could add some comments on how you put it together, found the materials and any special treatment to stabilize the cow horn, if any was needed.
I also wonder if you made or found the brass fitting and adapted it from something else.
I recently used a very large 3" brass spherical 1/8" staircase decoration to cut up pieces of with a dremel cutting wheel for metal decorations to a walking staff I made. Also steel brass plated rings also used on the staircase wooden bars: The whole point is that one can find interesting and shaped pieces of brass or other metals and reshape them to use as handle/pommel/guard or other decorative elements with a little reshaping with dremel or grinders.
Making a collar/ferule from scratch from stock round or flat or castings takes some real machining equipment or casting capability or have these pieces custom cast from wax models and not economical to have just one piece cast.
Attachment: 143.51 KB
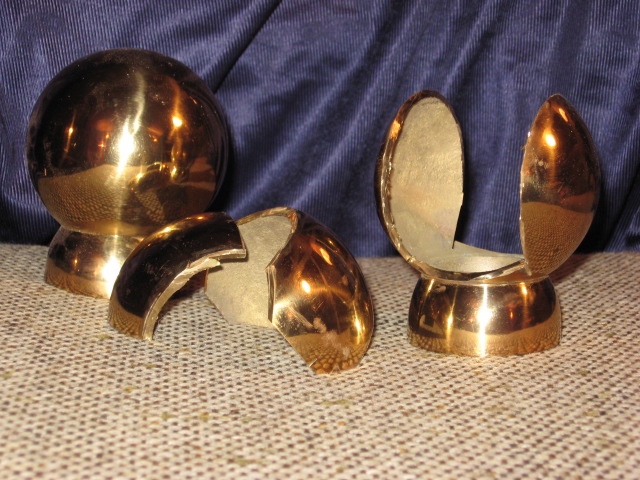
Examples of the brass decoration in it's original shape and after being partialy cut up for parts for projects.
You can easily give up your freedom. You have to fight hard to get it back!
|
|
|
|
|
|
Ken Speed
|
| Posted: Sun 26 May, 2013 5:17 pm Post subject: |
|
|
Yeah, What he said! Just kidding, although I do agree with my friend Jean; you did a super job on the handle, especially the bone.
I'm curious to see what the sheath you make will look like.
|
|
|
|
|
|
Mark Moore
|
| Posted: Sun 26 May, 2013 6:17 pm Post subject: |
|
|
Fantastic. That grip is about as fine as it is functional! The blade really does look like a Paul B. Great work....can't wait to see the 'suit'....  ............McM ............McM
|
|
|
|
|
Daniel Wallace

Location: Pennsylvania USA Joined: 07 Aug 2011
Posts: 580
|
| Posted: Tue 28 May, 2013 6:37 am Post subject: |
|
|
|
that grip is great, the rough unfinished joint of the horn has a great functional aspect, and the polished horn is almost like an ivory/glassy look.
|
|
|
|
|
|
Alex Indman
|
| Posted: Tue 28 May, 2013 7:16 am Post subject: |
|
|
I also like the look of the polished bone.
Did you get a "processed" bone from some supplier, or started with a raw bone from a butcher's? I wonder how complicated it is to process/stabilize a bone for use as handle material.
And, BTW, what part of a cow this bone came from?
Alex.
|
|
|
|
|
|
Christoph Allgaier
Location: Stuttgart, Germany Joined: 23 Sep 2007
Posts: 7
|
| Posted: Tue 28 May, 2013 10:34 pm Post subject: |
|
|
Thanks for the positive resonance!
to your Questions:
The Cattle bone was unprocessed like the pic below (taken from the Internet) .
So it took me a lot of grinding an polishing to bring it into shape.
To bring the bone into shape I first used a rasp / file (Feile in german) to take away the large parts of material and continued with increasingly smoother sandpaper. For the polishing at the end I used a tool for the Drilling machine...Looks like I am not a real medieval craftsman ;-)
The brass Piece was some sort of cap of whatever I found in my box full of random brass and bronze pieces I purchased some years ago on eBay. So it had the right size and shape and I had nothing more to do than make a hole for the Tang and to polish it. Maybe it was a Fitting to some Kind of handle before...
I got the Bone from a Trader on some medieval reenactment market here in southwest Germany. As written above, it was unprocessed, meaning it had ist natural shape but it was cooked, free of meat residues and medulla (bone marrow? - don´t know the right word...the stuff inside the bone)
I am not sure which part of the cow the bone is from, butt guessing I´d say it might be from the lower front legs.
Attachment: 38.07 KB
[ Download ]
|
|
|
|
|
|
Christoph Allgaier
Location: Stuttgart, Germany Joined: 23 Sep 2007
Posts: 7
|
| Posted: Tue 28 May, 2013 11:00 pm Post subject: |
|
|
and one Thing I´ve forgot to answer....I have a confession to make...
I used synthetical resin to fix the bone to the Tang...experiments with bone glue did not work out for me and regarding the smell, I decided to use modern material.
The antler part is fixed with two Pins or dowels and also the resin.
If you look a the Fotos you can see the resin where the brass Fitting and the bone do not connect properly.
Question to the more experienced Forum members: What would the historical accurateway have been?
|
|
|
|
|
|
|

