Info Favorites Register Log in
myArmoury.com Discussion Forums

Forum index Memberlist Usergroups Spotlight Topics Search
Forum Index > Makers and Manufacturers Talk > Making a latchet bow - in progress Reply to topic
This is a standard topic  
Author Message
Leo Todeschini
Industry Professional


Location: Oxford, UK
Joined: 12 Nov 2006
Likes: 1 page

Spotlight topics: 1
Posts: 1,723

Feedback score: 100%
(3 total ▮ 100% positive)
PostPosted: Mon 29 Oct, 2012 4:41 pm    Post subject: Making a latchet bow - in progress         Reply with quote

A while back, I set up a thread on making a Cinquedea and it was fun to have people watching as it came along and so I thought that it is time for another.

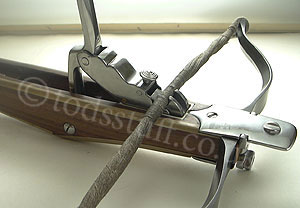
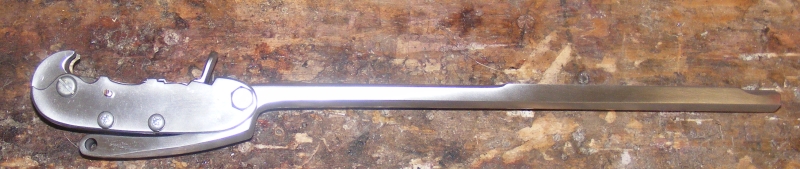
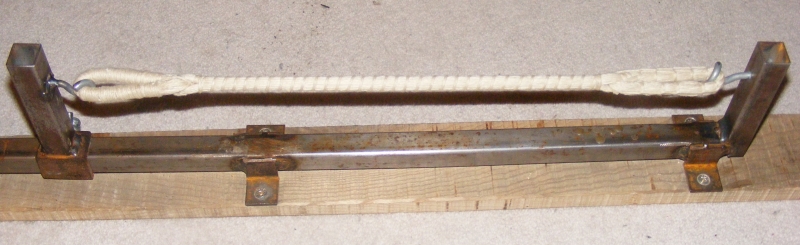
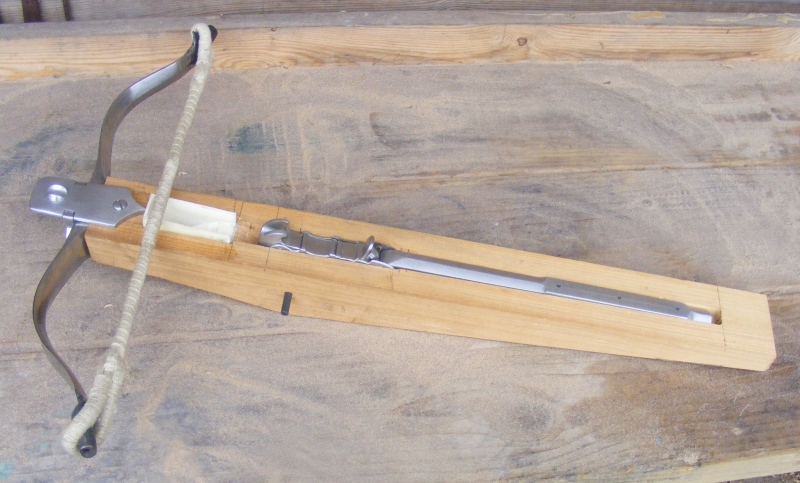
This time I am making a latchet bow and have added a picture of the last one I made. Latchets bows are small lever action bows with the cocking lever built into the top of the stock and a top mounted trigger. I actually don't know that much about these but I believe that they were civil defence bows from the second half of the 16thC and were popular in the North of England and in the Borders.

I examined one about 7 years ago and made a fairly close reproduction at the time and now making another and as these are rather unusual and interesting pieces I thought I would share the process.

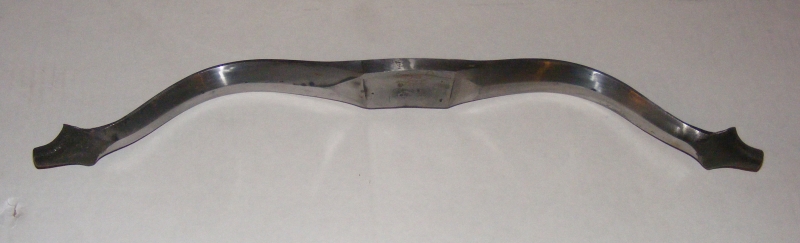
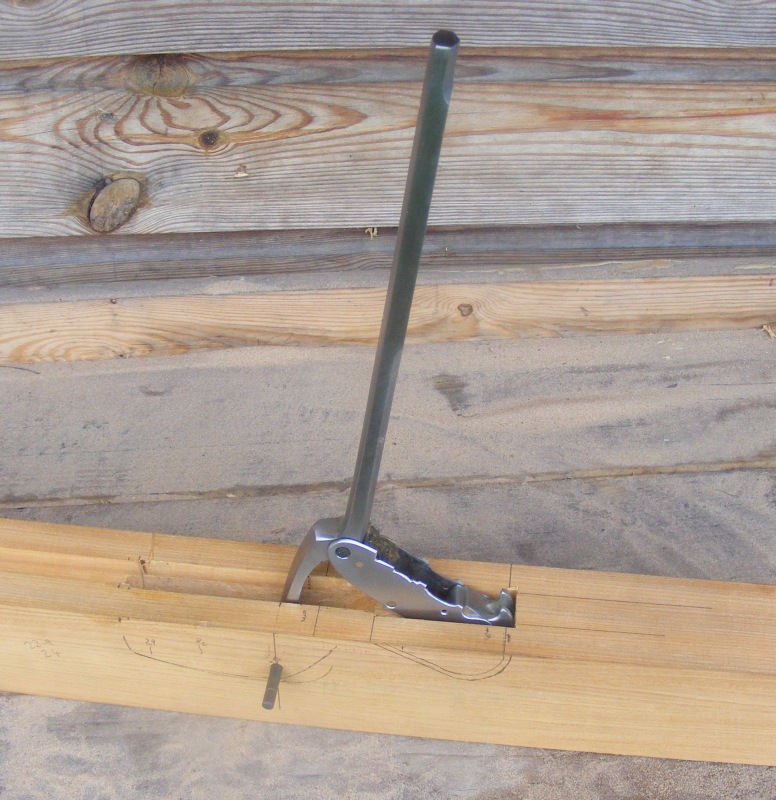
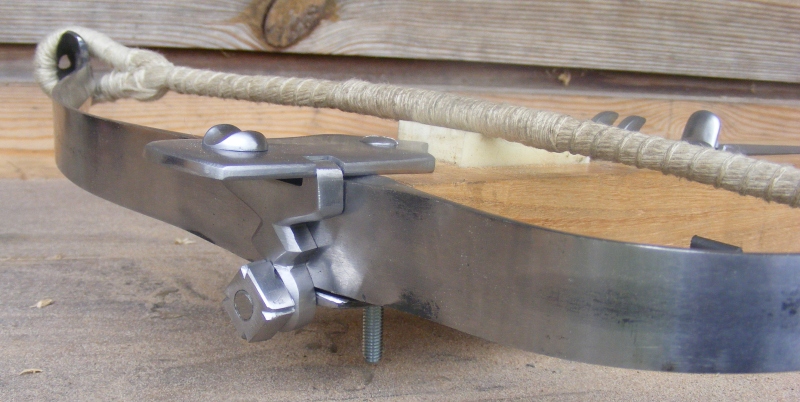
The inbuilt lever and top trigger means that it can shoot about every 8 seconds and be shot single handed and although the draw is quite short with 225lb it will still pack a punch. The bow is about 40cm wide and has a triangular cross section and rolled ends.

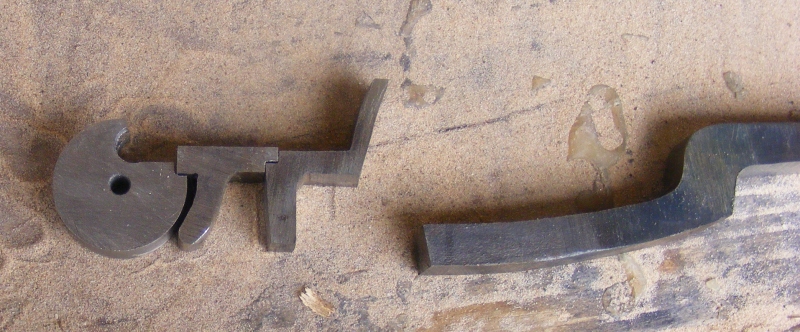
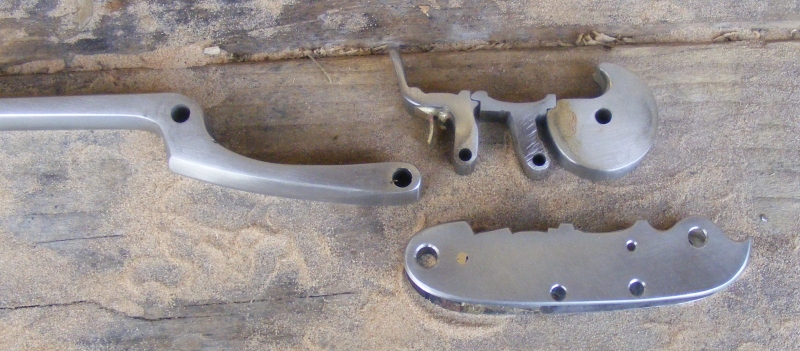
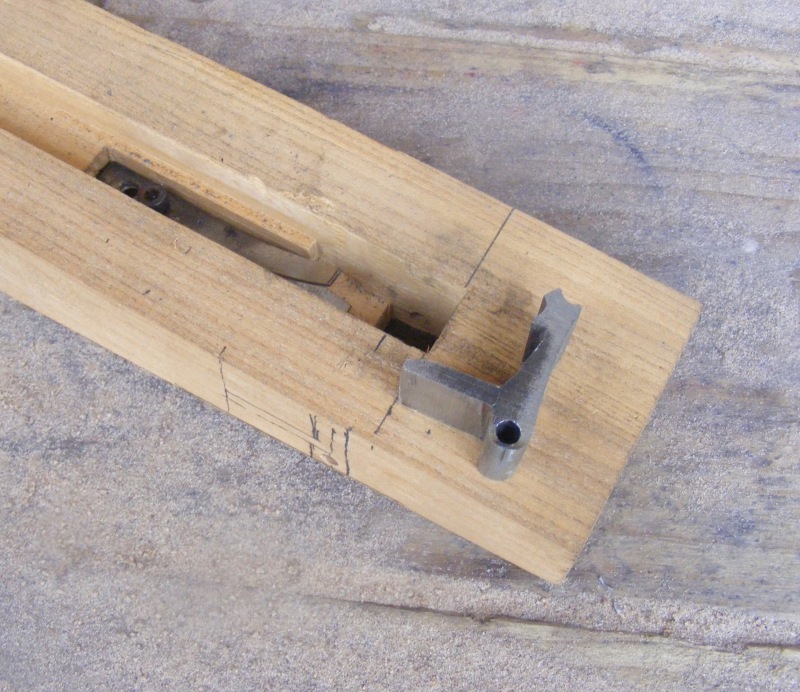
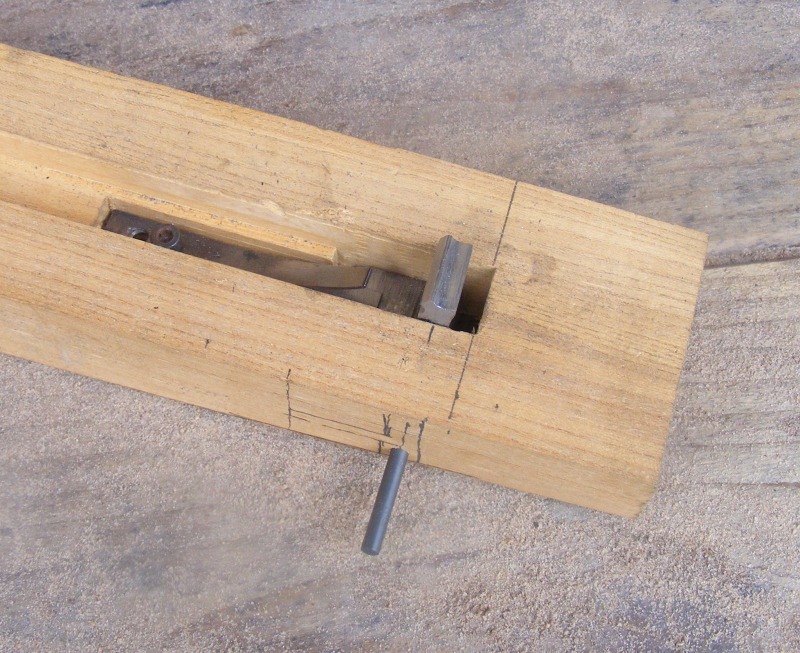
I started by making the nut and the sear train. I used a layout taken from an assasins bow which also uses a top trigger and I find a much easier system than the one fitted to this bow originally. The original system was very sensitive and it is tricky to get the balance right between hair trigger and impossibly hard, so I decided to use a different method.

When making a trigger the most common mistake is that the more load you put on the trigger, the stiffer it gets, so it in effect becomes self locking. This system doesn't suffer from this, but still has the great advantage of the more load you put through it, the more it locks, so it cannot slip, but crucially remains easy to trigger.

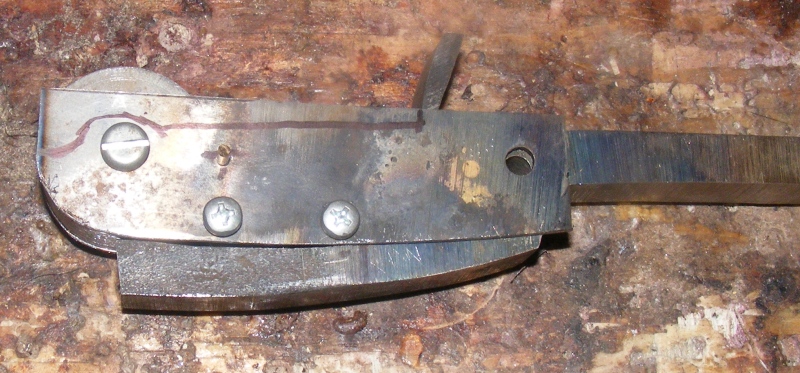
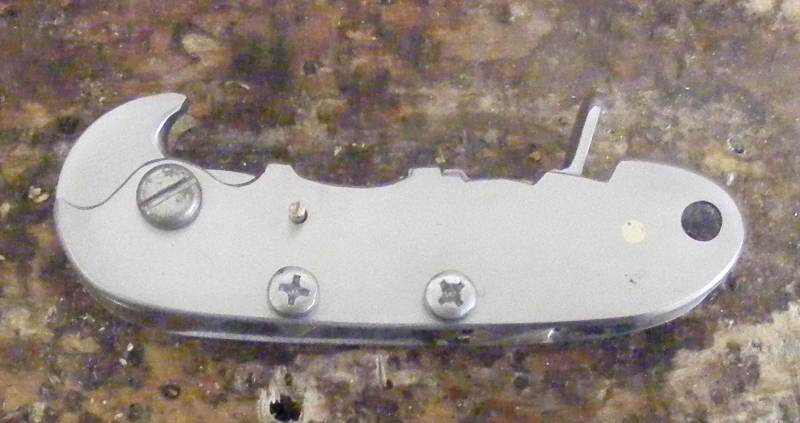
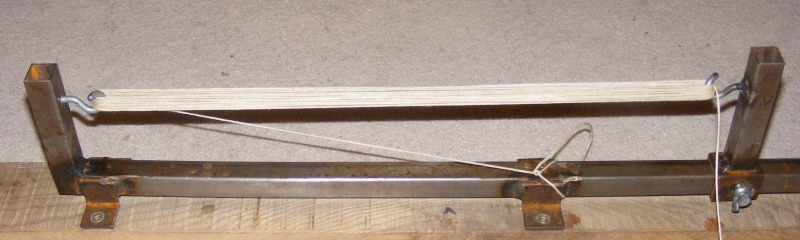
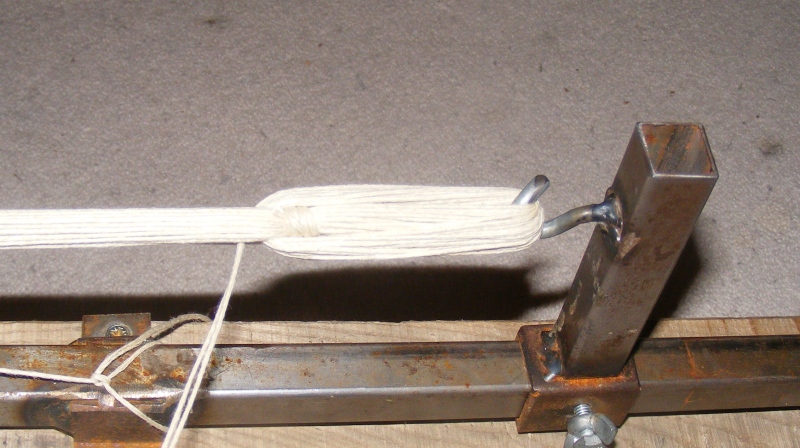
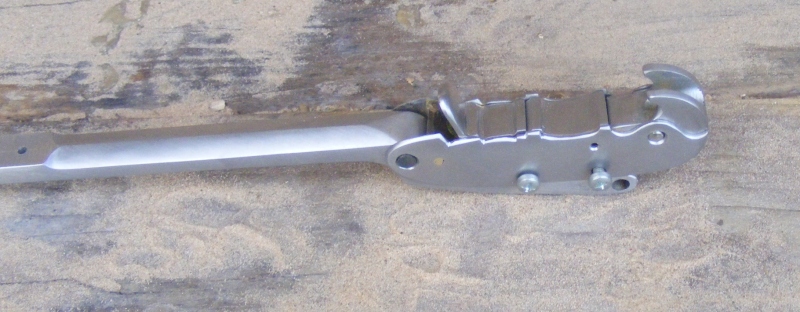
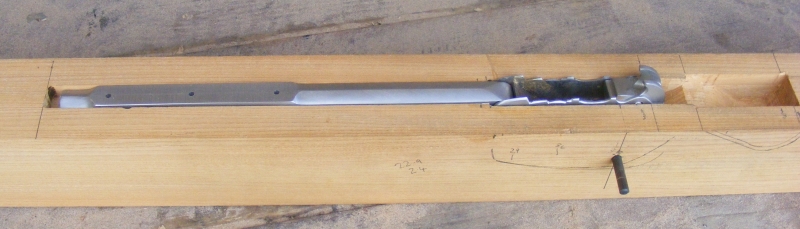
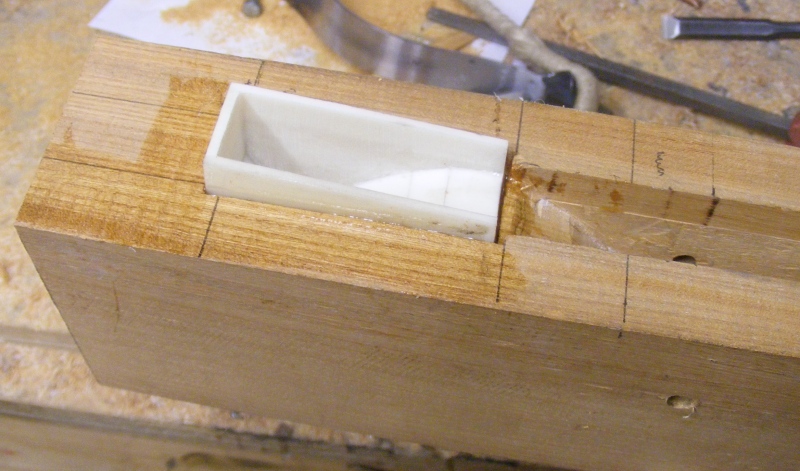
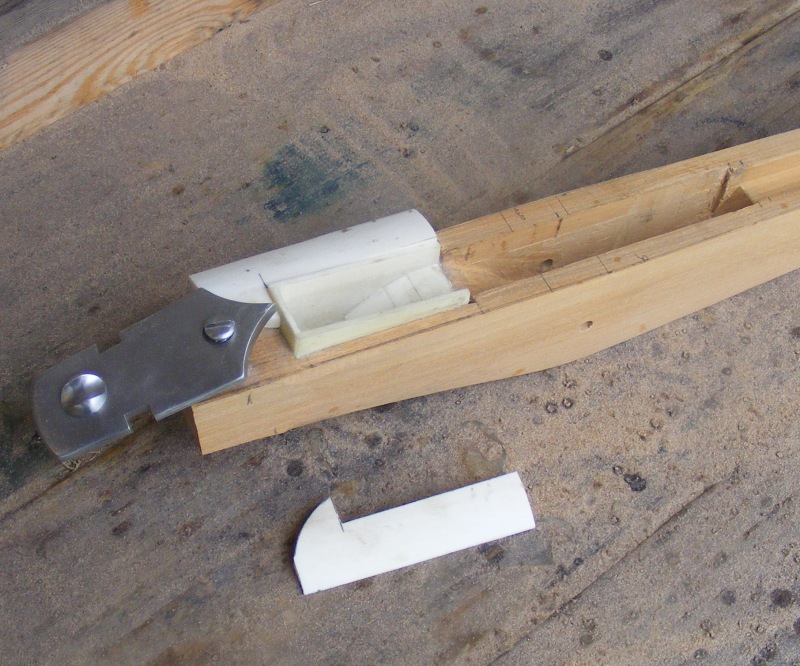
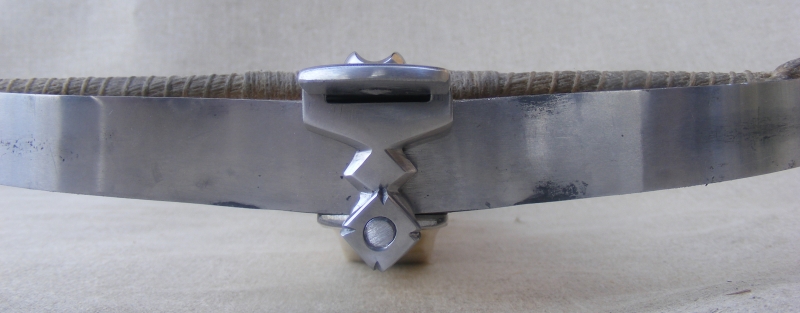
When the nut and sear train was made, I added roughed out side plates, drilled them and fitted them up to the roughed out lever. Once all the clearances worked and all the little interferences were dealt with, I brazed a spacer inbetween the plates and I polished the pieces up and started thinking about the string................

I hope you find the story interesting because there is more to come.

Tod


 Attachment: 15.11 KB
latchet.jpg


 Attachment: 202.9 KB
1.JPG


 Attachment: 204.78 KB
2.JPG


 Attachment: 199.66 KB
3.JPG


 Attachment: 144.22 KB
4.JPG


 Attachment: 126.77 KB
5.JPG


www.todsworkshop.com
www.todcutler.com
www.instagram.com/todsworkshop
https://www.facebook.com/TodsWorkshop
www.youtube.com/user/todsstuff1
View user's profile Send private message Visit poster's website
Karl Randall


Location: South Korea
Joined: 10 Jul 2009
Likes: 3 pages

Posts: 38

Feedback score: None
PostPosted: Tue 30 Oct, 2012 6:24 am    Post subject:         Reply with quote

Excellent work!

Might I ask what kind (and temper) of steel you used for the bow itself?
View user's profile Send private message Send e-mail
Joel Minturn


Joined: 10 Dec 2007

Posts: 232

Feedback score: None
PostPosted: Tue 30 Oct, 2012 7:41 am    Post subject:         Reply with quote

Can't wait too see this progress.

The latchet crossbow is one of my favorite styles and since I have always wanted to build one myself I'm looking forward to see how you do the lock.
View user's profile Send private message
Martin Francis


Location: Northumberland, UK
Joined: 27 Sep 2008

Posts: 32

Feedback score: None
PostPosted: Tue 30 Oct, 2012 8:49 am    Post subject:         Reply with quote

Dear me Tod, that original one looks rather familiar..... Big Grin

Flora and I will see you at TORM

Regards

Martin
View user's profile Send private message
Leo Todeschini
Industry Professional


Location: Oxford, UK
Joined: 12 Nov 2006
Likes: 1 page

Spotlight topics: 1
Posts: 1,723

Feedback score: 100%
(3 total ▮ 100% positive)
PostPosted: Tue 30 Oct, 2012 3:49 pm    Post subject:         Reply with quote

Thanks for the interest and hopefully this thread will make the process a bit easier.

Treat the steel like a spring and you will be fine, but find a spring steel available to you and heat treat it like a spring.

I finished off the cocking lever and trigger and got it ready to start sizing it up to the stock so that I could start cutting the recess for the lever and trigger. At this point it is not possible to set out the stock until the bow has a string because you have a given drawlength for the bow and until it is braced and you can measure form here you can't start.

To begin the string, loop round a single thread until you have built up a bundle large enough - about the diameter of the bolt is usually a good rule of thumb. tie off each end and lay in the reinforcing loops and then put the spiral on the cord and then whip the ends and the centre.

I then wax the string, but as it can get a bit messy I will do this at the end after the bow is finished.

The next stage is to cut the angle on the front of the stock, estimating as best as possible what this should be to allow the string to just touch the top of the stock. If your guess is wrong asses how much it should be changed and try again. When this angle has been settled, the bow can be held in position and the brace position and draw position can be marked and then you can position the lever and start to cut it in.

When you lift the lever, the trigger slides forward and up and then dips down into a recess so the the nut teeth are just behind the string. This recess is then cut in and then lined with bone plates.


 Attachment: 165.86 KB
laying out the cords.JPG


 Attachment: 186.33 KB
laying in the reinforcing loop.JPG


 Attachment: 167.63 KB
whipping.JPG


 Attachment: 197.34 KB
trigger train.JPG


 Attachment: 154.18 KB
trigger assembled.JPG


 Attachment: 146.77 KB
lever in stock.JPG


 Attachment: 198.63 KB
lever forward and in nut recess.JPG


 Attachment: 180.3 KB
nut recess.JPG


www.todsworkshop.com
www.todcutler.com
www.instagram.com/todsworkshop
https://www.facebook.com/TodsWorkshop
www.youtube.com/user/todsstuff1
View user's profile Send private message Visit poster's website
Leo Todeschini
Industry Professional


Location: Oxford, UK
Joined: 12 Nov 2006
Likes: 1 page

Spotlight topics: 1
Posts: 1,723

Feedback score: 100%
(3 total ▮ 100% positive)
PostPosted: Wed 31 Oct, 2012 3:49 pm    Post subject:         Reply with quote

I started by fitting the lever and made sure that it goes through the loading cycle and went on to make the rear retaining catch. This is needed because when the lever is pushed back into the stock there is a reasonable force from the bow trying to pull the lever forward. This catch is very important to get right because if it fails at best the lever will fly forward and detsroy the stock, at worst, it will connect with part of the shooter on the way forward.

At this point, the stock needed shaping and the bow irons making and the bow mounted. I could now check that the whole system works together.

Now that all the parts are made the bone top and bottom deck can be started.

Tod


 Attachment: 190.21 KB
1 bow and lever in place.JPG


 Attachment: 195.56 KB
2 rear catch.JPG


 Attachment: 191.57 KB
3 rear catch in place.JPG


 Attachment: 177.77 KB
4 bow irons.JPG


 Attachment: 184.81 KB
5 irons in place.JPG


 Attachment: 192.32 KB
6 bone deck starts.JPG


www.todsworkshop.com
www.todcutler.com
www.instagram.com/todsworkshop
https://www.facebook.com/TodsWorkshop
www.youtube.com/user/todsstuff1
View user's profile Send private message Visit poster's website
Ralph Grinly


Joined: 19 Jan 2011

Posts: 330

Feedback score: None
PostPosted: Wed 31 Oct, 2012 5:26 pm    Post subject:         Reply with quote

This is looking like a fascinating project Big Grin Here's hoping you can show us a video of it in action when you've completed it. I *think* I can visualize how it works Cool
View user's profile Send private message
Jason L. Baker


Joined: 13 May 2007

Posts: 1

Feedback score: None
PostPosted: Thu 01 Nov, 2012 4:14 pm    Post subject:         Reply with quote

Thanks for sharing this Leo, watching your work flow is incredibly interesting and makes me appreciate the end result so much more.
View user's profile Send private message
Jean Henri Chandler


Location: New Orleans
Joined: 20 Nov 2006

Spotlight topics: 1
Posts: 1,420

Feedback score: None
PostPosted: Fri 02 Nov, 2012 10:33 am    Post subject:         Reply with quote

this is really interesting thanks for posting Tod,

J

Books and games on Medieval Europe Codex Integrum

Codex Guide to the Medieval Baltic Now available in print
View user's profile Send private message
Leo Todeschini
Industry Professional


Location: Oxford, UK
Joined: 12 Nov 2006
Likes: 1 page

Spotlight topics: 1
Posts: 1,723

Feedback score: 100%
(3 total ▮ 100% positive)
PostPosted: Fri 02 Nov, 2012 6:08 pm    Post subject:         Reply with quote

Thanks for the support and I enjoy doing these and just hope they are of interest.

The top deck of bone was fitted on so that the panels were sanded to have a straight edge and these were glued to the stock to neatly line the edge of the cut out and when this had cured the bottom deck was applied.

The next stage was to turn the knob that is fixed to the butt. This feature is common to stone bows and small crossbows of the 16thC and aids whe you are spanning them as the butt of the bow lodges in the join of your thigh and trunk and so this makes it more comfortable. This was bonded on with a peg as a core and shaped to blend the lines.

The final stage was to flat all the bone off, test assemble the bow and lever and make sure again that everything works as it should and to get a level to use as a guide for fitting the bone scale to the back of the lever. The final stage is to fit this scale,

The scale is decoration, but also it has a slight undercut so that it provides a positive grip for your fingers. When you open the catch at the rear that holds the lever a spring pops the lever up, but the undercut allows you to get a good grip.

The last thing to happen will be to assemble (again) and then to test shoot.......................


 Attachment: 158.02 KB
20.JPG


 Attachment: 187.19 KB
21.JPG


 Attachment: 193.38 KB
23.JPG


www.todsworkshop.com
www.todcutler.com
www.instagram.com/todsworkshop
https://www.facebook.com/TodsWorkshop
www.youtube.com/user/todsstuff1
View user's profile Send private message Visit poster's website
Robert MacPherson
Industry Professional


Location: Jeffersonville USA
Joined: 27 Feb 2008

Posts: 141

Feedback score: None
PostPosted: Sat 03 Nov, 2012 8:31 am    Post subject:         Reply with quote

Tod,

It is a delight to get a glimpse into your process. We are watching you over at The Arbelest Guild http://thearbalistguild.forumotion.com/t809-l...chini#7467

We would be an honored if you would join us there sometimes.

Mac

Robert MacPherson
http://www.lightlink.com/armory/
http://billyandcharlie.com/
View user's profile Send private message Visit poster's website
Joe Fults


Location: Midwest
Joined: 02 Sep 2003

Posts: 3,646

Feedback score: 100%
(6 total ▮ 100% positive)
PostPosted: Sat 03 Nov, 2012 8:38 am    Post subject:         Reply with quote

You just really do some darn neat stuff. Cool
"The goal shouldn’t be to avoid being evil; it should be to actively do good." - Danah Boyd
View user's profile Send private message
Leo Todeschini
Industry Professional


Location: Oxford, UK
Joined: 12 Nov 2006
Likes: 1 page

Spotlight topics: 1
Posts: 1,723

Feedback score: 100%
(3 total ▮ 100% positive)
PostPosted: Sat 03 Nov, 2012 9:00 am    Post subject:         Reply with quote

Robert MacPherson wrote
Quote:
Tod,

It is a delight to get a glimpse into your process. We are watching you over at The Arbelest Guild http://thearbalistguild.forumotion.com/t809-l...chini#7467

We would be an honored if you would join us there sometimes.

Mac


Thanks Robert, I am glad you are enjoying it. I know about the Arbalists Guild and infact lurk there from time to time, but as I have very wide interests in the medieval weapons area, I have found myArmoury to be fasciniating and invaluable to my development as a maker across many disciplines and types of object. I am not sure it is a 'brand loyalty' as such but I have very little time and between my facebook page, myArmoury and my work in general I have found that I really only have the time to devote to one site. I will make sure though that next time I post up an interesting bow I will alert you over there.

So after yesterday all that was left to do was make up a test bolt and shoot it. I have only shot half a dozen so far, enough to make sure that it is operating as it should. I had a request to post up some video on You Tube, so I will try and do that next week and then you will also get a scale of the bow with a person as well as how it operates and how quickly it shoots.


 Attachment: 200.46 KB
three quarter.jpg


 Attachment: 191.59 KB
top spanned.jpg


 Attachment: 201.26 KB
side lever.jpg


 Attachment: 193.12 KB
top view.jpg


 Attachment: 197.8 KB
front again.jpg


 Attachment: 191.17 KB
trigger.jpg


 Attachment: 158.18 KB
irons.jpg


www.todsworkshop.com
www.todcutler.com
www.instagram.com/todsworkshop
https://www.facebook.com/TodsWorkshop
www.youtube.com/user/todsstuff1
View user's profile Send private message Visit poster's website
Robert MacPherson
Industry Professional


Location: Jeffersonville USA
Joined: 27 Feb 2008

Posts: 141

Feedback score: None
PostPosted: Sat 03 Nov, 2012 3:18 pm    Post subject:         Reply with quote

Leo Todeschini wrote:

I know about the Arbalists Guild and infact lurk there from time to time, but as I have very wide interests in the medieval weapons area, I have found myArmoury to be fasciniating and invaluable to my development as a maker across many disciplines and types of object. I am not sure it is a 'brand loyalty' as such but I have very little time and between my facebook page, myArmoury and my work in general I have found that I really only have the time to devote to one site. I will make sure though that next time I post up an interesting bow I will alert you over there.


I know what you mean about "brand loyalty" in discussion groups. Ya' get used to one, and the others just don't seem "right". Please be sure to tell us over there when you are doing a crossbow related thing. We would hate to miss it!

Mac

Robert MacPherson
http://www.lightlink.com/armory/
http://billyandcharlie.com/
View user's profile Send private message Visit poster's website
Tomas B


Location: Ireland, Wales, Canada...I'm transient
Joined: 02 Mar 2007
Reading list: 3 books

Posts: 84

Feedback score: None
PostPosted: Mon 05 Nov, 2012 3:13 pm    Post subject:         Reply with quote

Fabulous work. You really make crossbows come to life.
View user's profile Send private message
Leo Todeschini
Industry Professional


Location: Oxford, UK
Joined: 12 Nov 2006
Likes: 1 page

Spotlight topics: 1
Posts: 1,723

Feedback score: 100%
(3 total ▮ 100% positive)
PostPosted: Wed 07 Nov, 2012 1:45 pm    Post subject:         Reply with quote

I have now uploaded me using the bow onto youtube and you can find it here

http://youtu.be/tW4lYh8Yg38

I hope it shows the basis of the bow.

Tod

www.todsworkshop.com
www.todcutler.com
www.instagram.com/todsworkshop
https://www.facebook.com/TodsWorkshop
www.youtube.com/user/todsstuff1
View user's profile Send private message Visit poster's website
Josh Wilson


Location: WV
Joined: 01 Nov 2010
Reading list: 1 book

Posts: 143

Feedback score: None
PostPosted: Wed 07 Nov, 2012 2:31 pm    Post subject:         Reply with quote

Very nice Sir! Excellent looking craftsmanship, and a great video!
View user's profile Send private message
G K Vaughn


Location: Australia
Joined: 22 Jun 2011

Posts: 19

Feedback score: None
PostPosted: Wed 07 Nov, 2012 10:10 pm    Post subject:         Reply with quote

Ahh, I get how it all works now.

I can see how a weapon like that would be more popular for civilian self-defense yet less suited for war than a pistol from the same era.

"The rifle is no more than the grip of the bayonet."

--Giuseppe Garibaldi
View user's profile Send private message
Jimi Edmonds


Location: Dunedin, New Zealand
Joined: 25 May 2009
Likes: 8 pages

Posts: 145

Feedback score: None
PostPosted: Sat 10 Nov, 2012 12:18 am    Post subject:         Reply with quote

Well that is truly impressive!
View user's profile Send private message
Ralph Grinly


Joined: 19 Jan 2011

Posts: 330

Feedback score: None
PostPosted: Sat 10 Nov, 2012 12:44 pm    Post subject:         Reply with quote

Thanks for posting that video..now I get how it works Cool Any idea what the average, accurate range is ? I'm guessing it's rather short, given the one-handed mode of use.
View user's profile Send private message


Display posts from previous:   
Forum Index > Makers and Manufacturers Talk > Making a latchet bow - in progress
Page 1 of 1 Reply to topic
All times are GMT - 8 Hours

View previous topic :: View next topic
Jump to:  
You cannot post new topics in this forum
You cannot reply to topics in this forum
You cannot edit your posts in this forum
You cannot delete your posts in this forum
You cannot vote in polls in this forum
You cannot attach files in this forum
You can download files in this forum


All contents © Copyright 2003-2024 myArmoury.com — All rights reserved
Discussion forums powered by phpBB © The phpBB Group
Switch to the Basic Low-bandwidth Version of the forum