| Author |
Message |
Daniel Wallace

Location: Pennsylvania USA Joined: 07 Aug 2011
Posts: 580
|
 Posted: Sun 22 Jul, 2012 5:45 pm Post subject: a project to share: Colossus Posted: Sun 22 Jul, 2012 5:45 pm Post subject: a project to share: Colossus |
 |
|
I've seen from time to time others have posted up some rebuilt blades that they came up with at home, i've also been diving into that for the past few years, this past july 4th while spending time with some family i got the opportunity to get my hands on a pice of steel that had some potential to be something else.
an uncle of mine is an amateur historian for WWII items - he had a m1908 bayonet reproduction that was shipped a little broken - so he told me to take it and see if i could make anything of it.
first step was to find out what kind of steel it might be. by spark testing i'm rather sure it's a high carbon steel, not the greatest quality but it at least is easy to work with. secondly by file testing the steel - i was surprised to see my file slip off of the steel and not bit into it. taking a triangle file i wanted to see how hard the metal was, and noticed it's not the best - but it was pretty tuff.
as broke apart the knife, the only truly broken section was the 'quillon' block, it didn't hold tightly to the tang and just slipped right off. i could have just drilled and riveted it back together but my mind was already going on a different path with the project.
i noticed a small dilemma, the blade had looked as it was either welded or press fitted to the handel of the knife, i could see what i though was a small ridge and taking no chances i cut the handel off. i didn't want to take any chances of the blade snapping free if anyone would be horsing around with it later (namely me). i didn't really care for a blade over 20 inches anyway.
using a bench sander with a 40 grit belt, i first gave the blade a little bit of distal taper. the blade also had hammer marks, where it look as if this blade was just stamped out of a blank. so i redressed the bevels of the false edge and 'true' edge. and now there's little distortion that you can see in the blade.
for the hilt i wanted to so something different. i had remembered seeing photos of work from 'todd's stuff" of german hunting knife sets with the big fighter knife having a little shell guard on them. so i though i would give it a try. now i don't have a forge . . . yet . . . so i had to make the quillon and its block out of flat steel. i would find in nearly impossible to cut a quillon block from a block of steel without a forge to drift it, or a mill to cut it out.
the only material i had laying around was 16 gage hot rolled steel laying around. i challenged myself and cold cut all the hilt pieces with a hammer and chisel. with patients, and a good arm, it worked out really well. i just had to grind off where the steel sheared and it looks just a precision cut.
the hard part was that i didn't make the shell guard and quillons from the same piece, i made them sperate. mostly because the shell i did make is really big like everything else on this knife. in order to give the guard a flush look, i cut out the opposing sections so that when they lay together, they look like one sheet of metal.
the bending of the guards was probably the most frustrating. i don't have a torch - and if you think a same propane pluming torch will get the steel hot enough to bend it, if won't - i tried - so it was just a vise and the biggest crescent wrench i could find and i worked the bends in. once i did the bends, i worked on the file work of the guards, it came out o.k. so far. i keep telling myself that they still look a little amateur because their not yet polished in any way.
the material i choose for the grip was just about as hard to work with as the steel. i have a silver maple tree growing in the back yard, some years ago i trimmed it back and kept most of the wood for fire wood. i had a few smaller logs laying around and decided to use it. well i should have remembered that maple is harder than oak once its dried. the log laughed at my table saw and attempted to throw it across the floor. i had to adjust my blade depth to 16th of an inch at a time to make my boards.
i wanted to use the maple because it will show really crisp lines on the wood if i decided to do a wood carving on it. and should be tuff. usually when i make a knife i make a lower guard to protect the grip material. but for this one i thinking on using the maple and a little red oak i have left over.
as i was working on the knife, one day i told myself 'this thing is turing out to be colossal.' and so i dubbed the project with the name Colossus. pictured below i have the key points of the work coming together. it doesn't look like it belongs to any period to the trained eye, but i could see it in bud - k with a 18th century pirate sticker title. 
i'm open to any suggestions of how to make it look a little more authentic, or if anyone just wants to critique my work up to this point.
 Attachment: 98.2 KB Attachment: 98.2 KB
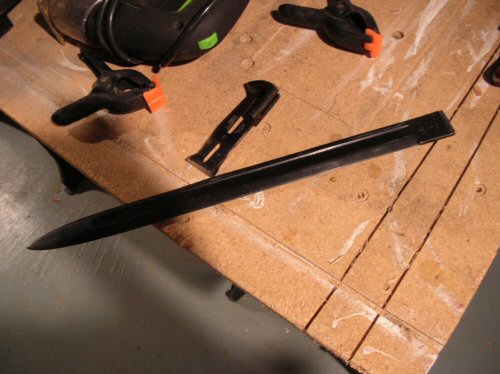
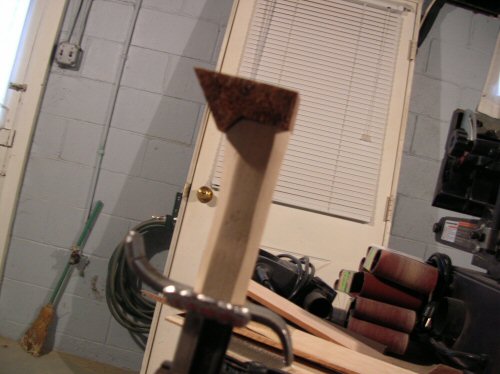
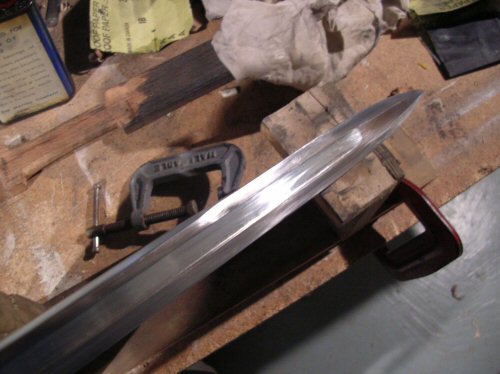
here i have the blade cut from the handel. the blade alone is around 16in
Attachment: 101.51 KB
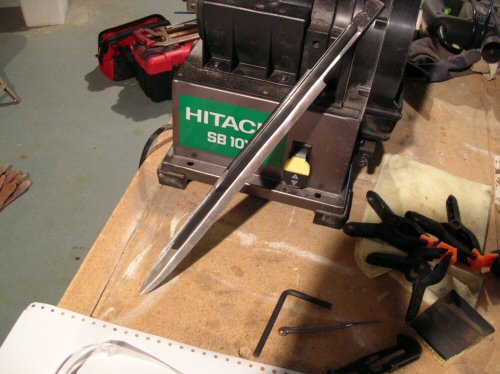
these are details of the work for the new distal taper, and rebeveling the edges.
Attachment: 90.69 KB
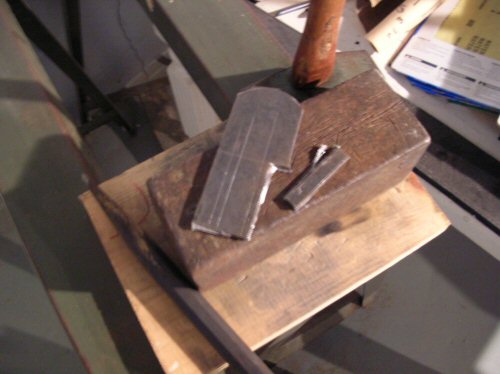
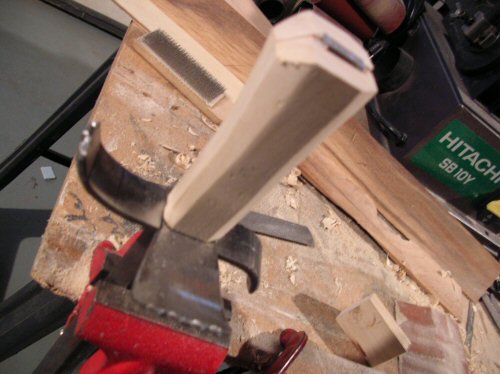
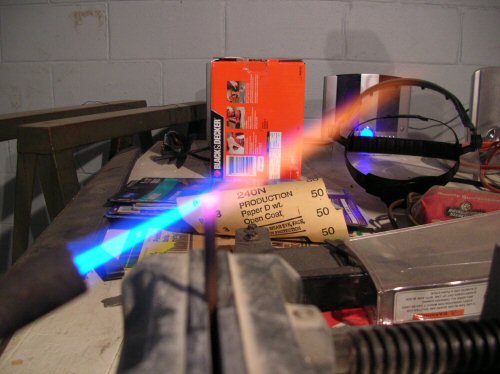
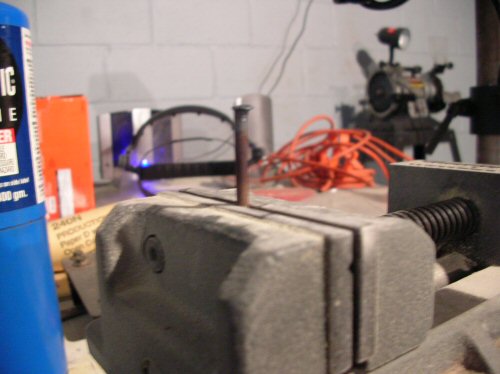
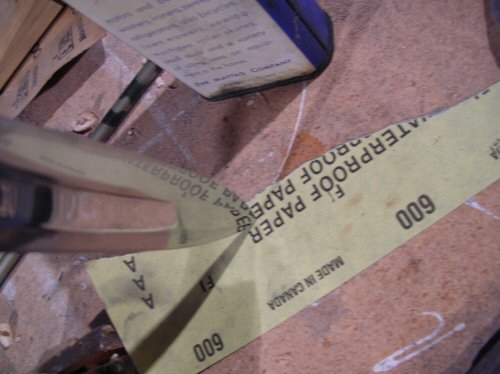
cutting soft steel with a chisel is not as hard as it looks. though i do recomend that you hammer on something solid. what i have there is an old brick of steel that i had laying around my grandfathers house that he used to use to straighten nails out o
Attachment: 99.1 KB
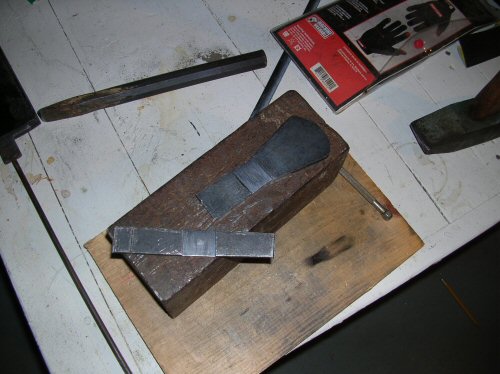
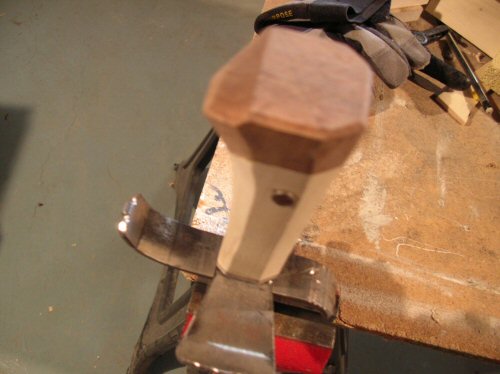
this is the fitting i made for the guards to sit on top of each other. quite tricky to pull off, and easier in carpentry.
Attachment: 84.34 KB
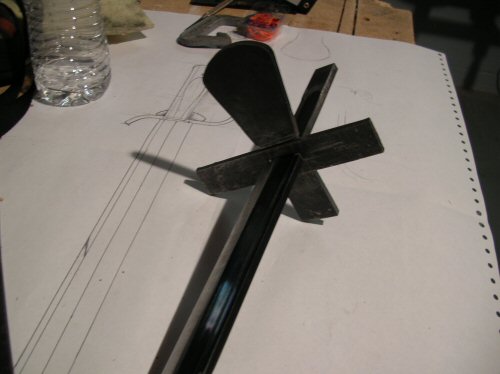
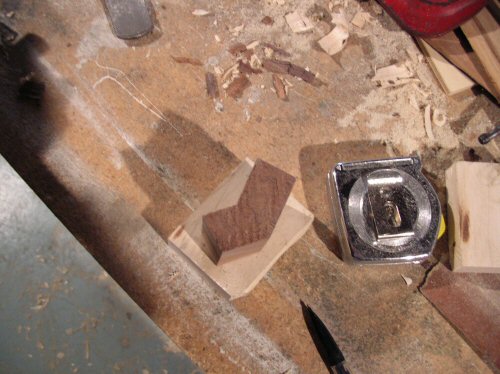
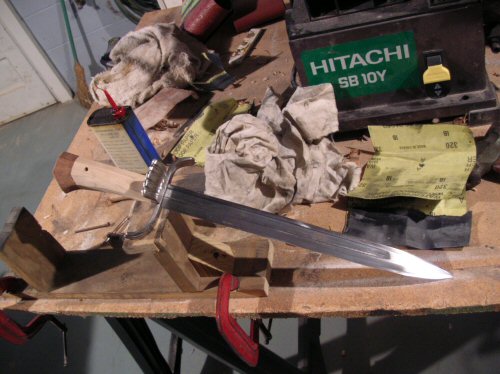
here are the guards fit together
Attachment: 86.05 KB

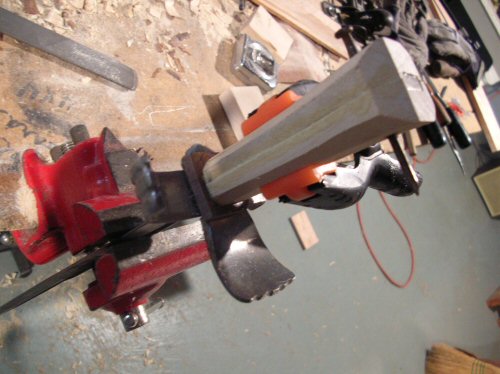
to bend this part took nearly all the mussle my little body could muster. but where there is will there is a way.
Attachment: 97.79 KB
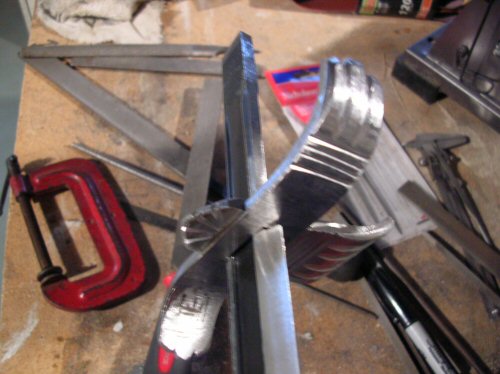
this is just a little more of the file work. i though about repeating the shell look, but it still feels like it needs more shape somewhere.
Attachment: 99.62 KB
even though it would be quicker to use power tools i often turn away from them for the traditional chisel. but when working with mapel - make sure you have a hammer with that chisel.
|
|
  |
 |
Daniel Wallace
Location: Pennsylvania USA Joined: 07 Aug 2011
Posts: 580
|
| Posted: Sun 22 Jul, 2012 5:49 pm Post subject: |
|
|
i wasn't able to add this late photo - its just where i ended up with the shaping of the grip for this week.
Attachment: 103.31 KB
i'm attempting to give this a little of a blocky look. turning away from a smooth oval girp. i still want to add a wood carving but i'm not sure of what just yet.
|
|
|
|
|
|
Scott Woodruff
|
| Posted: Mon 23 Jul, 2012 12:47 am Post subject: |
|
|
|
Very impressive considering your very limited tools and materials.
|
|
|
|
|
Daniel Wallace
Location: Pennsylvania USA Joined: 07 Aug 2011
Posts: 580
|
| Posted: Mon 23 Jul, 2012 9:51 am Post subject: |
|
|
|
i keep on wondering how much more i could do if i had a forge - for one i know i could make things look more period correct. there's just such a limit of what you can do with cold metal. but still you only need a few tools and determination to remake a knife. the only power tools i really rely on are my bench sander (which i modified slightly for metal working) and a good drill press. i didn't really turn to my grinding wheel all that often on this so far, only to shape up the edges of where i cold cut the steel.
|
|
|
|
|
Josh Wilson

|
| Posted: Mon 23 Jul, 2012 1:30 pm Post subject: |
|
|
|
Sweet! Cant wait to see it finished!
|
|
|
|
|
Daniel Wallace
Location: Pennsylvania USA Joined: 07 Aug 2011
Posts: 580
|
| Posted: Sun 29 Jul, 2012 1:19 pm Post subject: |
|
|
had some progress this weekend. i've switched from the blade to the wood work lately. i wanted to make a wooden sheath for the blade to correspond with the grip material, but the material i chose didn't work out to well this week. i attempted to cut a board out of another silver maple log, but it didn't come out very square so i had to pitch it. maybe better luck in the next few weeks with it.
so this week i focused on the grip. i started out thinking of using red oak with the maple to give the overall look of the knife some contrast, but when i lined up the maple next to the oak, i knew that i had something better laying around. years ago i got a little bit of cherry wood and kept it on the side for a special project, and some rough cut walnut left over from my sheath i made for my A&A german bastard sword. stacking them together i had to go with the walnut. the maple is just so pure bone white that only a really dark wood will contrast with it neatly. hopefully as i begin to seal it - the wood won't loose all of it's white quality. nearly all finishes tend to darken the wood, but its internal luster can't be matched and only shows with a varnish of some kind on top of it. i'll probably take a sample and try just plan linseed oil (which i know most of you around here know and love) and my personal favorite tung oil, which is nearly the same thing. i'd go after varnish, but you can't get it anymore. everything is now a latex polyurethane. tung oil is about the only thing that i've ever seen penetrate and bring the grain in wood to life as much as it does.
ok, so, i never intended to keep the handle looking the way it did in the previous photos. again it looks kinda amateur to me. to flair it up the walnut was going to be like an end cap. like i stated before i always like to have a lower guard on a knife, just so the grip is protected, but i didn't have the option here.
before i added the walnut block, i mitered the grip at a 45 degree angle on my chop saw about a 1/4 of an inch to get rid of the point at the base of the grip. not only did the point there look a little silly to me, but its also a weak spot, first time i drop that grip its going to chip right there.
now the tricky part was matching up the walnut block to that obtuse angle and making it look seamless. well for that i used a table saw angled at 45 degrees, and set the blade really low. i only raised the blade by a turn until i got it to the correct level. i could have tried a chisel and hammer - or coping saw to get this angle, i prefer a table saw when trying to match joints. also the walnut is so dense a chisel may crack it when working with a block this small, a coping saw would take hours. so with a lot a caution and using a c clamp to hold the block while passing it trough the table saw (i do not recommend to work a piece of wood like this with your hands alone, your just asking to loose your finger) i got my desired angle, and then made my shoulder cut to make the obtuse angle complete.
because the tang of this knife didn't extend beyond the base of the grip, i had to think of a way of securing it. nothing better than a home made rivet. for rivets i'll use just about anything. i didn't have any steel rod laying around only junk brass that cracks apart instead of shaping. also didn't care for the look of brass either, so i just picked out a old size 8 common nail to use. for right now i was only use to use it to secure the grip for test fitting, you'll see how i make the rivet from it later.
drilled a whole through the tang to receive the nail and attempted the same with the grip. then i had a happy little accident  what you couldn't see from the previous picture was that the grips are tapered so i didn't line them up to well when i drilled through them. it dawns on my now that i should have measured, but like i said it was a happy little mistake. what you couldn't see from the previous picture was that the grips are tapered so i didn't line them up to well when i drilled through them. it dawns on my now that i should have measured, but like i said it was a happy little mistake.
so as i lined everything up the nail pulled the grip away from the quillon block, and now the quillon and shell guard danced around so freely  simple correction, i just took another sliver of walnut and butted it right up against the guard, cut the grip to join up with it just perfectly, now the two pieces of walnut look so good stacked between the maple. (you have to use some imagination from the photos, and got to understand this knife is already done in my head) simple correction, i just took another sliver of walnut and butted it right up against the guard, cut the grip to join up with it just perfectly, now the two pieces of walnut look so good stacked between the maple. (you have to use some imagination from the photos, and got to understand this knife is already done in my head)
i'm still playing around with a wood carving idea for the handle and sheath but nothing has come to mind yet. but something will.
Attachment: 97.66 KB
Attachment: 94.08 KB
this is part of the walunt block cut to the correct angle
Attachment: 103.37 KB
i wanted to also repeat the angel. it looks better, and is a bit more sturdy than just letting that hard angle just sit out there
Attachment: 99.13 KB
and this is the little walnut washer that i made in a pinch to hide my little mistake, which i think will add to its look now that i see it there.
|
|
|
|
|
Daniel Wallace
Location: Pennsylvania USA Joined: 07 Aug 2011
Posts: 580
|
| Posted: Sun 12 Aug, 2012 10:47 am Post subject: |
|
|
well i got a few more bits done on the project this weekend. finished up the shaping of the handle and it came out great. the choise of maple and walnut almost looks a little like ivory and ebony on a keyboard.
so as i began work on the finishing touches for the grip, i tested out lin seed oil and my trusted tung and teak oil to see which finish i liked better. i didn't want to add too much color to the wood and after testing it out, neither the lin seed oil nor tung oil added too much color to the wood. so i decided to stick with my tung oil.
so as i set the grip on the side for a while, i turned back to the blade. i'm going to go for a mirror polish on the blade, a satin for the guards. polishing is where i find i'm taking up most of my time when working on a knife, maybe because i chose to do it all by hand.
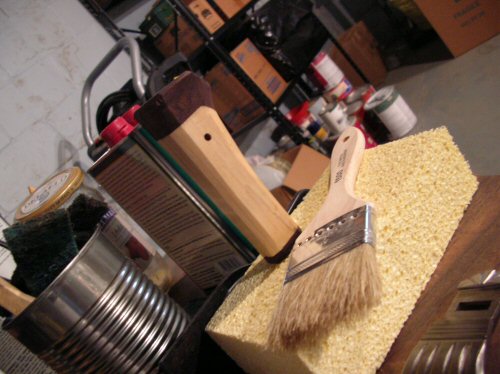
i built a jig a few years ago to help me with polishing it's pictured below. i always use wet/dry sanding paper and a board when polishing, unless i wanted to hide the bevels on the blade. i have carpal tunnel i both my hands so sitting there pinching a pice of sand paper all day makes me cringe.
i stated with a final pass on my belt sander with 120 grit paper to level out all my previous grind marks, and move off to the polishing jig to start with 320 grit paper. the 320 grit paper is more like a planing process on the steel. it just helps you to level out all the little stuff and gives a nice level surface to work with. especially if your using a board like i do. also, you should use this paper wet - i prefer to use a 3 in 1 oil this graphite dust is very fine and you will get it in your nose/lungs etc if you don't try to keep the dust down. the 3 in 1 oil prevents the build up of rust which will happen at this point .
anytime i do any polishing or beveling on a knife, i always do the primary edge last. this will help in keeping which bevel you want to keep on top of another. so i began with the flat distal taper, then worked the false edge, then the true edge.
when your polishing it's also good to remember that you're removing material when working the bevels, so you'll slowly put a edge on them and if you don't remember one slip will give a nasty gash full of graphite. using oil - you'll see a build up a particles as you move the paper back and forth, as you wipe off the oil, you'll see a frost like haze build up over the sections that aren't totally level. not to mention that you'll also be able to see the previous papers grind marks as a guide to where the paper hasn't touched yet. just keep on working it down, unless it's a real gouge it will eventually work it's way out.
here's this week's progress. 
Attachment: 89.53 KB
here's the girp pieced together, i also beveled the edges of the grip to prevent it from chipping out.
Attachment: 101.73 KB
one little coat of tung oil
Attachment: 96.83 KB
polishing jig
Attachment: 85.51 KB
Attachment: 95.88 KB
Attachment: 103.75 KB
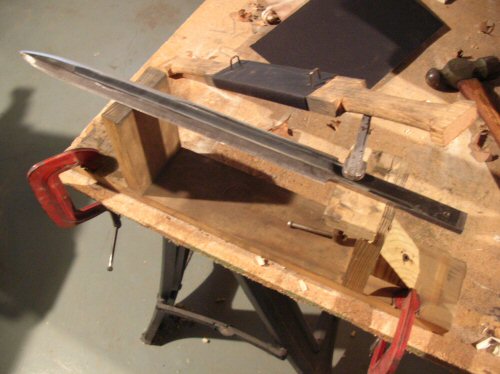
teasing myself, starting to look like a finished knife.
|
|
|
|
|
Daniel Wallace
Location: Pennsylvania USA Joined: 07 Aug 2011
Posts: 580
|
| Posted: Sat 08 Sep, 2012 1:53 pm Post subject: |
|
|
ok, so i've had some progress for the past few weeks - i've just been keeping quiet.
recently i've made my rivet from a nail, and completed my polishing of the knife. hours and hours of polishing - and i decided i wanted it to be mirror polished just to show off my skills at it.
other than the polishing, i had to solder the guard to the blade due to some play i found when putting the piece together. i started another post asking for a little help with soldering because my attempt at it may have been the wrong materials because of my pains in getting a really crummy result. work all that time and you get something that may have ruined your work. well today i cleaned up my solder joints and they look a lot better. but i did notice a lot of bubbles and voids in the solder as i was cleaning it away. if it breaks off, i have a new method i'll use on it that worked today on some scrap steel. the solder i have there is holding for now and i couldn't see removing it at the expense of possibly wrecking the guard.
Attachment: 94.67 KB
here i've cut off the head of a nail and heated it to peen it over into a rivet
Attachment: 89.97 KB
here is a rough shaping of the rivet. to do this you don't need to heat the nail, but it works faster than making a rivet through cold hammering.
Attachment: 93.59 KB
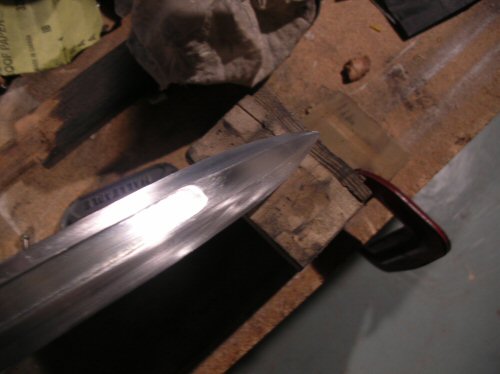
this is a finished polish on the blade. i usually put it up to writting to see if i can read the lettering in the blade for chrispness.
Attachment: 89.6 KB

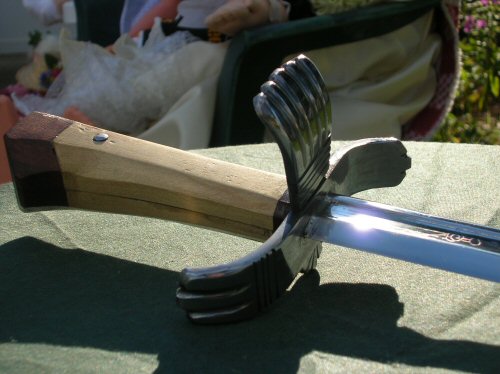
after a ton of cleaning up, this is the guard soldered to the blade. there was a lot of work involved to get it to look this way. the solder and flux i used never 'pooled' it just golbbed on the surface of the steel only though luck did it stick.
|
|
|
|
|
Daniel Wallace
Location: Pennsylvania USA Joined: 07 Aug 2011
Posts: 580
|
| Posted: Tue 18 Sep, 2012 8:22 am Post subject: |
|
|
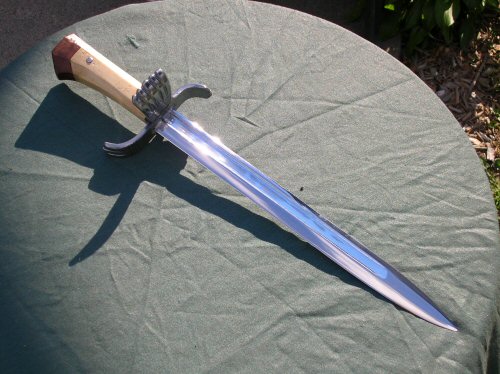
Finally, i finished Colossus this weekend. it come out great in my opinion my only draw back was the soldered joint which took more time than what i wanted it to for cleaning up. everything holds solid now, and it feels like a blade - not a chunk of steel with an edge bevel.
i'll let the pictures speak for themselves.
Attachment: 96.57 KB

Attachment: 96.36 KB
Attachment: 107.35 KB
|
|
|
|
|
|
|
You cannot post new topics in this forum
You cannot reply to topics in this forum
You cannot edit your posts in this forum
You cannot delete your posts in this forum
You cannot vote in polls in this forum
You cannot attach files in this forum
You can download files in this forum
|
All contents © Copyright 2003-2026 myArmoury.com — All rights reserved
Discussion forums powered by phpBB © The phpBB Group
Switch to the Basic Low-bandwidth Version of the forum
|

