| Author |
Message |
Leo Todeschini
Industry Professional

|
 Posted: Tue 16 Nov, 2010 12:34 pm Post subject: Cinquedea repro in progress Posted: Tue 16 Nov, 2010 12:34 pm Post subject: Cinquedea repro in progress |
 |
|
Hi All,
I have found that posts from makers that show the work in progress are very interesting and so I will try and do that with this comission I have started on; not least because it is quite an unusual piece and has a fair set of nasty technical challenges that will be interesting for me and so hopefully for you.
Early in the year a client came to me looking for a cinquedea and although I have not made one before it is certainly something I have wanted to do for a long time and so leapt at the chance.
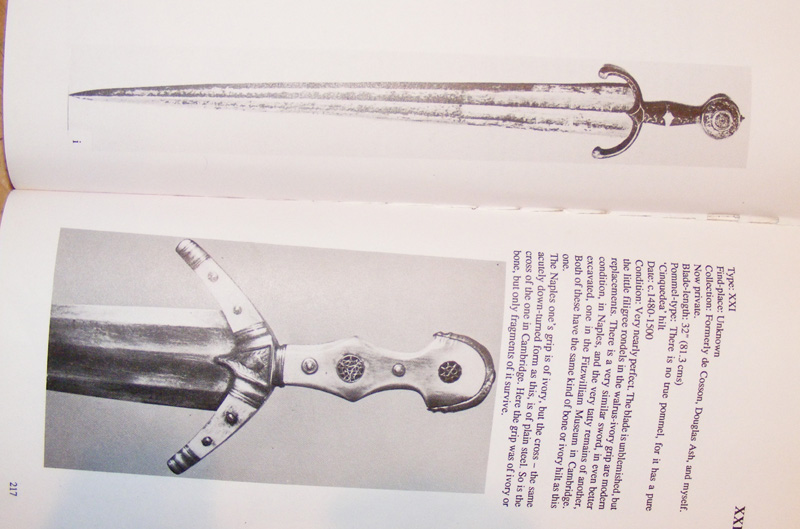
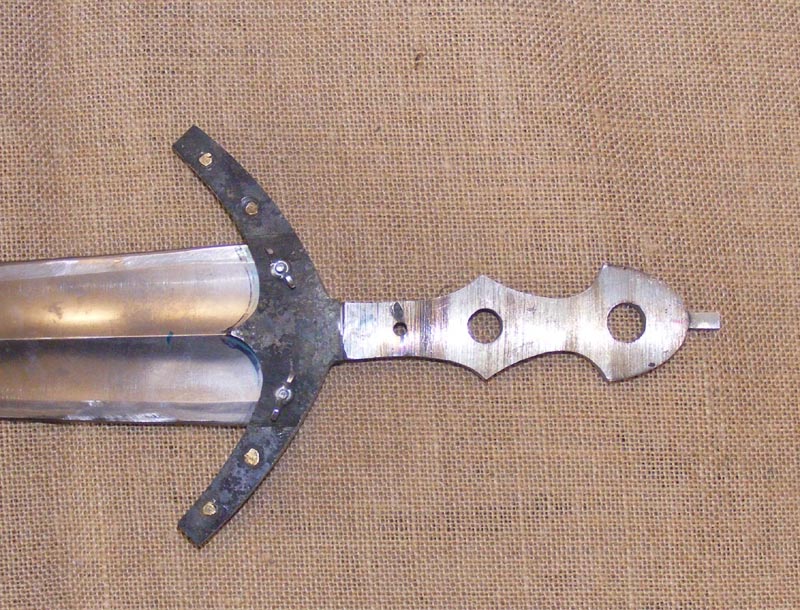
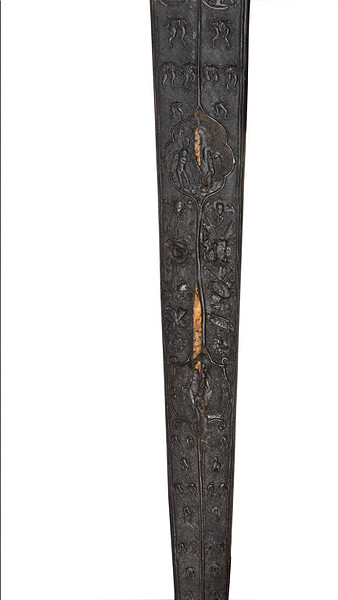
The brief for the project is to make a cinquedea with a blade based on this one from Records of the Medieval Sword but 27" inches long and the hilt is to be of a more traditional form rather than the sword hilt form, so similar to the one on the adjoining page in shape though not in construction. The guard and pommel cap are to be in blued steel, which is unusual in a cinquedea and the handle slabs in bone and the mosaic pins in silver and the peening cap, guard rivets and chape also in silver.
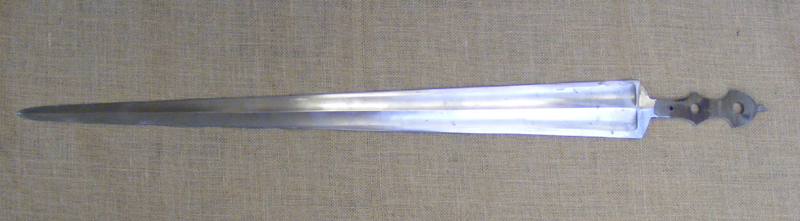
The blade was made by Owen Bush and is a lively piece and promises to make a lovely sword, with twin fullers each side and left from him with a large slab tang.
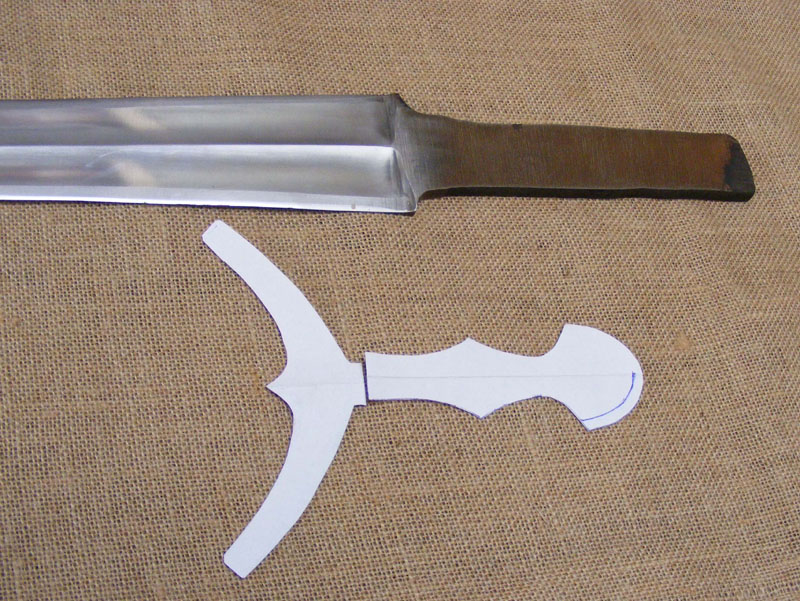
I drew out the handle and hilt form in paper and translated the design onto the tang slab and this was straightforward enough.
The guard is always a tricky thing on baselards and this was a bigger thicker version where you have to form the guard pieces to the blade and then flat them to meet each other well, whilst still meeting the blade well. This could have been an exercise in chasing my tail for days and so I opted to add to the silver detail by putting in a silver sheet between the guard sides and this would both provide a nice feature and ease my anticipated fitting problems and I think will work well.
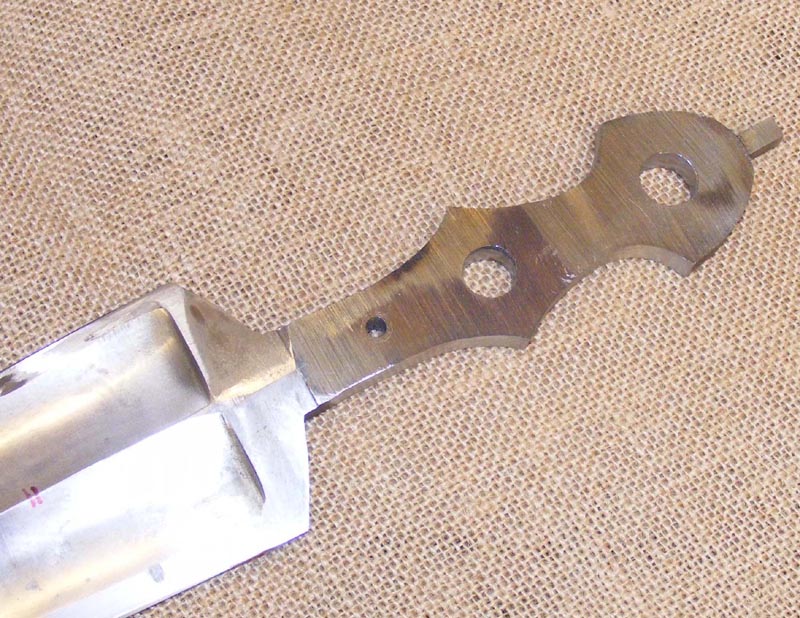
The stage I have got to now is that the blade is made (by Owen), though still needs a final dressing, which there is no point on doing until the guard is fully made and fitted as I have to keep sliding it up and down the blade. The guard is roughed out and it is preliminarily fitted and a great deal of thinking is going into how to make the mosiac pins........
I should get onto the pommel cap tomorrow and then work is likely to cease for a few days but I will try to post up pictures as I do the work.
I hope you enjoy the process.
Regards
Tod
 Attachment: 142.43 KB Attachment: 142.43 KB
Attachment: 189.02 KB
Attachment: 185.99 KB
Attachment: 156.97 KB
Attachment: 164.91 KB
Attachment: 186.04 KB
www.todsworkshop.com
www.todcutler.com
www.instagram.com/todsworkshop
https://www.facebook.com/TodsWorkshop
www.youtube.com/user/todsstuff1
|
|
   |
 |
Jean Thibodeau

|
| Posted: Tue 16 Nov, 2010 12:52 pm Post subject: |
|
|
Yes you are correct that " In progress pics & comments " are very interesting and they are also very much like "cheese to mice " or in this case " weapons to historical weapons collectors " and have us salivating and maybe more motivated to put some money away for a future purchase.   
Not necessarily for the same but certainly for a pet project or one of your standard models as made by you or modified with some customization.
For some of us the design process, the production and aesthetic decision are very interesting to follow.
The blade look very nice with a strong central spine and it's good to see how you construct the handle.
You can easily give up your freedom. You have to fight hard to get it back!
|
|
|
|
|
|
Patrick Kelly
|
| Posted: Tue 16 Nov, 2010 4:40 pm Post subject: |
|
|
Very interesting Leo. I've always had an interest in the Cinquedea so I'll be eager to see what you come up with. The size and proportions look very nice.
"In valor there is hope.".................. Tacitus
|
|
 |
|
Nathan Robinson
myArmoury Admin


|
| Posted: Tue 16 Nov, 2010 4:45 pm Post subject: |
|
|
Thank you for taking the time to document this project! As a maker, I'm sure you take quite a bit from such topics, but please let it be known that even us regular members also benefit from this. I realize it's yet another thing adding time to your busy days, but it does not go unnoticed.
You're right: it's an interesting project with some unique details that I'll be eager to see get fleshed out!
.:. Visit my Collection Gallery :: View my Reading List :: View my Wish List :: See Pages I Like :: Find me on Facebook .:.
|
|
 |
|
|
Tim Lison
|
| Posted: Tue 16 Nov, 2010 8:45 pm Post subject: |
|
|
|
Well, I'll pile it on! This project looks very cool. It is always fun for us to see the in progress stuff. this piece looks like it will be another beauty from you Tod! Keep posting pics as you go...
|
|
|
|
|
Julien M

|
| Posted: Wed 17 Nov, 2010 2:49 am Post subject: |
|
|
Hey Leo,
This looks awesome so far, and I'm sure you will nail the hilt on this one...very very nice hollow ground blade from Owen too!
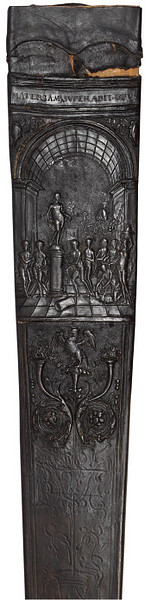
Cinquedea renaissance scabbards are among amongst my favourite, often displaying amazing carving in typical baroque fashion...are you up for one of these? 


Looking forward to see the finish piece!
Cheers,
Julien
|
|
|
|
|
Leo Todeschini
Industry Professional
|
| Posted: Wed 17 Nov, 2010 12:44 pm Post subject: |
|
|
Thanks guys.
Julien M wrote | Quote: | | Cinquedea renaissance scabbards are among amongst my favourite, often displaying amazing carving in typical baroque fashion...are you up for one of these? |
Julien, you are right these scabbards are phenomenal pieces of work and I personally don't know how they were made, I would guess looking at the relief and the smoothness of form that they were pressed wet into a female mould prior to being sewn; that is speculation though. Either way I simply do not have the skill to execute a design like that adequately. I am usually up to trying most things but that is beyond me. Even if it was not beyond me, the cost would surely be exhorbitant and well beyond the cost of the sword itself.
I will be making a scabbard of the correct form, but the decoration will not be as high as this, though hopefully will not let the package down.
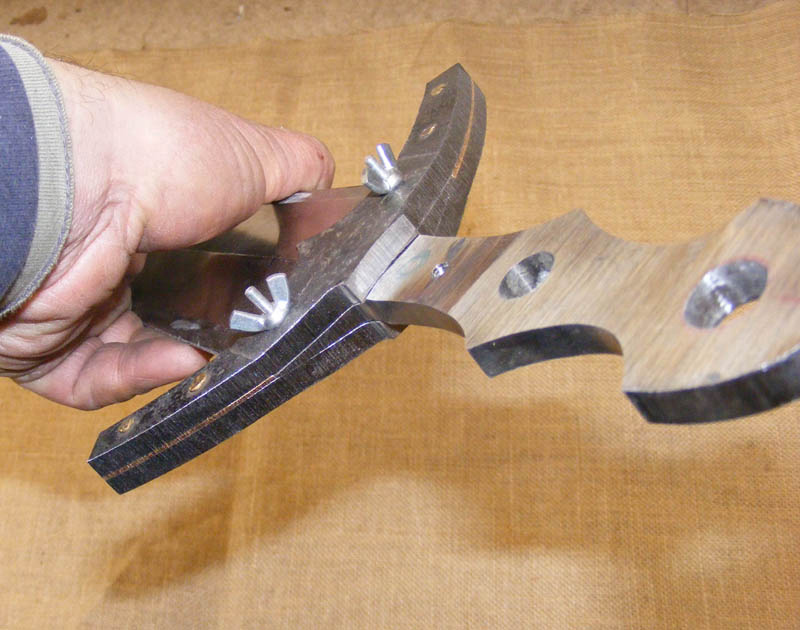
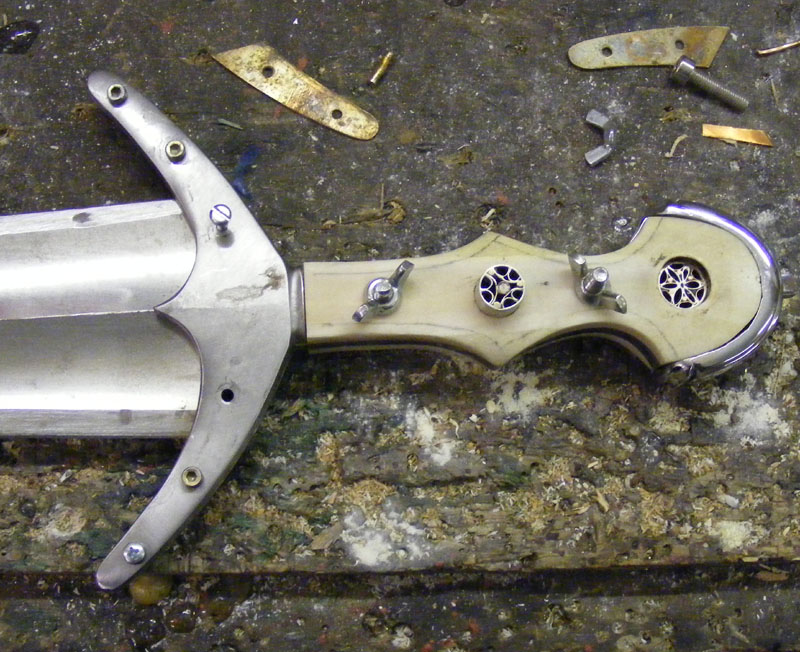
Right. Today has been a fiddly day. I finished shaping the guard. The guards are curious in that most cinquedea although extravagently finished have fairly austere guards that are in fact quite 'blocky', so I have also left this in a similar vein. It will be blued eventually so it will go to a full polish for this at some stage.
I made the pommel cap to fit and then carried on a little although I will have to revisit some of this work when I have the bone for the grips. I really need to form the bone next before carrying on with the pommel. That is the thing about a project like this, you cannot start one element and carry it on through to the end you have to stop and pick up the next part, which is a real case of self discipline as of course you just want to finish an element, but in fact it can be a great way to waste loads of time.
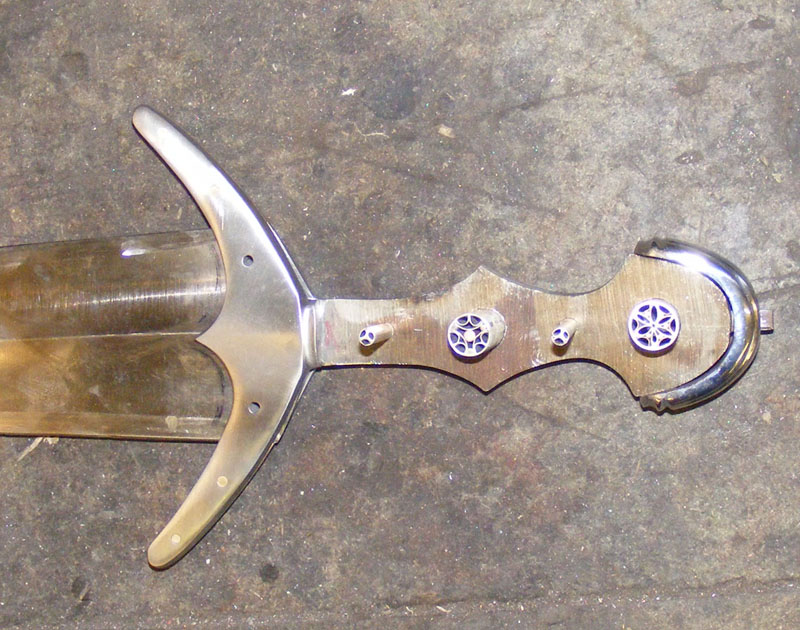
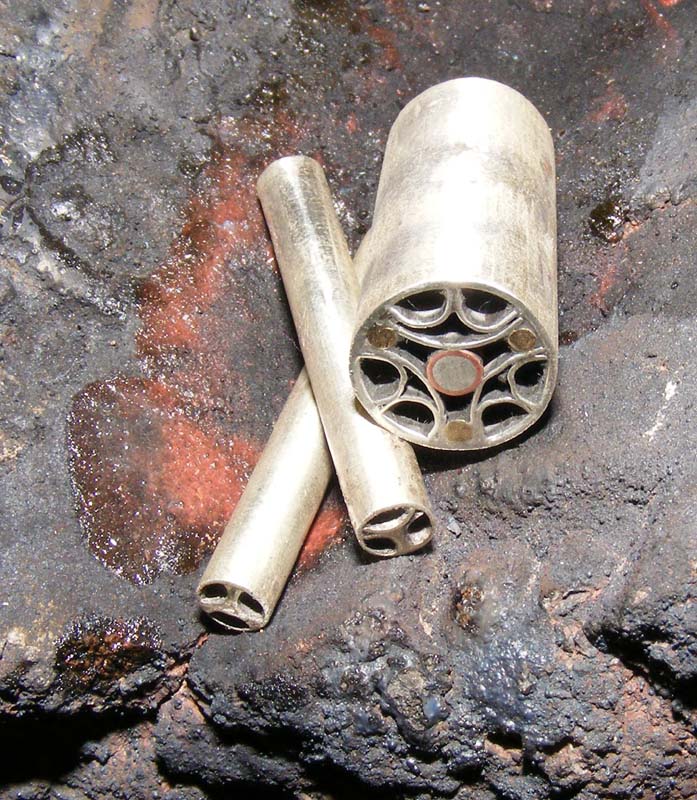
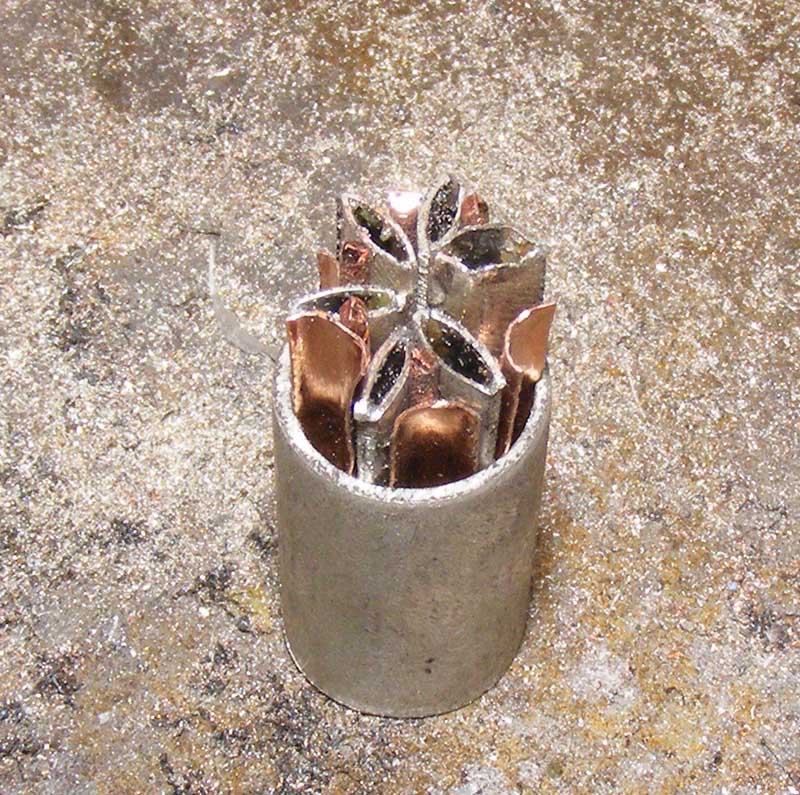
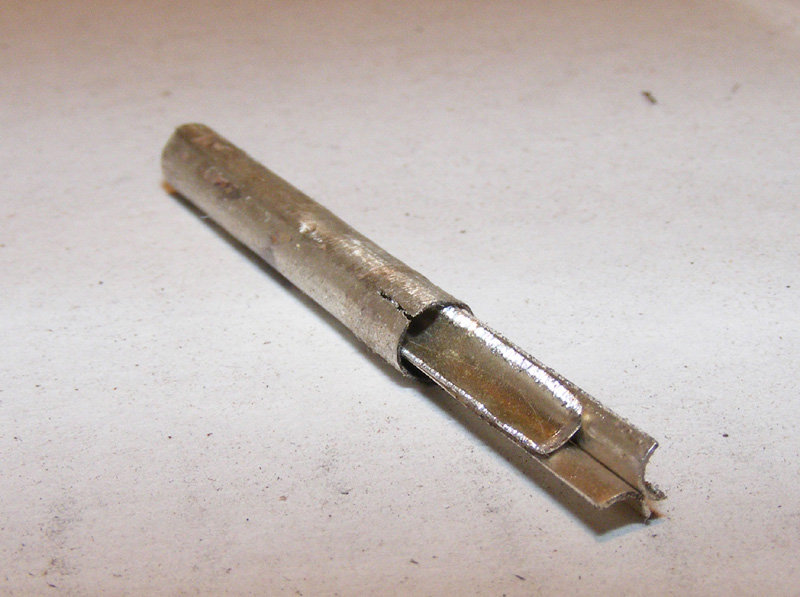
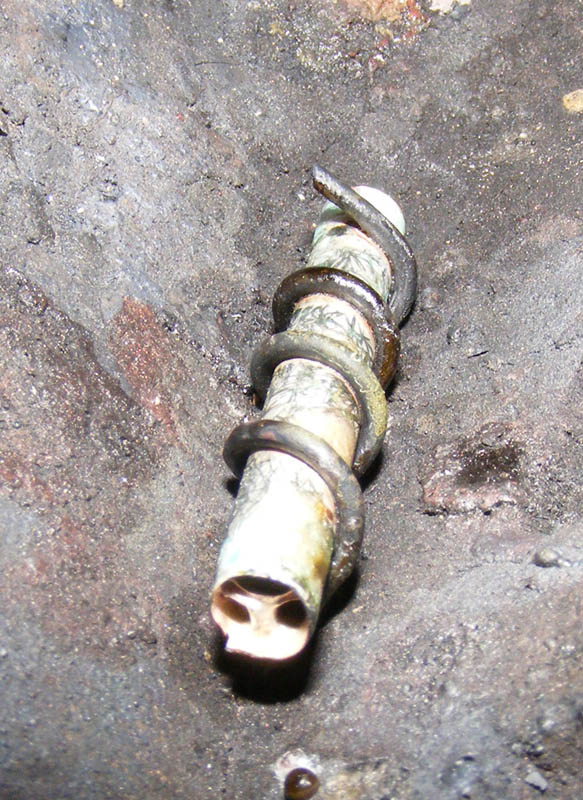
And then the pins. I have not made these mosaic pins before and so have been thinking about how to approach them for a few months. I wanted to solder them in to make sure they last and I think most of the originals were soldered, but the quality of the work is extraordinary. The solder is not visible at all and yet they stick together. I have heard of a method where you mix copper sulphate and animal glue (as a binder) and paint this between components and then when you heat it to just below melting it forms a copper/silver amalgam where the pieces touch and so solder them together. I tried and failed in this method, though I will revisit it at some time I am sure, although I am not even sure if it is true, though it sounds plausible and seemed to offer some hint of it working and would leave the sort of lack of solder evidence that the original pieces show. Either way you can bet there were specialists making these pins and only these pins, so as a first attempt I can only go so far in emulating them.
The pins were tricky for sure and involved rolling a tube of silver and soldering it up after binding it in wire, then cutting and shaping the arcs and then fittings and fettling and fitting until they fitted well then feeding the solder in from each end and sanding off the excess until the form was clear. I have shown the small and medium pins as parts and then finished. I was going to show all the parts of the large pin seperate and before assembly, but as it took about 2 hours of swearing to get all the parts in and made sure they fitted I was not going to take it apart to get a picture for you lot - sorry. The large pin has a very modest (by original standards) 25 parts.
I will be off now for a few days in Paris at a reenactors market, but I hope you like the progress.
Regards
Tod
Attachment: 164.35 KB
Attachment: 186.19 KB
Attachment: 168.07 KB
Attachment: 172.6 KB
Attachment: 154.33 KB
Attachment: 149.01 KB
www.todsworkshop.com
www.todcutler.com
www.instagram.com/todsworkshop
https://www.facebook.com/TodsWorkshop
www.youtube.com/user/todsstuff1
|
|
|
|
|
Sean Flynt

|
| Posted: Wed 17 Nov, 2010 1:12 pm Post subject: |
|
|
Those pins are amazing and the whole piece clearly is going to be spectacular!
On those scabbards--If leather-only, maybe they were pressed in a two-piece die. I hate think of the precision engraving that would require for correct registration, though. If they're leather-over-wood I wonder if the design could be built up on the core by painting on/carving layers of wax before being covered with very thin wet leather, then chased and pressed into the design with a stylus as it dries. The higher-relief areas could actually be made in molds and applied to the scabbard before covering. The first elaborate relief etching of steel in this style was being done in this period and would have been familiar to cutlers and those in their orbit. Just a thought. If not historical, it might work for a reproduction. In theory, you could even transfer to a wood core a grotesque design like the one shown above and simply follow the lines.  Volunteers? Volunteers?
-Sean
Author of the Little Hammer novel
https://www.amazon.com/Little-Hammer-Sean-Flynt/dp/B08XN7HZ82/ref=sr_1_1?dchild=1&keywords=little+hammer+book&qid=1627482034&sr=8-1
|
|
|
|
|
|
Patrick Kelly
|
| Posted: Wed 17 Nov, 2010 2:06 pm Post subject: |
|
|
Wow, those pins are works of art in and of themselves. I love that kind of detail work, now I'm even more excited to see the completed project.
"In valor there is hope.".................. Tacitus
|
|
|
|
|
Julien M
|
| Posted: Thu 18 Nov, 2010 2:45 am Post subject: |
|
|
| Patrick Kelly wrote: | | Wow, those pins are works of art in and of themselves. I love that kind of detail work, now I'm even more excited to see the completed project. |
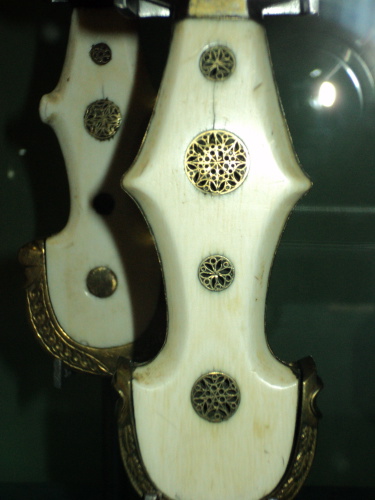
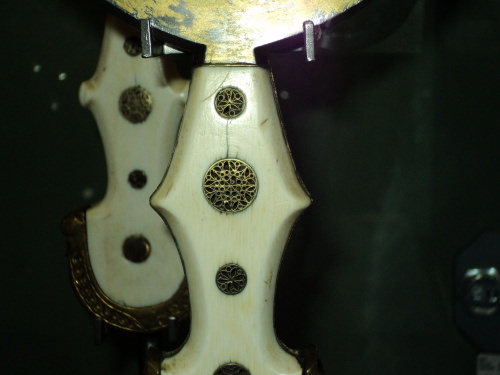
I agree!...looking at the picture of the original I would have though these were mere surface inserts (lets say a couple of centimetre deep, recessed and glued on of the bone handle). It that a personal interpretation or have you seen it built that way on originals before? I any case it looks fantastic. If you are in Paris and have the time, go to the musee de l'armee as they have half a dozen or more cinquedea with matching scabbards perfectly preserved.
One can only speculate on the method used to built those amazing details on the scabbards. There is one such scabbard in the victoria and albert museum that might yield some clues (see pictures below) as it is unfinished and the artist left sketching marks on the piece, suggesting that he's actually embossing the piece once applied on the wood core (there is a woodcore for sure, as we can see on the gaps). For the more raised pattern, either they are pressed before the leather is wrapped, or as Sean said there must be something to back the leather and create the pattern.
Anyway, really looking forward to see the final piece, and I hope I might have a chance to see it for myself at Owen's at some point!
Cheers,
Julien
Attachment: 29.61 KB
Attachment: 13.67 KB

Attachment: 36.43 KB
|
|
|
|
|
|
Ben C.
|
| Posted: Thu 18 Nov, 2010 7:23 am Post subject: |
|
|
|
beautiful work as always. I think everyone appreciates when makers, such as yourself and others on this site, give the time to post the step by step production of their work.
|
|
|
|
|
Sean Flynt
|
|
|
|
|
Nathan Robinson
myArmoury Admin
|
| Posted: Fri 19 Nov, 2010 9:30 am Post subject: |
|
|
| Sean Flynt wrote: | Julien: I had forgotten about those photos! They trump my theories. Clearly, the work was being done from the outside, with no inserts, on an otherwise finished scabbard. I have no idea how the artist got such high relief from such thin leather.  |
It could have been formed on a moulding surface before being cut and covered on the leather core. That's how I've done simple projects in the past. I carved the design in wood or build it up on the wood with a moldable clay and whatnot and then formed and pressed the wet leather over it. I could do this several times if necessary. I then cut it to shape and formed it and finished the item (in my case, it was hardened cases/pouches with embossed designs). Who knows?
.:. Visit my Collection Gallery :: View my Reading List :: View my Wish List :: See Pages I Like :: Find me on Facebook .:.
|
|
|
|
|
Leo Todeschini
Industry Professional
|
| Posted: Mon 22 Nov, 2010 12:04 pm Post subject: |
|
|
Julien M wrote | Quote: | | I agree!...looking at the picture of the original I would have though these were mere surface inserts (lets say a couple of centimetre deep, recessed and glued on of the bone handle). It that a personal interpretation or have you seen it built that way on originals before? I |
I assume you mean milimeters deep. The density of work in the rondels means it is a actually very hard see how thick they are but I have always assumed they were thin panels set into the grips; having recently acquired Armi Bianchi Italiane which shows a couple with the panels missing you can see that the outer tube rivet clearly goes right through the grips and tang. For this first reproduction using the fretwork panels I suspected it would be better for me to make complete 'through' pieces and so I did this rather than make 3mm thick panels.
As regards the process I think the story is here after all, with that example from the VandA? where the scabbard is half sculpted and half sketched out. I simply don't know how they got that level of relief and precision of work just in the leather, but that appears to be what was happening from that piece and they were not pressing into moulds as I originally suspected or working over applied forms. Just unadulterated skill and learning I guess.
I have been away at a show in Paris and the bone for handles arrived while I was away so after a trip to see Steve Stratton, the bowyer about another project tomorrow I will be back on the bench with this one and will post up some pictures as I have them.
Tod
www.todsworkshop.com
www.todcutler.com
www.instagram.com/todsworkshop
https://www.facebook.com/TodsWorkshop
www.youtube.com/user/todsstuff1
|
|
|
|
|
|
Christopher Treichel
|
| Posted: Mon 22 Nov, 2010 1:07 pm Post subject: |
|
|
| Julien M wrote: | Hey Leo,
Cinquedea renaissance scabbards are among amongst my favourite, often displaying amazing carving in typical baroque fashion...are you up for one of these?
|
Hmmm... embossed leather... I have seen some folks in California and Mexico make leather belts /holsters that are embossed in similar if not more complex patters... David Born in the LA area could probably do something like that... I have seen some of his other leather work... such as the lionking mask and such... I think he is working with www.corellianimports.com or Brayton would know how to reach him...
|
|
|
|
|
|
Owen Bush
Industry Professional
|
| Posted: Tue 23 Nov, 2010 1:12 am Post subject: |
|
|
This is looking very good Tod
I always like the process of seeing a plain piece of steel leave the forge and manifest its self into one of Tods creations.
I will want to have this one in my hand before it goes to its new home.
All the best Owen
forging soul into steel .
www.owenbush.co.uk the home of bushfire forge school of smithing .
|
|
|
|
|
Leo Todeschini
Industry Professional
|
| Posted: Wed 24 Nov, 2010 1:25 pm Post subject: |
|
|
Hi All,
Thanks for the encouragement.
I have been busy again having a very fiddly day.
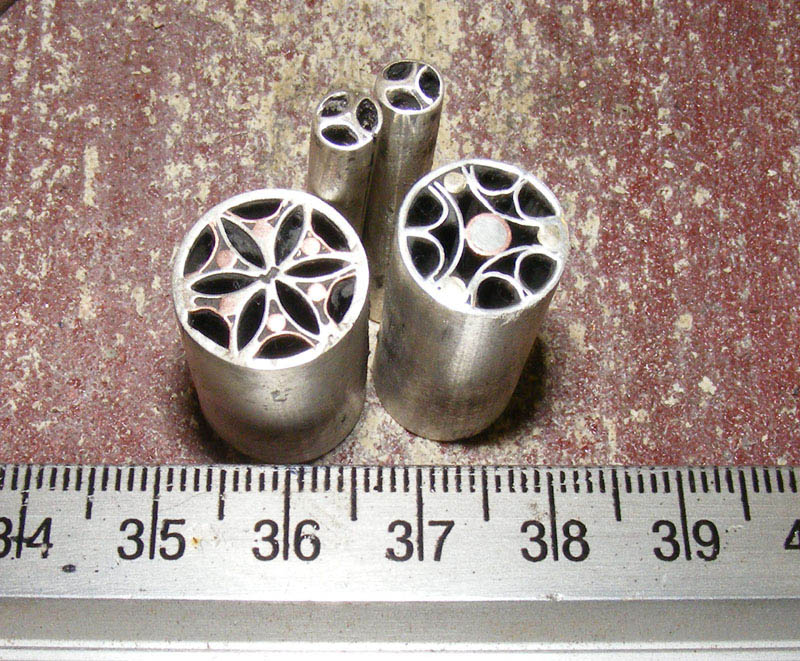
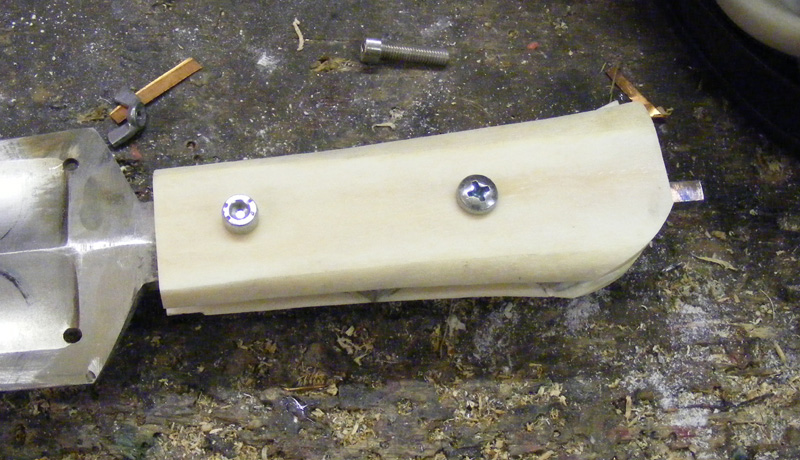
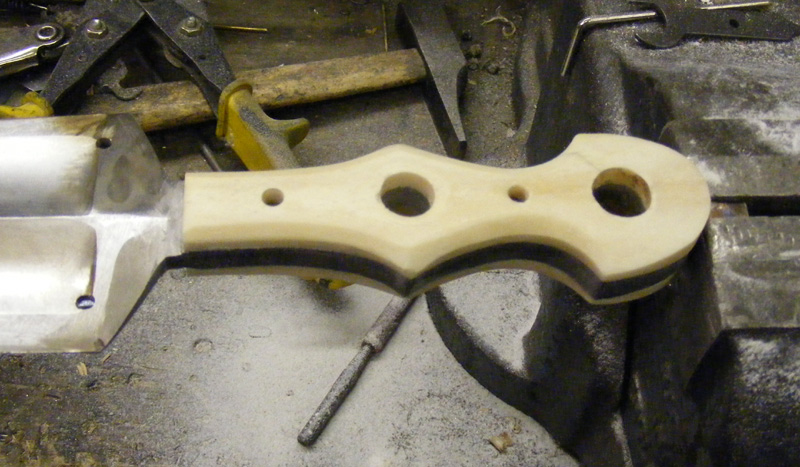
I received the bone for the scales the other day and cut out the panels today. This is rather tricky as the curvature of the bone combined with the width of the tang on this sword means that getting the pieces to fit without showing internal marrow matrix and still being good on the outside was slow going.
I then drilled through the small rivet holes and bolted the scales in place and shaped the edges to suit, then squared off the guard end to the right length and then curved in the top arches. Again the last part was tricky as the pommel cap is forged and so is not as pure a curve as one could hope for.
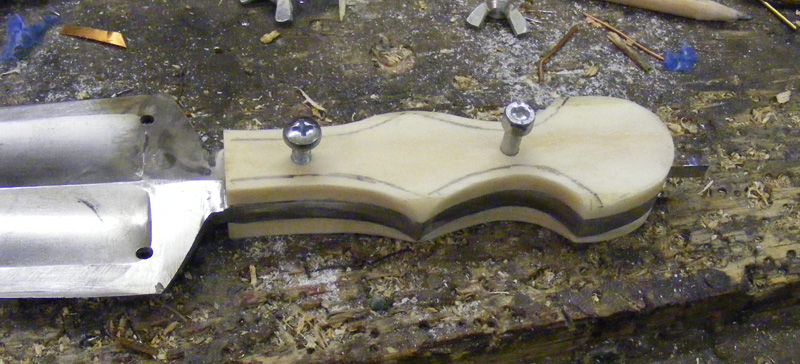
I drilled the large holes through a side at a time before thinning the bone down as the bone chips easily at the hole edge on holes this size and then thinned it down. Now I had the visual guide offered by the large holes I chamfered in the edges of the bone, followed by reshaping the pommel cap so that it tapers more toward the outside edges.
What makes a job like this particularly slow is that you have to continually take apart and put back together to check every small step, so 3 minutes work becomes half an hour.
So, its coming on; hopefully some more pictures tomorrow.
Getting back to the leather I think I may have some part of a solution. When you leather carve (forming) the leather moves about under you and this partially restricts the detail you can put in. I sometimes glue the leather to the wooden core and I suspect that if it was glued you could push around the top surface much more to help allow for the extremes of 3D these examples show.
Tod
Attachment: 189.78 KB
Attachment: 165.37 KB
Attachment: 173.21 KB
Attachment: 168.11 KB
www.todsworkshop.com
www.todcutler.com
www.instagram.com/todsworkshop
https://www.facebook.com/TodsWorkshop
www.youtube.com/user/todsstuff1
|
|
|
|
|
Julien M
|
| Posted: Wed 24 Nov, 2010 1:38 pm Post subject: |
|
|
Splendid.
I didn't know I needed a cinquedea until now (damn it...!). Thanks again for the great WIP pictures and explanations.
Can't wait to see this finished.
Cheers,
Julien
|
|
|
|
|
Jesse Belsky
Industry Professional

|
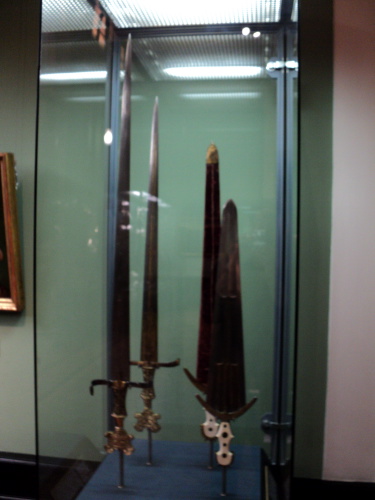
| Posted: Thu 25 Nov, 2010 12:08 pm Post subject: just happened to be walking by this today.... |
|
|
I'm in Vienna on business, and i played hooky this morning to check out the arms and armor collection at the Kunsthistorisches Museum. Lots of great stuff there, and I would have walked right by this piece without a close look but I've been following Leo's amazing work so i snapped some pictures to share. Enjoy!
Attachment: 60.66 KB
Attachment: 52.74 KB
Attachment: 56.85 KB
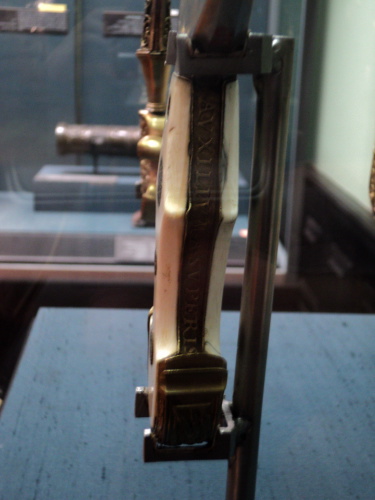
Attachment: 48.82 KB
Attachment: 58.88 KB
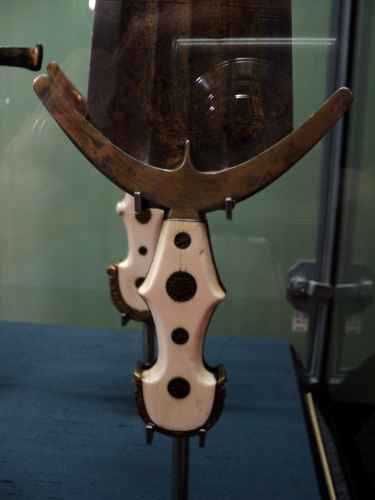
Attachment: 57.18 KB
Attachment: 54.43 KB
|
|
|
|
|
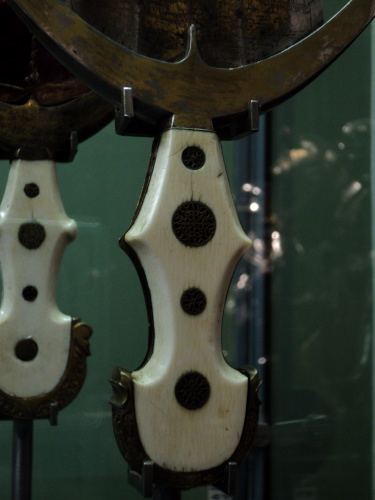
Jesse Belsky
Industry Professional
|
| Posted: Thu 25 Nov, 2010 12:13 pm Post subject: |
|
|
Hmm, those close ups got a bit fuzzy when i resized them for the web. Lets try that again....
Attachment: 217.55 KB
[ Download ]
Attachment: 228.45 KB
[ Download ]
|
|
|
|
|
|
|

