| Author |
Message |
|
Gabriele Becattini
|
 Posted: Sun 30 May, 2010 3:29 am Post subject: how to to make an incised leather scabbard Posted: Sun 30 May, 2010 3:29 am Post subject: how to to make an incised leather scabbard |
 |
|
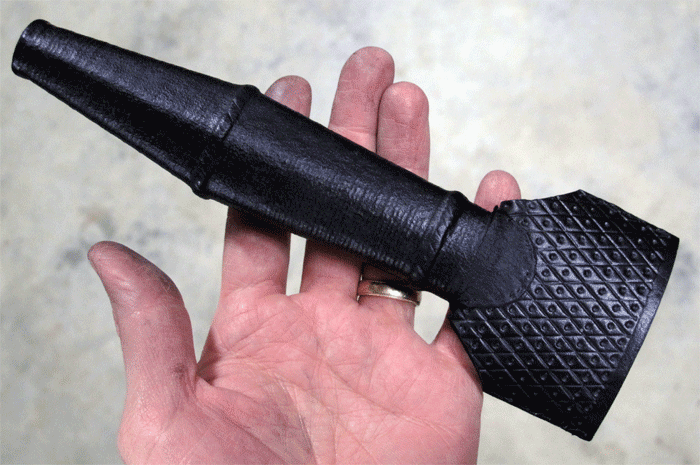
I would like to know if someone can give some usefull information about the method for making an incised scabbard like the one in the attached photo, especially about the right kind of leather to use and the tools.
also what is the basic difference between incise and tooling the leather?
thanks for help
gabriele
 Attachment: 32.62 KB Attachment: 32.62 KB
|
|
  |
 |
Chad Arnow
myArmoury Team


|
| Posted: Sun 30 May, 2010 5:38 am Post subject: Re: how to to make an incised leather scabbard |
|
|
| Gabriele Becattini wrote: | I would like to know if someone can give some usefull information about the method for making an incised scabbard like the one in the attached photo, especially about the right kind of leather to use and the tools.
also what is the basic difference between incise and tooling the leather?
thanks for help
gabriele |
Gabriele,
I recognize that photo.  I believe Craig made this one via stamping the leather, which is one historical method. The leather was almost certainly wet when he did it and he just pressed the shapes into it. So this one isn't incised; it's stamped. I believe Craig made this one via stamping the leather, which is one historical method. The leather was almost certainly wet when he did it and he just pressed the shapes into it. So this one isn't incised; it's stamped.
Incising is usually thought of as cutting/slicing. Tooling involves various tools (hence the name ) to cut/scrape away leather in certain designs. With tooling, a hammer is often used to drive the tool along.
I'm sure I may not be fully correct about some of this, as I'm not a leather worker. I'm sure someone will correct me as needed.
ChadA
http://chadarnow.com/
|
|
  |
|
|
Gabriele Becattini
|
| Posted: Sun 30 May, 2010 5:55 am Post subject: |
|
|
Chad,
thank you for having clarify to me the difference between stamped and incised, the method that mr. Craig as used for your scabbard is visually very nice and looks not so difficult to do using the process that you have described.
hope that other people skilled in the art of leather working , and i have seen many here, can add some imput to this thread, as i found it very interesting.
thanks
gabriele
|
|
|
|
|
|
J. Scott Moore
|
| Posted: Sun 30 May, 2010 5:58 am Post subject: |
|
|
one could make the criss-crossing pattern by incising, for which you could use a swivel knife, while the leather is wet. if you don't do it while its wet, the leather will close, and the lines will become very fine. too fine to see from a distance at any rate. I am doing an incised pattern on the scabbard for my albion laird right now, as a matter of fact.
"Whoever desires peace, let him prepare for war."
-Vegetius
|
|
 |
|
Jared Smith

|
| Posted: Sun 30 May, 2010 12:09 pm Post subject: |
|
|
Some of the diagonal lines could easily have been done with incising. A bone type tool (rounded edge similar to a butter knife) can simply be pressed against the leather and drawn along the desired route (slow slicing motion with pressure) to create a line like impression on dampened leather. (Keep the leather slightly moist for around 10 to 20 minutes first, so that it is actually soft enough to take a set from the deformation.) I would agree that the other rectangular and circular shapes would turn out best from stamping.
Absence of evidence is not necessarily evidence of absence!
|
|
|
|
|
Craig Johnson
Industry Professional

|
| Posted: Sun 30 May, 2010 12:34 pm Post subject: Working leather |
|
|
Hi Gabriele
The technic to do the scabbard pictured is not difficult. Chad is correct that you want the leather good and damp before working it. The piece needs to be worked on a firm base so the piece will take the indents. In the case of a pre-made scabbard one might want to have a blank or wrap the blade in plastic and stick it in the scabbard to work the surface. Just make sure to clean and oil it when done and take care if stamping bits as they can mar the blade.
Then I use a piece of steel that I polished and made a series of patterns on the edges. Somewhat like a comb. If you like it to look medieval mark and work the patterns by hand. start with close measurements but do not make it exact. They nuance of the marks not being super regular adds greatly to the appeal of the item if that is the look you prefer.
for the lines just use a straight edge on the steel that has been polished to a round or shaped if you want it more distinct.
Use veg tanned leather and if you have some scraps do test pieces and trials of different things. This is a very useful thing. While the leather is not expensive having an idea of how it works before staring on the finished project is invaluable experience.
Best
Craig
|
|
|
|
|
Leo Todeschini
Industry Professional

|
| Posted: Sun 30 May, 2010 1:24 pm Post subject: |
|
|
Hi Gabriele,
Building on what Craig has said.
Medieval leatherwork used a variety of techniquies, principally stamping, incising, moulding and carving.
The leathers used were usually veg tan and sometimes alum tanned; lets concentrate on veg tanned. Veg tanned leather is tanned using vegtable products of a high tannin content, usually oak bark and makes for a tough leather that can be wet worked to take a shape and then dry stiff to hold that shape. This is the priciple to working the leather.
The most common decorative method is incising and that is where shallow cuts are made to create a pattern and these can be left as cuts which are subtle or widened with a shaped piece of metal horn, bone or wood. This could be done by professionals or amateurs. Often these decorations are of such a bad standard they surely must have been made by drunk guys in pubs with a friends dagger..........
Stamping is made by using a punch and hammer and the stamps were often engraved or etched and so one assumes they were the toolkit of a professional. This was also common is existing examples.
Moulding can be done by locally working areas of the leather to press it into shapes or on a larger scale into moulds or over forms so a Roman curaiss could be made in this way over a wooden or plaster form. The leather needs to be very wet to pull over forms and then left to dry. On small leather items local areas could be lifted and the surrounding areas pushed down for example, to create dramatic 3D level changes.
Carving is where areas of the leather are pushed down and others (optionally) are pulled up. It is a misnomer in that leather is not cut away like carving wood.
most medieval leatherwork on professional pieces is a combination of incising, stamping and carving. The leather should be worked damp rather than wet. If the leather is wet it will be 'saggy' and will not hold the decoration well. If you are moulding larger pieces over forms, then it needs to be wet and left to dry.
Different areas of the skin of a cow behave differently, just like you. The back is tough, the armpit alomost useless and the belly is more pliable. If you want to make belts, belly leather will stretch, but will work well for shoes. Use the right leather for the job.
Cow skins are usually sold as a half hide and this is from the back bone round to the belly, and will be about 20 square feet and should cost you about 4 Euros per ft .
As Craig said, try messing about with some pieces and see what happens - it is not so hard. And yet again echoing what Craig says and perhaps going further than he does, historical pieces rarely seemed to be measured, traced or pre-marked and looking closely they would to modern eyes be considered 'bad' or 'slopppy'. To my mind it is the free decorating of pieces that makes them seem right.
On a final note they sewed many seams, but they were also not shy about using glue.
Good luck
Tod
www.todsworkshop.com
www.todcutler.com
www.instagram.com/todsworkshop
https://www.facebook.com/TodsWorkshop
www.youtube.com/user/todsstuff1
|
|
|
|
|
Brawn Barber

Location: In the shop Joined: 20 Nov 2008
Posts: 60
|
| Posted: Sun 30 May, 2010 8:13 pm Post subject: |
|
|
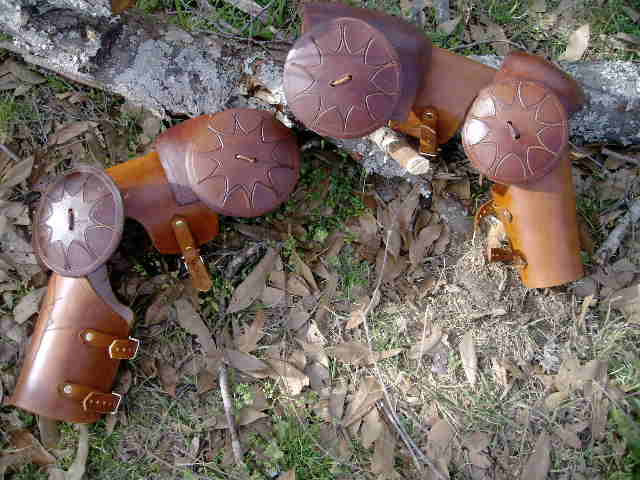
An example of incised, rather than embossed/stamped design. Not done in the pub with a dagger, to my recollection.
Attachment: 38.72 KB
|
|
|
|
|
|
Gabriele Becattini
|
| Posted: Mon 31 May, 2010 1:27 am Post subject: |
|
|
thank you very much to everybody for all the informations, now the entire process is much more clear, as well the
difference between the various techniques, now i believe that i have only to find a piece of leather and try.
thank you again for your help
cheers
gabriele
|
|
|
|
|
Craig Johnson
Industry Professional
|
| Posted: Tue 01 Jun, 2010 5:11 am Post subject: |
|
|
| Leo Todeschini wrote: | Often these decorations are of such a bad standard they surely must have been made by drunk guys in pubs with a friends dagger..........
|
Sure Tod tell everyone the secret to how to make it look old. Now everyone will be going to pubs 
Craig
|
|
|
|
|
Sean Flynt

|
|
|
|
|
T.F. McCraken

Location: Ingleside, Illinois Joined: 13 Apr 2006
Posts: 128
|
| Posted: Tue 01 Jun, 2010 6:59 am Post subject: |
|
|
I thought, since this is an active topic, that it would be beneficial to ask this question here. (My apologies to the threads author, though, it's hardly off-topic)
I have constructed quite a few wood-core scabbards with aspirations to eventually leather-wrap them. I see work by Christian Fletcher and Brian K and, of course, want to emulate them using my own tooling. I have one possibly important, albeit, stone-headed question....
Does the tooling and designs (cut/incised/carved) take place before it is sewn on and shrunk to the wood-core, or after?
I hope this question makes sense to those whose experiences may assist! 
Murphy 
|
|
|
|
|
T.F. McCraken
Location: Ingleside, Illinois Joined: 13 Apr 2006
Posts: 128
|
| Posted: Thu 03 Jun, 2010 7:23 am Post subject: |
|
|
Still hoping for some imput on my question. Also, has anyone tried pyrography (burning) to render designs on leather scabbards?
Interested in replies!
Murphy
aka "Murphy"
See ya at Bristol Renaissance Faire!
The decisions we make, dictate the life we lead.
"I drank what?" -Socrates
www.celticfuryproduction.com
|
|
|
|
|
Chad Arnow
myArmoury Team
|
| Posted: Thu 03 Jun, 2010 9:37 am Post subject: |
|
|
| T.F. McCraken wrote: | Still hoping for some imput on my question. Also, has anyone tried pyrography (burning) to render designs on leather scabbards?
Interested in replies!
Murphy |
You might consider a thread just devoted to your questions, since they are a little beyond what the OP was discussing.
ChadA
http://chadarnow.com/
|
|
|
|
|
T.F. McCraken
Location: Ingleside, Illinois Joined: 13 Apr 2006
Posts: 128
|
| Posted: Thu 03 Jun, 2010 10:21 am Post subject: |
|
|
| Chad Arnow wrote: |
You might consider a thread just devoted to your questions, since they are a little beyond what the OP was discussing. |
Well, it IS forum ettiquette (sic?) to try to add to an existing topic if at all possible, so, I did try to keep it in one, but, I did contemplate starting a new thread at first. I think you're right, though.
Thanks Chad!
Murph
aka "Murphy"
See ya at Bristol Renaissance Faire!
The decisions we make, dictate the life we lead.
"I drank what?" -Socrates
www.celticfuryproduction.com
|
|
|
|
|
|
Gabriele Becattini
|
| Posted: Thu 24 Jun, 2010 1:48 am Post subject: |
|
|
i have in mind at least three kind of different projects:
making a waist belt and a pouch
making a knife scabbard from heavy leather
making some sword grips and may be a covered wooden scabbard
which kind of leather is the best suited? do you have some raccomendations for a good european vendor?
|
|
|
|
|
|
Jeremy V. Krause
|
| Posted: Thu 24 Jun, 2010 9:41 am Post subject: |
|
|
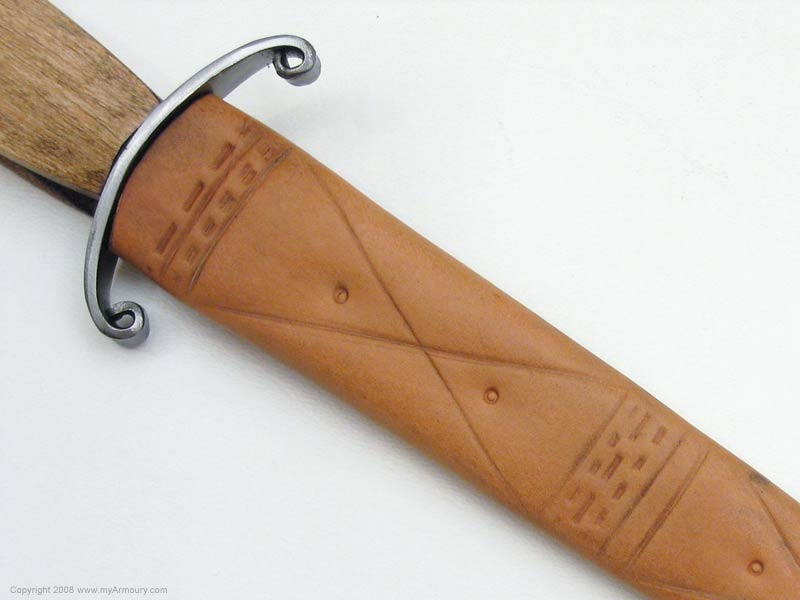
| Sean Flynt wrote: | | FWIW: I used a dull chisel and nail set to stamp this chappe. |
That's really nice Sean- very cleanly done, but not too perfect.
|
|
|
|
|
|
Al Muckart
|
| Posted: Thu 24 Jun, 2010 4:47 pm Post subject: |
|
|
Craig and Tod have pretty much covered it, but I thought I'd add one more point and elaborate a bit on "wet" v.s. "damp" since moisture content of the leather is critical to making the decoration crisp and permanent.
I've seen a lot of "medieval" items people have made and then covered in modern tooling and it invariably Just Looks Wrong. Modern western floral carving is very very different to the vast majority of decoration you see on medieval artefacts and the majority of the tools used in modern tooling aren't much good for reproducing a good medieval look and feel. I use modern backgrounders occasionally but I won't touch a medieval job with a swivel knife and beveller. The vast majority of what I do I do with a scratch awl, a bone folder and a few stamps I made from old nails and with that I can get things that look 'right' compared to originals.
Scissor case:

Knife sheath - the 'vine' of the leafwork is all wrong, I was experimenting with a different tool. I've been meaning to remake this for about 4 years now.

Moisture content:
Leatherworkers call the process 'casing' the leather. What you want is enough moisture in the leather that it will take and hold the impression and - ideally - slightly darken in the compressed areas, but not so much that it is excessively floppy. Excessive moisture will mean the leather will get damaged by the tools and tear more easily as well as not taking impressions as well as it could.
When I made my decorated knife sheath I did the scraped areas with the leather dry. I just used a scratch awl (straight, round bladed, slightly pointed awl used for marking leather) to do the decoration. I did the back with a ball-point scriber after wiping the leather with a damp cloth.
When I did the scissor case which has a bit more coverage of stamped decoration on it I soaked the leather in slightly lukewarm (never hot!) water until bubbles stopped coming out of the flesh (fuzzy) side of the leather, then took it out of the water, wiped it off with a towel and wrapped it in clean newspaper then left it over night.
When I unwrapped it it was back to its normal colour but it was cool to the touch. That's a state bootmakers refer to as 'mellow' and I've found it's the best moisture content for this sort of decoration. Lines and stamps take well into the leather and you get a good darkening of the stamped area. It's not terribly forgiving though, so practice a lot before you tackle something big.
The other thing to note is that different parts of the hide will take decoration in different ways. The leather has to have a decent consistency and firmness to take decoration. It may be tempting to use belly scraps to practice on because they're cheap but belly leather is flabby and loose and not good for decorating.
--
Al.
http://wherearetheelves.net
|
|
|
|
|
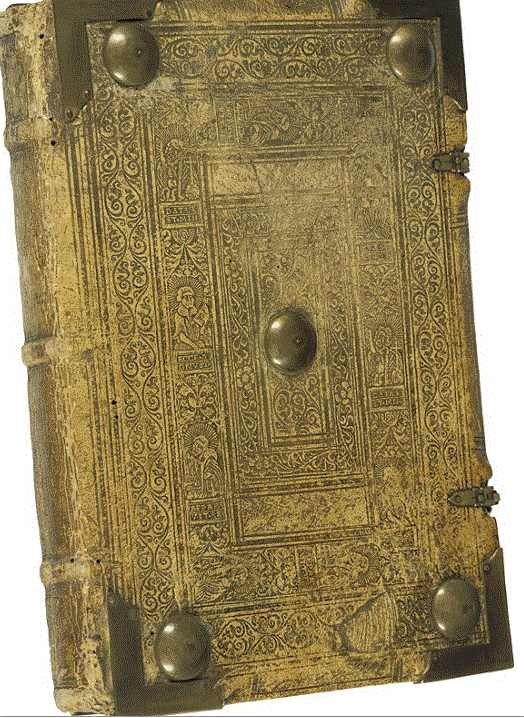
Jared Smith
|
| Posted: Thu 24 Jun, 2010 7:30 pm Post subject: |
|
|
| Al Muckart wrote: |
I've seen a lot of "medieval" items people have made and then covered in modern tooling and it invariably Just Looks Wrong. |
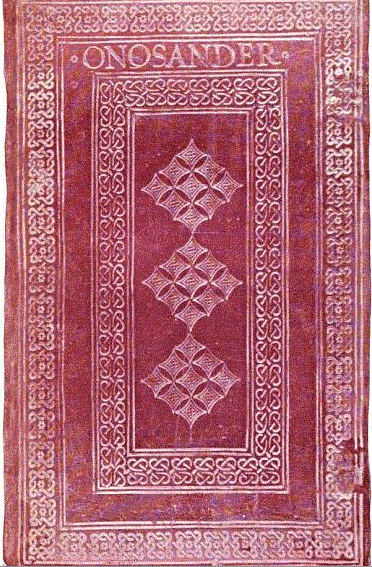
I would have to agree with the modern Western stamping tools giving a "wrong" look. I like your own examples pretty well. I would say that some of the better preserved leather working examples occur in well preserved books. Most used significant incised line work. It was very precise in some cases though.
I am attempting to attach a late 15th century Italian red color Onosander example.
German leather working had pretty much rivaled modern Western carving, including something comparable to the swivel knife and carving around the 15th century. The tooled leather grip on the Bayreiches museum sword (inspiration behind the Albion Munich model) is the type of work that I am trying to remind us of here. I don't have a good color photo of some of the better carved books, but a text on German book plates that I have read indicated unrivaled carving skills as I remember it. Some pretty good detail work, still not much carving, shows on the brown benediction book.
Attachment: 111.16 KB
Attachment: 159.43 KB
Absence of evidence is not necessarily evidence of absence!
|
|
|
|
|
|
|