| Author |
Message |
Scott Hrouda

|
 Posted: Wed 03 Mar, 2010 9:15 pm Post subject: DIY Spaulder Decorative Enhancement Posted: Wed 03 Mar, 2010 9:15 pm Post subject: DIY Spaulder Decorative Enhancement |
 |
|
Inspired by Price's Techniques of Medieval Armour Reproduction and the wealth of DIY projects posted on this forum, I decided to try my hand at adding brass borders to my 14th century harness components.
I purchased a small sheet of 18 gauge brass from my local hardware store for $17 and some change. I cut the sheet into 1/2" strips with metal shears then lightly tapped the curled strips flat again on an anvil using a non-marring hammer. A fine file was used to clean up the rough edges.
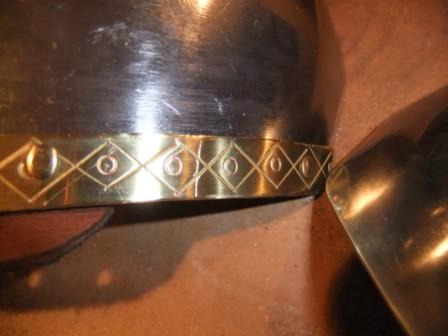
A simple, repetitive pattern was drawn on the strips with a felt tip marker. Using just a cold chisel and a nail set-punch, I stamped the pattern into the brass strips. The strips were cleaned up with 0000 steel wool after a few mounting holes were punched.
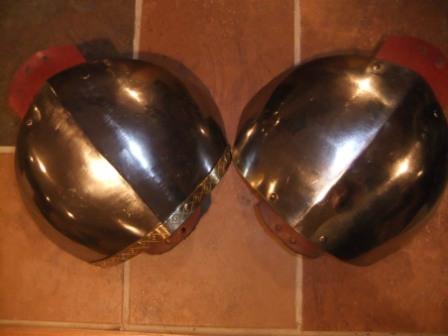
I started with my Windrose Armoury "14th Century Simple Spaulders" as the bottom edge is straight and I could easily use my strips. Here are the results:
 Attachment: 25.55 KB Attachment: 25.55 KB

Close up
 Attachment: 24.6 KB Attachment: 24.6 KB

One done, one to go
...and that, my liege, is how we know the Earth to be banana shaped. - Sir Bedevere
|
|
  |
 |
Michael B.
Industry Professional

Location: Seattle, WA Joined: 18 Oct 2007
Posts: 367
|
 Posted: Wed 03 Mar, 2010 9:53 pm Post subject: Posted: Wed 03 Mar, 2010 9:53 pm Post subject: |
 |
|
Excellent, I've been wanting to do some decorative work on my armour as well (besides just changing the buckles). Haven't really found anything exciting yet other than the Fico-Group armour, but it's a little too much etching for me. How did you adhere the brass? Did you rivet it?
www.bearmountainforge.com
Michael Bergstrom
|
|
   |
 |
Scott Hrouda

|
 Posted: Wed 03 Mar, 2010 10:02 pm Post subject: Posted: Wed 03 Mar, 2010 10:02 pm Post subject: |
 |
|
| Michael B. wrote: | | How did you adhere the brass? Did you rivet it? |
Yes, I used little brass rivets. The finished work actually appears better than the picture shows. For a few bucks and a little bit of time you can easily dress up your kit.
...and that, my liege, is how we know the Earth to be banana shaped. - Sir Bedevere
|
|
  |
 |
Maurizio D'Angelo

|
 Posted: Thu 04 Mar, 2010 5:34 pm Post subject: Posted: Thu 04 Mar, 2010 5:34 pm Post subject: |
 |
|
idea may be to paste a piece of laminated card. On paper, draw the decoration.
is easier to be precise.
Your work is excellent as a start. Bravo. 
just my two cent.
Ciao
Maurizio
|
|
   |
 |
Scott Hrouda

|
 Posted: Thu 04 Mar, 2010 8:59 pm Post subject: Posted: Thu 04 Mar, 2010 8:59 pm Post subject: |
 |
|
Maurizio,
Thank you for the compliment. It's only a start, but you have to start somewhere.
Some interesting things I learned during the process: If you've loaned the beverly shears to a friend, get it back so you don't have to attempt straight cuts with hand shears. Assume you will ruin the first strip or two. Don't strike the cold chisel too hard or you'll cut the strip into two very tidy pieces. Don't strike the chisel too lightly because you'll never get it lined up exactly right again. Do strike the chisel cleanly or else you will skip the blade across your piece. Take the time to properly line up your hole punch before making a permanent mistake.
That about covers all the glaring mistakes in the close up photograph. 
...and that, my liege, is how we know the Earth to be banana shaped. - Sir Bedevere
|
|
  |
 |
|
|

