| myArmoury.com is now completely member-supported. Please contribute to our efforts with a donation. Your donations will go towards updating our site, modernizing it, and keeping it viable long-term.
Last 10 Donors: Piotr H. Feret, Graham Shearlaw, Anonymous, Daniel Sullivan, Chad Arnow, Jonathan Dean, M. Oroszlany, Sam Arwas, Barry C. Hutchins, Dan Kary (View All Donors) |
| Author |
Message |
|
Al Muckart
|
 Posted: Sun 29 Mar, 2009 12:22 am Post subject: Re-gripping a Windlass Waster Posted: Sun 29 Mar, 2009 12:22 am Post subject: Re-gripping a Windlass Waster |
 |
|
I can hear you asking yourself, why on earth would someone bother regripping a windlass waster? Mostly because I wanted the practice. I've done one grip previously, about three years ago, using very thin chrome-tanned leather and superglue. I was never that happy with the results, and I wanted to have a go at doing it "right" on something relatively inconsequential before I try my hand at covering the grip on a longsword I'm having made.
I also just started going to WMA classes where pretty much everyone uses the same wasters and I thought this would be a good way to set mine apart rather than writing my name on it, or sticking a piece of coloured tape around it somewhere. It'll be interesting to see how it holds up over time.
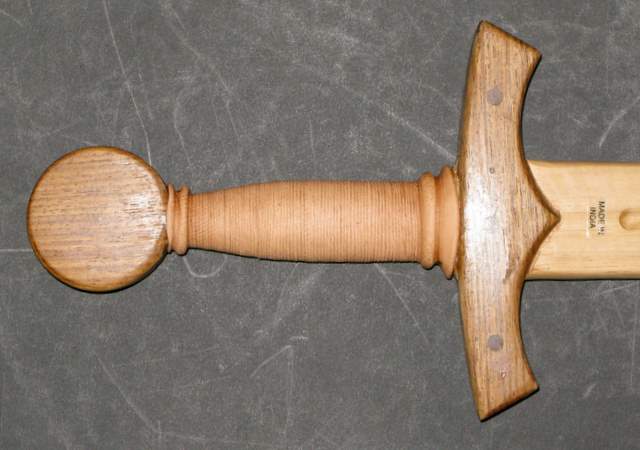
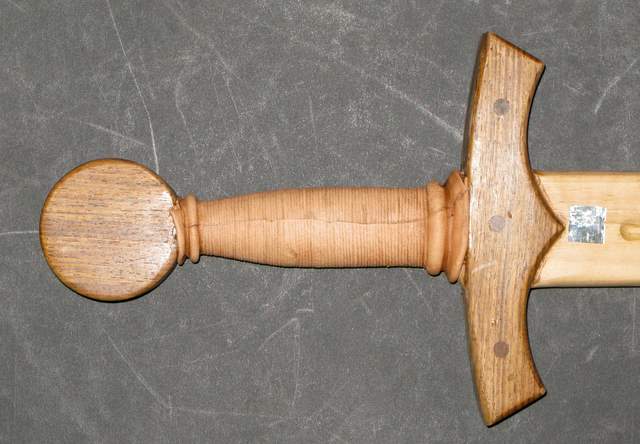
The victory conditions I set myself before I started were that it be comfortable and reasonably tidy - especially at the seam. These photos are of the second attempt, the first serving as an interesting learning experience. Overall, it came out Ok but there's a lot I'll do differently next time, mainly using much thinner and better leather and smaller cord for the risers. The seam is fairly tidy except at the very top and bottom, so I'm happy enough.
The leather is some scrap 1-1.5 mm thick vegetable-tanned cowhide that was a second that really should have been binned. It was uneven in thickness and had quite a lot of marks on the grain surface. It wasn't particularly nice stuff to work, having been split down thinner than you can really get away with on cowhide so it's been kicking around for a while waiting for a purpose in life. It actually worked quite well for this. I didn't bother dyeing it.
The risers are shoelaces, because that's what I had kicking around when I did it 
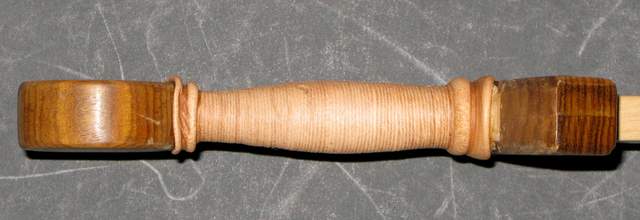
I reshaped the grip, starting by scraping off the varnish and gluing some 6mm MDF to the sides which I then ran down to shape on a belt grinder. That didn't quite yield the shape I wanted so I also glued some scraps of soling leather to the edges of the grip and further ground the grip to shape. Final shaping and finishing was done with cabinet scrapers.
The shape is rather approximately based on the grip shape of my Albion Knight but it's a lot more chunky because I didn't want to grind too much of the original grip off, lest I weaken it. As it is the bulk of the original grip is intact, the corners have just been rounded a bit.
After shaping the wood I measured out a square of leather, skived the top and bottom edges down to nothing and folded them over then soaked it in warm water and molded it to the grip, marking the excess. I trimmed the excess and skived the overlapping edges down to nothing then smeared it with hide glue and stuck it to the hilt and cord-wrapped it.
I didn't get it applied fast enough and the hide glue had started to gell by the time I was done, which meant it wasn't going to stick properly. Rather than having another go I cord-wrapped the damp leather and wrapped a very hot damp cloth around the whole lot while it was still bound in the cord. This remelted the hide glue and seems to have stuck everything down very nicely. The beauty of using hide glue of course is that when the time comes I can just soak the leather off and replace it.
 Attachment: 38.53 KB Attachment: 38.53 KB

Grip, non seam side.
 Attachment: 42.58 KB Attachment: 42.58 KB

Grip, seam side. Rather untidy at the top and bottom edges.
 Attachment: 21.44 KB Attachment: 21.44 KB

Grip, edge profile
 Attachment: 20.56 KB Attachment: 20.56 KB

Grip, other edge profile.
--
Al.
http://wherearetheelves.net
|
|
   |
 |
|
|
You cannot post new topics in this forum
You cannot reply to topics in this forum
You cannot edit your posts in this forum
You cannot delete your posts in this forum
You cannot vote in polls in this forum
You cannot attach files in this forum
You can download files in this forum
|
All contents © Copyright 2003-2026 myArmoury.com — All rights reserved
Discussion forums powered by phpBB © The phpBB Group
Switch to the Basic Low-bandwidth Version of the forum
|

