| Author |
Message |
|
Christian Böhling
Industry Professional
|
 Posted: Wed 03 Feb, 2010 11:42 am Post subject: Posted: Wed 03 Feb, 2010 11:42 am Post subject: |
 |
|
| Dustin R. Reagan wrote: | | Christian Böhling wrote: | | Myles Mulkey wrote: | | It's a similar sandwich construction to later Viking combs, but definitely has a different style. |
Yep! Here are some viking and medieval ones I made (comb-making is good against winter-depressions!!!! Try one yourself!! |
Great stuff! A quick question...what sort of tool do you use to add those dot-and-concentric-ring patterns? Also, what sort of dye/filler do you use to blacken the pattern, yet not stain the rest of the piece?
Also, any tips on how to incise/engrave bone and antler? I'd like to try inlaying wire into bone, but I'm not sure the best way to incise the grooves without too much chipping? Would a standard graver set be good for this sort of thing?
Thanks,
Dustin |
Hi Dustin,
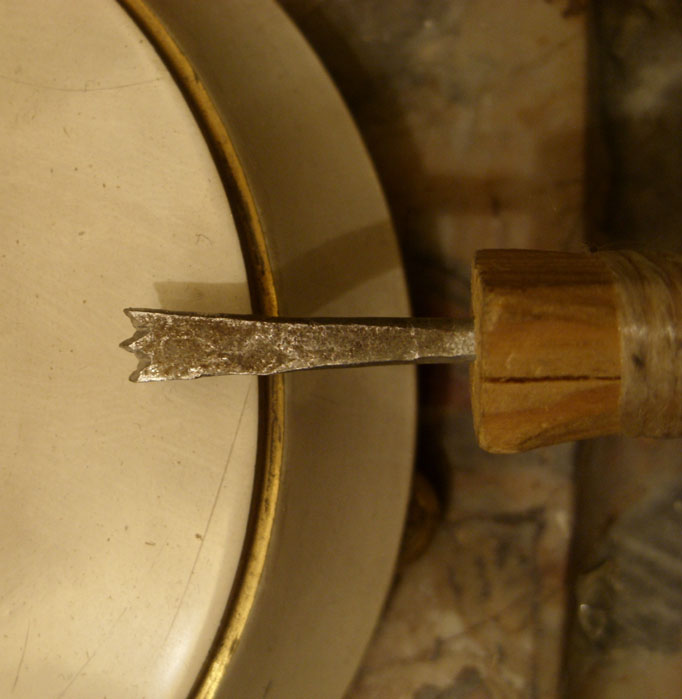
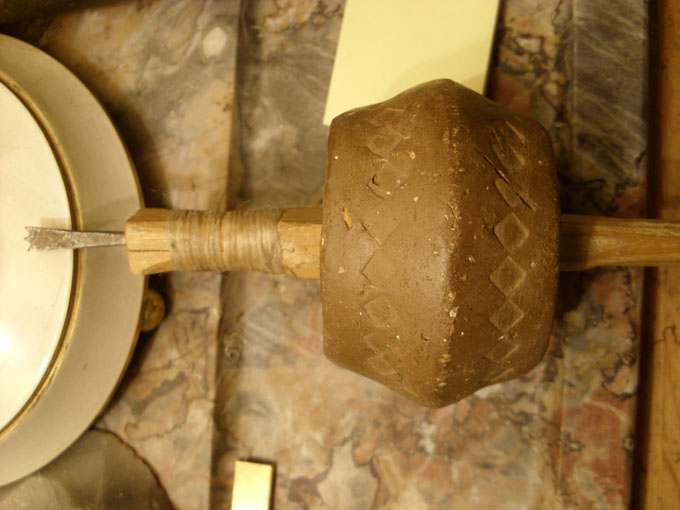
the tool I use for the point-circles is shown below....there is a horizontal stick with a ribbon which runs over the vertical shaft, I havn´t photographed it because it´s lost, hope you can imagine.....with this you start spinning this primitive machine....
For the black incrustations I use the fine powder of antler which you get by working with this material, put it into a spoon and heat it with a candle - may look strange if a policeman would see this  - but then the powder gets very intesive black. Onto the hot spoon with the black powder I give a small piece of bee´s-wax, it sucks the powder and gets like gum...I apply it on the point-circle, melt it again with the heated spoon, and polish it into it. After it had cooled I simply polish the rests off. (this is the original-method, Archaeologists in Sleswig found bee´s wax and bone-char in those ornaments. Ther is a name: bone-black! That´s it. You can find a wikipedia-article on bone-char, bone-black, ivory-black! - but then the powder gets very intesive black. Onto the hot spoon with the black powder I give a small piece of bee´s-wax, it sucks the powder and gets like gum...I apply it on the point-circle, melt it again with the heated spoon, and polish it into it. After it had cooled I simply polish the rests off. (this is the original-method, Archaeologists in Sleswig found bee´s wax and bone-char in those ornaments. Ther is a name: bone-black! That´s it. You can find a wikipedia-article on bone-char, bone-black, ivory-black!
It´s "the deepest available black"!
You can use any tool, you can use for woodworking and metalworking. But I wonder if hammering a wire into it will not damaging it....
 Attachment: 102.63 KB Attachment: 102.63 KB
 Attachment: 105.74 KB Attachment: 105.74 KB
www.archaeoschmiede.de
www.eisenzeithaus.de
Last edited by Christian Böhling on Wed 03 Feb, 2010 12:24 pm; edited 5 times in total
|
|
   |
 |
|
Christian Böhling
Industry Professional
|
|
   |
 |
Petr Florianek
Industry Professional

|
 Posted: Wed 03 Feb, 2010 12:02 pm Post subject: Posted: Wed 03 Feb, 2010 12:02 pm Post subject: |
 |
|
Thats funny how simillar tool we use, i have the drill with spindle whorl and also the bit for dremel :-)
Great info about the bone black too! thanks for that!
Do you by any chance know Harm Paulsen and other people from Opinn Skjold?
|
|
   |
 |
|
Christian Böhling
Industry Professional
|
 Posted: Wed 03 Feb, 2010 12:12 pm Post subject: Posted: Wed 03 Feb, 2010 12:12 pm Post subject: |
 |
|
| Petr Florianek wrote: | Thats funny how simillar tool we use, i have the drill with spindle whorl and also the bit for dremel :-)
Great info about the bone black too! thanks for that!
Do you by any chance know Harm Paulsen and other people from Opinn Skjold? |
Caught! Yes, I know Harm since more than 20 Years now, with him it all started, and I know the old Opinn Skjold very well!
Harm has brought me to the Idea to work as archaeo-technician and museums-pedagogue after finishing the university. i started studying in Kiel, Harm was in Schleswig then...
www.archaeoschmiede.de
www.eisenzeithaus.de
|
|
   |
 |
|
Christian Böhling
Industry Professional
|
 Posted: Wed 03 Feb, 2010 12:15 pm Post subject: Posted: Wed 03 Feb, 2010 12:15 pm Post subject: |
 |
|
| Petr Florianek wrote: | Thats funny how simillar tool we use, i have the drill with spindle whorl and also the bit for dremel :-)
|
Indeed  Coming to the same ideas inventing the same things, solving the same problems, yet never met... Coming to the same ideas inventing the same things, solving the same problems, yet never met...
www.archaeoschmiede.de
www.eisenzeithaus.de
|
|
   |
 |
|
K J Seago
|
 Posted: Wed 03 Feb, 2010 12:21 pm Post subject: Posted: Wed 03 Feb, 2010 12:21 pm Post subject: |
 |
|
i have a collection of ring dot drill bits too, and for my Dremel!!! i use charcoal and beeswax in my grooves and also rust (iron) verdigree (Copper) and all sorts of other colours ,but black does generally do the best, its nice hearing from other boneworkers! do you have any techniques for doing drills with more than one ring? i've always thought more than one ring and you have one point one side and the other(excluding the centre bit) further out than the other, sound right to you?
just another student of an interesting subject, 
|
|
  |
 |
|
Christian Böhling
Industry Professional
|
 Posted: Wed 03 Feb, 2010 12:30 pm Post subject: Posted: Wed 03 Feb, 2010 12:30 pm Post subject: |
 |
|
| K J Seago wrote: | | i have a collection of ring dot drill bits too, and for my Dremel!!! i use charcoal and beeswax in my grooves and also rust (iron) verdigree (Copper) and all sorts of other colours ,but black does generally do the best, its nice hearing from other boneworkers! do you have any techniques for doing drills with more than one ring? i've always thought more than one ring and you have one point one side and the other(excluding the centre bit) further out than the other, sound right to you? |
 funny, how this thread is exploding....it is slowly getting a thread about iron-age techniques in general... funny, how this thread is exploding....it is slowly getting a thread about iron-age techniques in general...
I used a smaller bit and a wider bit, first made the smaller circle, than put the wider one over the ornament and drilled again...
www.archaeoschmiede.de
www.eisenzeithaus.de
|
|
   |
 |
Nathan Robinson
myArmoury Admin


|
 Posted: Wed 03 Feb, 2010 12:34 pm Post subject: Posted: Wed 03 Feb, 2010 12:34 pm Post subject: |
 |
|
| Christian Böhling wrote: |  funny, how this thread is exploding....it is slowly getting a thread about iron-age techniques in general... funny, how this thread is exploding....it is slowly getting a thread about iron-age techniques in general... |
You should consider making a new one about the new subject of iron-age techniques rather than keeping adding to this. Allow others to find the information easier and think about these topics as an archive of knowledge stored for years to come.
.:. Visit my Collection Gallery :: View my Reading List :: View my Wish List :: See Pages I Like :: Find me on Facebook .:.
|
|
    |
 |
|
Dustin R. Reagan
|
 Posted: Thu 04 Feb, 2010 5:13 pm Post subject: Posted: Thu 04 Feb, 2010 5:13 pm Post subject: |
 |
|
Thanks so much for the info on dot-circle tool & bone-black!
| Christian Böhling wrote: |
You can use any tool, you can use for woodworking and metalworking. But I wonder if hammering a wire into it will not damaging it.... |
I wonder about that too. However, I know wire inlay in bone is possible & was done historically (there's an example in the book, Medieval Knives & Scabbards of tin wire inlay in a bone knife handle ).
Thanks,
Dustin
|
|
  |
 |
|
K J Seago
|
 Posted: Fri 05 Feb, 2010 3:05 am Post subject: Posted: Fri 05 Feb, 2010 3:05 am Post subject: |
 |
|
I used a smaller bit and a wider bit, first made the smaller circle, than put the wider one over the ornament and drilled again...
thanks for your info, i'll certainly gie it a try! i do agree, this possibly could become a different topic alltogether, never realised there were so many interested in bonework hidden in the shadows!
just another student of an interesting subject, 
|
|
  |
 |
|
Myles Mulkey
|
 Posted: Fri 05 Feb, 2010 5:16 am Post subject: Posted: Fri 05 Feb, 2010 5:16 am Post subject: |
 |
|
| Christian Böhling wrote: | | the combs found in Illerup with that broad and high grip-plates and the one-piece combs are of scandinavian origin, while the smaller ones assembled with more parts are denish or northern german, as Elks were not living there. |
Do you have any examples of what the continental Danish and German combs looked like? Were they similar to the thinner Viking combs you showed?
|
|
  |
 |
|
Christian Böhling
Industry Professional
|
|
   |
 |
|
Myles Mulkey
|
 Posted: Fri 19 Feb, 2010 6:07 am Post subject: Posted: Fri 19 Feb, 2010 6:07 am Post subject: |
 |
|
| Christian Böhling wrote: | Hi Peter,
you are absolutely right! The economic use of material that the original material show us was impressing me much, when nowadays modern craftsmen say "forge thick - grind thin", they tried to use all material which was availlable to "forge close to the end...." So I formed the grip out of the full material when most modern craftsmen would do it by cutting it out...
But what really impresses me is what I have seen through the finds of Illerup Ådal, I have been to Moesgaard several times and found blades which were finished so acourate - we both know the octagonal blade from that site, we have had it here at our museum where I am employed in Kalkriese for the time of our special exhibithion 2009! I have done a few lance heads from Illerup to see how this is to be done without modern tools - and I was really shocked when Jörgen Ilkjaer said, they must have done thousands of them inner a few years just to prepare on one attacking of Jutland.
At the moment I work on a so called roman spatha from Illerup with octagonal blade...can only show you a small impression of it. I first forged it and then profiled it´s octagonal cross section with a rasp like knife makers would have done it, it was a goddam piece of hard work to do this, now I can make the finish and polish it...But I should have done it from damaskus-steel...but I have to lern much before..
I saw your Åsby-reconstruction at albion and: yes! That meets with the original absolute in any detail! On several comparable finds I have seen some bronze-parts attached to the grip I can not explain myself, maybe we both can some day solve this problem... Good work you are doin there (but I hope the Chasuari will buy my weapons first, hehe  ) But you bring this exeptional early germanic weapon-"industry" to a greater public! Tak you for that!! ) But you bring this exeptional early germanic weapon-"industry" to a greater public! Tak you for that!!
Next images show some pieces I have done: a LaTéne Type lance and a Illerup lance, and an unfinished octagonal Illerup blade, what do you think about it? |
How long is the typical Illerup lance?
|
|
  |
 |
|
Christian Böhling
Industry Professional
|
 Posted: Fri 19 Feb, 2010 6:45 am Post subject: Posted: Fri 19 Feb, 2010 6:45 am Post subject: |
 |
|
| Myles Mulkey wrote: | | How long is the typical Illerup lance? |
Many of the lances of the type "Vennolum" can be impressingly 18 - 20 inches long, but there are also many shorter pieces and types, too. I made the most Vennolum Lances ca 18 inches long!
www.archaeoschmiede.de
www.eisenzeithaus.de
|
|
   |
 |
|
Myles Mulkey
|
 Posted: Fri 19 Feb, 2010 7:00 am Post subject: Posted: Fri 19 Feb, 2010 7:00 am Post subject: |
 |
|
| Christian Böhling wrote: | | Myles Mulkey wrote: | | How long is the typical Illerup lance? |
Many of the lances of the type "Vennolum" can be impressingly 18 - 20 inches long, but there are also many shorter pieces and types, too. I made the most Vennolum Lances ca 18 inches long! |
And that's 18 inches including the socket or just the blade?
|
|
  |
 |
|
Christian Böhling
Industry Professional
|
 Posted: Fri 19 Feb, 2010 10:40 am Post subject: Posted: Fri 19 Feb, 2010 10:40 am Post subject: |
 |
|
| Myles Mulkey wrote: | | And that's 18 inches including the socket or just the blade? |
18 inches including socket. But there are pieces which are 20 inches total ! I am not sure right now as my books are not here at the moment, but I think the longest is 46 cm or so... Maybe Peter has his books on hand...?
www.archaeoschmiede.de
www.eisenzeithaus.de
|
|
   |
 |
|
Peter Johnsson
Industry Professional
|
 Posted: Sat 20 Feb, 2010 12:41 am Post subject: Posted: Sat 20 Feb, 2010 12:41 am Post subject: |
 |
|
|
No, sorry. Most of the Illerup book are with Søren in Kopenhagen. I only have the two on spathae blades.
|
|
   |
 |
|
Christian Böhling
Industry Professional
|
 Posted: Mon 22 Feb, 2010 11:57 am Post subject: Posted: Mon 22 Feb, 2010 11:57 am Post subject: |
 |
|
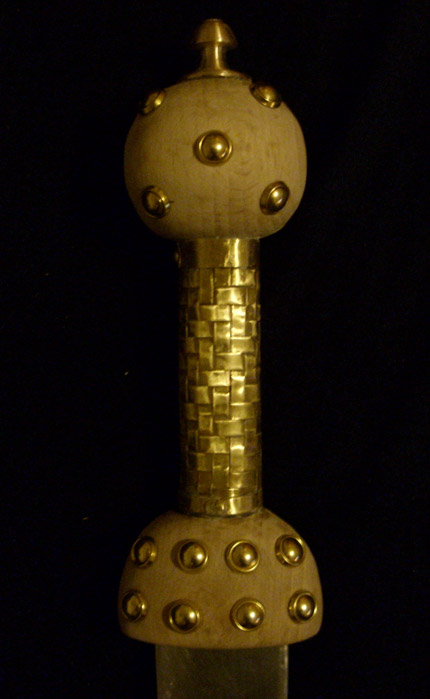
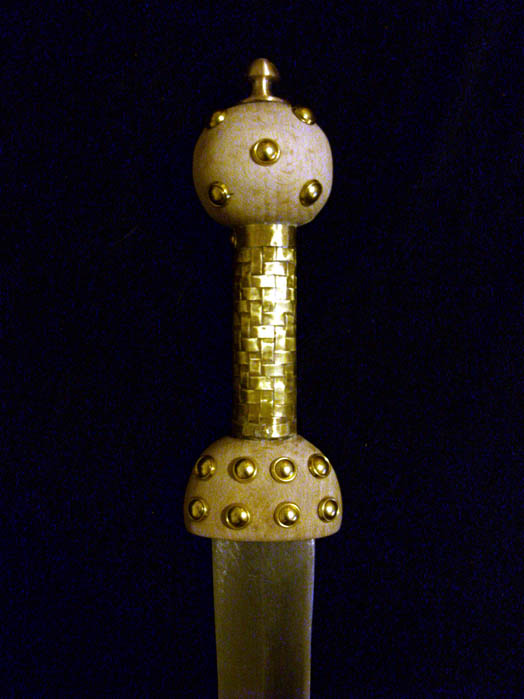
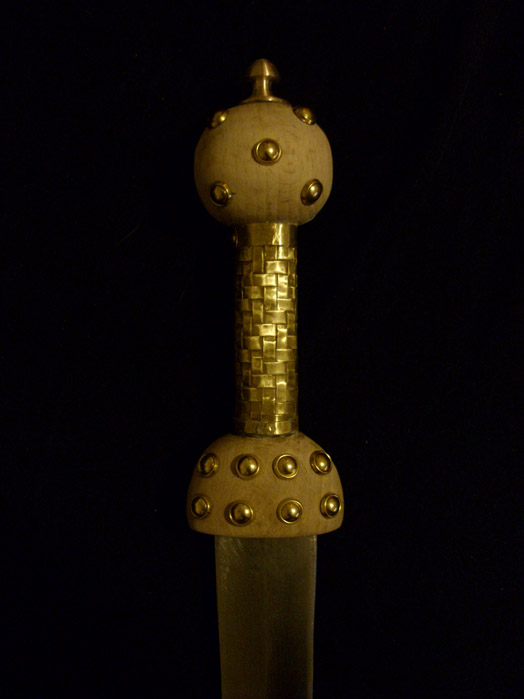
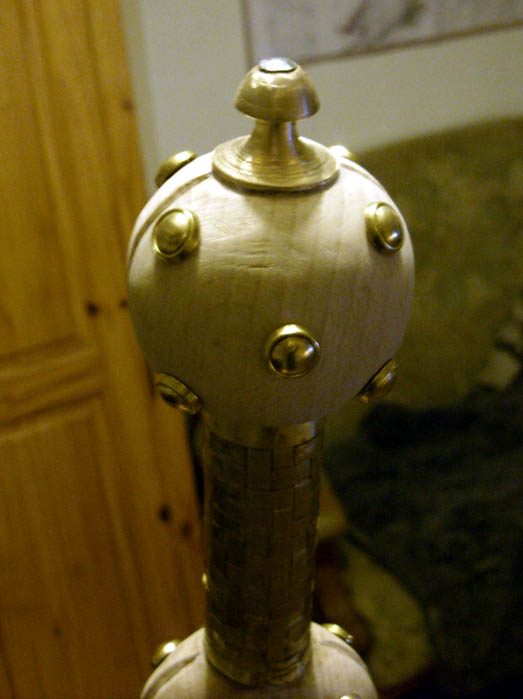
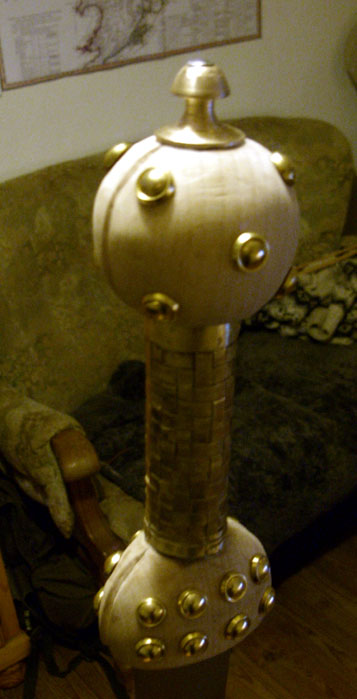
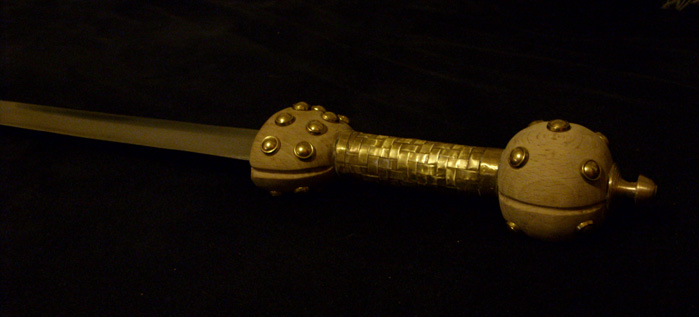
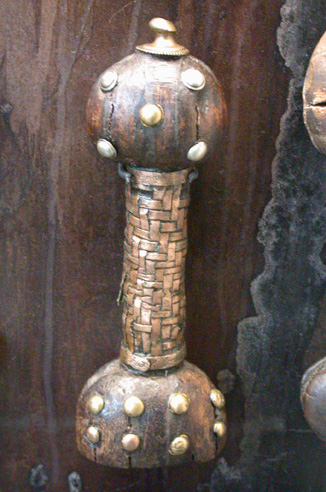
So....after a while, here are the first impressions on the Thorsberg-Sword
She is not finished yet, the wooden parts have to be waxed. But all in all, i am satisfied with this little beauty...
Hope you like her, too! The rivets are not perfect symmetrical, but the original ones were not, too! So this is I think the original was meant.
 Attachment: 89.31 KB Attachment: 89.31 KB
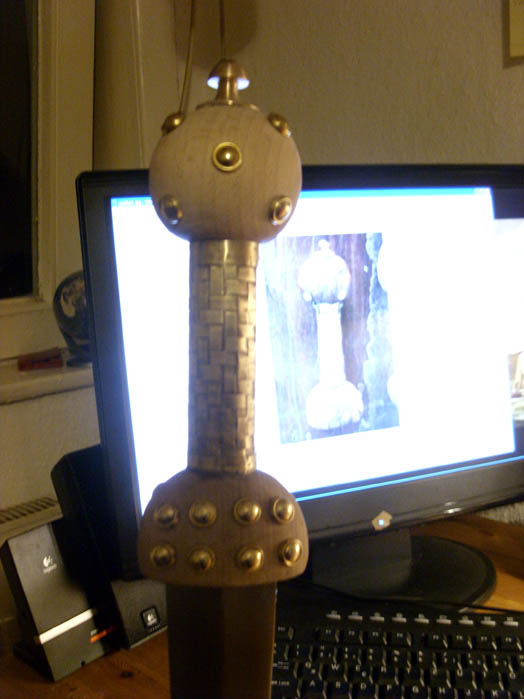
the rivets at the lower wood part on this image look not horizontal, but they are, don´t know...photo-perspective.
 Attachment: 95.57 KB Attachment: 95.57 KB
 Attachment: 87.13 KB Attachment: 87.13 KB
 Attachment: 88.26 KB Attachment: 88.26 KB
 Attachment: 84.44 KB Attachment: 84.44 KB
 Attachment: 90.57 KB Attachment: 90.57 KB
 Attachment: 97.88 KB Attachment: 97.88 KB
 Attachment: 112.1 KB Attachment: 112.1 KB
www.archaeoschmiede.de
www.eisenzeithaus.de
Last edited by Christian Böhling on Mon 22 Feb, 2010 12:23 pm; edited 1 time in total
|
|
   |
 |
|
Peter Johnsson
Industry Professional
|
 Posted: Mon 22 Feb, 2010 12:23 pm Post subject: Posted: Mon 22 Feb, 2010 12:23 pm Post subject: |
 |
|
Nice work Christian.
Brings a smile to my face.
I have this impression that the germanic hilts often had a thin leather cover over the pommel and guard (and grip in those cases when it was just wood). These nails are spaced over the surface in a way that it seems like an intention to distribute the stress of keeping leather taut over the surface. The deeply cut groves in the direction of the edge also seem perfect to keep two halves of leather pressed down while the leather cures.
(Perhaps even roman sword hilts were finished like this, in those cases when only wood was used?)
The leather would have been of a thin kind. Possibly gut leather. Since this type of leather was used to cover shields, it was a material and technique that was commonly in use. The transculent leather allows for coloring of the wood below the leather and the surface will take a wax or fat very readily, allowing effective proofing against wetness.
Just my private theory.
I know that no leather as survived, but that is also the case with the shields: no leather cover has survived. Tests has shown that a thin gut leather most probably have been used, even if no actual trace of the leather now survives. Edge bands around the rim of the shields would also have been effective in sealing the leather and keeping it in place. Sometimes also small holes as from stitching around the rim.
In the case of sword hilts we have the plentiful use of rivets and domed tacks, plus otherwise mysterious semi-circle shaped narrow iron bands along the edge of pommels and guards.
What do you think of this theory?
|
|
   |
 |
|
Christian Böhling
Industry Professional
|
 Posted: Mon 22 Feb, 2010 12:31 pm Post subject: Posted: Mon 22 Feb, 2010 12:31 pm Post subject: |
 |
|
Yes, Peter, I am with you in this theory!! At first I wanted to do with leather, but I made it as the original has survived, tried to not interprete too much here....but the next (and I will do this one again in Summer!) will be with leather, so that the Chasuari can discuss it with the public at their public gigs and explain experimental archaeology then! This is my plan - first one without interpretation, second with suggestions. And I believe in leather, too! So this example is a "know" one, next will be a "believe" one. And these will be the names of this swords: "Know" and "believe". Have to search for the germanic words for it. 
But I think I met the proportions exept the rivets are a bit too big...
EDIT: When I first thought at doing this with leather, I made a few trials and I was not very satisfied with it. We have all different leather types here at our ironage-house, well natural made and some thin and stretchable, but it was not easy to get it covering the pommel in a way we would like  I have to do other experiments. But now and without it gives a good impression of the original hilt from Thorsbjerg Mose as it repeats the woven brass cover and the rivets and the proportions - thats waht this is about. BTW: this seems to be the only brass woven hilt, and to decide me to make this piece has a story: I have to do other experiments. But now and without it gives a good impression of the original hilt from Thorsbjerg Mose as it repeats the woven brass cover and the rivets and the proportions - thats waht this is about. BTW: this seems to be the only brass woven hilt, and to decide me to make this piece has a story:
There is a woman in the Chasuari Group who is very much inside weaving and dying techniques. She is the expert in cloth. And she is a colleque of mine at my work. When she asked me to do early 3rd century stuff for her, I immediately decided to make the Thorsberg piece because of it´s woven brass cover. I saw that the original craftsman had make some mistakes (as he tried to keep one pattern). I decided to take the pattern of the middle of the grip and keep it at the whole rest the same... Will do te scabbard tomorrow and tomorrow evening she will get her Sword.
It is made of C60 Steel and very light. She will love it!
Cheers
Chris
www.archaeoschmiede.de
www.eisenzeithaus.de
|
|
   |
 |
|
|

