| Author |
Message |
Antal László

|
 Posted: Wed 25 Jun, 2014 2:31 am Post subject: Posted: Wed 25 Jun, 2014 2:31 am Post subject: |
 |
|
That sword looks very elegant and deadly.
I love the peen.
Further to the welding job, the guard is stainless steel? If it is that makes it more expensive too just because the welding wire and the gas you need to use is more expensive. It looks very good so if it was mine I'd think it was worth it.
Julien I wouldn't recommend that welder. Or any classic arc welder for projects like these. Maybe a cheap MIG welder but then again, as with everything you get what you pay for.
|
|
   |
 |
|
Lukas MG
Industry Professional
|
 Posted: Fri 27 Jun, 2014 10:19 am Post subject: Posted: Fri 27 Jun, 2014 10:19 am Post subject: |
 |
|
The guard is stainless (that's what VA uses), the rings are mild steel. I guess he did do a good job with the weld. Mind you, he didn't to it right away, I left the guard with him for two weeks.
Anyway, glueing grip:

The end is drawing near... 
Still trying to decide on leather color. I have black and the brown I used for my last sword (see pic further up in thread). Also some green but that leather is a bit on the thick side. Hm...
|
|
   |
 |
|
Lukas MG
Industry Professional
|
 Posted: Sat 28 Jun, 2014 3:57 am Post subject: Posted: Sat 28 Jun, 2014 3:57 am Post subject: |
 |
|
Decided on green. Something to set it apart. With skiving the green leather actually worked just fine.
Cord wrapped:

I ran out of yellow string while wrapping and had to finish with white. Doesn't matter anyway.
Skiving the leather:

Folding over upper and lower edge where they touch guard and pommel:
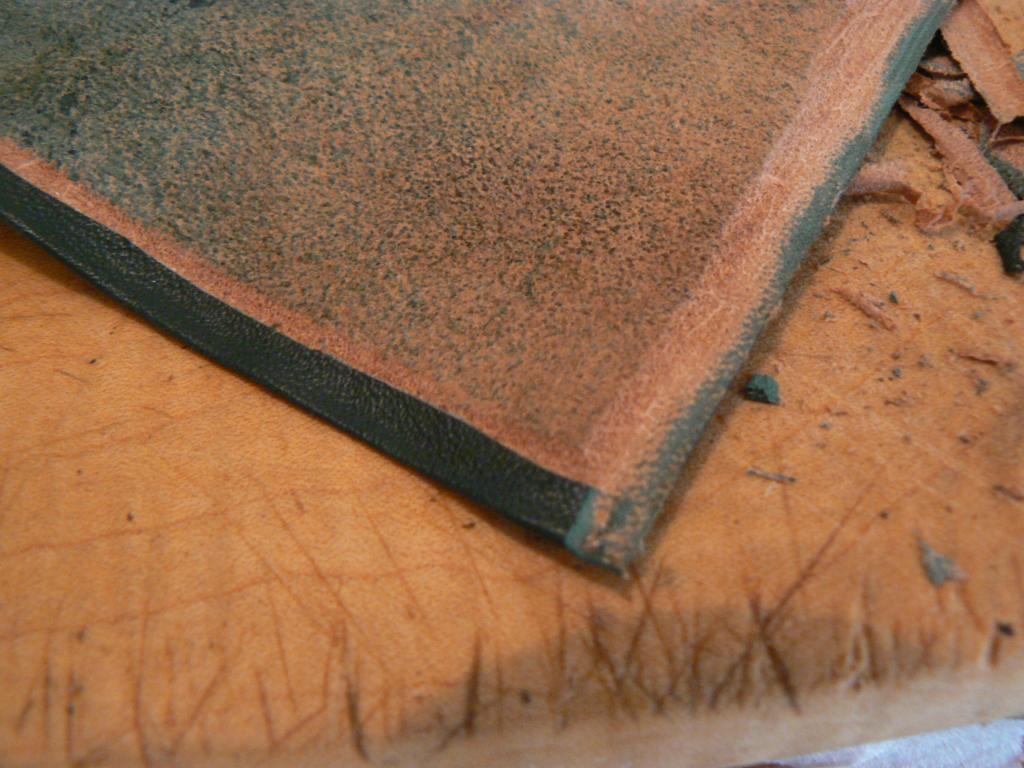
Then I soaked the leather, did the leather wrap and wrapped again with cord. Now the leather is drying.

The sword is practically complete. I still need to do the final sharpening as well as go over everything once more to make sure it's all good. In any case you can expect some final photos and a LOT of text sometime later today 
|
|
   |
 |
|
Einar Drønnesund
|
 Posted: Sat 28 Jun, 2014 5:40 am Post subject: Posted: Sat 28 Jun, 2014 5:40 am Post subject: |
 |
|
|
The shape of the grip is really slim and elegant, goes very well with the slender blade. And I think that dark green is going to look really good.
|
|
  |
 |
|
Lukas MG
Industry Professional
|
 Posted: Sat 28 Jun, 2014 6:14 am Post subject: Posted: Sat 28 Jun, 2014 6:14 am Post subject: |
 |
|
Thanks!
The sword is now complete. Prepare for a wall of text and lots of pics 
Anyway, here we go. I hope you find this interesting.
As with most of my blades, this sword isn‘t a replika of an existing original. Instead, it‘s my attempt at creating a longsword in the tradition of the German School of longsword fighting and represents everything I want in a sharp longsword.
The blade is inspired by the late 15th and early 16th century German longswords. A very famous example is the longsword in the Bayrisches Nationalmuseum in Munich, Germany. I‘ve recently seen it in person and it really is a remarkable sword. Undoubtably one of the very best existing originals and it‘s not surprising that it has often been replicated (for example by Albion).
The hilt configuration represents my personal taste and is not realIy influenced by the desire to represent a typical longsword from that time period. In fact, I doubt this exact hilt design ever existed.
So, I present:

Stats:
Steel: 56Si7, heat treated to ca. 58Rc by the gents at http://www.Schmiedeglut.de
overall length: 132.5cm (52.1“)
blade length: 101cm (39.8“)
blade width at base: 4cm (1.57“)
weight: 1740g (3.8lb)
PoB: 11cm (4.3“)
CoP: 60cm (23.6“)
forward pivot point: 1cm (0.4“) behind the tip
hilt node: 7cm (2.75“) behind guard (about 4cm before the middle riser)

As with my last piece, this sword was designed with the help of Peter Johnsson‘s work on geometric proportion and harmonic principles. Again, many thanks to him for both his invaluable research and his generosity in sharing what he finds.
The sword blade is rather massive and not nearly as delicate as it might look. While narrow, it is a full 8mm thick at the base and sports a convex distal taper to 4mm right before the tip. This makes for a rigid blade with quite some blade presence that (especially with the long grip) allows for very powerful and fast cuts. It‘s certainly not what I‘d consider a light target cutter, in fact I feel it will perform best against medium to hard targets like tatami mats with wooden cores. It has the mass necessary to stun an opponent through armor and the slender, stiff point can be worked into weak spots, maybe with halfsword techniques. While best suited for blossfechten, it would also be a good choice for armored combat.
Swords of similar shape are often depicted in period art along with saints in full armor so one shouldn‘t underestimate the role longswords played in armored combat. Peter Johnsson once called a XVIIIb he made „a slim but powerful sword of war in a gentleman‘s guise“. I think that is a very fitting description. People always imagine big XII or XIII swords when hearing the phrase „war sword“ but a stiff XVIIIb or c with good edges and a fine point would be a great choice for any soldier going to war in Europe in the 15th or early 16th century. Plate armor was at the height of its development but only rich noblemen could afford a full suit so most men-at-arms wore a mix of plate and other, cheaper defenses. Against plate a sword‘s edge is essentially useless but a thrusting point can do the job while preserving the edge for opponents wearing less or no armor. I believe that besides being very popular for duels and civilian use in general, longswords were employed quite frequently during military raids or skirmishes, if not full scale battles.

A short look at the blade profile of XVIIIb swords will tell that they are designed to be deadly thrusters. That is undoubtably true for this sword as well, the sleek and stiff point effortlessly pierces soft targets. The pivot point at the tip aids by giving great point control and making it easy to stay on target when changing through guards.
Talking about it, the sword‘s tip might be worth a second look:
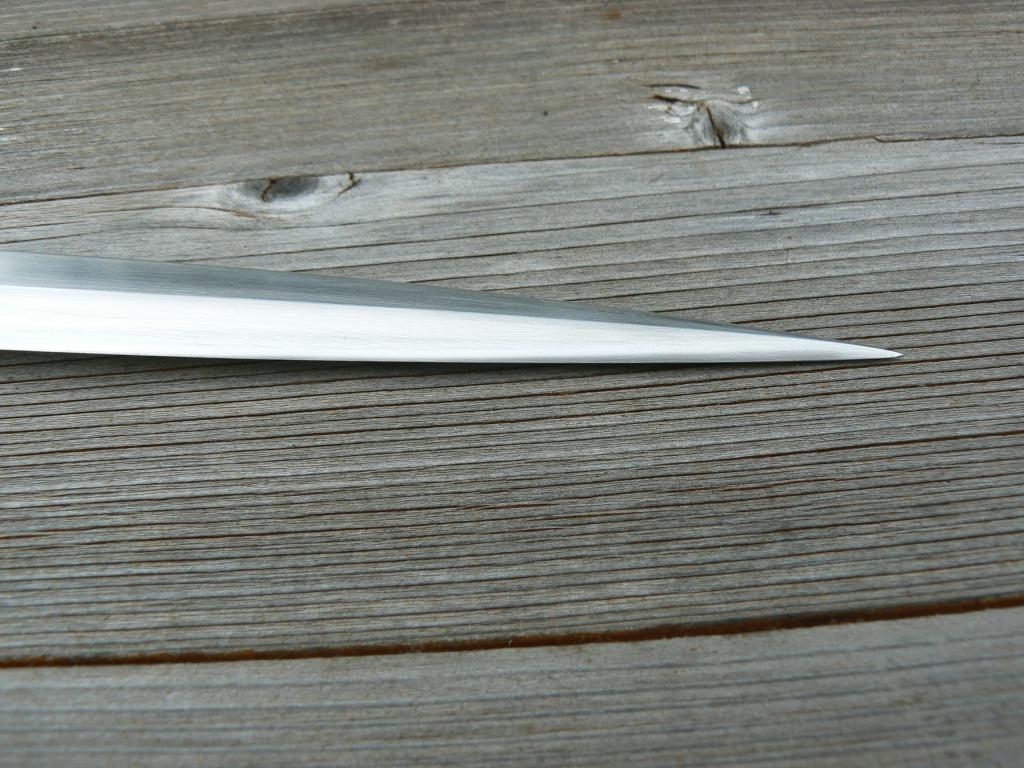
Over the last few inches, the flat ground bevel gradually transitions into a very steep, strongly convex bevel. As it is the case over almost the entire edge (the base being blunt), there‘s no secondary bevel here, but a smooth appleseed edge that easily slices paper. Of course, right at the tip the angle is so steep that effective cutting is hardly possible. So while sacrificing performance on tip cuts, this design allows for deeply penetrating thrusts and the reinforced point is much more capable of surviving thrusts into hard targets than a wide cutting tip would be.
Due to the convex profile taper, the blade retains enough width for effective cutting in the upper half. While not a dedicated cutter, this sword cuts very well with proper technique so I have no doubt a good cut would be fatal against an unarmored opponent.
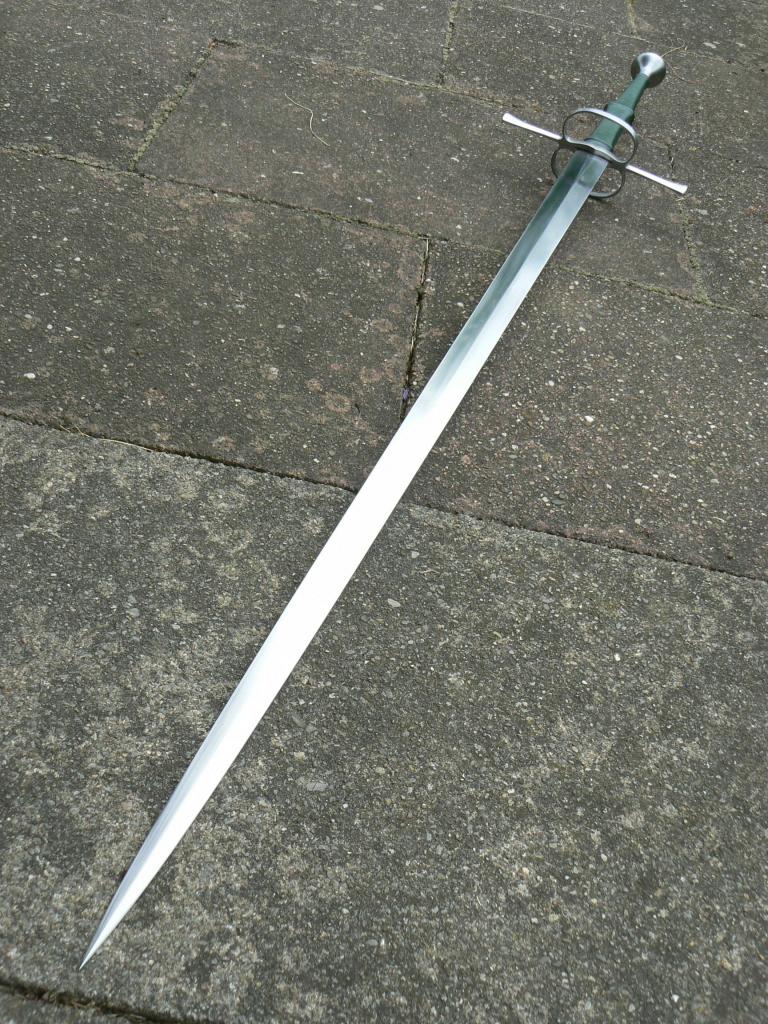
Overall, the feel of this sword is that of a weapon. It feels very solid and absolutely dependable in hand. 1740g seems pretty hefty for a sword but actually falls on the lighter end of the spectrum for originals of this type and size. Here is a beautiful early 16th century piece that I took clues from during the making of this sword:
http://www.zornhau.de/wordpress/wp-content/up...3-SW-3.pdf
Many more pics of other interesting originals (plus data sheets) can be found here:
http://www.zornhau.de/dinkelsbuhl-first-steel/#more-92
The guys at Zornhau do really great work with their measuring projects!! Very helpful and worth a round of applaus 
What actually surprised me was just how the feel and balance of this sword belies its weight. Had I to guess, I‘d put the sword at 1500g tops. It‘s a big boy and not weightless but far from a clunker and easily flows through longsword plays. „Agile and authorative“ is a good description for how this sword feels in hands. Of course it is meant to be used with two hands but the occasional one-handed technique can be performed without problems. While the sword moves swiftly and with little effort, it‘s still almost 4lb in motion so just by its mass this blade is a devastating weapon. Add to that sharp edges and whatever stands in its path should better get the hell out of the way  . With the leverage of the long handle, the sword changes directions very easily and turns on a dime. The amount of power one can generate even with short movements is astounding. . With the leverage of the long handle, the sword changes directions very easily and turns on a dime. The amount of power one can generate even with short movements is astounding.
I think I have succeded in creating a sword that would work very well for the German School of fencing.
I will later add a cutting video, don‘t have enough bottles right now 
EDIT: Here's an extremely low quality cutting vid (for various reasons I had to use a very old camera for the vid). Found some tetra packs and prepared some newspaper rolls. Those rolls are pretty tough stuff, harder to cut than tatami mats. Anyway:


I was actually surprised that I got some silent cuts on the tetra packs. This sword is really not optimized for light targets. As you saw when I cut the newspaper rolls, the sword is very unforgiving on bad technique. You really have to follow through properly. These narrow, thick blades aren't optimized for cutting but when you get it right, they cut perfectly fine. Even when I messed up, the blade left deep gashes in the rolls, plenty deep enough to put someone out of a fight (if that had have been an arm or throat). The good cuts went through the rolls without much resistance.
I don't have it on tape unfortunately (thought of it only after I had turned the camera off) but thrusts against the rolls were pretty impressive. Even with little effort, the tip went in several inches and a more powerful thrust went right through, splitting the wooden core.
In any case, I'm looking forward to a chance to put this one up against some mats!
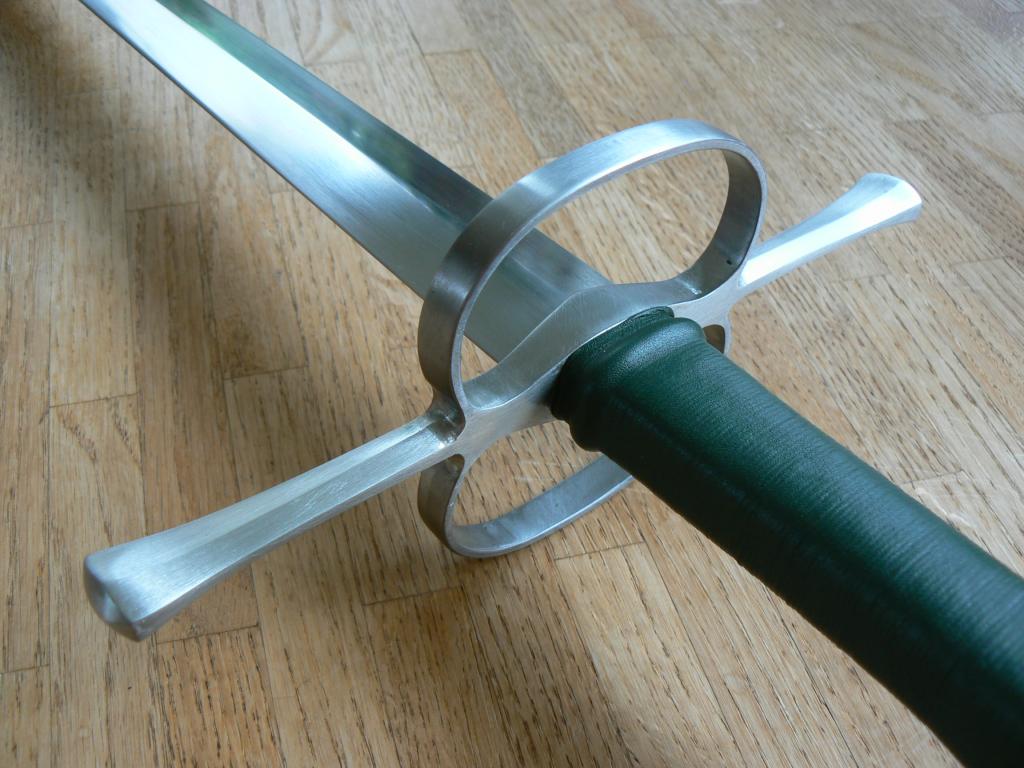
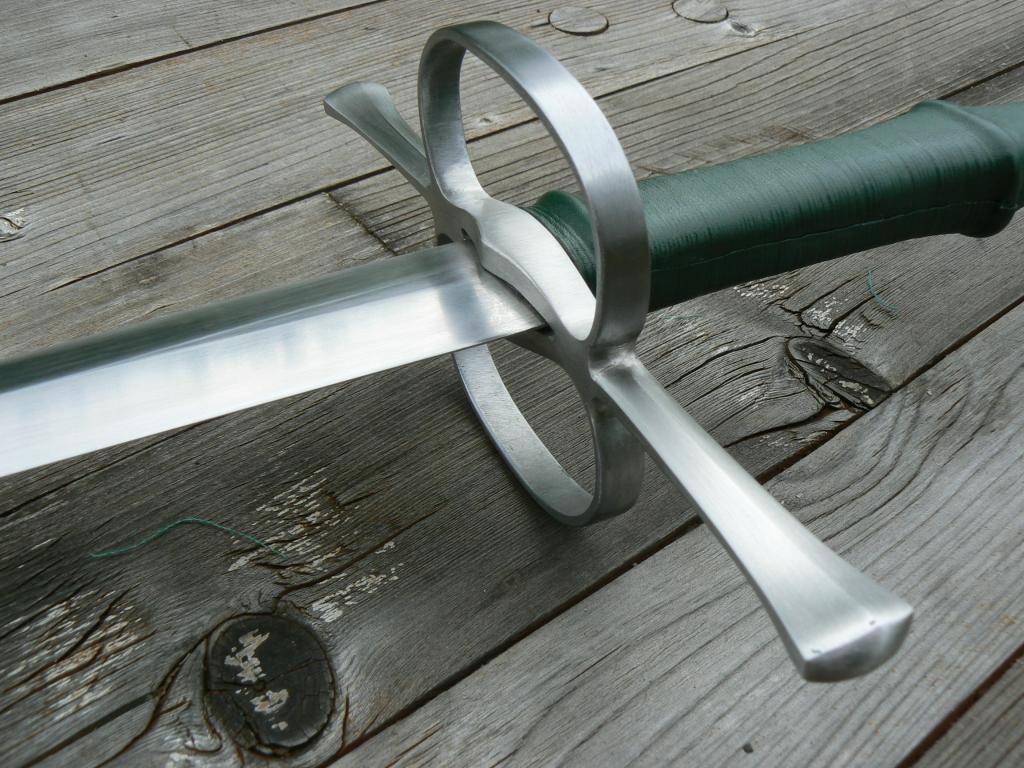
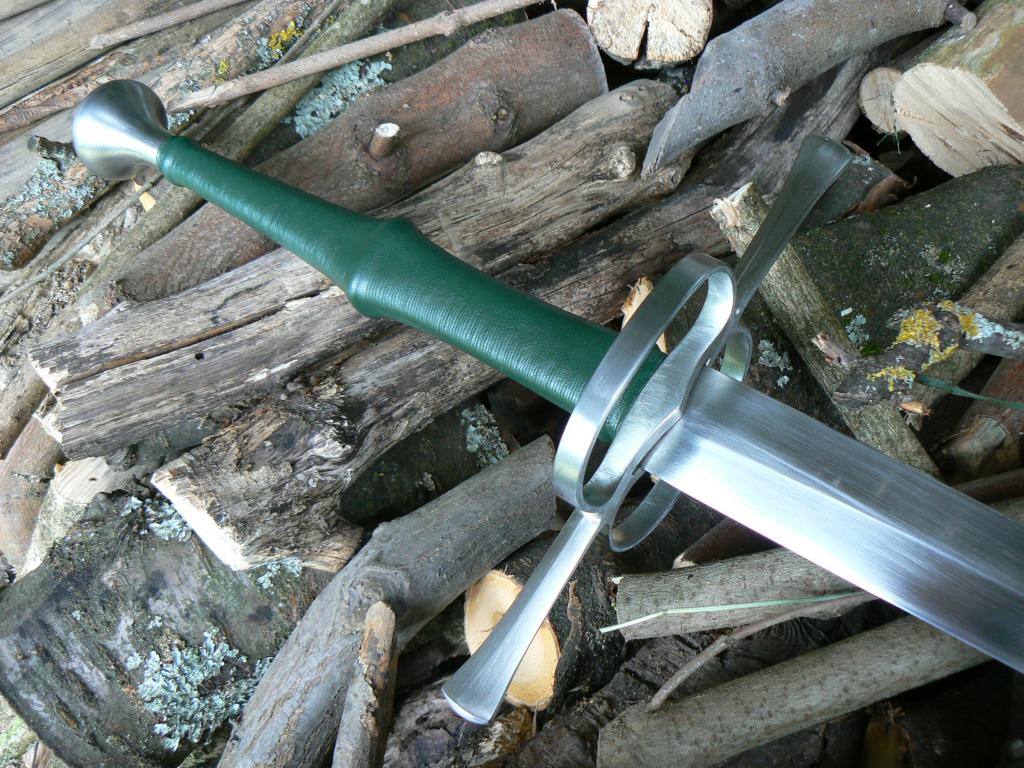
The sword‘s aesthetics are meant to reflect the „to-the-point“ design. Graceful but functional, no excessive embellishments. Overall I wanted the sword to look like the sidearm a nobleman or well-off man-at-arms would carry, not without style but a weapon through and through.
I had a bit of trouble picking the right guard. First I decided on downturned quillons and had the guard already forged out when I realized I wasn‘t happy with the design. I spend some time not being able to make up my mind when I remembered that I had a guard that used to be on a VA Kriegsschwert in my spare parts collection. I picked it up and immediately knew it would work wonderfully with some modifications. I had to do a lot of work on it but I really like the result and am glad that I went that way.

For the pommel, I decided on a pear shape. A scent stopper or fishtail with clean lines and facets might have fit the guard better but no pommel feels as good in my hand as a simple pear does so that it is. The pommel was turned on a lathe by a good friend of mine, I then reground it a bit to exactly meet the weight requirements. Finally, the pommel was fitted to the tang, hot peened, the wooden handle scales epoxied on, bound with cord and wrapped with leather.


Eventually I will make a scabbard for this sword but for now, I need to catch a break from working in the shop and will concentrate on using swords, not making them 
I appreciate all comments and critique! Thanks for looking.


Last edited by Lukas MG on Wed 09 Jul, 2014 3:17 pm; edited 2 times in total
|
|
   |
 |
|
Einar Drønnesund
|
 Posted: Sat 28 Jun, 2014 7:18 am Post subject: Posted: Sat 28 Jun, 2014 7:18 am Post subject: |
 |
|
|
Stunning work, Lukas. I knew the blade was gorgeous, but wow, that grip turned out great as well. Really clean lines. I hope to make something like this one day.
|
|
  |
 |
|
Lukas MG
Industry Professional
|
 Posted: Sat 28 Jun, 2014 1:46 pm Post subject: Posted: Sat 28 Jun, 2014 1:46 pm Post subject: |
 |
|
Thanks 
I added a very low quality cutting vid. At least it should give a decent impression of the sword's size and performance/handling.
|
|
   |
 |
Hector A.

|
 Posted: Sun 29 Jun, 2014 4:59 am Post subject: Posted: Sun 29 Jun, 2014 4:59 am Post subject: |
 |
|
How do you reach and maintain that Polish? Every time i sharpen my albion's i have to scotchbrite them for hours during days to get them back to that polish. Any advice?
Also how did you sharpen it?
|
|
  |
 |
|
Lukas MG
Industry Professional
|
 Posted: Mon 30 Jun, 2014 3:02 am Post subject: Posted: Mon 30 Jun, 2014 3:02 am Post subject: |
 |
|
Thanks, I'm glad you like it.
Regarding the polishing/sharpening: That is indeed to so easy. I find I get the sharpest edge when I sharpen a blade going across the edge, not lengthwise the way I would polish. Now that is a problem. What I do is this:
When I polish the sword (full length strokes, going higher and higher in grids), I also work the edge. When I'm at about 400 grit, the edge is already pretty sharp. Now I take 600 to 1000 grit and actually sharpen the edge with a mouse pad as backing (the soft backing will deform a bit and follow the appleseed shape of the edge). This inevitably leads to fine scratches on the blade that go against the polish. This looks bad and needs to be taken care of. So now I again take my micarta sanding block and do full length strokes, first again with 400 and then up to1000 grit. This takes away the scratches from sharpening everywhere but the very edge (as that part curves in, the flat sanding block doesn't touch it). That's pretty much the way I leave it so when you look very closely at one of my blades, you see that the very edge is polished differently than the rest of the sword. As the grits are very high, it's really hard to notice and IMO doesn't look bad at all. Doesn't show up in pictures either.
The final part is stropping with leather, again going across the edge.
|
|
   |
 |
Julien M

|
 Posted: Mon 30 Jun, 2014 4:36 am Post subject: Posted: Mon 30 Jun, 2014 4:36 am Post subject: |
 |
|
Just two words Lucas: Top notch!
Very impressive - and reading you, one would think making a sword from stock removal is a walk in the park 
That was not nearly as long as you initially expected right?
Cheers,
JM
|
|
  |
 |
|
Radovan Geist
|
 Posted: Mon 30 Jun, 2014 5:07 am Post subject: Posted: Mon 30 Jun, 2014 5:07 am Post subject: |
 |
|
|
I really like it - simple and elegant! and kudos for that grip - both for colour selection, and flawless execution.
|
|
  |
 |
Daniel Wallace

Location: Pennsylvania USA Joined: 07 Aug 2011
Posts: 580
|
 Posted: Mon 30 Jun, 2014 8:25 am Post subject: Posted: Mon 30 Jun, 2014 8:25 am Post subject: |
 |
|
|
I really like the dimensions of this sword, it has that slender presence with a thick unassuming distal taper to provide some real smack.
|
|
  |
 |
Scott Hanson

|
 Posted: Mon 30 Jun, 2014 9:17 am Post subject: Posted: Mon 30 Jun, 2014 9:17 am Post subject: |
 |
|
Awesome, awesome sword, and beautiful work.
This is just about a "grail sword" sort of sword for me. Very well done!
Proverbs 27:17 "As iron sharpens iron, so one man sharpens another"
Wisconsin Historical Fencing Association (WHFA)
A HEMA Alliance Affiliate
|
|
  |
 |
Sean Flynt

|
|
   |
 |
|
Lukas MG
Industry Professional
|
 Posted: Mon 30 Jun, 2014 11:54 am Post subject: Posted: Mon 30 Jun, 2014 11:54 am Post subject: |
 |
|
Thanks for your comments, I really appreciate it.
@Julien: Well, I don't think making a stock removal blade is easy but determination and patience will get you a long way. The rest is just practice. You could do it just as well.
I am indeed surprised how quickly this sword came together. My last piece took me a full year so I was certainly not expecting to get done this fast. I was lucky in the sense that I hit very few bumps with this piece. I was pretty smooth riding most of the time, except for the kinks after HT I never ran into something that could have potentially been a deal-breaker. Also, I found myself with quite a bit of free time at my hands these last couple months (changing right now).
|
|
   |
 |
|
Lukas MG
Industry Professional
|
 Posted: Wed 17 Sep, 2014 11:14 pm Post subject: Posted: Wed 17 Sep, 2014 11:14 pm Post subject: |
 |
|
Just a quick note, the old cutting video was deleted and I made a new one:

That should give a better (clearer  ) idea of the sword's size and proportions. ) idea of the sword's size and proportions.
|
|
   |
 |
|
Lukas MG
Industry Professional
|
 Posted: Thu 18 Sep, 2014 6:42 am Post subject: Posted: Thu 18 Sep, 2014 6:42 am Post subject: |
 |
|
Hopefully it works now...

|
|
   |
 |
|
Paul Mullins
|
 Posted: Thu 18 Sep, 2014 8:06 am Post subject: Posted: Thu 18 Sep, 2014 8:06 am Post subject: |
 |
|
Ausgezeichnet!
Very beautiful work of art, Lukas!
Thank you for sharing your progress with us.
|
|
    |
 |
|
Lukas MG
Industry Professional
|
 Posted: Thu 18 Sep, 2014 11:40 pm Post subject: Posted: Thu 18 Sep, 2014 11:40 pm Post subject: |
 |
|
Thanks 
|
|
   |
 |
Julien M

|
 Posted: Thu 18 Sep, 2014 11:42 pm Post subject: Posted: Thu 18 Sep, 2014 11:42 pm Post subject: |
 |
|
|
Said it already Lucas, but will say it again: very impressive work all around!
|
|
  |
 |
|
|

