| Author |
Message |
|
Luke Zechman
Location: Lock Haven Pennsylvania Joined: 18 Jan 2009
Posts: 278
|
 Posted: Mon 04 Jan, 2010 11:51 pm Post subject: Posted: Mon 04 Jan, 2010 11:51 pm Post subject: |
 |
|
Just finished the grip slats and the pommel. I did the slats in American Hornbeam, which has a mix of lighter and darker grains. I did the pommel out of Black Walnut (the same hunk of wood I used for my gladii). First time carving hornbeam, and I must say that it was not as bad as I thought it would be. I think this wood will be ideal for the job because it is so dense and resistant to chipping off. The area of the grip slats nearest the blade always concerned me as far as being an area prone to chipping. Hopefully I will not split anything while riveting the slats. I will be using bronze boat nails to rivet the whole deal. Also I still need to polish the blade, attach the pommel, and oil all the wood. I will be doing minimal sharpening. With a good handle this sword will be a good weapon against soft targets as is.
I will be posting some pictures tomorrow.
|
|
  |
 |
|
Luke Zechman
Location: Lock Haven Pennsylvania Joined: 18 Jan 2009
Posts: 278
|
| Posted: Tue 05 Jan, 2010 9:38 am Post subject: |
|
|
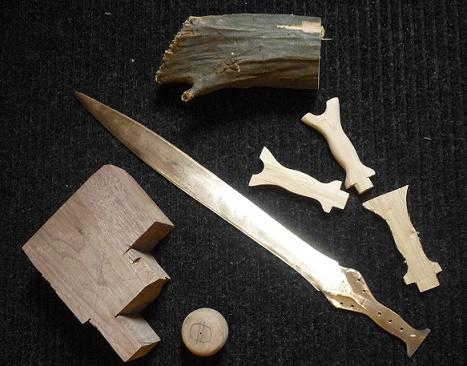
Picture:
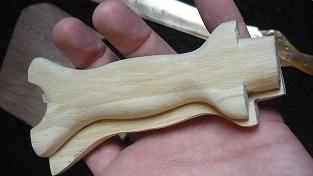
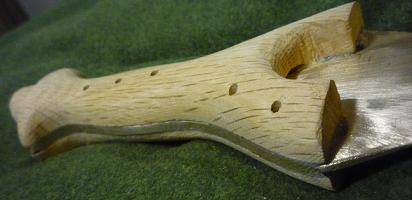
Bottom left is block of walnut and pommel cut from it. Center is the blade (duh). Bottom right are the scales and a sliver i cut off of one of the scales to make it thinner initially. The scales where cut from the log of Hornbeam pictured top. I used a hatchet and hammer to split relatively flat rough boards from the log. I then planed one side completely flat, drew on the pattern and scroll sawed them out. Shaped and voila.
I plan to rivet the scales onto the tang with bronze boat nails... should I anneal them first? If so any pointers?
 Attachment: 47.64 KB Attachment: 47.64 KB
Attachment: 24.18 KB
|
|
|
|
|
|
Jeroen Zuiderwijk
Industry Professional
|
| Posted: Tue 05 Jan, 2010 12:53 pm Post subject: |
|
|
| Luke Zechman wrote: | Picture:
Bottom left is block of walnut and pommel cut from it. Center is the blade (duh). Bottom right are the scales and a sliver i cut off of one of the scales to make it thinner initially. The scales where cut from the log of Hornbeam pictured top. I used a hatchet and hammer to split relatively flat rough boards from the log. I then planed one side completely flat, drew on the pattern and scroll sawed them out. Shaped and voila.
I plan to rivet the scales onto the tang with bronze boat nails... should I anneal them first? If so any pointers? |
Yes, anneal them just to make sure they're as soft as possible. N.b. it's too late now, but it's best to drill the holes through the scales before shaping them completely, as the drill will chip some wood as it goes through the other end. In this case, just make sure to have another piece of wood pressed against the back where the drill comes through, which reduces the chipping. Also, it's best to scotch tape the first scale on the handle, drill one hole, place a locating pin (another drilbit of identical size, or the rivets f.e.), drill the second on the opposite end, place another pin and then drill the rest. Next scotch tape the second scale onto it as well, and use the holes on the other side as guides, and press the locating pins through both scales. Otherwise it may be near impossible to get all the pins in, without haveing to oversize the holes. When you peen the rivets, use a ballpeen hammer and gently tap down the edges (don't compress the entire rivet, or it will bend and split the wood). I'm assuming the rivets you mention already have a head on one side? That will make things easier. Also, when riveting, it's best to have allt he rivets already in the holes, and the pommel attached, so you will be sure everything will fit together.
Jeroen Zuiderwijk
- Bronze age living history in the Netherlands
- Barbarian metalworking
- Museum photos
- Zip-file with information about saxes
|
|
 |
|
Thom R.

|
| Posted: Tue 05 Jan, 2010 1:27 pm Post subject: |
|
|
I have a Halstatt sword from Neil. Love it. tr

|
|
|
|
|
|
Luke Zechman
Location: Lock Haven Pennsylvania Joined: 18 Jan 2009
Posts: 278
|
| Posted: Tue 05 Jan, 2010 2:08 pm Post subject: |
|
|
|
Thanks for the advice Jeroen. By the time you posted I had already done it and well let me just say it was a disaster. I finished it and it looks ok I guess, but I think eventually I will be stripping it down and redoing it. I actually hand drilled each scale individually, and getting things to match was HELL! Oh well you live and learn. The next time I do it I have confidence that I will be able to do it very well. I get in a hurry and want something done NOW! It is my biggest fault with these things.
|
|
|
|
|
|
Jeroen Zuiderwijk
Industry Professional
|
| Posted: Tue 05 Jan, 2010 2:43 pm Post subject: |
|
|
| Luke Zechman wrote: | | Thanks for the advice Jeroen. By the time you posted I had already done it and well let me just say it was a disaster. I finished it and it looks ok I guess, but I think eventually I will be stripping it down and redoing it. I actually hand drilled each scale individually, and getting things to match was HELL! Oh well you live and learn. The next time I do it I have confidence that I will be able to do it very well. I get in a hurry and want something done NOW! It is my biggest fault with these things. |
Yep. That's the most important thing to learn when doing these things: patience, and taking the time to do things  Then consider that they did all these things in the bronze age without basically all the tools we use now (spiral drill bits, files, rasps, sandpaper, even single edge knives were not part of the toolkit of those who made the Ewart Park swords!). Then consider that they did all these things in the bronze age without basically all the tools we use now (spiral drill bits, files, rasps, sandpaper, even single edge knives were not part of the toolkit of those who made the Ewart Park swords!).
Jeroen Zuiderwijk
- Bronze age living history in the Netherlands
- Barbarian metalworking
- Museum photos
- Zip-file with information about saxes
|
|
|
|
|
|
Eric Lu
|
| Posted: Wed 06 Jan, 2010 1:12 pm Post subject: |
|
|
The left sword is my Type G from Neil, next to it is the Dave Chapman leaf blade and Mike Kasner dagger. I have since ground away the center ridge in the hilt portion of the Type G. Neil's sword just feels more lively in the hand.

|
|
|
|
|
|
Matthew Amt
|
| Posted: Wed 06 Jan, 2010 2:33 pm Post subject: |
|
|
Eek, sorry to hear it didn't go well, Luke! Patience is just about the most important tool in your toolbox--and please lemme know if you come across any to spare since I've never had any! Post some photos, it might not be a total loss. Half of mine are off-center or have cracks or splits, but then half the originals do, too.
I drill my holes just like Jeroen describes. However, I don't anneal my rivets and usually it's no problem. I'm always concerned that the shank of a longer rivet will get too soft and bend more easily instead of peening straight.
Eric, nice spread! Can you tell us more about the Bronze Age Foundry/Dave Chapman sword? I haven't seen any pieces by him up close and would love to know how they compare to Neil. (It's almost not fair, EVERYthing gets compared to Neil's work these days! But he's certainly earned his reputation.)
Khairete,
Matthew
|
|
|
|
|
|
Eric Lu
|
| Posted: Wed 06 Jan, 2010 4:08 pm Post subject: |
|
|
Hi Matthew! I purchased the Dave Chapman sword a few years ago and it was my first bronze sword. It came unfinished but cleaned up from the mold, with filed edges as well ( I don't think it was work hardened). Overall I would say it's pretty nice, and wasn't very expensive either. After recently receiving the Type G from Neil, I think Neil's sword just feels more "Alive" in the hand, better balance, and lighter. But of course the Type G and Dave's leaf blade are very different designs so it's hard to compare stats. Personally I think Neil's blades look more "handmade" and with more attention to detail put into the creation of his blades. I really love Neil's work a lot, but it took a while for me to pick up my first one! Dave's sword is a great value still, but I would say Neil's sword is more refined.
I hope people post more pictures of their bronze swords....It's really nice to see them from different angles and light!
|
|
|
|
|
|
Luke Zechman
Location: Lock Haven Pennsylvania Joined: 18 Jan 2009
Posts: 278
|
| Posted: Thu 07 Jan, 2010 2:42 pm Post subject: |
|
|
Made up my mind that I will be redoing to scales on the sword. There are a lot of things about the ones I had done first that bug me. The grain of the wood for one is pretty ugly, although I am sure it would hold up as a handle being Hornbeam and all. I know I can do the rivet hole and rivets better. I am just going to take it one step at a time. Also I am going to work the surface of the blade and get it to a near finished texture before I attach the scales. Also at least at this point I know I can make a sturdy handle... this this is hard to get apart!
Jeroen... any suggestions on wood to use for the scales and pommel?
|
|
|
|
|
|
Jeroen Zuiderwijk
Industry Professional
|
| Posted: Fri 08 Jan, 2010 12:00 am Post subject: |
|
|
| Luke Zechman wrote: | Made up my mind that I will be redoing to scales on the sword. There are a lot of things about the ones I had done first that bug me. The grain of the wood for one is pretty ugly, although I am sure it would hold up as a handle being Hornbeam and all. I know I can do the rivet hole and rivets better. I am just going to take it one step at a time. Also I am going to work the surface of the blade and get it to a near finished texture before I attach the scales. Also at least at this point I know I can make a sturdy handle... this this is hard to get apart!
Jeroen... any suggestions on wood to use for the scales and pommel? |
Well, hornbeam is a pretty good one IMO., so maybe you just need a different piece? But if you want something else:
- ash: similar in color and appearance as hornbeam, but much coarser in structure
- apple: very nice redbrown and mirroring effects (in the bronze age only crab apple would have been available)
- box: very nice yellow wood with looking great grain
- yew: most beautiful wood that definately was available and used in the bronze age. Downside, it splits really easily. Other downside, I personally get very severe asthmatic reactions that last months from the dust from it, so I had to completely stop using it.
- cherry: nice red colored wood
Here you can find more native trees in the UK: http://www.twigs.org.uk/nativetrees.htm
Also remind that in nearly all woods that occur both in Europe and US, the European variaties are much lighter in color.
Jeroen Zuiderwijk
- Bronze age living history in the Netherlands
- Barbarian metalworking
- Museum photos
- Zip-file with information about saxes
|
|
|
|
|
David Cooper

|
| Posted: Fri 22 Jan, 2010 2:32 pm Post subject: |
|
|
I got my first Neil Burridge sword recently. The Limehouse. I cannot sing his praises highly enough. A wonderful sword and Neil is great to deal with.I've done some work on the hilt components Neil supplied and have just about finished the sword and will be working on a scabbard. I cannot compete with some of the artistry and workmanship dispalyed on this site but I am pleased with my efforts and would like to share them.


The hilt inserts are ivory or bone from old piano key tops. I'm not sure how authentic this sort of inlay would be but I like the appearance. 
The journey not the destination
|
|
|
|
|
|
Luke Zechman
Location: Lock Haven Pennsylvania Joined: 18 Jan 2009
Posts: 278
|
| Posted: Fri 22 Jan, 2010 2:48 pm Post subject: |
|
|
|
David.... WOW! That looks beautiful, and thanks for sharing. I have put my Ewart Park aside for a while. What type of wood did you use for the scales? I really like the inlay and wanted to do some of that on my hilt as well, but was concerned about historical accuracy. Either way it looks fantastic. Thanks again for sharing!!!
|
|
|
|
|
David Cooper
|
| Posted: Fri 22 Jan, 2010 3:28 pm Post subject: |
|
|
Luke
Neil supplied the hilt and pommel blanks, they are oak.
The journey not the destination
|
|
|
|
|
|
Eric Lu
|
| Posted: Fri 22 Jan, 2010 4:19 pm Post subject: |
|
|
|
wow I love the contrast inserts in the hilt provide. Beautiful sword! Must be a great feeling to finish a wonderful sword like that
|
|
|
|
|
|
Matthew Amt
|
| Posted: Sat 23 Jan, 2010 3:24 pm Post subject: |
|
|
| David Cooper wrote: | | ...I cannot compete with some of the artistry and workmanship dispalyed on this site... |
That's what you may think, friend, but you just raised the bar for the rest of us! Very cool work, congrats.
Matthew
|
|
|
|
|
Alain D.

|
| Posted: Sun 24 Jan, 2010 6:00 am Post subject: |
|
|
Wow, that looks great David!
What kind of work or tools are required to finish one of Neil's unfinished swords?
-Alain
|
|
|
|
|
David Cooper
|
| Posted: Sun 24 Jan, 2010 12:32 pm Post subject: |
|
|
| Alain D. wrote: |
What kind of work or tools are required to finish one of Neil's unfinished swords?
-Alain |
Well I know that Dremels were an expensive luxury during the bronze age but I'm afraid that was my most useful tool. Other wise a woodworking gouge, kraft knife, vise and ball pein hammer. I also cheated and used modern glue to secure the hilt scales prior to peening the rivets. A useful tip I read about somewhere was to use a small wooden wedge in the rear of the hilt prior to tapping in the pomel. This means the end of the hilt expands into the pomel, holding it securely.


The journey not the destination
|
|
|
|
|
|
Luke Zechman
Location: Lock Haven Pennsylvania Joined: 18 Jan 2009
Posts: 278
|
| Posted: Wed 27 Jan, 2010 8:31 pm Post subject: |
|
|
Made two scales... attached them... removed them (wanted to do a better job)... made two more scales... attached one and messed up the first drilled rivet hole... removed it... made one more scale... I finally achieved a satisfactory job. Five scales later!!!  I still need to shape the handle to have a more oval shape, rivet (yikes I hope I done split anything) , and shape and attach a pommel. sand and soak in linseed. So I wanted to do some inlay on the pommel. I had a question... was there any ever any evidence of inlay on these. I really like the look of David's, and have been looking for a reason to do inlay forever it seems. I wasn't going to do the same thing of course. Also I wanted to do a carving in bone to inlay and need to see some bronze age designs (period art) for inspiration. Any ideas would be awesome. I still need to shape the handle to have a more oval shape, rivet (yikes I hope I done split anything) , and shape and attach a pommel. sand and soak in linseed. So I wanted to do some inlay on the pommel. I had a question... was there any ever any evidence of inlay on these. I really like the look of David's, and have been looking for a reason to do inlay forever it seems. I wasn't going to do the same thing of course. Also I wanted to do a carving in bone to inlay and need to see some bronze age designs (period art) for inspiration. Any ideas would be awesome.
The handle is of red oak... maybe not historical, but it will have to do. I hand drilled the holes, and seconds later my buddy asked me if I wanted to use the drill press in the basement!!! Oh well they are straight.
Attachment: 28.37 KB
|
|
|
|
|
|
Jeroen Zuiderwijk
Industry Professional
|
| Posted: Thu 28 Jan, 2010 12:31 am Post subject: |
|
|
| Luke Zechman wrote: | | Made two scales... attached them... removed them (wanted to do a better job)... made two more scales... attached one and messed up the first drilled rivet hole... removed it... made one more scale... I finally achieved a satisfactory job. Five scales later!!! I still need to shape the handle to have a more oval shape, rivet (yikes I hope I done split anything) , and shape and attach a pommel. sand and soak in linseed. So I wanted to do some inlay on the pommel. I had a question... was there any ever any evidence of inlay on these. |
Nope, no evidence of inlays. Of british/irish swords there are actually very few examples with any organic remains though, about three with hilt plates (horn and probably bone), one with a pommel (wood). Most evidence of the hilts comes from metal hilts or hilt parts.
Jeroen Zuiderwijk
- Bronze age living history in the Netherlands
- Barbarian metalworking
- Museum photos
- Zip-file with information about saxes
|
|
|
|
|
|
|

