| Author |
Message |
|
Alex Indman
|
 Posted: Sun 25 Nov, 2018 7:28 pm Post subject: My first Bauernwehr! Posted: Sun 25 Nov, 2018 7:28 pm Post subject: My first Bauernwehr! |
 |
|
Hi guys,
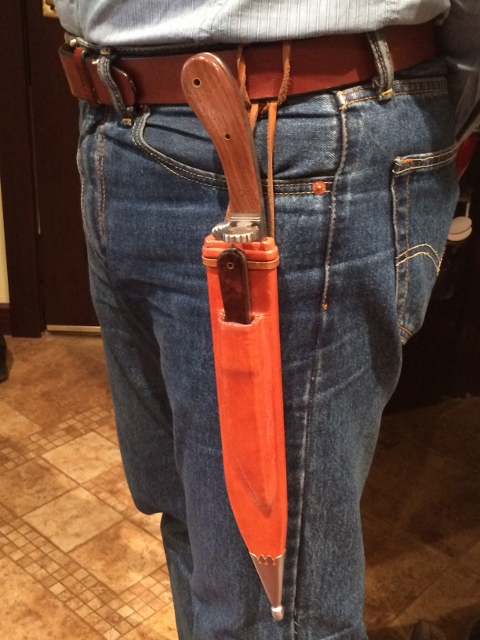
I finally finished my first Bauernwehr project! I used inexpensive but reasonably good quality Atlanta Cutlery blades, with some modifications and re-profiling, as discussed here: http://myArmoury.com/talk/viewtopic.php?p=332735#332735 (Companion for main and Small Hunter for by-knife).
All metal fittings for knives and scabbard are fabricated from 1018 mild steel.
Scabbard has poplar wood core, thick leather sheath for by-knife, covered with some thin stretchy leather I had left over from another project.
Suspension is facilitated by a riser close to the throat, allowing for hanging to the belt with any kind of leather thong (which I did) or cord, etc. I got this idea from a thread here a couple weeks ago (it was about Rondel suspension I think).
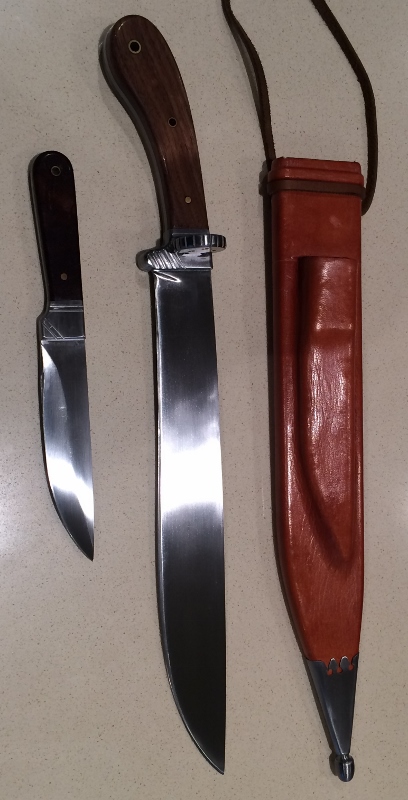
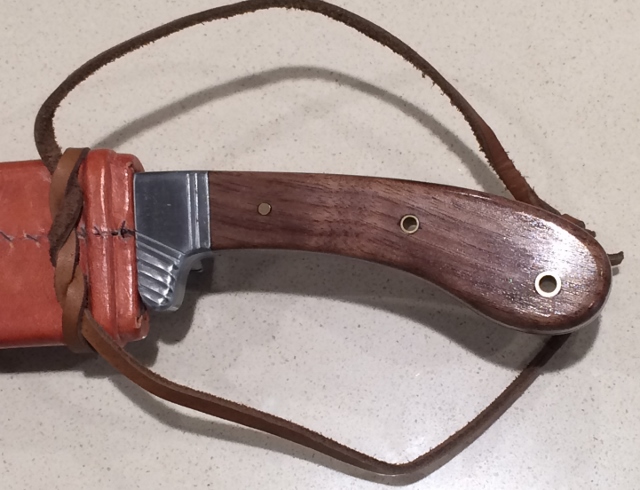
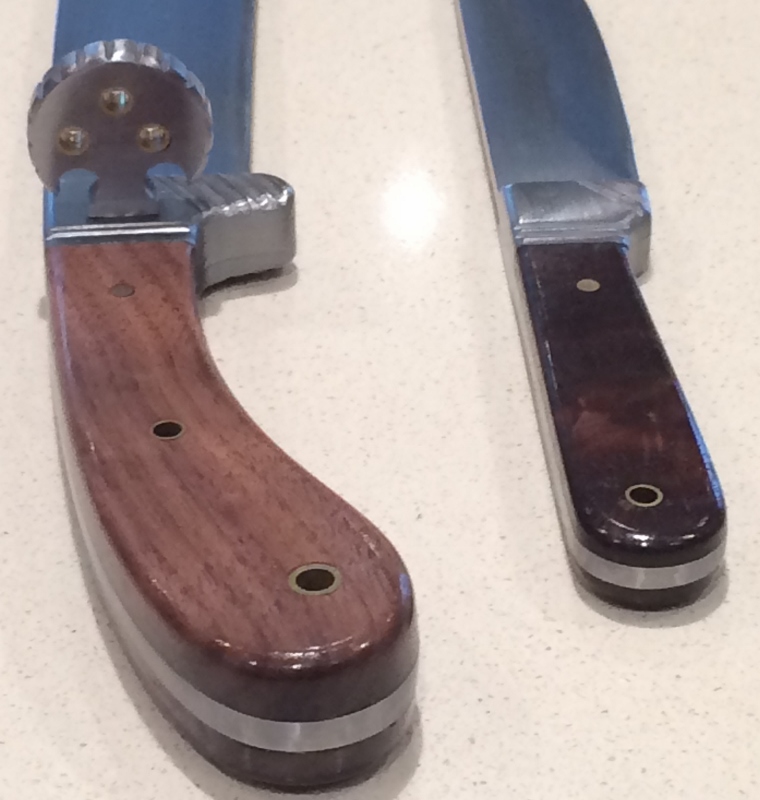
Baurnwehr blade is a bit over 10 1/2" long, 1 3/8" at the widest point, 3/16" thick at the base with surprisingly nicely done distal taper. I got it to 600 grit satin finish and almost razor sharp. Should slice like crazy with this shape, chop as well as could be expected of a blade this length, and stab too if required (not against armor of course).
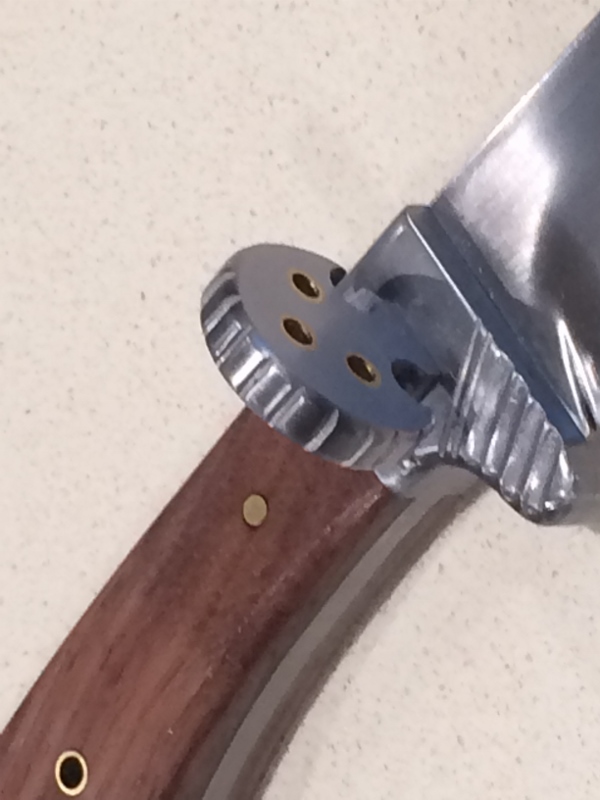
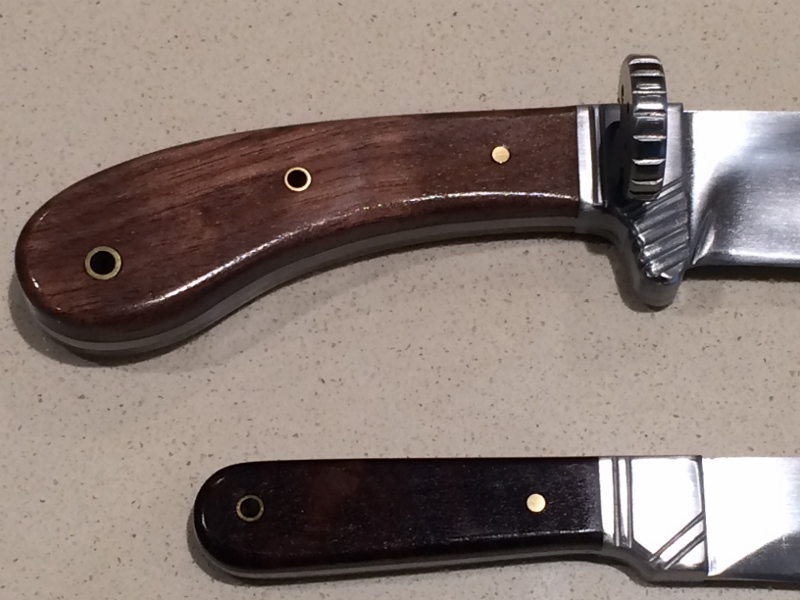
Handle 5" long, with both bolsters and nagel decorated with some file work (nagel also has 3 decorative holes with 3/16" brass tubing inserted). Walnut scales finished with tung oil, held on with epoxy and 3 brass pins: 1/8 pin, 3/16" tube, 1/4" tube (I think increasing pin diameters look nice with widening handle). Feels comfortable and very secure in "hammer" grip, and surprisingly even better in "saber" grip.
By-knife blade is pretty substantial at 1/8" thick, 4 1/2 " long. 7/8" at the widest point.
Handle relatively small (just over 3 1/2" long) but pretty comfortable. Also it is possible to choke up on it for better control by placing index finger over bolsters at the base of the blade. Due to the unusual grind shape on this blade, the first 3/4" is completely not sharpened but the rest is very sharp, especially the "belly" part. Finished to 600 grit satin finish, like the main blade.
Bolsters have simple file work decoration, partially matching Bauernwehr's.
Scales are made from some leftover "walnut burl" I had. They are not stained, application of tung oil just turned them very dark brown, as opposed to the much lighter color of the new plain walnut scales I bought for the Bauernwehr... Pinned with brass 1/8" pin and 3/16" tube.
I put up better quality pictures in an album here: https://public.fotki.com/aindman/bauernwehr-with-atl/
Attaching small versions of some the pictures in hopes that they will show up in the post without requiring downloads.
Let me know what you think. Would love some discussion and suggestions for future Bauernwehr projects!
 Attachment: 187.91 KB Attachment: 187.91 KB
Attachment: 182.53 KB
Attachment: 146.74 KB
Attachment: 200.23 KB
Attachment: 166.63 KB
Attachment: 197.04 KB
|
|
  |
 |
Leo Todeschini
Industry Professional

|
|
 |
|
Jean Thibodeau

|
| Posted: Mon 26 Nov, 2018 1:14 pm Post subject: |
|
|
Nice work, I like than handle shape is looks comfortable and secure in hand.
The file work is also nice as well as the leather work.
You can easily give up your freedom. You have to fight hard to get it back!
|
|
|
|
|
|
Alex Indman
|
| Posted: Tue 27 Nov, 2018 11:12 am Post subject: |
|
|
| Leo Todeschini wrote: | Fantastic job - well done and shows how good a result you can get with a repurposed blade.
Tod |
Tod, thanks for the compliment! Coming from you, it means a lot to me. I believe you make the best modern bauernwehrs (not to mention lots of other great stuff, of course). Actually, seeing some of your bauernwehrs first triggered my interest in this type of knives.
Alex.
|
|
|
|
|
|
Alex Indman
|
| Posted: Tue 27 Nov, 2018 12:53 pm Post subject: |
|
|
| Jean Thibodeau wrote: | Nice work, I like than handle shape is looks comfortable and secure in hand.
The file work is also nice as well as the leather work. |
Thanks Jean, appreciate the comment.
About the handle shape - it is comfortable indeed, but I get a feeling it would have been even better with a straighter back, close to inline with the blade, like all the originals I have seen seem to be. I guess people back then knew what they were doing...
BTW, the file work was surprisingly hard to keep parallel and evenly spaced (and it's not like I picked up a file for the first time in my life). It was an interesting project for me, tried a couple new techniques in it.
Alex.
|
|
|
|
|
Harry Marinakis

|
| Posted: Sun 02 Dec, 2018 5:32 pm Post subject: |
|
|
Bravo
I'd like to see/hear more about how you made the chape
Firesteel Designs
Hand-crafted good lovingly infused with hemoglobin
|
|
|
|
|
|
Alex Indman
|
| Posted: Mon 03 Dec, 2018 7:54 am Post subject: |
|
|
| Harry Marinakis wrote: | | I'd like to see/hear more about how you made the chape |
Harry,
unfortunately I don't have any step by step pictures of making the chape. Basic process was:
- cut out a pattern from thin 1018 steel sheet;
- bend it to shape and fit so that the joint is up the middle on the back. Shape the point end around 1/4" steel rod so it has round 1/4" opening;
- solder the joint, cut to final shape top and bottom ends;
- make the ovoid "finial" out of a piece of 1018 steel rod. One end taken down to 1/4" diameter so it fits tight into opening of sheet metal part. I made it mostly by clamping the part in my drill press, running at medium speed and holding files/sandpaper to it. With a lathe, would have been much simpler.
- insert the "finial" and solder it in place.
- clean up solder joints and finish all over.
Alex.
|
|
|
|
|
|
|
You cannot post new topics in this forum
You cannot reply to topics in this forum
You cannot edit your posts in this forum
You cannot delete your posts in this forum
You cannot vote in polls in this forum
You cannot attach files in this forum
You can download files in this forum
|
All contents © Copyright 2003-2026 myArmoury.com — All rights reserved
Discussion forums powered by phpBB © The phpBB Group
Switch to the Basic Low-bandwidth Version of the forum
|

