Info Favorites Register Log in
myArmoury.com Discussion Forums

Forum index Memberlist Usergroups Spotlight Topics Search


myArmoury.com is now completely member-supported. Please contribute to our efforts with a donation. Your donations will go towards updating our site, modernizing it, and keeping it viable long-term.
Last 10 Donors: Anonymous, Daniel Sullivan, Chad Arnow, Jonathan Dean, M. Oroszlany, Sam Arwas, Barry C. Hutchins, Dan Kary, Oskar Gessler, Dave Tonge (View All Donors)

Forum Index > Historical Arms Talk > Cinquedea reproductionDIY Project Reply to topic
This is a standard topic Go to page 1, 2  Next 
Author Message
Martin Moser


Joined: 13 Feb 2014
Likes: 1 page

Posts: 43

PostPosted: Sun 24 Apr, 2016 11:05 am    Post subject: Cinquedea reproduction         Reply with quote

Hello all,

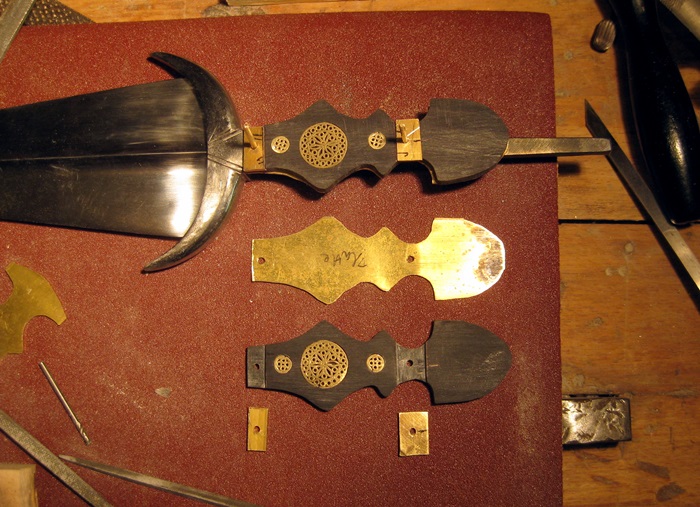
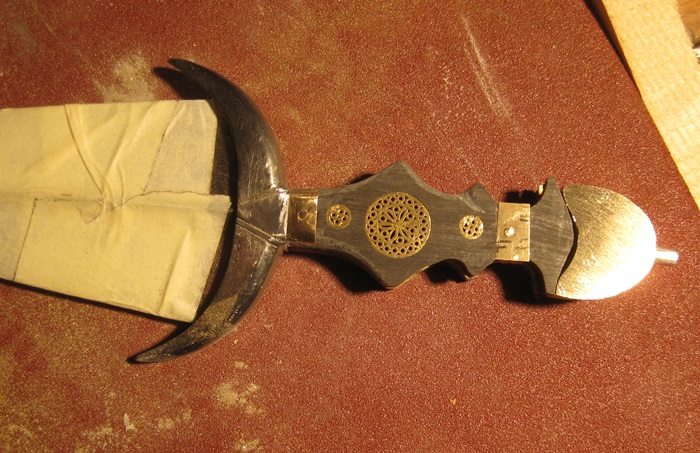
a bit of a progress report on a Cinquedea I'm working on for my early 16th century Landsknecht thingy. I got a blade made after an orignal sold in an auction and am now in the progress of making the elements that decorate the hilt after doing the crossguard.
I'm shaping the hilt after an original in the Met: http://www.metmuseum.org/art/collection/searc...nformation

Cheers,
Martin


 Attachment: 384.26 KB
[ Download ]

 Attachment: 422.07 KB
[ Download ]

 Attachment: 329.24 KB
[ Download ]

Cheers,
Martin

https://www.facebook.com/leatherworkthroughtheages/
View user's profile Send private message Visit poster's website
M. Adair Orr


Joined: 26 Jan 2004

Posts: 97

PostPosted: Mon 25 Apr, 2016 10:34 am    Post subject:         Reply with quote

Great work so far. I love the brass inserts.

-A.
View user's profile Send private message
Juan Federico Gonzalez


Location: NW Arkansas
Joined: 18 May 2014
Likes: 4 pages

Posts: 19

PostPosted: Wed 27 Apr, 2016 12:52 pm    Post subject: Nice!         Reply with quote

That's looking really good.
One of the most horrible features of war is that all the war-propaganda, all the screaming and lies and hatred, comes invariably from people who are not fighting.

George Orwell - Homage to Catalonia
View user's profile Send private message
Martin Moser


Joined: 13 Feb 2014
Likes: 1 page

Posts: 43

PostPosted: Sun 01 May, 2016 11:59 am    Post subject:         Reply with quote

Most of the pieces that make up the hilt are done and ready for assembly:


 Attachment: 167.3 KB
IMG_3043.JPG


Cheers,
Martin

https://www.facebook.com/leatherworkthroughtheages/
View user's profile Send private message Visit poster's website
Julien M


Location: Austin TX
Joined: 14 Sep 2005

Spotlight topics: 1
Posts: 1,086

PostPosted: Tue 03 May, 2016 6:22 am    Post subject:         Reply with quote

Not a single comment?
This is great work, especially for an amateur (I remember your previous projects well). Keep it up, and keep documenting this!
Cheers,
J
View user's profile Send private message
M. Adair Orr


Joined: 26 Jan 2004

Posts: 97

PostPosted: Tue 03 May, 2016 7:39 am    Post subject:         Reply with quote

Again, excellent work.

I'm curious about a couple details. You've cut out the profile of the grip in wood, but the image shows a faily large pommel. Is that pommel solid or a cap? Similar question about the brass bands that you have prepped for inlay into the wood grip; on the original are they set into the flat of the grip only, or do they collar the entire perimeter?

I can't wait to see this grip in someones hand. The design looks like such an ungainly thing to hold, but I know there is good logic to it. Hopefully you can provide a photo when you are done.

-Adair
View user's profile Send private message
Martin Moser


Joined: 13 Feb 2014
Likes: 1 page

Posts: 43

PostPosted: Tue 03 May, 2016 12:48 pm    Post subject:         Reply with quote

Thanks for the comments :-)

M. Adair Orr wrote:
I'm curious about a couple details. You've cut out the profile of the grip in wood, but the image shows a faily large pommel. Is that pommel solid or a cap?


I *think* it is a sort of cap from what I can make out of the pics I have, but after a bit of experimenting (and because of lack of time, need to finally get this one ready) I decided to do it solid. Which means I will need to cut back the end of the pommel. Material is blackish horn btw. as with the original.

Quote:
Similar question about the brass bands that you have prepped for inlay into the wood grip; on the original are they set into the flat of the grip only, or do they collar the entire perimeter?


They are set in only. At the moment they are oversized and will be cut/filed back considerably along with the shaping of the horn hilt plates

Quote:
I can't wait to see this grip in someones hand. The design looks like such an ungainly thing to hold, but I know there is good logic to it. Hopefully you can provide a photo when you are done.


Well observed and my opinion as well. It also is fairly small, I measured the original and its proportions repeatedly and that's what is really is. And yes, I'll provide more updates over the next few days!

Cheers,
Martin

https://www.facebook.com/leatherworkthroughtheages/
View user's profile Send private message Visit poster's website
Gregg Sobocinski


Location: Michigan
Joined: 21 Sep 2007
Likes: 5 pages
Reading list: 12 books

Posts: 170

PostPosted: Wed 04 May, 2016 7:16 pm    Post subject:         Reply with quote

I'm waiting for the completion of this project. The simple blade attracts me more than the more common, multi-fullered blades. Could end up being a new favorite look for the type!
View user's profile Send private message
Martin Moser


Joined: 13 Feb 2014
Likes: 1 page

Posts: 43

PostPosted: Thu 05 May, 2016 11:44 am    Post subject:         Reply with quote

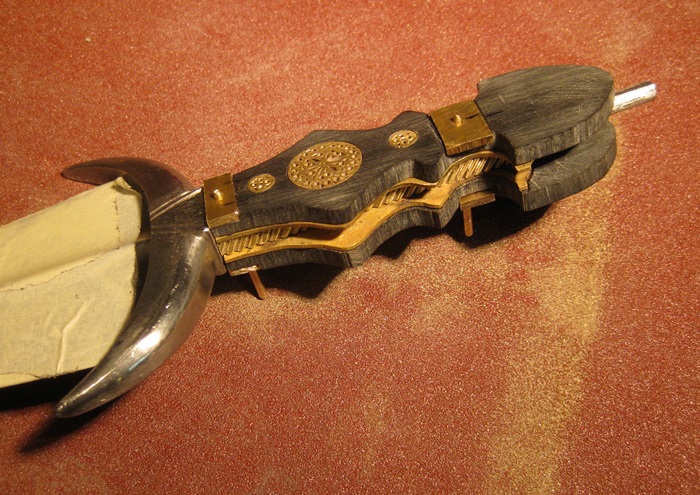
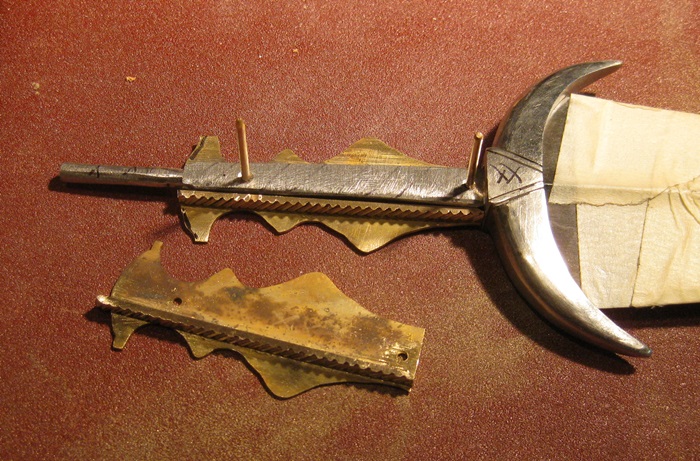
Some progress, I'm hoping to get the Cinquedea completed (without scabbard) this weekend. The side view shots give a view of the hilt construction, which is interesting IMHO in that it is kind of only semi-filled between the hilt plates.


 Attachment: 167.14 KB
IMG_3053.JPG


 Attachment: 185.92 KB
IMG_3049.JPG


 Attachment: 177.27 KB
IMG_3045.JPG


Cheers,
Martin

https://www.facebook.com/leatherworkthroughtheages/
View user's profile Send private message Visit poster's website
Martin Moser


Joined: 13 Feb 2014
Likes: 1 page

Posts: 43

PostPosted: Sat 07 May, 2016 12:41 pm    Post subject:         Reply with quote

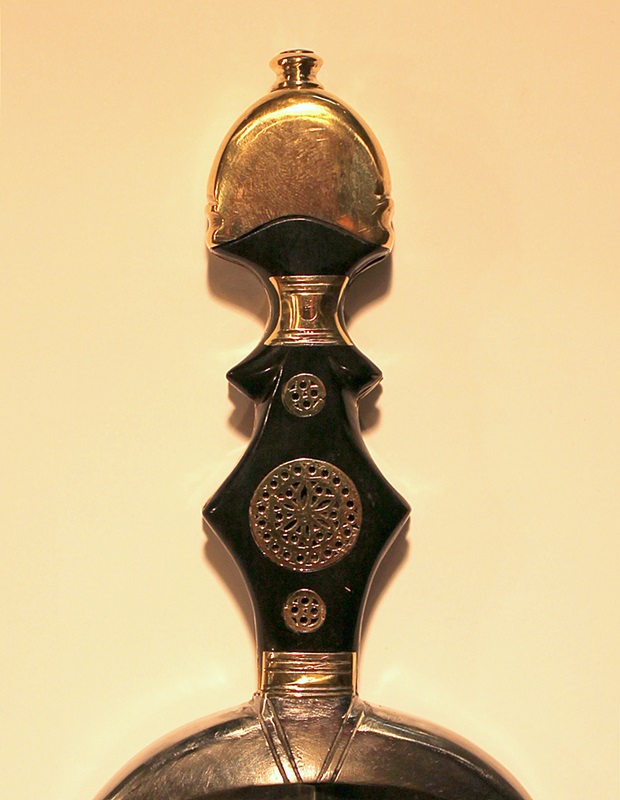
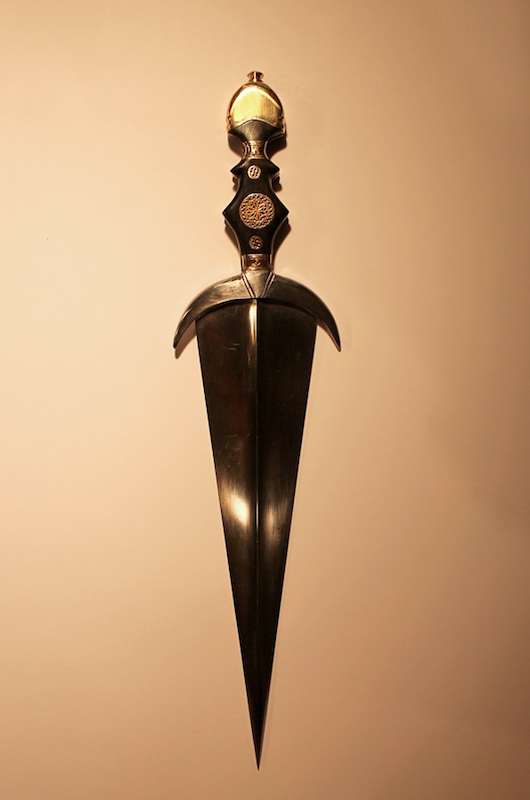
Hours of filing, sanding, cursing and sweating later ... almost ready except for the engraving of the pommel. I'm very much in love with the shape and proportions of this weapon. And, like the originals it is modelled after, those little asymmetries and imperfections make it very lively - plus it puts it into my skill range ;-)

(why is it that some pics show up, while others only appear as a downloadable attachment?)


 Attachment: 114.45 KB
IMG_6588.JPG


 Attachment: 64.29 KB
IMG_6577.JPG


Cheers,
Martin

https://www.facebook.com/leatherworkthroughtheages/


Last edited by Martin Moser on Tue 10 May, 2016 6:09 am; edited 1 time in total
View user's profile Send private message Visit poster's website
Jeffrey Hildebrandt
Industry Professional


Location: Canada
Joined: 04 Jan 2012
Likes: 1 page
Reading list: 5 books

Posts: 163

PostPosted: Sun 08 May, 2016 6:43 pm    Post subject:         Reply with quote

Very nice so far, Martin!
Royal Oak Armoury Website
Royal Oak Armoury Facebook
View user's profile Send private message Visit poster's website
Juan Federico Gonzalez


Location: NW Arkansas
Joined: 18 May 2014
Likes: 4 pages

Posts: 19

PostPosted: Sun 08 May, 2016 8:34 pm    Post subject:         Reply with quote

That is looking really really nice
One of the most horrible features of war is that all the war-propaganda, all the screaming and lies and hatred, comes invariably from people who are not fighting.

George Orwell - Homage to Catalonia
View user's profile Send private message
Julien M


Location: Austin TX
Joined: 14 Sep 2005

Spotlight topics: 1
Posts: 1,086

PostPosted: Mon 09 May, 2016 3:21 am    Post subject:         Reply with quote

Very very impressed by your work on this piece - you made the all process look as easy as a walk in the park.
What kind of équipement do you have to silver solder? Looking Forward to see the scabbard too (most cinquedea scabbards I've seen in museum had exquisite leather carved renaissance motives - daunting!)
Thx,
Julien
View user's profile Send private message
Martin Moser


Joined: 13 Feb 2014
Likes: 1 page

Posts: 43

PostPosted: Mon 09 May, 2016 10:41 pm    Post subject:         Reply with quote

Thanks for the encouraging comments all :-)

Julien M wrote:
you made the all process look as easy as a walk in the park.


Be assured it did cost me a few nerves :-P

Quote:
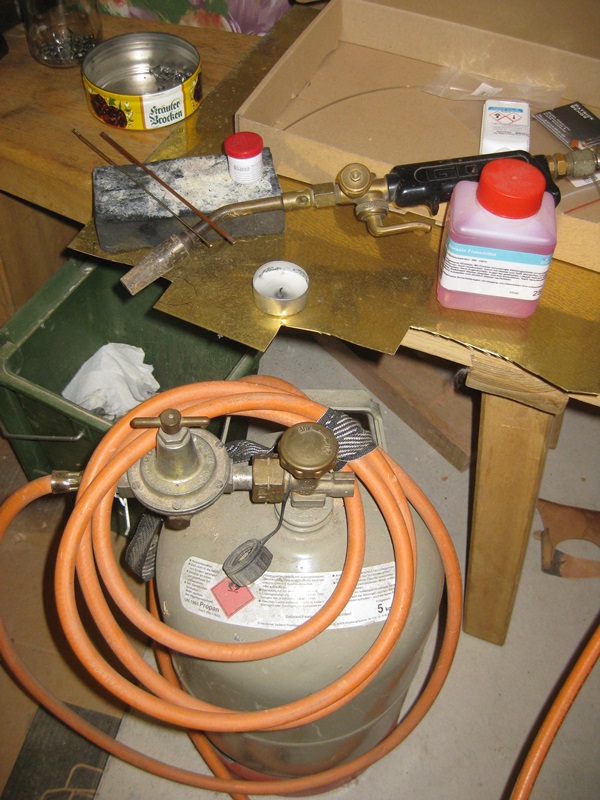
What kind of équipement do you have to silver solder?


Nothing special (see pic) except for one thing perhaps, which is a greyish silversolder paste I only recently discovered exists (http://www.bengs-modellbau.de/werkzeug/loetzubehoer/silberlotpaste-zum-hartloeten). Works pretty much like the pastes available for tinning if you know those. I found this very helpful brazing the rosettes that have almost 40 smallish pieces to it that I brazed to a bottom plate in one go. Since the actual solder is in the paste it can be applied very precisely. Worked really well for me.

Quote:
Looking Forward to see the scabbard too (most cinquedea scabbards I've seen in museum had exquisite leather carved renaissance motives - daunting!)


Indeed - will go to the State Library in Munich today to do some research on that, actually. In the meantime it's back to shoemaking ...


 Attachment: 184.24 KB
IMG_3055.JPG


Cheers,
Martin

https://www.facebook.com/leatherworkthroughtheages/
View user's profile Send private message Visit poster's website
Leo Todeschini
Industry Professional


Location: Oxford, UK
Joined: 12 Nov 2006
Likes: 1 page

Spotlight topics: 1
Posts: 1,731

PostPosted: Mon 09 May, 2016 11:02 pm    Post subject:         Reply with quote

That is a fantastic piece of work Martin, as Julien says "all the more impressive for a non-professional"

Really really stunning piece and as a shoe maker I have a fell that the scabbard will be a thing to see as well.

Really well done.

Tod

www.todsworkshop.com
www.todcutler.com
www.instagram.com/todsworkshop
https://www.facebook.com/TodsWorkshop
www.youtube.com/user/todsstuff1
View user's profile Send private message Visit poster's website
Nathan Robinson
myArmoury Admin


myArmoury Admin

PostPosted: Tue 10 May, 2016 1:00 am    Post subject:         Reply with quote

Martin Moser wrote:
(why is it that some pics show up, while others only appear as a downloadable attachment?)


http://myArmoury.com/talk/faq.php?mode=attach

.:. Visit my Collection Gallery :: View my Reading List :: View my Wish List :: See Pages I Like :: Find me on Facebook .:.
View user's profile Send private message Send e-mail Visit poster's website
Martin Moser


Joined: 13 Feb 2014
Likes: 1 page

Posts: 43

PostPosted: Tue 10 May, 2016 6:11 am    Post subject:         Reply with quote

Thanks for the kind words, Tod, all the more as they come from such an expert maker! :-)

Nathan - thanks for the pointer, that's the info I was looing for but was somehow too blind to find :-P 800x800 max, got it now!

Cheers,
Martin

https://www.facebook.com/leatherworkthroughtheages/
View user's profile Send private message Visit poster's website
Gregg Sobocinski


Location: Michigan
Joined: 21 Sep 2007
Likes: 5 pages
Reading list: 12 books

Posts: 170

PostPosted: Tue 17 May, 2016 7:09 pm    Post subject:         Reply with quote

I really like this sword! Nicely done! There is something about the adornments on the handle, paired with the simpler, single-rib blade that really works!
View user's profile Send private message
Martin Moser


Joined: 13 Feb 2014
Likes: 1 page

Posts: 43

PostPosted: Wed 29 Jun, 2016 1:18 pm    Post subject:         Reply with quote

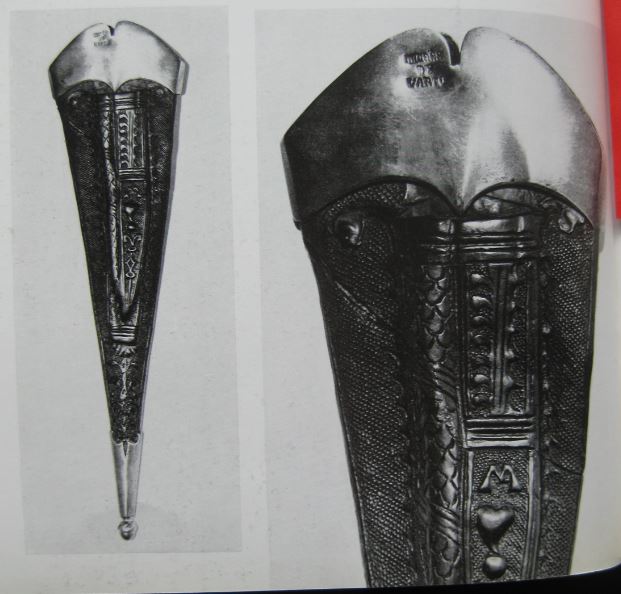
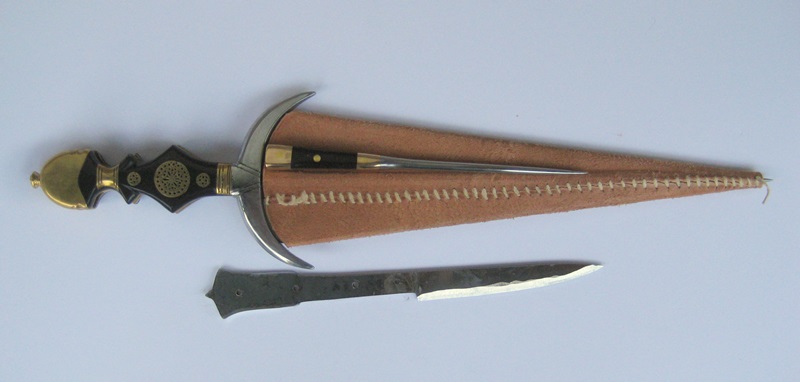
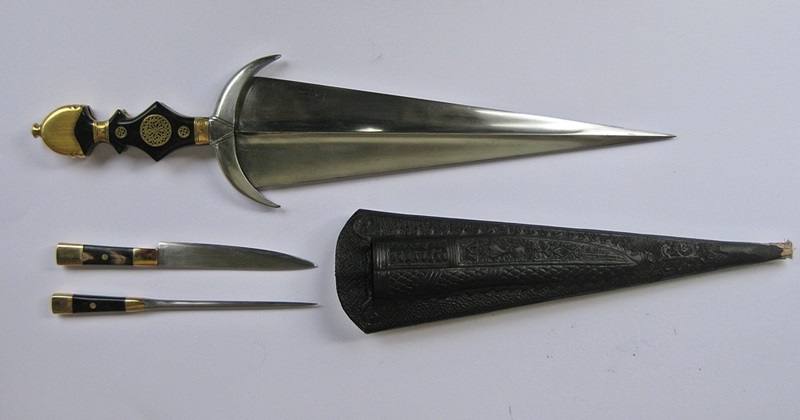
Picking it up again, I have decided on what type of scabbard to make for this cinquedea - I'm going to go with a scabbard from Armi Bianchi Italiane that has 2 by-knives, see below at bottom. The scabbard will not have the metal band at the top, which apparently is a modern addition.

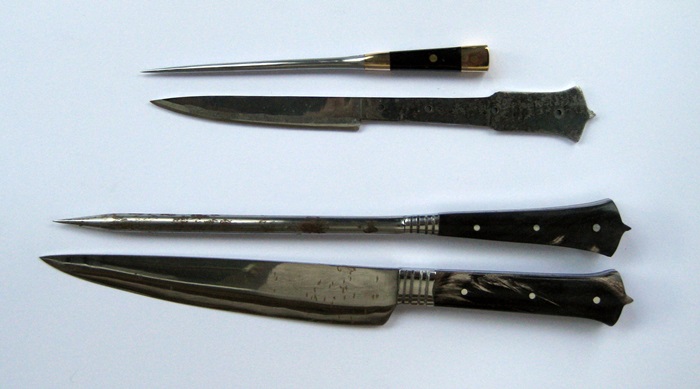
I have prepared the inner layer of the scabbard and am now working on the by-knives. The pick is done, started cutting and grinding the shape of the knife . For these I'm repurposing one of a few sets of cheap and very large knife and pick I bought years ago, see the before-after pics and how they are going to be placed on the scabbard.


 Attachment: 58.06 KB
Scabbard.JPG


 Attachment: 70.91 KB
IMG_3751.JPG


 Attachment: 62.58 KB
IMG_3752.JPG


Cheers,
Martin

https://www.facebook.com/leatherworkthroughtheages/
View user's profile Send private message Visit poster's website
Martin Moser


Joined: 13 Feb 2014
Likes: 1 page

Posts: 43

PostPosted: Mon 04 Jul, 2016 1:08 pm    Post subject:         Reply with quote

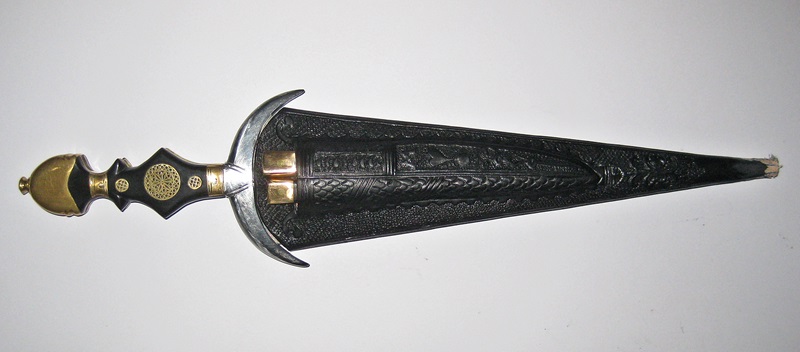
And another step ahead on the weekend - completed the sheath. 2 layer construction with stamping after a surviving original only slightly larger than mine. Next is the chape and then, finally engraving the pommel to finish the whole project off eventually.


 Attachment: 82.06 KB
IMG_3757.JPG


 Attachment: 75.5 KB
IMG_3754.JPG


Cheers,
Martin

https://www.facebook.com/leatherworkthroughtheages/
View user's profile Send private message Visit poster's website


Display posts from previous:   
Forum Index > Historical Arms Talk > Cinquedea reproductionDIY Project
Page 1 of 2 Reply to topic
Go to page 1, 2  Next All times are GMT - 8 Hours

View previous topic :: View next topic
Jump to:  
You cannot post new topics in this forum
You cannot reply to topics in this forum
You cannot edit your posts in this forum
You cannot delete your posts in this forum
You cannot vote in polls in this forum
You cannot attach files in this forum
You can download files in this forum


All contents © Copyright 2003-2024 myArmoury.com — All rights reserved
Discussion forums powered by phpBB © The phpBB Group
Switch to the Basic Low-bandwidth Version of the forum