A Resource for Historic Arms and Armour Collectors
A Resource for Historic Arms and Armour Collectors |
|
The Instant Antique: A Practical Guide
to Adding Antique Effects to Replica Arms An article by Sean A. Flynt The techniques described in this article are intended to add variety to a personal collection of replicas and momentarily fool the eye, not to help their user get away with fraud. Hopefully, as these and the countless other antiquing techniques become widely known in the arms and armor collecting community, we'll see fewer replicas sold as genuine antiques.
If you're worried that household dust might be dulling the shaving-sharp edge of your prized sword, read no further. Antiquing replica arms requires abusing them. Real, destructive corrosion is part of this process. Especially keep that fact in mind if you plan to use your replica for extensive test-cutting or western martial arts study. You don't want to discover in the middle of a martial flourish that your antiquing fatally weakened the tang of your sword, however unlikely that might be. Most of the techniques described here are at least partially reversible, but the more pronounced the antique effect, the harder it will be to undo. First try the techniques on an inexpensive replica or knife if you don't want to jump straight into the deep end of this pool. It's a bad idea to rub your bare hands vigorously over a sharp surface, so gauntlets or gardening gloves are essential for much of this work. You must also, at minimum, wear a dust mask when sanding and wear eye protection when working with stripper. As important as these safety measures are, they're only supplements to common sense and close attention. Learn as much as you can about original arms of the type you're working with in replica form. Seeing originals in varying states of preservation will give you good ideas about what authentic aging and conservation look like. Find examples in museum collections, auction catalogs and especially the myArmoury.com photo albums. Print color guide images and keep them in your work area. Steel Raven Armoury represents the gold standard for antiqued replica swords, so when I became interested in antiquing inexpensive replicas I asked Raven's Simon Fearnhamm for advice. He described a process of long-term burial, regular watering, periodic removal and examination and, finally, professional conservation. There's no arguing with Raven's stunning results, but their process of severe corrosion requires months or even years. Fortunately, many replica collectors have discovered that satisfying, if not perfectly convincing, results can be achieved in less than a week with apparatus no more complicated than a discarded spray bottle.
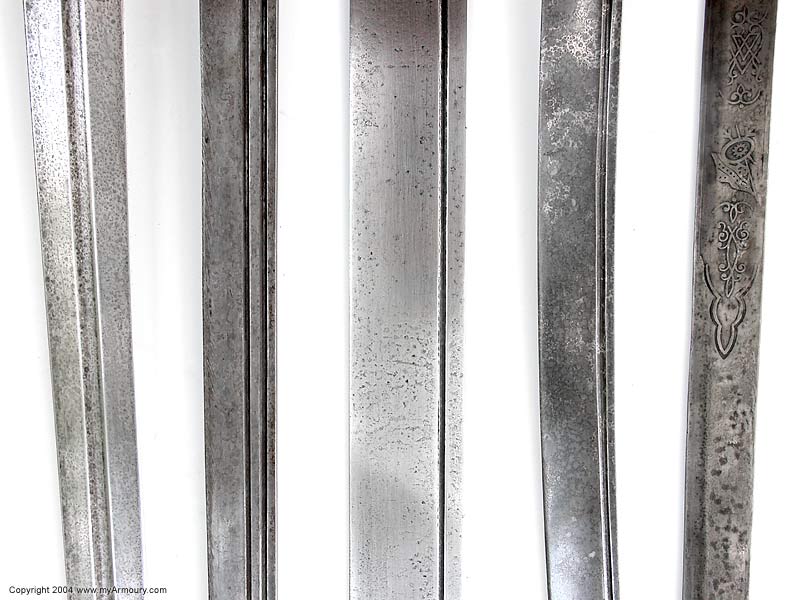
Start removing the lacquer either with a sanding sponge and various grades of sandpaper, or by applying Citristrip and then scrubbing the steel with Very Fine #00 steel wool. Depending on the thickness of the lacquer, the latter method may work and save you lots of sanding. If it doesn't work, you'll still have to sand and you'll also have to clean up the mess left by the stripper. In my experience, neither lacquer thinner nor Citristrip have much effect on the heavy lacquer found on many Windlass Steelcrafts (Museum Replicas Limited) blades, although Citristrip worked well on a lacquered brass Windlass hilt in my collection. If you sand the steel, the transition from the cloudy finish of the scratched lacquer to bright steel will let you know when to stop sanding. Whichever method you choose, wear a dust mask, eye protection and gloves, and sharpen the blade only after removing the lacquer. This also is a good time to add nicks or scratches to the blade, if you're so inclined. My fellow antiquers have accelerated the rusting of steel with everything from used cat litter to yellow mustard. Mild acid is the key factor in all such treatments, so feel free to experiment with various solutions. All the antiqued steel finishes shown here are the result of ordinary vinegar and salt applied with a spray bottle. This solution darkens the steel and produces pitting in direct proportion to the amount of time it's left on the steel. There's no scientific rigor involved in my rusting solution, much less a magic formula. My method is simply to combine the ingredients in random amounts and shake the bottle until the salt has dissolved. If you choose to work with this solution, spray it over all the steel, overlapping sprayed areas to ensure coverage, but not using so much solution that it pools and runs. The finer the mist you can get from the spray bottle, the better. Lean the sword against a wall so any excess solution will drain to the tip of the blade rather than down into the grip and pommel.
Repeat the rusting and cleaning cycles until you have the desired finish. Be sure to remove all reddish-brown rust, but leave the brown or black staining beneath. Hard-to-clean recessed areas such as pits, engravings and fullers will be significantly darker than the surrounding steel after cleaning, and will have much better definition than bright steel. Remember that the goal is not to have a long lump of red rust, but to have steel that looks like it has been neglected, then carefully cleaned and conserved. When you have the finish you want, wipe the replica clean and protect it with a preservative such as WD-40 or Renaissance Wax. Even with these treatments, the finish will darken and dim a bit over time, and you'll probably want to lightly polish the replica with steel wool from time to time to preserve its museum-piece glow. Brass Note: If antiquing a sword with a brass hilt, be sure to antique the blade first. Otherwise you're going to discover, as I did, that vinegar makes an effective brass cleaner. Antique brass is rich and buttery, and the effect is very easily achieved with ammonia fuming. For this process, which produces a deep and durable patina, you'll need a large bucket, a large plastic trash bag and ordinary ammonia.
You won't often see pristine brass on original arms because the soft metal is susceptible to knocks and scrapes. Roll your brass around on a cement driveway for a few seconds and you'll give it similar character. Use steel wool or mild sandpaper to soften the contours of the resulting pits and scratched areas. Once the brass is cleaned and distressed you need to somehow suspend it over a pool of ordinary ammonia. A cat litter bucket with a hinged lid served as my fuming chamber, but anything similar will work. Holding your breath, pour ammonia into the bucket; one half-inch of fluid should be sufficient. Get away from the bucket, breathe again and, if applicable, thrust your replica sword through the end of the trash bag from the inside. Balance and secure the brass hilt over the bucket (this is where a lid becomes handy) and draw the bag down over the bucket. Small brass items such as furniture tacks and hilts separated from their blades should be easier to fume because they can simply rest on a chicken wire or mesh platform inside the covered bucket. There's no need to make your fuming chamber air-tight, and I found that sealing it too well allows ammonia to condense on the brass and create irregular dark spots. Take care not to dip the brass in the ammonia or you'll see a similar but more pronounced effect. You may like the resulting stains, but they're easily polished out if you don't. Let the brass fume for at least 24 hours. Upon removal from the fuming chamber, it will be a sickly, hazy, greenish-blue color. Very gently clean it all over with the steel wool and you'll quickly see a glossy golden patina, possibly with some darker areas where ammonia has condensed. Work slowly! It's much easier to do a bit more cleaning than to re-fume an over-cleaned surface. Recessed areas, including pits and scratches, will remain dark after the cleaning, and another day of fuming and cleaning will leave those areas a beautiful brown-gold against the cleaned highlights. Repeated fuming and cleaning will create a more convincing finish. Light green verdigris may develop in some areas soon after fuming. Verdigris is toxic, so wear gloves if you want to clean it off with steel wool. Once you're satisfied with the overall finish of the brass, use steel wool selectively to polish the brass where it likely would have been touched often over the years. Here again, photos of genuine antiques are invaluable. Wood Antiquing wooden sword grips and polearm hafts will significantly improve the illusion you're creating, although many antique swords have modern replacement grips. Look closely at your guide images. Do they show bits of torn leather still clinging to dark wooden sword grips? Are polearm hafts eaten by woodworm? You can produce those effects in your replica, too, and at minimum you'll probably want to add a few scars to the wood before you stain it.
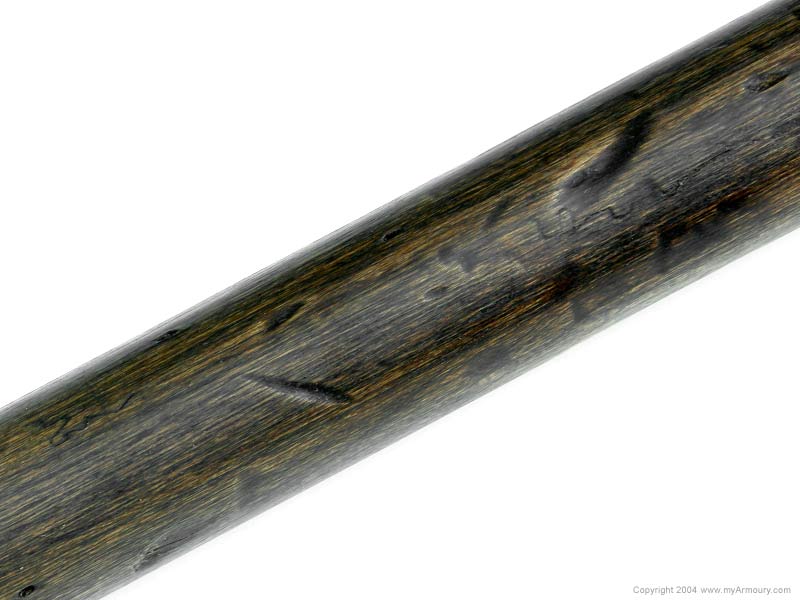
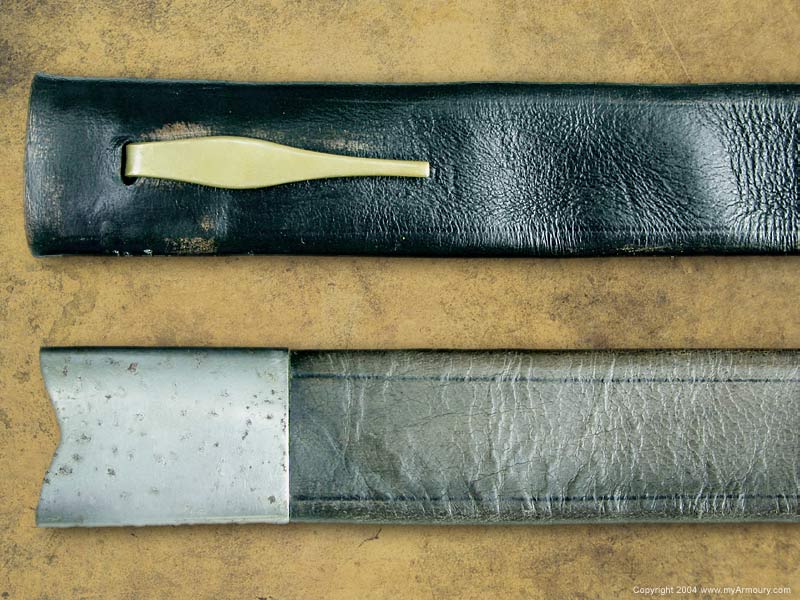
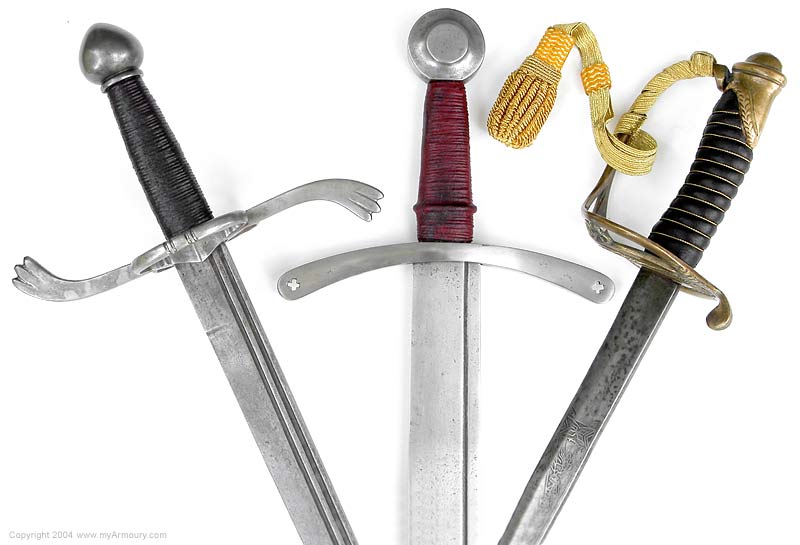
The haft shown here is poplar with repeated applications of dark walnut stain. Ignore the directions on the can of stain because you don't want a uniform, pretty finish. Just slather on the stain, let it dry and keep adding new coats until the wood is almost black. When the final coat of stain has dried, wipe down the wood with a dry paper towel or rag then gently rub Very Fine #00 steel wool over the entire surface of the wood. Recessed areas (dents, holes and other scars) will remain dark. When the overall finish is as light and clean as you want it, start thinking about where to apply some strategic wear. Wield the weapon and pay attention to where your palm and fingers are rubbing the wood. Give those areas enough extra attention with the steel wool to make them just slightly lighter and smoother than the surrounding wood. Finally, a coat of clear polyurethane or wax will preserve the finish you've created. Leather Like steel, brass and wood, leather scabbards and grip wraps can be abused and rubbed with steel wool or sandpaper to simulate wear. Repeatedly bending and twisting scabbards will soften and wrinkle the leather, giving it a much more worn appearance. Staining and scratching the leather slightly, tearing it away in places (taking care to antique exposed areas) or popping seams also adds to the effect. Experiment with dark shellac or other hard finishes that might crack with abuse and add to the impression of old, preserved leather. Before antiquing, both of the scabbards shown below were of the black, high-gloss variety common to Windlass Steelcrafts replicas. Grips Many replica swords, antiqued or not, can benefit from more attractive, custom designed grips. Fortunately, even some inexpensive replicas may have solid grips underneath their glossy, cheap-looking leather wraps, though the wood might benefit from stabilization with epoxy. After stabilization, a mass-produced grip may prove to be a solid foundation for a new wrap like those on the replicas shown here.
You'll need at least one size of cord. I use two sizes of hemp cord from a craft store. This material is rough and irregular in diameter along its length, which gives it a more homespun quality that I like. The narrower gauge cord is for the basic grip wrap while the heavier gauge is for risers in the surface of the grip. Very thin, high quality leather is expensive and hard to find in small quantities. However, chamois is inexpensive, readily available and easily dyed. Go to the automotive aisle of your local department store and get the thinnest chamois you can find. As-is, the matte finish of chamois may not be what you want in your final grip, but this leather is easily polished to a smooth, semi-gloss finish. You'll find a surprising variety of liquid dye colors in the same store where you find the chamois. With the sword tightly clamped to the work table and the grip hanging out over the edge, apply a few drops of epoxy or wood glue at the base of the wooden core and press the end of the cord into the glue (for better or worse, epoxy sets faster and is permanent). Once that glue is set, spread glue over the rest of the core and tightly wind the cord onto the core. When you reach the top of the core, tie a weight to the free end of the cord to keep the cord wrap tight as it dries. If you want risers in the surface of the grip, simply glue thicker pieces of cord wherever you choose. When the cord wrap is dry, trim the free end of the cord flush with the grip. Next, trim the dyed chamois to a size slightly larger than you need, wet it, wring it out, stretch it and glue one edge to the cord wrap. When that glue dries spread glue over the entire cord wrap, including half an inch or so of the leather starting point, and pull the chamois tightly around the cord wrap, overlapping the starting point. Immediately tie onto the blade or quillons one end of another length of thin cord. With that end secured, start wrapping the cord tightly around the grip, just as you did earlier, but without any glue. This will force the chamois into the grooves of the cord beneath and hold the leather in place while the glue dries. When the glued chamois is dry, unwind the cord overwrap, and trim the loose leather at the seam overlap and at the top and bottom of the grip. Finally, rub beeswax waterproofing into the leather and buff it just as you would shine a shoe. Darken the grip with shoe polish if desired. Don't Panic Don't be afraid to depart from your original plan mid-project or experiment with techniques of your own invention. If you don't like the way a project is turning out and decide to start over, rest assured that this will probably improve the final product by creating rich, irregular, layered effects. Finally, be warned that your replica is going to look very ugly and messy in the middle of the antiquing process, and you may have second thoughts about your ability to complete the project. Don't panic. At that point, the hard part is done and you're transitioning from abuser to conservator. With just a little more work you'll have your instant antique. Conclusion All of the techniques described above are easily modified to suit taste, available materials and the quirks of replica construction. I've also found that one new skill often leads to another. For example, creating a leather-over-cord grip wrap for my medieval replica sword helped me figure out how to make a new wrap for a 19th century replica sword. Antiquing replicas also has sharpened my eye for forgeries, theoretically making me a more skilled student of edged weapons. In fact, I would go so far as to suggest that anyone interested in collecting antique arms should not only keep a close eye on the replica market, but also acquire some inexpensive replicas and experiment with the techniques described in this article. It's a safe bet that most people antiquing replica arms and armour are doing so with criminal intent and the collecting community as a whole can benefit from our individual hands-on experience with the tricks of their trade. If we add variety and unique details to our replica collections as we learn, so much the better. About the Author Sean Flynt is a writer and editor living in Birmingham, Alabama. He is interested in Western arms and armour of all periods, but especially those of 16th through 18th century Britain and Colonial North America. Acknowledgements Photographer: Sean Flynt |
|