Was it common for 10th through 13th century swords to have guards and pommels "forged" to fit around the blade and tang?
My interest is primarily in the classic cruciform sword of the early medieval knight. I have seen a couple of modern high priced pattern welded creations that sport pattern welded guards and pommels. These were supposedly created with "traditional" methods which makes me wonder if one could literally forge the guard and pommel around the blade, and then finish to final shape with filing.
| Jared Smith wrote: |
| Was it common for 10th through 13th century swords to have guards and pommels "forged" to fit around the blade and tang?
My interest is primarily in the classic cruciform sword of the early medieval knight. I have seen a couple of modern high priced pattern welded creations that sport pattern welded guards and pommels. These were supposedly created with "traditional" methods which makes me wonder if one could literally forge the guard and pommel around the blade, and then finish to final shape with filing. |
Yes, hilt components were always forged to shape (when not cast in bronze, of course).
When forging the hilt components you have to make tools for the task: specially shaped drifts an chisels for each dimension of tang and blade. If you make series of hilts for more or less standardized blades (typical situation in a cutlers workshop in medieval times) you have a selection of tools that will solve most situations.
A contemporary custom smith will have to make new tools for each new blade unless he keeps to standard dimensions of blade thickness & tang size for all baldes he makes (not really possible).
You will typically need a hot chisel to open up the hole and a couple of drifts to enlarge the hole untill you get a basic fit. A special tool is needed to open the slot where the shoulders of the blade are inset. Traditionally this opening could be very tight or not tight at all: just a rectangular slot some 3-4 mm deep.
Afterwards you might need to apply additional heats and gently tap the guard down to fit the blade. It is usually a good idea to leave a small margin to be worked by filing. Work quickly here: if you leave the hot guard on to the blade too long it will shrink fit as it cools and be all but impossible to remove again.
When I forge the hilt components I make good use of the treadle hammer as that allows both hands to hold tong and hot chisel while you strike by stepping on the lever. Otherwise you normally need a helper for stirking. That would have been common in the medieval workshop (not so today when helpers are costly investments).
Forging hilt components is rather fiddly work: often as demanding as forging the blade, or even more so.
| Peter Johnsson wrote: | ||
Yes, hilt components were always forged to shape (when not cast in bronze, of course). When forging the hilt components you have to make tools for the task: specially shaped drifts an chisels for each dimension of tang and blade. If you make series of hilts for more or less standardized blades (typical situation in a cutlers workshop in medieval times) you have a selection of tools that will solve most situations. A contemporary custom smith will have to make new tools for each new blade unless he keeps to standard dimensions of blade thickness & tang size for all baldes he makes (not really possible). You will typically need a hot chisel to open up the hole and a couple of drifts to enlarge the hole untill you get a basic fit. A special tool is needed to open the slot where the shoulders of the blade are inset. Traditionally this opening could be very tight or not tight at all: just a rectangular slot some 3-4 mm deep. Afterwards you might need to apply additional heats and gently tap the guard down to fit the blade. It is usually a good idea to leave a small margin to be worked by filing. Work quickly here: if you leave the hot guard on to the blade too long it will shrink fit as it cools and be all but impossible to remove again. When I forge the hilt components I make good use of the treadle hammer as that allows both hands to hold tong and hot chisel while you strike by stepping on the lever. Otherwise you normally need a helper for stirking. That would have been common in the medieval workshop (not so today when helpers are costly investments). Forging hilt components is rather fiddly work: often as demanding as forging the blade, or even more so. |
That is good information.
I have never tried to make metallic hilt components, though it is on the agenda.
Every blade that I have made has just had simple handle scales.
Thank you, Peter.
I have Geibig's book at home and some of the guards featured look to have had little more than a slit created by hot cutting with little refinment of the tang opening. Some others have the appearance that they were made by folding and welding a long piece of stock back on itself leaving the opening for the tang, it's hard to say though since these impressions could also have been created by the fibrous nature of the iron, the practice of welding up smaller pieces of iron to create bar stock and the damage from rusting. All in all hilt components, like swords themselves seem to range from poorly made to those obviously made by craftsmen as skilled as the best blademsiths. Which brings another question to my mind, by the early medieval period would hilt components have been made by your average swordsmith or would another craftsman have generally done that?
I read somewhere (I believe more than one source) about some guards being forged closed around the tang. Some of them have come apart (ie. degraded) where they were forge-welded. If I recall correctly, the guard was basically formed separately, but with a slot left open for the tang on one side (top to bottom) and some flaps of material that would be forged around the tang, enclosing it.
Thanks for the insights Peter.
I hope to attempt my own first sword one of these years. I have always liked the look of twisted metal bar guards and other furniture that appears to be hand forged. I had wondered if these were made in two halves followed by welding together, but think punching with custom drifts makes a lot more sense than getting something incomplete stuck (forged) onto a good blade!
I hope to attempt my own first sword one of these years. I have always liked the look of twisted metal bar guards and other furniture that appears to be hand forged. I had wondered if these were made in two halves followed by welding together, but think punching with custom drifts makes a lot more sense than getting something incomplete stuck (forged) onto a good blade!
I think that in those cases where guards and pommels are obviously forge welded together (you do see this a lot, especially on viking era and high medieval era swords, but also on later pieces like Sciavonesca hilts) one should not assume the guard is forge welded in place on the tang of the sword. Rather a separate tool was used for the final shaping of the hole for the tang. I assume that a guard that is forge welded togther is made pretty much like an axe head: the separate pieces are pre-shaped with a rather high degree of precision so that most of the hole is already shaped in the two halves. The welding process will distort this a little, so a tool is used to do final shaping after welding. This is the smae procedure you follow when you make a typical viking axe, where a butterfly shaped plate is shapd inot the eye and forge welded to the body of the blade. The edge and sometimes the neck reinforcement are then welded on afterwards. There is still a lot of shaping to do after forge welding. You cannot do this wothout a set of tools shaped specifically fo the task. Thse tools are essential for any smith: each product will ned a set of specially made tools that allows precise shaping of the parts. The craft of the smith includes the making of these tools: it is half the work. The more you froge to shape, the higher demand of fit and precision there is, the more specific tools you need: drifts, punches, fullering tools and swages.
A balde smith anvil was up till moder times a large block of steel with dove tail cuts in the upper surface: in these were affixed a number of special dies that allowed for precise forging of various cross sections. The master held the fullering tool or set hammers, while the helper (helpers) struck with the sledge hammer.
It is not always the case that old methods are less advanced than the methods we typically use today.
:)
This would be a nice example
Nick
 Attachment: 42.29 KB
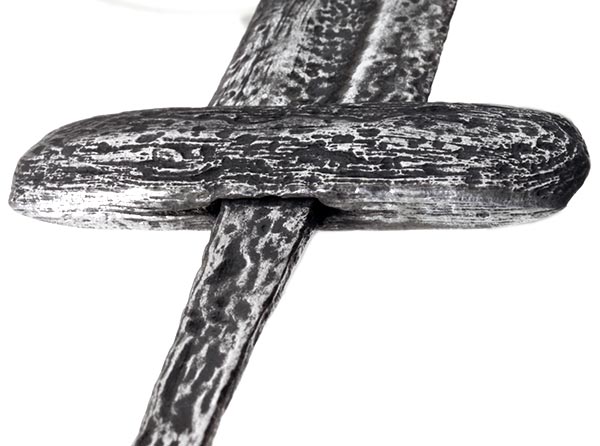
Nick
Thanks Peter
Your words are consistant with my observations (from period swords and other sources) and thoughts - I had no time to experiment with that however ...yet :)
French blade/blacksmith Tristian Esnault specifically forges "shouldered" chisels the same dimensions as the sword's shoulders and tang - hot punching/cutting through iron or mild steel is easy enough.
From what I've seen on period swords, this is probably how the thing was done (or something similiar), the chisel/punch obviously being available for later uses. The idea is to get the best fit on the tang - it matters less if the blade slot is too wide - thus one specific chisel/punch can be used on other crosses.
Thoguh I'd be interested in your take on pommels...
| Chad Arnow wrote: |
| I read somewhere (I believe more than one source) about some guards being forged closed around the tang. Some of them have come apart (ie. degraded) where they were forge-welded. If I recall correctly, the guard was basically formed separately, but with a slot left open for the tang on one side (top to bottom) and some flaps of material that would be forged around the tang, enclosing it. |
I have seen a pommel at an old Czerny's auction that was clearly amde by forge welding two halves, it was a german gothic blade, sort of primitive scent stopper pommel.
I have examined also a blade (type XII) with a tiny pommel clearly made by hammering, with slight hammer marks (item from an excavated medieval tomb, unquestionably authentic), most likely amde of two forge welded halves.
It is a method I'm considering myself for my next pommel, a needle like file is likely useful to refinish the forged pommel.
I guess I will need to experiment a bit with thickness of the two halves, since heating will expand materials and I do not know if some expansion will remain after slow cooling of the newly made pommel.
I have just terminated piercing a pommel with a specially made chisel, much thinner than needed, alas.
So filing was necessary, but it is a slow and ineffective technique, the pommel is low carbon iron (0,4 % carbon), but hammering made it very resistant, piercing it was difficult (a bit of drilling was used and it required a professional drill column, very slow drilling speed, frequent greasing of the drill bit with oil to cool it down)
Page 1 of 1
You cannot post new topics in this forumYou cannot reply to topics in this forum
You cannot edit your posts in this forum
You cannot delete your posts in this forum
You cannot vote in polls in this forum
You cannot attach files in this forum
You can download files in this forum
All contents © Copyright 2003-2006 myArmoury.com — All rights reserved
Discussion forums powered by phpBB © The phpBB Group
Switch to the Full-featured Version of the forum
Discussion forums powered by phpBB © The phpBB Group
Switch to the Full-featured Version of the forum