| Author |
Message |
Greg Griggs

|
 Posted: Wed 13 Sep, 2006 8:05 am Post subject: New cover for the St. Maurice Posted: Wed 13 Sep, 2006 8:05 am Post subject: New cover for the St. Maurice |
 |
|
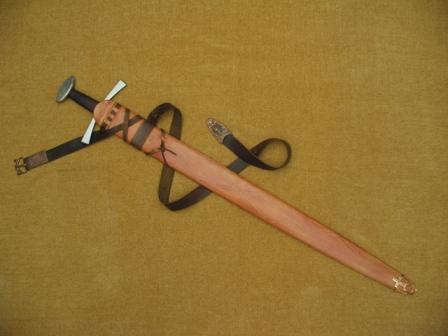
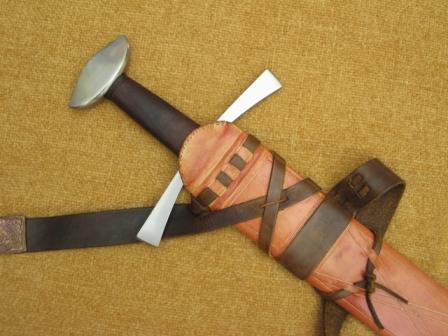
As most are aware, Patrick K. had acquired the Sword of St. Maurice of Turin for me several months back and I've been enjoying it immensely. The reason(s) he picked this particular sword are varied, not the least of which is that we both like unusual historical blades and the looks and styling of this weapon fit that to a tee.:}
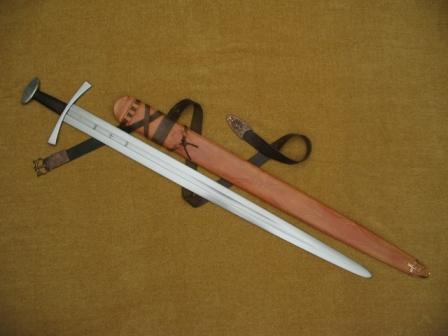
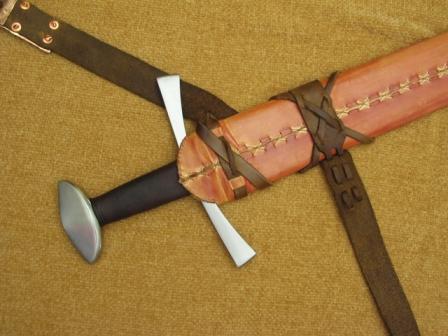
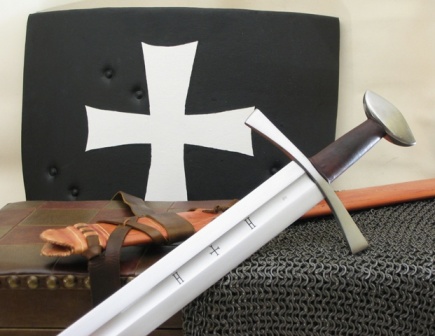
But another reason was that he knew I was wanting to do a late 12th C historically correct Hospitaller kit and this was perfect for the job. The only problem was that I didn't have a scabbard to carry the silly thing! Sooooo.......being somewhat handy, and a lot crazy, I decided to tackle making my own. I wanted some historic accuracy so made sure I followed Peter Johnsson's instructions (thank you Peter!), plus got a lot of inspiration after seeing some wonderfully made schetches and actual scabbards whilst in England and Scotland this summer. It was honestly easier than I thought it would be, and according to those whom have seen it, including P.K., it didn't turn out too badly.  After begging, pleading, conjoling, and finally resorting to bribery, (OMG, did I really say I'd make one for his Reeve?!?!?!?! After begging, pleading, conjoling, and finally resorting to bribery, (OMG, did I really say I'd make one for his Reeve?!?!?!?!  ) he agreed to take some pictures. So without further ramblings, here they are. Let me know what you folks think, and don't spare the criticisms. ) he agreed to take some pictures. So without further ramblings, here they are. Let me know what you folks think, and don't spare the criticisms.  
Thanks all, and have a great one!
- Greg
 Attachment: 17.8 KB Attachment: 17.8 KB
Attachment: 18 KB
Attachment: 22.95 KB
Attachment: 26.36 KB
Attachment: 27.05 KB
Attachment: 26.8 KB
Attachment: 23.71 KB
Attachment: 51.43 KB
Not one shred of evidence supports the notion that life is serious.
|
|
  |
 |
|
Geoff Wood
|
| Posted: Wed 13 Sep, 2006 8:16 am Post subject: |
|
|
Very smart! I like the rear seam and the overall lack of bulk. If it were mine, I'd probably have a different chape (looks like it might be a bit inclined to snag), but it does fit the theme.
regards
Geoff
|
|
|
|
|
Jean Thibodeau

|
| Posted: Wed 13 Sep, 2006 8:25 am Post subject: |
|
|
Very very nice and if this is your first scabbard project your starting point on the learning curve is way up there above 90% of what you might be able to do with more practice !  But then the last 10% of any skill takes 200% or more effort to achieve. As an example: if you can group your shots from a handgun inside 3" at 25 yards you are doing really well, but getting 2" groups at the same range is going to take 10 times more range time. ( Assuming some talent for it and a handgun with sufficient inherent accuracy. ) But then the last 10% of any skill takes 200% or more effort to achieve. As an example: if you can group your shots from a handgun inside 3" at 25 yards you are doing really well, but getting 2" groups at the same range is going to take 10 times more range time. ( Assuming some talent for it and a handgun with sufficient inherent accuracy. )
I'm seriously impressed. Maybe you could turn it into a partime business ? You seem that good and it would depend on how much fun you get making scabbards. ( Could finance other sword purchases or other pieces of kit like clothing and armour. )
You can easily give up your freedom. You have to fight hard to get it back!
|
|
|
|
|
Pamela Muir

|
| Posted: Wed 13 Sep, 2006 9:00 am Post subject: Re: New cover for the St. Maurice |
|
|
| Greg Griggs wrote: | | Sooooo.......being somewhat handy |
And a master of understatement! Greg, that is very nicely done. I especially like the chape. I am quite impressed.
Pamela Muir
Founder/Lead Instructor
Academy of Chivalric Martial Arts
"I need a hero. I'm holding out for a hero 'til the end of the night. He's gotta be strong, And he's gotta be fast, And he's gotta be fresh from the fight." ~Steinman/Pitchford
|
|
|
|
|
Sean Belair
Industry Professional

|
| Posted: Wed 13 Sep, 2006 9:28 am Post subject: |
|
|
beautiful,
im trying to make a similar one for my gaddhjalt and you just blew mine out of the water
fantastic work
|
|
|
|
|
Sean Belair
Industry Professional
|
| Posted: Wed 13 Sep, 2006 9:31 am Post subject: |
|
|
forgot to ask
did you make the buckle and belt end or did you buy it?
|
|
|
|
|
Bruno Giordan

|
| Posted: Wed 13 Sep, 2006 9:40 am Post subject: |
|
|
|
It is flawless.
|
|
|
|
|
|
Patrick Kelly
|
| Posted: Wed 13 Sep, 2006 10:55 am Post subject: |
|
|
To say that I'm impressed by Gregs work on this scabbard would be a huge understatement, especially considering this is his first one. When we were discussing it I kept telling him things like "thinner is better", "don't overbuild it", etc. Some people just don't have an eye for those kinds of proportions and details, so often a scabbard will wind up looking like a piece of lumber strapped to a western gunbelt. Obviously, Greg doesn't have that problem. When he showed me the completed scabbard core I was initially impressed because it was thin and light as it should be. I then became very eager to see the completed project. I think he did an outstanding job.
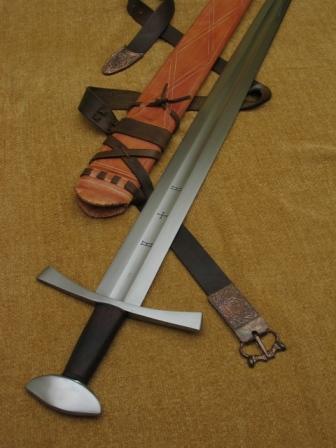
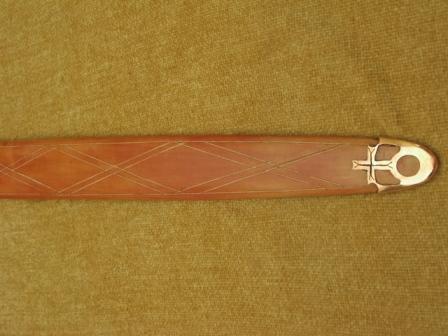
Here's a close-up of the chape.

As you can see, it fits very flatly to the scabbard so there isn't any real chance of it snagging on anything.
Here's a larger version of one of the photos so the details are a bit clearer.

|
|
 |
|
|
Geoff Wood
|
| Posted: Wed 13 Sep, 2006 11:02 am Post subject: |
|
|
Thanks Patrick.
Very good photography.
Geoff
|
|
|
|
|
Greg Griggs
|
| Posted: Wed 13 Sep, 2006 11:41 am Post subject: |
|
|
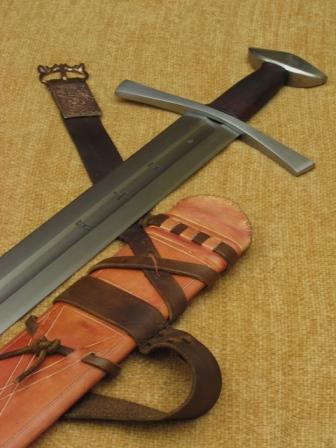
Thanks for the compliments everyone. The chape was probably the hardest thing to figure out because I wanted something unique and that would fit with the theme. I found several chapes on the net that were pretty; awesome even in some cases, and downright crazy in others. Unfortunately by doing the wood core in the proper way, none of the cast chapes would fit as they are ALL too wide for the thickness of the finished core. I also wanted to try just once to do something that fit in with the hand-made chapes I had seen in the museums. The historically cast ones are like you see in todays market, but the ones that were forged, beat, and hand-cut for design had a coarseness and individualist flair that I intentionally wanted to give this piece. Some people will like it and others will see it as crude or too unusual. I don't have a problem with that.
Sean - wish I could make those pieces, hehe. The belt fittings are the only things I didn't make for this scabbard. Bought them from Raymonds Quiet Press. He makes a lot of cast belt fittings, etc, that are inexpensive, of good quality and service, plus most pieces being based on actual historic finds. Patrick has used them as well and can speak for the quality. Here's the URL: http://www.quietpress.com/
Jean - You've been talking to Patrick and my better half haven't you? HA! What you said on doing this as a part time business is almost word for word what they are both telling me. Honestly I did enjoy making this one and do have plans for at least two more, one for the Gallowglass I have coming and one for Patrick's Reeve, and IF they turn out as I hope then I will offer to make them for others. After all it is an expensive hobby and I have to finance my babies some way.
Many many thanks to Patrick and my loverly Linda for their advice and pointers. Would have been impossible to do without their help and suggestions! I can only hope to improve with practice. Now I'll shut up, go into my corner, and blush, hehe.
Not one shred of evidence supports the notion that life is serious.
|
|
|
|
|
|
J. Bedell
|
| Posted: Wed 13 Sep, 2006 12:29 pm Post subject: |
|
|
It's really a work of art. Nice job!
-James
The pen may be mighter, but the sword is much more fun.
|
|
 |
|
|
Eric Allen
|
| Posted: Wed 13 Sep, 2006 12:37 pm Post subject: |
|
|
That is really impressive! Really!
Out of curiosity, how did you make the core?
|
|
|
|
|
Greg Griggs
|
| Posted: Wed 13 Sep, 2006 1:38 pm Post subject: |
|
|
| Eric Allen wrote: | | Out of curiosity, how did you make the core? |
I could tell you, but then I'd have to send PK around to have everyone on this forum done away with.
Seriously - It isn't that hard. I started with two pieces of 1" x 4" poplar boards, drew a center line, laid the sword down to draw an outline, measured the different thicknesses along the sword, step cut the inside with a router (started with a dremel but couldn't control it as well along the edges and the poplar was HARD), shaved the steps with sharp chisels, and finished it with a sanding block until the fit was where I wanted it. Glued the two pieces together, used a planer to take the thickness down to about 3/8", center-lined and outlined the outside of the scabbard and cut that with a bandsaw, shaped the outside with a 6" belt sander 80 grit belt, then finished sanded with a palm sander 120 grit. Phew! The idea on shaping is to remember that thinner is better and to get that beautiful oval shape throughout the length. I have an end shot showing the shape I'll post later when I get home.
-Greg
Not one shred of evidence supports the notion that life is serious.
|
|
|
|
|
Nathan Robinson
myArmoury Admin


|
|
 |
|
|
Patrick Kelly
|
| Posted: Wed 13 Sep, 2006 2:13 pm Post subject: |
|
|
| Greg wrote: | | Seriously - It isn't that hard. |
Shhhhhhhhh!!!!!!!!!!!!!!!!!!!!!!!!!!!!!!!!!!!!!!!!!!!!! 
|
|
|
|
|
Thomas Hoogendam

|
| Posted: Wed 13 Sep, 2006 2:17 pm Post subject: |
|
|
It's not that hard he says..........
Seriously, you have a talent Greg. Can't wait to see some other scabbards when you make them.
|
|
|
|
|
Greyson Brown

|
| Posted: Wed 13 Sep, 2006 2:54 pm Post subject: |
|
|
I might as well just give up right now! There is no way I can make my scabbards look that nice. And I had the audacity to think I could do a decent job without the sword on hand. You put me to shame, good sir. We're in the same state at the moment, and when I get out of the Army, I'll be about the same distance the opposite direction, in Colorado (maybe a touch farther). That being the case, I may have to have you make my scabbards. I'm still going to see what I can do on my own, though.
-Grey
"Somewhat handy," my foot. Bloody irritating perfectionists!
"So long as I can keep the path of honor I am well content."
-Sir Arthur Conan Doyle, The White Company
|
|
|
|
|
|
Patrick Kelly
|
| Posted: Wed 13 Sep, 2006 4:04 pm Post subject: |
|
|
Greyson,
You should be able to see this one up close at the Great Plains Ren. Faire at the end of the month.
|
|
|
|
|
|
Edward Hitchens
|
| Posted: Wed 13 Sep, 2006 8:13 pm Post subject: Re: New cover for the St. Maurice |
|
|
| Greg Griggs wrote: | don't spare the criticisms.
|
Criticisms? What criticisms? That's a gorgeous ensemble. I especially like that chape. Excellent work gentlemen!
"The whole art of government consists in the art of being honest." Thomas Jefferson
|
|
|
|
|
|
Al Muckart
|
| Posted: Thu 14 Sep, 2006 12:47 am Post subject: |
|
|
Greg,
That is truly an excellent piece of work, I love the thinness of the core - that's where I went a little bit wrong with my knight scabbard. The leatherwork is very cleanly executed, it's not often you see reproduction kit with gouged work like that.
Out of curiosity what weight leather did you use for the cover and the strapping? I used 1.5mm (3-4 oz or around 0.06 inch) thick for the cover and the belt both and came to the conclusion that it's about 1oz too heavy for the cover and 1oz too light for the belt. It's what I could get though.
Any chance of a close up shot of the stitching, it looks like you did it a bit differently to mine and I'm curious because yours looks quite a bit tidier.
--
Al.
http://wherearetheelves.net
|
|
|
|
|
|
|

