Posts: 813 Location: Windsor, Colorado
Tue 12 Sep, 2006 11:05 am
| Pamela Muir wrote: |
| Nylon thread is nasty stuff, it's hard to see and it cuts into your hands. |
Yeah, but it has great uses in bread baking and cake decorating. :D Was that sufficiently non-guy enough? And I actually found the stuff in the same aisle as the crochet thread, so a hardware store would not be necessary. Of course, it would still be good to hang out in a hardware store a bit. You see neat things like brick hammers (which could be used to make a functional, though not historical, war hammer), and bill hooks. And they have lots of the handy-man's helper, duct tape.
-Grey
And remember; keep your stick on the ice. (Jean is probably one of a very few people who will understand this).
Posts: 8,310 Location: Montreal,Quebec,Canada
Tue 12 Sep, 2006 11:46 am
| Greyson Brown wrote: |
| Pamela Muir wrote: | | Nylon thread is nasty stuff, it's hard to see and it cuts into your hands. |
Yeah, but it has great uses in bread baking and cake decorating. :D Was that sufficiently non-guy enough? And I actually found the stuff in the same aisle as the crochet thread, so a hardware store would not be necessary. Of course, it would still be good to hang out in a hardware store a bit. You see neat things like brick hammers (which could be used to make a functional, though not historical, war hammer), and bill hooks. And they have lots of the handy-man's helper, duct tape.
-Grey
And remember; keep your stick on the ice. (Jean is probably one of a very few people who will understand this). |
Hockey reference I assume ? I'm probably the only French Canadian not into hockey but even I know that one.
Oh, and the hardware store was always useful for brass collar, plumbing supplies, that could become but caps for spears or for some D.I.Y. walking sticks I made. And the duct tape can hold your cord in place if you have to leave it half done for some reason and keep all that slow and careful winding from unravelling. Or even hold the end of the cord after you finish.
Posts: 813 Location: Windsor, Colorado
Tue 12 Sep, 2006 2:14 pm
Actually, the "keep your stick on the ice" comment goes along with the Moose Lodge title for duct tape (i.e. the handy-man's helper), and is a reference to the Canadian television show Red Green. It can be found in the states on Public Television sometimes, and is one of the few shows that I highly recomend people seek out.
-Grey
Posts: 8,310 Location: Montreal,Quebec,Canada
Tue 12 Sep, 2006 2:40 pm
| Greyson Brown wrote: |
Actually, the "keep your stick on the ice" comment goes along with the Moose Lodge title for duct tape (i.e. the handy-man's helper), and is a reference to the Canadian television show Red Green. It can be found in the states on Public Television sometimes, and is one of the few shows that I highly recomend people seek out.
-Grey |
A " The Red Green Show " and I thought it was about keeping your hockey stick on the ice had something to do with not loosing the puck or something ? Well I did say I didn't know very much about hockey. :blush:
Yeah, Red Green would do all sort of weird project with duct tape every week: Sort of a running gag there.
Didn't the Apollo 13 guys fix their air filters using duck tape ?
I think we should get back on topic though ! Anything close to re-gripping and Pamelas' topic. ;)
Posts: 336
Tue 12 Sep, 2006 8:04 pm
Like they say in the "live" roleplaying community:
"Duct tape is like the Force - it has a light side and a dark side, and it binds the Universe together". ;)
The only best thing is Lepage steel epoxy glue (wonderful to fix loose Del Tin hilt components).
Posts: 813 Location: Windsor, Colorado
Thu 14 Sep, 2006 6:24 am
Pamela,
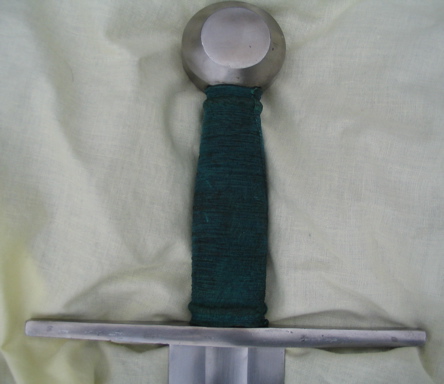
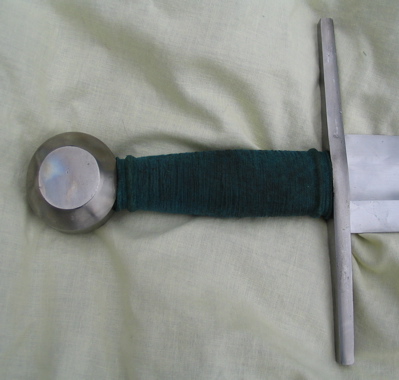
You said that you used Rit dye for the grip. You're talking about the fabric dye, where you use boiling water, and soak the fabric, right? I had not thought of that. I just kept looking for leather dyes. Did you have any problems as a result of soaking, drying, and then rewetting the chamois? I suppose a chamois would be better suited to that than some other leathers. Let me know how the green dye turns out, because I would really like to do one that color (my chlorophil-based effort has faded into more of a campaign brown).
-Grey
Posts: 282 Location: Arlington, VA
Thu 14 Sep, 2006 6:45 am
Hi Grey, I used the Rit dye in a bucket in the laundry room sink. I was really more nervous about the mess it might make in my washing machine or my kitchen, so I modified the method a little to do it in a bucket and not in the machine or on the stove top. Rit dye is not made for leather but since a large chamois is so cheap and I only need a little bit to do a grip I had enough to experiment with. My first attempt, I used the dark green dye and used the strength recommended on the package. I found out chamois absorbs the dye very well! Too well. I put it in the bucket and pulled it out nearly immediately and it was still so dark it was nearly black. (The directions on the package say to leave the material in the dye for up to 30 minutes.) Lesson learned, I used it at half strength for the yellow. I have a package of kelly green for the next project. I'll let you know how that turns out.
After dyeing, I had no problems with drying or rewetting the chamois. After I pulled it out of the dye solution, I did make sure that I rinsed and rinsed and rinsed until the water ran clear.
Not everyone likes the texture of the chamois for the grip. It is a little rough, not smooth and polished. I like the chamois because it is so much easier to play with different colors.
Posts: 813 Location: Windsor, Colorado
Thu 14 Sep, 2006 7:06 am
| Pamela Muir wrote: |
| Not everyone likes the texture of the chamois for the grip. It is a little rough, not smooth and polished. I like the chamois because it is so much easier to play with different colors. |
I will agree that it is not the ideal leather, but for something that is readily available, it really is not too bad. A little bit of bees wax or shoe polish when you are done helps to smooth it out, and make it a littile less course. I do have to emphasise a little bit. Especially with shoe polish, it can be easy to get too much on there, and then your hands turn black every time you handle the sword. I am having this problem with my waster.
-Grey
Posts: 616 Location: Toronto, Canada
Thu 14 Sep, 2006 7:57 am
| Greyson Brown wrote: |
| Pamela Muir wrote: | | Not everyone likes the texture of the chamois for the grip. It is a little rough, not smooth and polished. I like the chamois because it is so much easier to play with different colors. |
I will agree that it is not the ideal leather, but for something that is readily available, it really is not too bad. A little bit of bees wax or shoe polish when you are done helps to smooth it out, and make it a littile less course. I do have to emphasise a little bit. Especially with shoe polish, it can be easy to get too much on there, and then your hands turn black every time you handle the sword. I am having this problem with my waster.
-Grey |
May I suggest suede dye for the chamois? It will be more permanent that fabric dye, which tends to fade. Also instead of waxes or polishes that attract dirt, consider one of the waterproofing compounds designed for fabric and suede/nubuck leathers. SnoSeal "Waterguard" aerosol is very good but ScotchGuard will do the trick as well. Both resist sweat and skin oils well.
I've really enjoyed this thread the couple times it popped up. One thing bugs me about winding the grip though. How do you get a really even spacing? Is there some kind of jig for doing this? How do the big shops do this? They must do a couple every week.
Posts: 813 Location: Windsor, Colorado
Thu 14 Sep, 2006 8:54 am
| Kel Rekuta wrote: |
| One thing bugs me about winding the grip though. How do you get a really even spacing? Is there some kind of jig for doing this? How do the big shops do this? They must do a couple every week. |
I usually try not to have much spacing when I wrap my grips. I do a tight cord wrap, cover it in leather, and then wrap cord around that while it dries. The first wrap creates small ridges and valleys, and the second cord wrap basically slides into those grooves (unless I get lazy and allow gaps to develop). That means you get the tight spiral shape without having to leave spaces in either wrap. Now if you want to do a looser spiral, that has a hole other set of problems with it. I'm still trying to figure out some of that.
-Grey
Posts: 8,310 Location: Montreal,Quebec,Canada
Thu 14 Sep, 2006 11:09 am
| Greyson Brown wrote: |
| Kel Rekuta wrote: | | One thing bugs me about winding the grip though. How do you get a really even spacing? Is there some kind of jig for doing this? How do the big shops do this? They must do a couple every week. |
I usually try not to have much spacing when I wrap my grips. I do a tight cord wrap, cover it in leather, and then wrap cord around that while it dries. The first wrap creates small ridges and valleys, and the second cord wrap basically slides into those grooves (unless I get lazy and allow gaps to develop). That means you get the tight spiral shape without having to leave spaces in either wrap. Now if you want to do a looser spiral, that has a hole other set of problems with it. I'm still trying to figure out some of that.
-Grey |
Never done it and it might be a stupid idea: How about using two separate cords and wrapping them side by side using a weak glue that will hold the cords in place after it dries. One would pick at the second cord and remove it leaving the first cord in place. Hmmmmm ........ maybe using a jute cord that will stay glued in place for the cord you want to stay and use a nylon cord for the one you want to remove that the glue will not stick to as strongly as the jute and that will not stick to the other cord. Using only a minimum of glue on the wood core would also minimize the sticking of the two cords together.
Once the spiral has been revealed by removing the second cord, one would glue on the covering leather and use an outside cord wrap in the intervals left by the removed cord.
Different patterns and spacing might be created using various versions of the same idea.
Alternate idea would be to use a narrow tape in multiple layers to build up a spiral and leave a regular spacing in which a cord would be glued in the spiral track. The tape removed after the glue holding the cord has dried and then the
cover etc .....
Maybe you can think of another way ? ;) :lol:
Posts: 813 Location: Windsor, Colorado
Thu 14 Sep, 2006 11:18 am
Jean,
That would work pretty well. I have also had luck with just drawing a line on the grip core where I wanted the riser to go, and then glueing my cord right over that. Since you will cover it in leather, no one will see your line. Hey, you could draw Mickey Mouse's face on the core, and it wouldn't matter. The trick comes in when you are trying to do the exterior wrap on a grip like this. I ended up having to tie it off and go the opposite direction a few times, because you want to ensure that you have good pressure on both sides of the riser. Part of the reason I had trouble, though, was that the crochet thread just wasn't the stuff to be using on the size spiral I had.
-Grey
Posts: 616 Location: Toronto, Canada
Thu 14 Sep, 2006 1:44 pm
| Greyson Brown wrote: |
| Kel Rekuta wrote: | | One thing bugs me about winding the grip though. How do you get a really even spacing? Is there some kind of jig for doing this? How do the big shops do this? They must do a couple every week. |
I usually try not to have much spacing when I wrap my grips. I do a tight cord wrap, cover it in leather, and then wrap cord around that while it dries. The first wrap creates small ridges and valleys, and the second cord wrap basically slides into those grooves (unless I get lazy and allow gaps to develop). That means you get the tight spiral shape without having to leave spaces in either wrap. Now if you want to do a looser spiral, that has a hole other set of problems with it. I'm still trying to figure out some of that.
-Grey |
I tried to be clear but I guess I wasn't. (so I bolded and unlined what I was after)
Patient as I can be, I never seem to get the winding spaced tightly and evenly enough for my satisfaction. Perhaps someone has an idea for jig to do this better than clamping the blade in a vise? I guess the gaps come in when I change hands winding the thread copp around the grip. (btw, I use various thicknesses of linen hand stitching thread.)
Maybe I should just cut back on the coffee in the morning? :p
Posts: 282 Location: Arlington, VA
Fri 15 Sep, 2006 3:18 am
| Kel Rekuta wrote: |
| Patient as I can be, I never seem to get the winding spaced tightly and evenly enough for my satisfaction. |
Hi Kel, That's the catch. I figure, for me, it will come out better with time and practice. For now, having both the under and over wraps fills in any of the slight gaps that I couldn't seem to get rid of. It sounds like you are a lot more experienced at this than I am. :) This was only my second attempt. I do have a third project planned and a fourth one too. (A friend of mine has consented to let me practice on his sword, this time we're going for red with multiple risers.)
Posts: 813 Location: Windsor, Colorado
Fri 15 Sep, 2006 6:15 am
Kel,
I tend to work with the sword horizontal. I don't know if that will make any difference, though. In order to get the first wrap tight, I do not use much glue. That way, I can slide the cord tighter if I need to. I do use some glue about 1/3 and 2/3 of the way through the grip, to hold everything in place. On the exterior wrap, I just have to be slow and careful. If there is a good way to set up a jig for this, I can't think of it.
To be honest, there is a very good chance that my grips would not meet your standards (some days, I question whether they meet mine :blush: ), as I have yet to do one where the spacing on any of the wrapping was entirely even.
-Grey
Posts: 616 Location: Toronto, Canada
Fri 15 Sep, 2006 9:54 am
grip wrapping jigs
Last time I regripped one of my AL training swords, I was determined to get the thread as tidily wound as the examples on Albion's grip selection. Not there yet.... hoping the trick isn't to do several dozen until you get it right! :eek:
I clamp the blade in a long wooden faced vice as Greyson suggests. Still, winding a thread copp from hand to hand allows the tension to slack and tighten so keeping it on track is challenging. And time consuming.
I figured there must be some kind of jig that clamps the blade in the centre and then spins slowly, maybe treadle driven or with a hand pulled wheel. What was I thinking? :lol:
Oh well... :blush:
Posts: 282 Location: Arlington, VA
Fri 15 Sep, 2006 10:11 am
Some sort of jig would be nice. :) I have the sword horizontal in a vice. I wrap from guard to pommel and only hold the thread in my right hand. My left hand acts as a guide when needed, but I don't switch hands. It just didn't seem natural to me to change hands.
Posts: 214 Location: Houston, TX
Fri 15 Sep, 2006 12:48 pm
Actually a rig like that would be quite easy to build, but I doubt it would be worth the expense of the bearing(s) you would need to make it turn smoothly unless you were doing a number of swords. Then again.......I suppose it depends on how badly you want to make it "juuuust right". :lol:
Posts: 5,981 Location: Birmingham, Alabama
Fri 15 Sep, 2006 1:59 pm
Those who don't like the natural roughness of the chamois (myself included) can simply apply beeswax and buff just like you buff a leather dress shoe. This gives a nice, smooth finish without compromising the security of the grip.
Posts: 282 Location: Arlington, VA
Thu 05 Oct, 2006 6:53 am
This is becoming quite addicting...
You
cannot post new topics in this forum
You
cannot reply to topics in this forum
You
cannot edit your posts in this forum
You
cannot delete your posts in this forum
You
cannot vote in polls in this forum
You
cannot attach files in this forum
You
can download files in this forum