| Author |
Message |
Jared Smith

|
|
  |
 |
Greyson Brown

|
 Posted: Sun 12 Mar, 2006 7:56 am Post subject: Posted: Sun 12 Mar, 2006 7:56 am Post subject: |
 |
|
Jared,
Does this thread contain the info you need? If not, I could be willing to do some different step-by-step pictures.
Keep in mind that the pictures that Chuck linked to are essentially backwards. If you follow the pictures exactly, the suspension is set up for a left-handed user. If you are right handed, all you really need to do is orient your scabbard the other way (so the tip points up and right, rather than down and left) then just do what the pictures show.
-Grey
"So long as I can keep the path of honor I am well content."
-Sir Arthur Conan Doyle, The White Company
|
|
|
|
|
Mathieu Harlaut

Location: Paris-France Joined: 14 Dec 2004
Posts: 45
|
| Posted: Sun 12 Mar, 2006 1:30 pm Post subject: |
|
|
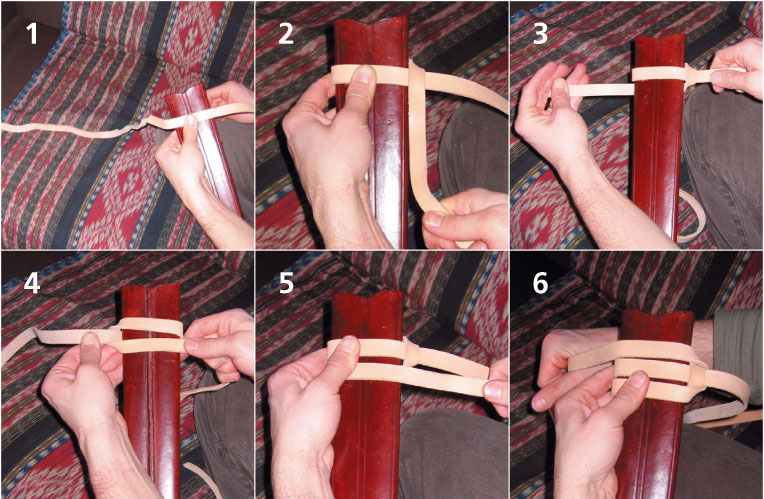
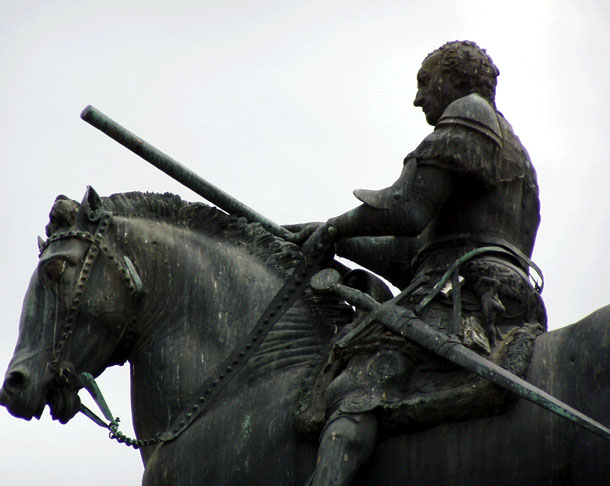
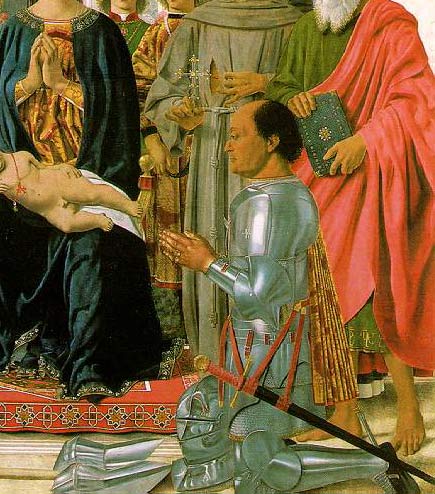
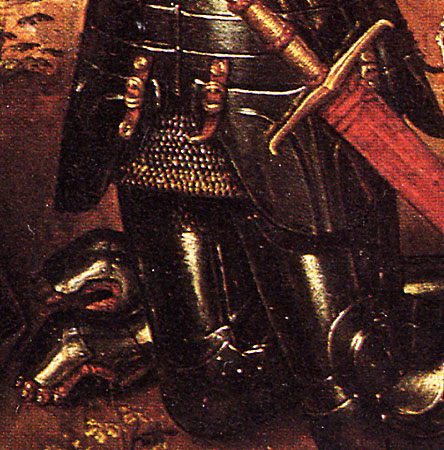
After looking for a while to some XVth century artworks (paintings and statues) and also to the pictures on Albion website, I managed to find the way to do those knots.
The main references I used are :
- 2 portraits of the Duke of Urbino : "Montefeltro Altar" in Milan by Piero della Francesca / "Federico da Montefeltro ans his son Guidobaldo" in Urbino
- One altar by Rogier Van der Weyden : "The Sforza Tryptich" in Brussel
- The statue of Gattemelata in Padua by Donatello
It shows the same knot as the one done by Albion. The knot is very efficient to hold the scabbard, in fact I am not sure that a riser is needed to prevent it from moving . I tried a couple of other way to make them before but the result wasn't so good.
I have seen a couple of other XVth century pictures with this kind of knot but the ones above are the most obvious and helpfull. The picure show sometimes one knot on the scabbard, but usually two, never more.
A couple of days ago I made some picture to explain to a friend of mine.
Very important thing: you need a very long strap of leather. On this kind of sword hanger, there is more of the leather strap around the scabbard than between the scabbard and belt, about 3 times more!
I hope it helps
Mathieu
 Attachment: 120.74 KB Attachment: 120.74 KB
Attachment: 112.84 KB
|
|
|
|
|
Jared Smith
|
| Posted: Sun 12 Mar, 2006 2:46 pm Post subject: |
|
|
Thankyou very much Mathew.
This does help considerably. I was not sure if the overall strap had a "loose end" tucked inside each knot somewhere, or if the belt strap just looped throughout both locations of ties onto the scabbard. It appears from your excellent pictures, that around step # 12, there is a loose end at each knot that is tucked under the on the back side of the scabbard.
I am working on another (trial #10 or so) long scabbard for a Crecey that will have risers to help stop slippage. I am debating a 2-1/2" (about 62 mm) wide area between each pair of risers to make room for these knots. I have a little time to decide, as the glued cloth is drying over the wood core right now.
Absence of evidence is not necessarily evidence of absence!
|
|
|
|
|
|
Felix Wang
|
| Posted: Tue 14 Mar, 2006 10:34 am Post subject: |
|
|
Matheiu,
A very clear set of pictures! Thank you for providing them.
|
|
|
|
|
Bill Grandy
myArmoury Team


|
| Posted: Tue 14 Mar, 2006 10:41 am Post subject: |
|
|
Very nice and clear photo essay, Mathieu! Any chance you could post pics of those sources you listed, or at least links to them online?
HistoricalHandcrafts.com
-Inspired by History, Crafted by Hand
"For practice is better than artfulness. Your exercise can do well without artfulness, but artfulness is not much good without the exercise. -anonymous 15th century fencing master, MS 3227a
|
|
 |
|
Mathieu Harlaut
Location: Paris-France Joined: 14 Dec 2004
Posts: 45
|
| Posted: Tue 14 Mar, 2006 3:07 pm Post subject: |
|
|
Thanks for your comments. I am pleased to help.
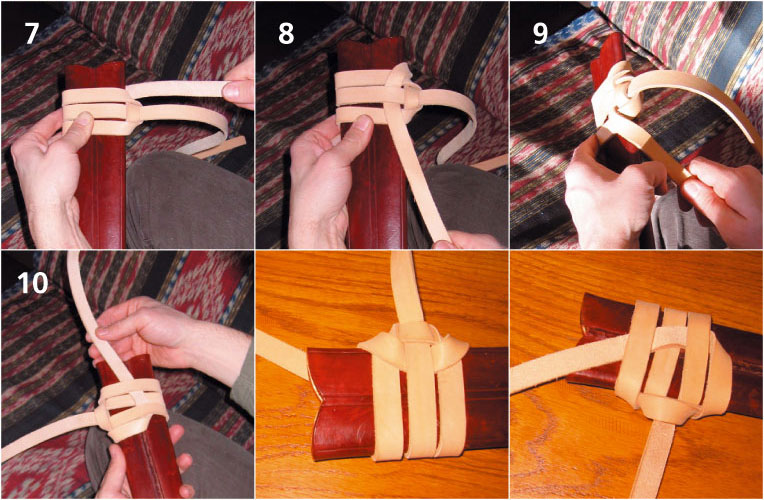
Here are some pictures. I have named the pictures accordingly.
It could be larger but that's all I found.
Attachment: 50.67 KB
Attachment: 58.65 KB
Attachment: 88.65 KB
Attachment: 71.33 KB
[ Download ]
|
|
|
|
|
David Browning

Location: Dallas, Texas Joined: 05 Mar 2006
Posts: 4
|
| Posted: Tue 14 Mar, 2006 4:57 pm Post subject: |
|
|
Thanks for the great pics...
I've been making my own leather armor for the past year or so and just recently started thinking about making a couple of scabbards and belts. Anyone have any plans or pics for the wood core process?
This will save me a lot of time... I'll be sure to post the results down the road
DB
"Remember, no matter where you go, there you are" - Buckaroo Banzai
|
|
|
|
|
Jared Smith
|
| Posted: Tue 14 Mar, 2006 10:54 pm Post subject: |
|
|
Aaron Schnatterly had posted several examples of different scabbards in progress for different swords. This one is one of the closest to "step by step".
http://www.myArmoury.com/talk/viewtopic.php?t=3811
Absence of evidence is not necessarily evidence of absence!
|
|
|
|
|
Bruno Giordan

|
| Posted: Tue 14 Mar, 2006 11:40 pm Post subject: |
|
|
I wonder if:
1) this design was already in use in the XII century
2) any simple design more or less like this is documented for the XII century.
I already have the plans for the usual design for this century but it is a too complex design for somebody with a very limited spare time like me.
|
|
|
|
|
Chuck Russell

|
| Posted: Wed 15 Mar, 2006 3:46 am Post subject: |
|
|
|
write up a blow by blow discription of what your doing in each picture. and finish out the pictures to attach to the belt and maybe nathan will post it in myArmoury as a great tool for sword belts
|
|
  |
|
Jean Thibodeau

|
| Posted: Wed 15 Mar, 2006 4:35 am Post subject: |
|
|
Mathieu;
Thanks those how to picts are very useful and some more instructional articles like this would make interesting feature article
IMHO. Very 
I can never figure out knots by just looking at them in their finished state.
You can easily give up your freedom. You have to fight hard to get it back!
|
|
|
|
|
Michal Plezia
Industry Professional

|
| Posted: Thu 15 Jun, 2006 11:10 am Post subject: |
|
|
Hmm I have e question about that step by step instruction.What happens with the other end of the belt in the lower(closer to tip of the scabbard) knot?Because we finish with two ends(there can't be other way  ) .On the higher knot we use both of them to attach the suspension to scabbard. And in the lower knot the second strap end is invisible.... ) .On the higher knot we use both of them to attach the suspension to scabbard. And in the lower knot the second strap end is invisible....
www.elchon.com
Polish Guild of Knifemakers
The sword is a weapon for killing, the art of the sword is the art of killing. No matter what fancy words you use or what titles you put to
it that is the only truth.
|
|
|
|
|
Chad Sonderberg

|
| Posted: Thu 15 Jun, 2006 11:44 am Post subject: |
|
|
The lower strap end is cut and tucked in under the backside straps. That way the end is both hidden and held securely. I'll post a photo of what it looks like on my scabbard once I get home this evening.
A.C.S.
Lebend mit Ehre, Sterben Sie mit Dignität.
|
|
|
|
|
Michal Plezia
Industry Professional
|
| Posted: Thu 15 Jun, 2006 1:41 pm Post subject: |
|
|
| Chad Sonderberg wrote: | | The lower strap end is cut and tucked in under the backside straps. That way the end is both hidden and held securely. I'll post a photo of what it looks like on my scabbard once I get home this evening. |
Thanks! I would really appreciate that photo! 
www.elchon.com
Polish Guild of Knifemakers
The sword is a weapon for killing, the art of the sword is the art of killing. No matter what fancy words you use or what titles you put to
it that is the only truth.
|
|
|
|
|
Chad Sonderberg
|
| Posted: Thu 15 Jun, 2006 7:33 pm Post subject: |
|
|
Here is the photo I promised:
[ Linked Image ]
As you can see, the end strap wraps through the others before ending under the center strap. This creates a solid hold without the need to glue or stitch the tie.
A.C.S.
Lebend mit Ehre, Sterben Sie mit Dignität.
|
|
|
|
|
Jared Smith
|
| Posted: Thu 15 Jun, 2006 10:01 pm Post subject: |
|
|
Thanks Chad.
I just finished dyeing some straps and a belt for a similar suspension. I will experiment with it on a Crecey (non period) but something to play with!
Absence of evidence is not necessarily evidence of absence!
|
|
|
|
|
Michal Plezia
Industry Professional
|
| Posted: Fri 16 Jun, 2006 2:50 am Post subject: |
|
|
| Chad Sonderberg wrote: | Here is the photo I promised:
As you can see, the end strap wraps through the others before ending under the center strap. This creates a solid hold without the need to glue or stitch the tie. |
Thanks a lot!
www.elchon.com
Polish Guild of Knifemakers
The sword is a weapon for killing, the art of the sword is the art of killing. No matter what fancy words you use or what titles you put to
it that is the only truth.
|
|
|
|
|
Chad Sonderberg
|
| Posted: Fri 16 Jun, 2006 6:23 am Post subject: |
|
|
No problem. I'm glad I could help. 
If you need anymore advice, feel free to ask. I figured out how to replicate this belt design last spring (before this thread was created) from three images I had found. It takes a little while to get the hang of it, but it wears very comfortably for long periods and is easily adjustable for different people.
By period design, the two straps running to back of the belt are attached to a hook like component which can be attached/unattached from the waist belt with ease. I created my 'hook' using a 1/2 inch brass strip (my fittings are brass) that I folded in half, trimmed down the sides of the 'hook' areas, and riveted into place. I can post a couple photos, a riveted and unriveted, if you want.
A.C.S.
Lebend mit Ehre, Sterben Sie mit Dignität.
|
|
|
|
|
Michal Plezia
Industry Professional
|
| Posted: Fri 16 Jun, 2006 6:50 am Post subject: |
|
|
| Chad Sonderberg wrote: | No problem. I'm glad I could help.
If you need anymore advice, feel free to ask. I figured out how to replicate this belt design last spring (before this thread was created) from three images I had found. It takes a little while to get the hang of it, but it wears very comfortably for long periods and is easily adjustable for different people.
By period design, the two straps running to back of the belt are attached to a hook like component which can be attached/unattached from the waist belt with ease. I created my 'hook' using a 1/2 inch brass strip (my fittings are brass) that I folded in half, trimmed down the sides of the 'hook' areas, and riveted into place. I can post a couple photos, a riveted and unriveted, if you want. |
I am doing some research on this kind of suspension.I've found some findings of that belt hangers.The pattern from 15 cent is different from 16 cent because of the ring that is in one line with the rest of the hanger.
Any pictures are worth more than gold Chad So any pics of your solution will be welcomed.
Attachment: 15.74 KB
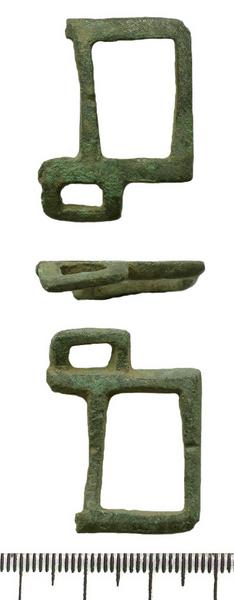
Late medieval
Attachment: 25.49 KB
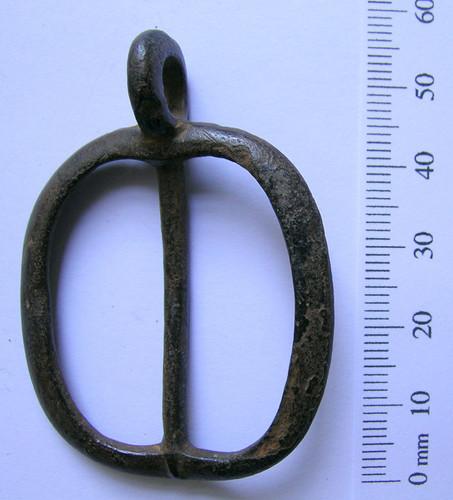
Post medieval
www.elchon.com
Polish Guild of Knifemakers
The sword is a weapon for killing, the art of the sword is the art of killing. No matter what fancy words you use or what titles you put to
it that is the only truth.
|
|
|
|
|
|
|

