Posts: 4,393 Location: Northern California
Tue 14 Feb, 2006 12:36 pm
Albion XIX Blade
Posts: 11,556 Location: San Francisco
Tue 14 Feb, 2006 12:45 pm
Roger, I noticed that blade photo posted as well and was excited to see it. I was also glad to see the detail of the incised ricasso lines. It's quite nice.
I've always liked your ArmArt as well.
Posts: 1,757 Location: Storvreta, Sweden
Wed 15 Feb, 2006 1:19 am
Thanks!
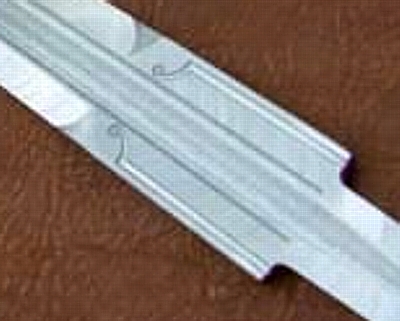
I am happy you appreciate this detail. It is a seemingly small thing, but it makes for a big difference. Some extra care and labour has gone into this to make sure they come out correct. As on some originals there are also decorative lines running on each side of the fuller, ending in a little decorative sign at the fullers end.
The decorative lines in the ricasso of these swords can be forged easily enough if you have the right tools for the job.
A straight chisel with a narrow U shaped section is used for the lenghtwise line, another more or less C- or comma-shaped one for the curve and a third for the circular, dot- or star-shaped ending.
The lines are forged into the ricasso at the very end of the shaping of the blade, when all forging of the blade itself is done.
I think these typical lines in the ricasso were not just for decoration but also a mark for the blade grinder as an aid when grinding the edge bevels.
Regardelss if you forge these decorations or if they are made with CNC machine, it is as much a matter of skill with your tools as an awareness of shape and form.
Using a CNC machine puts high demands on programming (if the result is to look organic) and precision in execution. All the elements in the blade: surface, taper, edge bevels, fullering and decorative lines are done in steps. As the blade is shaped it grows increasingly thinner and will be more and more prone of shifting in its web of steel. The process is not so automatic that the machine can do it without maintenance or supevision. The Machinist works with the machine like a craftsman works with his tools.
It takes awareness, knowledge and skill to get good (and constant) results.
The same holds true with the smith: he has to know his craft and have an understanding of both the technical and aesthetic aspekts of his work.
I think the skill aspekt in the making of the CNC machined blade is often underestimated. It is not a case where you put a length of steel into one end of a machine and get a finished sword out of the other.
Likewise I think the mental aspekt of forging is often underestimated. Awareness of form and proportion is as important as handiness with the hammer.
In a forged sword many operations are also *not* forged, but filed or ground.
It is dfficult to see on the photo, but to me it looks like the decorative groves on the Armart sword are not forged, but cut with a dremel tool or similar. I am only guessing this from what I can make out from the photo.
-Roger, could you have a careful look at this detail and let us know what you think?
Posts: 4,393 Location: Northern California
Thu 16 Feb, 2006 7:56 am
| Peter Johnsson wrote: |
It is dfficult to see on the photo, but to me it looks like the decorative groves on the Armart sword are not forged, but cut with a dremel tool or similar. I am only guessing this from what I can make out from the photo.
-Roger, could you have a careful look at this detail and let us know what you think? |
I talked to a machinist about this. He only saw the photograph but agreed that those lines were probably cut by something like a dremel. When I looked at the sword, they sure didn't look like they were done by chisel, but rather by some kind of rotary tool.
Posts: 11,556 Location: San Francisco
Thu 16 Feb, 2006 12:06 pm
| Roger Hooper wrote: |
| I talked to a machinist about this. He only saw the photograph but agreed that those lines were probably cut by something like a dremel. When I looked at the sword, they sure didn't look like they were done by chisel, but rather by some kind of rotary tool. |
There are claims that ArmArt does not use powertools. I'm not certain that ArmArt, themselves, have made these claims. Whoever made them, they are not true. Based on photos, their shop has many, many powertools in it. The work product, as discussed here, shows tell-tale signs of powertool use. No big deal, to me, as I don't personally care what creates the final product as long as it looks "the part". Erik Stevenson, for example, has made a few hilts for me with extremely detailed chiseling that was done with powertools. It's all about the end product, for me.
Posts: 4,393 Location: Northern California
Mon 27 Feb, 2006 7:57 am
Peter, perhaps that photo of your XIX blade is creating an illusion because the resolution isn't that great. If they aren't aready there, I respectfully suggest that you should move the curved lines to the circle down almost to the bottom of the ricasso so that the line curves closely reflect the curves at the ricasso end. If you look in
Oakeshott's
Records at XIX.1 and XIX.2, you will see that thjose incised lines are almost on top of that curved ricasso edge, creating a very attractive effect.. In the photo above, the line appears to be about 5mm above that place.
If I'm misreading the photo, never mind.
Posts: 219 Location: Aurora, Ohio
Mon 27 Feb, 2006 10:13 am
| Roger Hooper wrote: |
Peter, perhaps that photo of your XIX blade is creating an illusion because the resolution isn't that great. If they aren't aready there, I respectfully suggest that you should move the curved lines to the circle down almost to the bottom of the ricasso so that the line curves closely reflect the curves at the ricasso end. If you look in Oakeshott's Records at XIX.1 and XIX.2, you will see that thjose incised lines are almost on top of that curved ricasso edge, creating a very attractive effect.. In the photo above, the line appears to be about 5mm above that place.
If I'm misreading the photo, never mind. |
Hey Roger,
The blade blank in the photo has not been ground yet, so what you are seeing is the raw blank (only heat-treated with the oxides removed). The process of grinding the blade to the proper shape will move the plunges into their correct location. This is a case were the machining doesn't quite make the correct shaping (isn't possible to) and it has to be done by hand on the grinding wheel.
This also illustrates the amount of work that actually goes into finish one of our "Machined blades". The blank is close, but it is still only a blank, not a true blade. All of the edge character and refining of these generalized features must be brought out by a skilled grinder.
Posts: 4,393 Location: Northern California
Mon 27 Feb, 2006 11:06 am
Thanks for the answer, Jason
You
cannot post new topics in this forum
You
cannot reply to topics in this forum
You
cannot edit your posts in this forum
You
cannot delete your posts in this forum
You
cannot vote in polls in this forum
You
cannot attach files in this forum
You
can download files in this forum