Seriously... ;)
Don't know if most remember this, but Tom MacDonald bought himself a Clark 1086 a long time ago. He had a rather eclectic set of fittings made by Howard and the sword rather quickly polished and mounted by someone else. For a variety of reasons that really aren't important the sword ended up in my shop with a promise I made to Howard and Mac. Well, I've been *very* slow in getting it done...
Regardless, after a series of starts and stops, I started it up again. I was going to post a nice, long post about this when the whole project was completed. I had done the foundation work up through kaisei, built the saya and tsuka cores, and had just started in the next step of the polishing when I managed to remove a major chunk of my right thumb. "Wow, that didn't hurt at all... OOOOOOOOUUUUUUUCCCCCHHHHHH!!!!" My neural pathways must have been slowing down. Anyway, I couldn't polish for a while so I finished up his saya, been doing a bunch of other things, and now I'm getting antsy. I won't get to the polish for a few more weeks, but I thought I'd just share part of what I'd done already fwiw.
For those not familiar with japanese swords, this style of sword is called a shinogi zukuri style. it has a definite tip geometry that is in fact a very subtle and complex shape. These things aren't ground on with grinders but really can only be effectively and correctly created by careful, slow work on the stones. The prior polish had totally ignored this entire area (as well as a number of other things). So the entire blade was reshaped from the ground up and I spent a *very* long time installing the correct geometry for the kissaki. I had to work with what was left so it wasn't exactly what I wanted, but I think it is improved.
I also had to make a few subtle changes the tsuba and repatinate it. And then built custom seppa for the slightly different shaping howard Clark used for the fuchi on this sword. I also adjusted a few angles on the habaki to make the angles and fit of the saya better.
anyway, a few photos fwiw. Till I get more time to shoot the saya or at least get back to polishing the bloody (almost literally) thing.
[ Linked Image ]
[ Linked Image ]
[ Linked Image ]
[ Linked Image ]
That's a neat tsuba. This is 'shaping' up really nice, Keith. Congrats on the nifty blade, Thomas.
*rimshot*
*rimshot*
| Keith Larman wrote: |
| ...when I managed to remove a major chunk of my right thumb.... |
:eek: Prayers for a speedy recovery. :eek:
| Steve Grisetti wrote: | ||
:eek: Prayers for a speedy recovery. :eek: |
Nah, it wasn't so bad -- all meat and nothing else. Usually we call these type of cuts "deli slices" but this one was deep. Bit isn't anything that won't heal. And it is, after all, an occupational hazard of the job.
The biggest problem I've had is that it's the area of the thumb where I would press fingerstones on the blade. The weird thing is that the surface is numb, but because there is so much scar tissue forming (and still healing of course) any pressure on it hurts deep inside. And it's not quite healed enough yet to do that anyway. So finishing polish is on hold for a while...
Awesome project! I hear you about the thumb though. I managed to whack a deep slice in my index finger (nicking the bone I belive) and it too hurts when pressure is put against it, compressing the two sides of the cut. This was a year ago and its still really painful to press it against things. But mine was from a yari ;)
Heal fast and best wishes as always!
-Alex
Heal fast and best wishes as always!
-Alex
Hi Keith
Very sorry to hear about your injury, but I must say it was not in vain ..... Wow, the kissaki looks awesome !
Pretty amazing how your dealing with the mounting issues on that funky 'lil (basket-hilt) Howard tsuba, too !
Great work all around ..... I can't wait to see the end result of what you've done, and are doing, to make this piece shine !
Howard's blades & furniture deserve the best and I know with you that is what I'm getting !
Many thanks to you & Howard for seeing to it that this piece becomes something really special !
Slàinte, my friends, Mac
P.S.
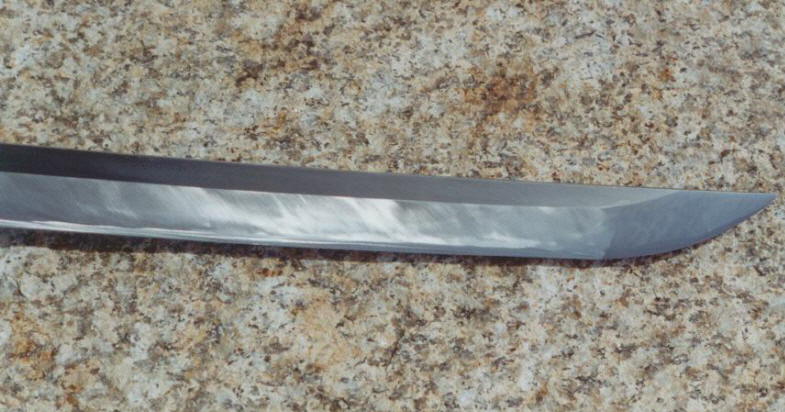
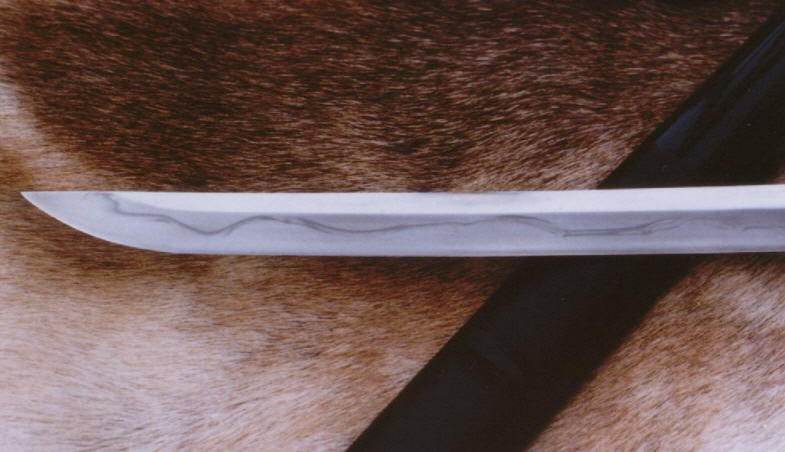
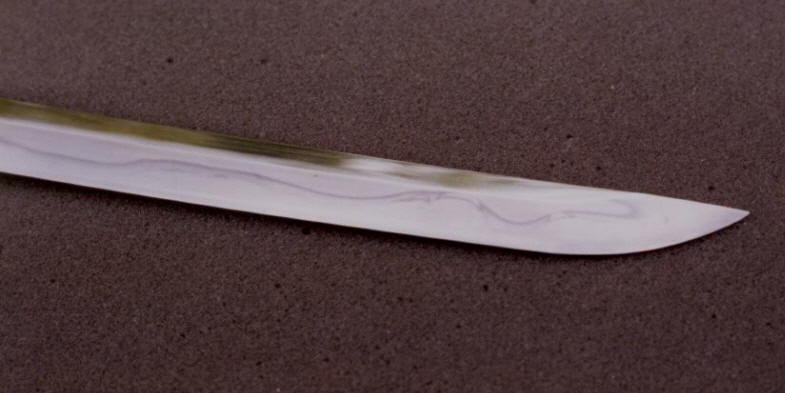
Here are are few pic's that show the kissaki's original shape (first two), from Howards hand, and two that show how it looked after I'd had a non-traditional type polish done ( sorry the images are not clearer ). But this should help to give eveyone an idea of where Keith had to start with this one, as well as where he's taken it ! Kudos, Keith !
 Attachment: 65.51 KB
Attachment: 39.28 KB

Attachment: 50.89 KB
Attachment: 37.24 KB
Very sorry to hear about your injury, but I must say it was not in vain ..... Wow, the kissaki looks awesome !
Pretty amazing how your dealing with the mounting issues on that funky 'lil (basket-hilt) Howard tsuba, too !
Great work all around ..... I can't wait to see the end result of what you've done, and are doing, to make this piece shine !
Howard's blades & furniture deserve the best and I know with you that is what I'm getting !
Many thanks to you & Howard for seeing to it that this piece becomes something really special !
Slàinte, my friends, Mac
P.S.
Here are are few pic's that show the kissaki's original shape (first two), from Howards hand, and two that show how it looked after I'd had a non-traditional type polish done ( sorry the images are not clearer ). But this should help to give eveyone an idea of where Keith had to start with this one, as well as where he's taken it ! Kudos, Keith !
Sorry about being a bit slow to reply. One of the joys of having a kid in preschool is the kid catches bug from the other little germ carrying rugrats, brings it home, shares with daddy, next thing daddy is snorting, popping motrin, and basically miserable. I swear, does this catching every freaking cold in existance thing ever end with kids? Man, I have incredible sympathy for preschool teachers... They must incredible immune systems after all those years.
Anyway, yeah, the tip was an interesting challenge shall we say. Some stuff was never removed that should have been (not a problem), but some other stuff was rounded, shifted, and dug out a bit too (a vastly bigger problem since I can't put steel back). So it was interesting installing the geometry. I must admit it is kinda fun because I imagine it must be like chiselling at a big block of marble trying to find David inside... ;) But now it has a crisp ko-shinogi (the ridge line of the tip), a real yokote (not as much as I'd like, but it's there now), and I'm much happier with how everything flows correctly from the body of the blade forming the kissaki at the end.
Today I was shooting a gunto mount that I have up on ebay. So I took two shots of the completely new saya for the sword. The circles are something Tom needs to explain and I hope I'm reasonably "accurate" in how I handled them. Nonetheless, this sword is modern made by a gaijin, with modern fittings so I don't see why we can't do something a bit "off the beaten track" with the design on the saya.
Here ya go.
[ Linked Image ]
[ Linked Image ]
The concentric circles were cut from gold leaf and hand placed on the finish of the saya. It was followed by a very thin clear coating to protect the foil. I rather like how it turned out...
That's all for now... To finish the polish and the tsuka now...
Verrrry nice, Keith !
Man that looks awesome ..... you've really done this big Scot proud ! Thank you !
To explain ....
Awhile back, Keith had asked me if I wished to have a personal touch added to the saya, like a family crest, or some sort of design that might mean something to me (given my constant Scottish ramblings over the years ;-), as he'd been working with this gold-leaf technique on his saya !
I considered the basic clanDonald family crest, etc., but that seemed a tad too busy and very not in keeping with the spirit of simple elegance for a sword of this type ( but that is just my take, as I'm sure there are many not so simple Japanese styled saya around, traditional or otherwise :-)
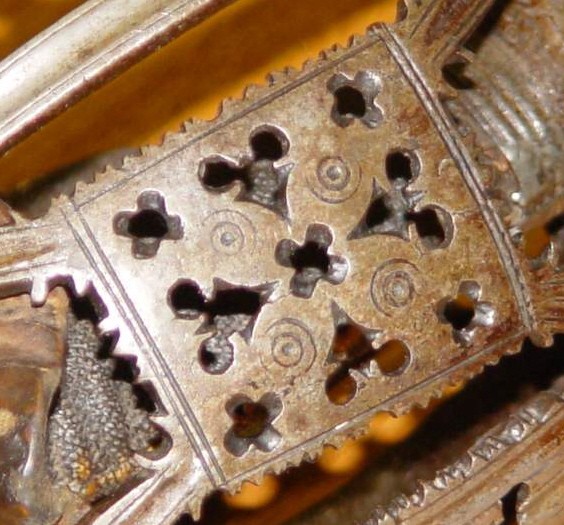
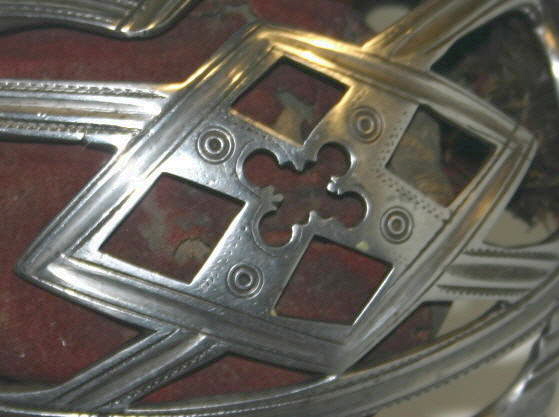
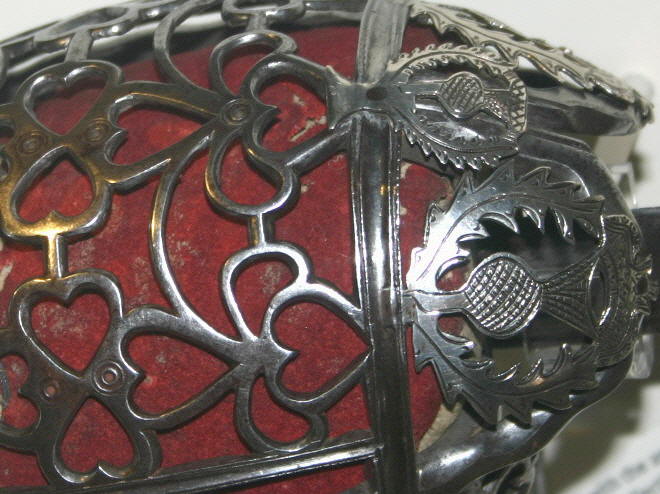
Anyway .... I was starring at a photo of a Walter Allan of Stirling basket hilt screen and those little "cup & ring" marks ( or 'Dot & Circle' ornamentation) and they just jumped out at me !
Perfect .... they are simple (at least in design), they have the Scottish decorative connection thing going (as well as the 5000 year mystery thing), and they draw your eyes in ...... ( insert Twilight Zone music) na-na-na-na na-na-na-na !
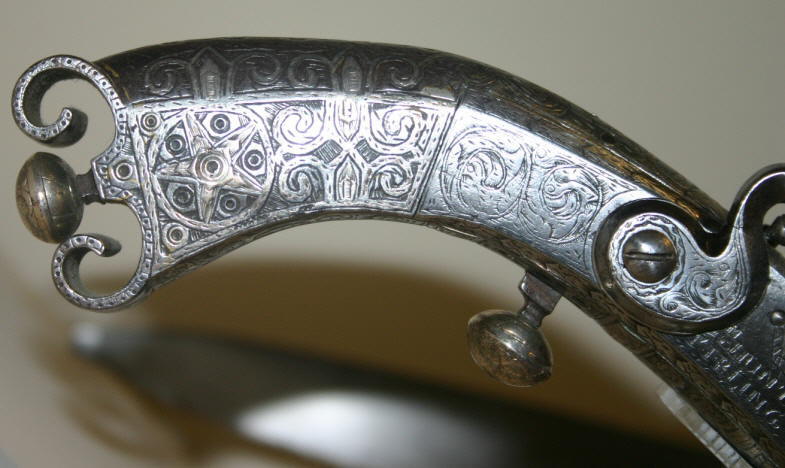
Many Scottish objects such as swords, sporran cantles, scabbards, pistols, belt fittings, etc., bear these decorative, or perhaps symbolic ?, marks ! (I'll attach a few images that show them)
Also I'll add a few links to some pages that discuss these marks !
Many thanks, Keith ..... awesome job, my friend !
Keys to the Past
Cup & Ring marks
Photos: T. McDonald, 2005.
Attachment: 95.39 KB
Attachment: 70.87 KB
Attachment: 56.69 KB
Attachment: 48.64 KB
Attachment: 56.38 KB
Attachment: 66.63 KB
Man that looks awesome ..... you've really done this big Scot proud ! Thank you !
To explain ....
Awhile back, Keith had asked me if I wished to have a personal touch added to the saya, like a family crest, or some sort of design that might mean something to me (given my constant Scottish ramblings over the years ;-), as he'd been working with this gold-leaf technique on his saya !
I considered the basic clanDonald family crest, etc., but that seemed a tad too busy and very not in keeping with the spirit of simple elegance for a sword of this type ( but that is just my take, as I'm sure there are many not so simple Japanese styled saya around, traditional or otherwise :-)
Anyway .... I was starring at a photo of a Walter Allan of Stirling basket hilt screen and those little "cup & ring" marks ( or 'Dot & Circle' ornamentation) and they just jumped out at me !
Perfect .... they are simple (at least in design), they have the Scottish decorative connection thing going (as well as the 5000 year mystery thing), and they draw your eyes in ...... ( insert Twilight Zone music) na-na-na-na na-na-na-na !
Many Scottish objects such as swords, sporran cantles, scabbards, pistols, belt fittings, etc., bear these decorative, or perhaps symbolic ?, marks ! (I'll attach a few images that show them)
Also I'll add a few links to some pages that discuss these marks !
Many thanks, Keith ..... awesome job, my friend !
Keys to the Past
Cup & Ring marks
Photos: T. McDonald, 2005.
Last edited by Thomas McDonald on Fri 11 Nov, 2005 3:26 pm; edited 1 time in total
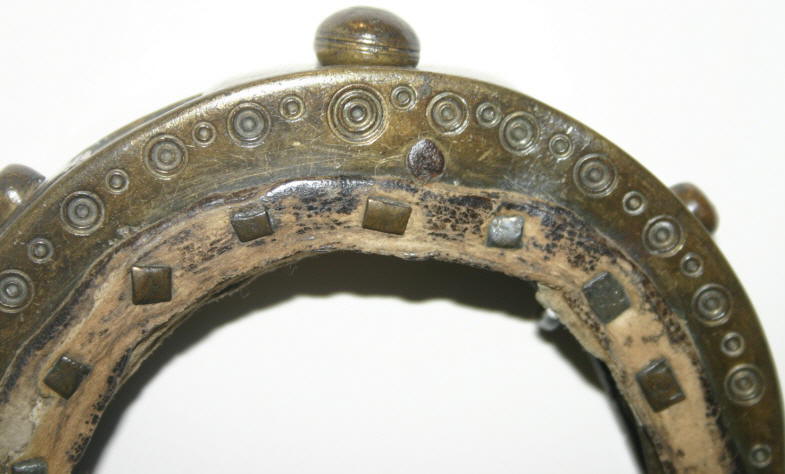
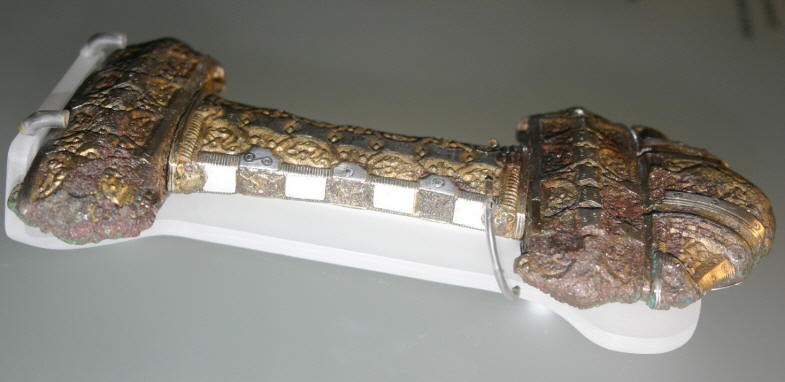
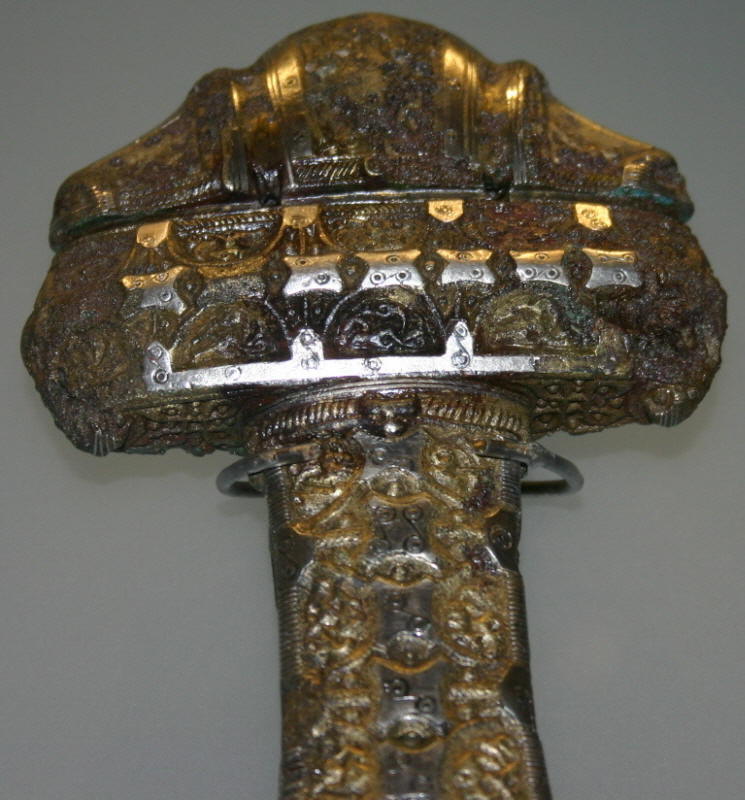
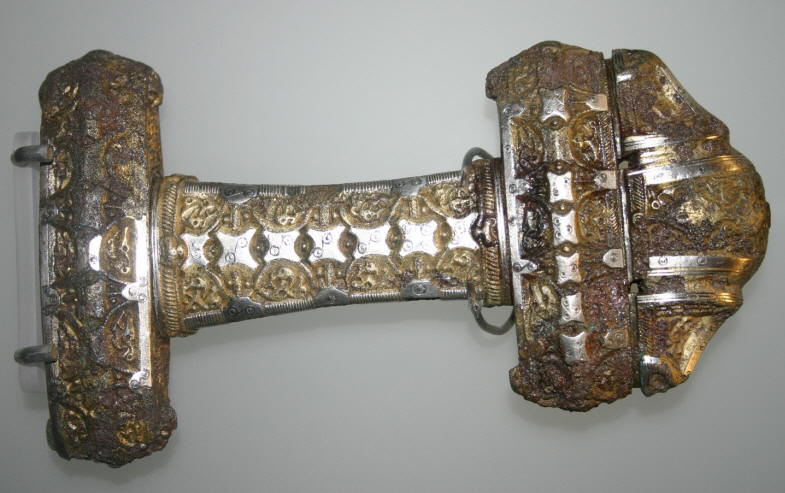
Even them Vikings seemed to like them circles !
Mac
Photos : T. McDonald, 2005. -- The Museum of Scotland, Edinburgh.
Attachment: 36.14 KB
Attachment: 84.27 KB
Attachment: 60.31 KB
Mac
Photos : T. McDonald, 2005. -- The Museum of Scotland, Edinburgh.
And as I was laying them out on the saya in my initial designs, I got thinking about the three of us. The owner, the smith, the guy doing the polishing and mounting. These are almost always the coming together of the desires,wishes, abilities, mistakes, etc. of all three of us. So three of them with three parts each... {shrug} ya know, it works for me... ;)
I had a young fella e-mail me recently wanting to know how I came up with my ideas... Did I meditate on them, do I spend days in libraries going over materials... Nope. Sometimes it's that simple. the customer says "I like this" and I think "yeah, that works and it kinda makes sense" (given some probably irrelevant detail).
or as I told one good customer of mine... I work on things until the little voices in my head quiet down. Then I know its going to be okay... ;)
this time it was really all mac's idea on the circle dots. I rather like how they turned out although I don't recall ever seeing anything like that on japanese pieces. But what the heck -- a crazed basket guy can have whatever he wants on his American made Japanese sword. :)
Oh, and I was going to suggest something Mac. I don't know if Howard has the time right now, but what about having him put a single one of those circle/dot pattern things on the tsuba... Just an idea...
Hi Keith
I like the way you think, laddie !
Aye, the power of three ..... I like it :-)
Wonderful suggestion, Keith ..... that would just be so cool !
If Howard's willing I'd certainly love to see it happen ! Guess this is how a theme kinda develops out of nowhere, 'eh !
Sword of Dreams - "Is this Heaven" ? .... "No, it's Iowa " ! ;-) Mac
I like the way you think, laddie !
Aye, the power of three ..... I like it :-)
| Quote: |
| Oh, and I was going to suggest something Mac. I don't know if Howard has the time right now, but what about having him put a single one of those circle/dot pattern things on the tsuba... Just an idea... |
Wonderful suggestion, Keith ..... that would just be so cool !
If Howard's willing I'd certainly love to see it happen ! Guess this is how a theme kinda develops out of nowhere, 'eh !
Sword of Dreams - "Is this Heaven" ? .... "No, it's Iowa " ! ;-) Mac
Cool. I'll get started on the handle and once I'm sure all that's set right I'll shoot the tsuba off to Howard if he is amenable to the idea. We'll see what we can come up with...
It's done, and on its way ...... :-)
Keith posted the following on Bugei's "Custom Sword Crafts" forum:
Just finished a Looooong term project. Lots of photos
It looks incredible, just fantastic .... I can't wait to see it !
A huge thank you to Howard Clark & Keith Larman, both of whom I am forever indebted to !
Drinks all around, ;-) Mac
Thanks, Mac.
Since I'd posted the thread over there (and it is also a Phpbb board), I'll cut and paste the post there for those who want to deal with it here.
---------------------------
Years ago I agreed to redo a blade for a good guy named Tom McDonald. He is a western sword guy -- baskethilts and the like. Loved the stuff. But he was also impressed with Howard Clark's work so he bought a sword. He found someone to do a quick polish and mount. Here's a photo of the blade after that initial work.

Well, for a variety of reasons I ended up volunteering to redo the polish and mount on the piece. One thing you can see in the above photo is how the blade looks. You can see the hamon of course. But *how* does the surface look? Cleaning it up further revealed deep scratches, dark oxides in the habuchi, and very rounded soft lines. No kissaki was defined to speak of. And if you look closely along the edge you can see how the edge is very abrupt in formation. At that time Howard tended to leave the blades with a very abrupt edge. It is up to the polish to "roll up" that edge and form a proper shaping for proper cutting. Niku. At that location the blade will tend to really "clunk" in a target. And given how tough 1086 is, well, that overly thick edge geometry is pretty much not giving any advantage whatsoever.
Anyway, other issues included the mounts. Howard had made a very unusual tsuba (but not necessarily without precedent historically). For lack of a better term I called it a giant pringle. ;) the problem with this was getting parts to lie flat, stay tight, etc. Also, the fuchi kashira were by howard but were somewhat small given the blade. And the kashira was even smaller compared to the fuchi which made it *very* difficult to create a flowing, aligned tsuka. The original craftsman made a very awkward, bulky tsuka. Which made sense (sort of) given that you simply need clearance to build things safely. Getting a flow, clean lines, etc. is much more complicated when things are that tight.
My first thing was to toss the old koshirae. I simply do things my own way and wanted to start anew. Next was to address the rounded lines, reset the overall geometry including niku, and cut in a proper kissaki. That took a lot of time. And realize that it sometimes take longer to fix something than to do it right originally. By rounding surfaces you loose the easy ability to "set" a proper shape and "push" it across the surface. You lose reference points. Reinstalling all that takes a lot of time, energy, and sometimes isn't even possible...
Here's the blade at kaisiedo.
[ Linked Image ]
[ Linked Image ]
That was a *lot* of work resetting all that. And properly defining that geometry was really an exercise in patience given how the hardened material flows back into the shinogi ji and mune.
The customer also had a thing about a theme seen in his baskethilts. It is a sort of "bullseye" pattern. Concentric circles. So I decided to inlay gold leaf into the saya to create three bullseyes -- one for Howard, one for me, one for the customer. And I sent the tsuba back to Howard and asked him to hand engrave them into the tsuba. No, not traditional, and not to everyone's liking, but this is the customer's sword and it is what he likes. Which is what matters... My job is to make it the best I can. And drawing outside the lines is okay with me as long as I don't sacrifice the "spirit" of the craft. Function and safety first.
Anyway, I finally managed to finish the piece. Howard Clark 1086 completely repolished and remounted.
[ Linked Image ]
The tsuka was difficult at best to shape and make work. I ended up doing a few extra things to reinforce it because things got right up to the limits of my comfort level. The rayskin is full wrap, lacquered black, with menuki of ken with entwined dragons (my one fully traditional addition to the fittings -- I had to). ;) The wrap was done by Jesse Pelayo.
[ Linked Image ]
The next photo shows how a tsuka matches up to the tsuba. The seppa is copper that I left "natural". It is small and fit exactly to the fuchi because that was the entire area I had flush on the tsuba seppa-dai. Notice how the ito lies flush with the fuchi.
[ Linked Image ]
here's the kissaki now. And the saya kojiri down below (including showing the gold leaf "bullseyes").
[ Linked Image ]
This next photo helps show how the geometry was changed with respect to niku. It also helps show how flat the shinogi ji is now and how much time was spent trying to crisp up the lines.
[ Linked Image ]
This next photo I took originally to show the habaki and tsuba. However, I later noticed the reflection in the shinogi ji of the display rack. Which raised something in my mind -- I've seen a lot of polishes lately on-line on modern stuff where people seem to completely forget about major aspects of the "aesthetic" of the Japanese style sword. One major complaint I have is people skipping burnishing. The reason the shinogi-ji looks like a mirror is that I spent at least a full day with a burnishing rod carefully compressing the steel surface to make it look like that. This isn't just about aesthetics either. The shinogi ji and mune were burnished also because it helps make the steel more resistant to rust. Users, if they're going to touch the blade in training will usually touch these areas the most. Especially the mune. No, modern steels are not easy to burnish. Nor are a lot of things in polishing. That doesn't mean we should just skip them. But that's a rant probably best for another post... Here's the photo.
[ Linked Image ]
And finally... one that I took because it just reminded me of a mountain scene. How cool is this?
[ Linked Image ]
That's all folks...
Since I'd posted the thread over there (and it is also a Phpbb board), I'll cut and paste the post there for those who want to deal with it here.
---------------------------
Years ago I agreed to redo a blade for a good guy named Tom McDonald. He is a western sword guy -- baskethilts and the like. Loved the stuff. But he was also impressed with Howard Clark's work so he bought a sword. He found someone to do a quick polish and mount. Here's a photo of the blade after that initial work.
Well, for a variety of reasons I ended up volunteering to redo the polish and mount on the piece. One thing you can see in the above photo is how the blade looks. You can see the hamon of course. But *how* does the surface look? Cleaning it up further revealed deep scratches, dark oxides in the habuchi, and very rounded soft lines. No kissaki was defined to speak of. And if you look closely along the edge you can see how the edge is very abrupt in formation. At that time Howard tended to leave the blades with a very abrupt edge. It is up to the polish to "roll up" that edge and form a proper shaping for proper cutting. Niku. At that location the blade will tend to really "clunk" in a target. And given how tough 1086 is, well, that overly thick edge geometry is pretty much not giving any advantage whatsoever.
Anyway, other issues included the mounts. Howard had made a very unusual tsuba (but not necessarily without precedent historically). For lack of a better term I called it a giant pringle. ;) the problem with this was getting parts to lie flat, stay tight, etc. Also, the fuchi kashira were by howard but were somewhat small given the blade. And the kashira was even smaller compared to the fuchi which made it *very* difficult to create a flowing, aligned tsuka. The original craftsman made a very awkward, bulky tsuka. Which made sense (sort of) given that you simply need clearance to build things safely. Getting a flow, clean lines, etc. is much more complicated when things are that tight.
My first thing was to toss the old koshirae. I simply do things my own way and wanted to start anew. Next was to address the rounded lines, reset the overall geometry including niku, and cut in a proper kissaki. That took a lot of time. And realize that it sometimes take longer to fix something than to do it right originally. By rounding surfaces you loose the easy ability to "set" a proper shape and "push" it across the surface. You lose reference points. Reinstalling all that takes a lot of time, energy, and sometimes isn't even possible...
Here's the blade at kaisiedo.
[ Linked Image ]
[ Linked Image ]
That was a *lot* of work resetting all that. And properly defining that geometry was really an exercise in patience given how the hardened material flows back into the shinogi ji and mune.
The customer also had a thing about a theme seen in his baskethilts. It is a sort of "bullseye" pattern. Concentric circles. So I decided to inlay gold leaf into the saya to create three bullseyes -- one for Howard, one for me, one for the customer. And I sent the tsuba back to Howard and asked him to hand engrave them into the tsuba. No, not traditional, and not to everyone's liking, but this is the customer's sword and it is what he likes. Which is what matters... My job is to make it the best I can. And drawing outside the lines is okay with me as long as I don't sacrifice the "spirit" of the craft. Function and safety first.
Anyway, I finally managed to finish the piece. Howard Clark 1086 completely repolished and remounted.
[ Linked Image ]
The tsuka was difficult at best to shape and make work. I ended up doing a few extra things to reinforce it because things got right up to the limits of my comfort level. The rayskin is full wrap, lacquered black, with menuki of ken with entwined dragons (my one fully traditional addition to the fittings -- I had to). ;) The wrap was done by Jesse Pelayo.
[ Linked Image ]
The next photo shows how a tsuka matches up to the tsuba. The seppa is copper that I left "natural". It is small and fit exactly to the fuchi because that was the entire area I had flush on the tsuba seppa-dai. Notice how the ito lies flush with the fuchi.
[ Linked Image ]
here's the kissaki now. And the saya kojiri down below (including showing the gold leaf "bullseyes").
[ Linked Image ]
This next photo helps show how the geometry was changed with respect to niku. It also helps show how flat the shinogi ji is now and how much time was spent trying to crisp up the lines.
[ Linked Image ]
This next photo I took originally to show the habaki and tsuba. However, I later noticed the reflection in the shinogi ji of the display rack. Which raised something in my mind -- I've seen a lot of polishes lately on-line on modern stuff where people seem to completely forget about major aspects of the "aesthetic" of the Japanese style sword. One major complaint I have is people skipping burnishing. The reason the shinogi-ji looks like a mirror is that I spent at least a full day with a burnishing rod carefully compressing the steel surface to make it look like that. This isn't just about aesthetics either. The shinogi ji and mune were burnished also because it helps make the steel more resistant to rust. Users, if they're going to touch the blade in training will usually touch these areas the most. Especially the mune. No, modern steels are not easy to burnish. Nor are a lot of things in polishing. That doesn't mean we should just skip them. But that's a rant probably best for another post... Here's the photo.
[ Linked Image ]
And finally... one that I took because it just reminded me of a mountain scene. How cool is this?
[ Linked Image ]
That's all folks...
Beautiful work as always Keith!
Hi Keith
Thank you so very much ..... it looks absolutely FANTASTIC, just a wonderful job all around!
(Howards lil cup & ring just brings it all together
I know alot of blood, sweat, and tears, went into this project, as well as boat loads of generosity ..... it will not be forgotten !
I am forever indebted to Howard Clark, a true gentleman, and a most talented & honorable soul ...... Thank you, Sir !
Keith .... thank you, my friend ..... your dedication, skill, and excellence, is truly inspiring !
Needless to say you boys are on my Christmas list
Slàinte, Mac
Holy Heck Keith!
I managed to miss the original post on this back in 2005, I always wondered just what had happened to Mac's adventure into the Japanese sword world. I remember some time ago he had asked for straight up opinions of the original job... and they were given to him. :) I sort of assumed that he had sold the blade after that since it wasn't really his primary area of interest and no more was said about it. I'm sure that the thumbs down that was given at the time was probably a little difficult to take considering the time and money he had put into the project but he took it like a man and apparently great things came of it. :) Mac if you have to own a Japanese sword you might as well make it an outstanding Japanese sword and that's apparently what the three of you have come up with.
I managed to miss the original post on this back in 2005, I always wondered just what had happened to Mac's adventure into the Japanese sword world. I remember some time ago he had asked for straight up opinions of the original job... and they were given to him. :) I sort of assumed that he had sold the blade after that since it wasn't really his primary area of interest and no more was said about it. I'm sure that the thumbs down that was given at the time was probably a little difficult to take considering the time and money he had put into the project but he took it like a man and apparently great things came of it. :) Mac if you have to own a Japanese sword you might as well make it an outstanding Japanese sword and that's apparently what the three of you have come up with.
Wow. What a spectacular result!
I'm glad people like the results. Hopefully Mac will still like it when he has it in hand... ;) Photos are one thing, holding it is another.
It took me way too long to get this done. And I just realized I have a few pieces by Harlan that I should have finished by now as well. My problem was that I took that one sort of outside the normal way and it wasn't really in my schedule. And then I attached Harlan's to that same unofficial queue. Meaning I'm way behind... Which has made me realize that what I really need is someone to manage me. I don't need an assistant, I need a keeper... ;)
The sword itself was quite a balancing act. Making those fittings "work" with the sword was really the biggest issue. I'm glad Mac offered up the idea of the bullseye - after all the sword is thoroughly modern, modern steel, modern process, even the polish needs to have modern methods in part due to the difficulties of working with that tough, vanadium rich steel. And burnishing that stuff is an exercise in either patience or futility. I haven't decided which yet. Anyway, the point is that this piece is really distinctive of Howard's work. A robust, healthy blade. His fittings which are really wonderful up close -- that pattern welded fuchi kashira is something amazing. The tsuba is somewhat like some antiques I've seen but still distinctively Howard. So when I was trying to figure out a way to tie all these pieces together it was great that Mac offered up the "bullseye" motif as an addition. I had been experimenting with gold leafing in the saya finish so it was good to have an excuse to try it out. Then asking Howard to engrave the bullseyes into the tsuba just added that extra bit that things needed. No, it will not be everyone's taste -- tastes will vary as they should. The point was to satisfy the customer's desires and tastes within the broad realm of the Japanese sword.
I think an important point in the custom sword world is to make something that appeals to the buyer while doing it properly. So you don't have to be a slave to convention and can "draw outside the lines" as a craftsman if you're doing it while keeping an eye on how it should be done in terms of function, safety, form and flow. Too often nowadays the low end mass produced stuff is being done to the lowest common denominator. It is one thing to draw outside the lines keeping form, function, safety and the tradition in mind and quite another to cut corners at the expense of form, function, safety and tradition. But I suppose that's a rant for another time. Enjoy the sword, Mac!
As an FYI, that bulls-eye pattern is also known as the "cup and ring" pattern and dates back to ancient stone-carvings. There's a little more info (very little) on the pattern here: http://www.myArmoury.com/review_ac_cupr.html
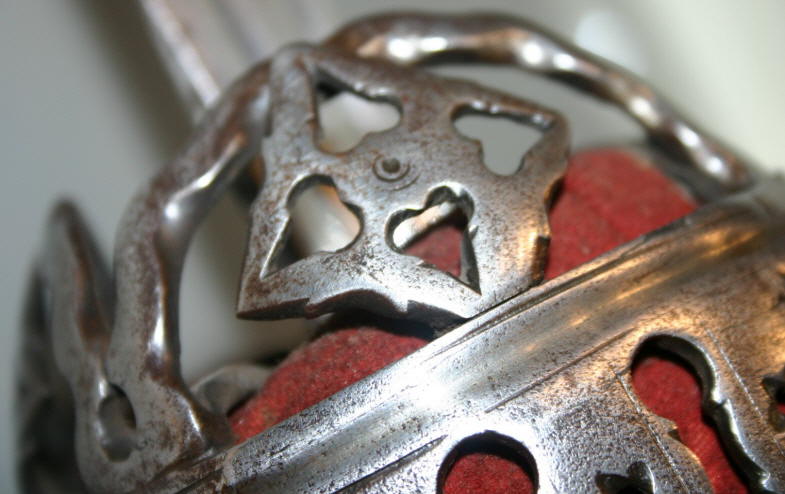
Most famously in the arms and armour world, it was used on this sword from the National Museum of Scotland:
[ Linked Image ]
Keith, this is fantastic work, by the way.
Most famously in the arms and armour world, it was used on this sword from the National Museum of Scotland:
[ Linked Image ]
Keith, this is fantastic work, by the way.
Page 1 of 2
You cannot post new topics in this forumYou cannot reply to topics in this forum
You cannot edit your posts in this forum
You cannot delete your posts in this forum
You cannot vote in polls in this forum
You cannot attach files in this forum
You can download files in this forum
All contents © Copyright 2003-2006 myArmoury.com — All rights reserved
Discussion forums powered by phpBB © The phpBB Group
Switch to the Full-featured Version of the forum
Discussion forums powered by phpBB © The phpBB Group
Switch to the Full-featured Version of the forum