| Author |
Message |
|
James H.
|
 Posted: Fri 05 Sep, 2008 8:02 pm Post subject: Posted: Fri 05 Sep, 2008 8:02 pm Post subject: |
 |
|
|
Thank you for the help in clarification. The shield will be a hanger to mount with my sword but I am the type of person who would like to be able to boast that it is a functional shield perfectly capable of handling the rigors of realistic battle such as original shields (Im thinking of the middle 13th to middle 14th centuries) and I would also like to get a feel for what a shield and sword maneuvers would have felt like for someone of this time. It will be on the wall for most of the time though and taken down for festivals and Halloween on occasions. Sturdy or not I realize no shield was made to last forever and I would not put it through too much abuse though I would like to practice mock sword play with it. The metal edging does sound much more difficult to do, I have seen pictures of the rawhide sewn on in this thread and on other sites and it looks rather nice and simple to do.
|
|
  |
 |
|
James H.
|
| Posted: Sat 06 Sep, 2008 8:01 am Post subject: |
|
|
|
A new question, which is superior in performance and durability as well as appearance. Would it be the flat heater shield or curved? The curve looks nicer I think but is it as efficient, it seems as the curved form would "glance" the attacking blade more and prevent shock to the forearm. Would this be correct thinking?
|
|
|
|
|
|
Bram Verbeek
|
| Posted: Sun 07 Sep, 2008 4:28 am Post subject: |
|
|
Curved is superior, you'll have a lot less stress on your arm. You really don't want to catch a blow from a large axe or polearm straight to your arm through your shield, if it glances off a little, the shock is reduced.
They are harder to make, but have always been deemed worthy of the effort
|
|
|
|
|
|
James H.
|
| Posted: Sun 21 Sep, 2008 3:35 pm Post subject: |
|
|
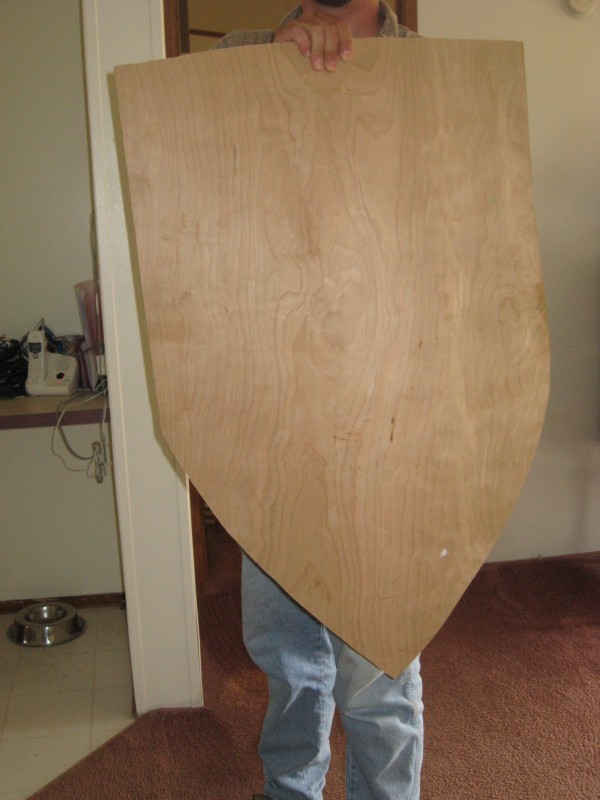
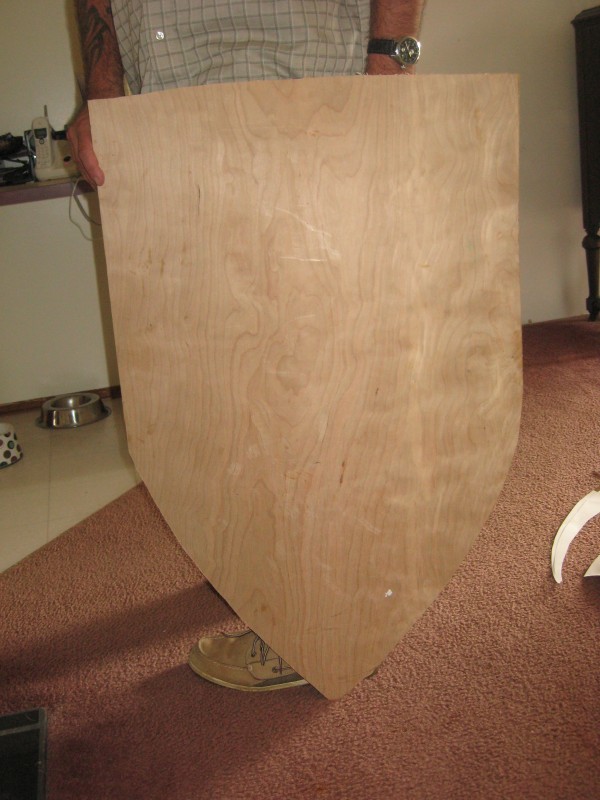
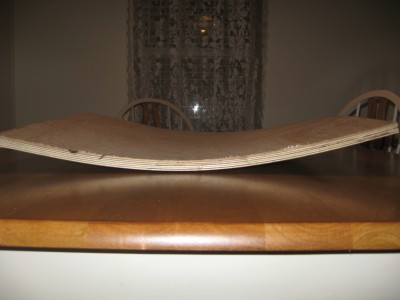
So, I made this shield but I might of messed up. I used three layers of birch 5mm plywood brought together with Elmer's wood glue. I curved it as well as possible across a steel oil drum. It was not as even of a curve as I would like but still turned out pretty nice I think. Curving this was not as easy as I had thought it would be.
After this was done I cut the shape I wanted. It is 24"x36" large heater type. I am happy, considering I am no craftsman by any means. But I do have a concern, three layers of the birch plywood may have been too much. This shield weighs ten ponds. Is that average for a shield this size? I was thinking of cutting the length and maybe slight of the width as well.
Any comments or recommendations is welcome. Thanks.
 Attachment: 81.56 KB Attachment: 81.56 KB
Attachment: 101.2 KB
|
|
|
|
|
|
James H.
|
| Posted: Sun 21 Sep, 2008 3:36 pm Post subject: |
|
|
Yes, I also know my carpet is dirty, if that is what you are thinking. 
|
|
|
|
|
Gavin Kisebach

|
| Posted: Sun 21 Sep, 2008 8:52 pm Post subject: |
|
|
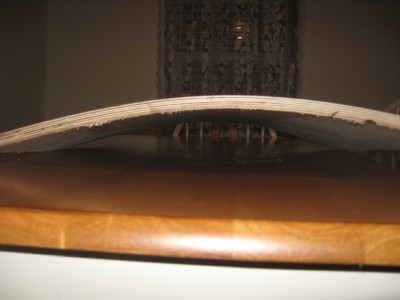
Actually I was wondering if you can get a top down view so that we can see the dishing. Elmers Wood Glue, right? That works very well for dishing.
A couple of important notes on dishing. First, the grain of the wood matters a lot; if you try to dish agaist the grain you'll split the wood and waste materials.
Second, some people soak the wood prior to pressing. I haven't needed to do this for most of the shields that i've pressed, but I recently tried to press birch for someone and got a very nasty split right away. I think that some woods may require soaking to relax the fibers prior to stressing.
I prefer an actual press to the straps around a tree method, though it seems like a daunting task to build and may be too much effort if you only want one shield. If you're active in any historical communities and word gets out that you have a press, you may find people popping up all over the place looking for dished shields.  Seriously. Seriously.
There are only two kinds of scholars; those who love ideas and those who hate them. ~ Emile Chartier
|
|
 |
|
|
James H.
|
| Posted: Sun 21 Sep, 2008 10:00 pm Post subject: |
|
|
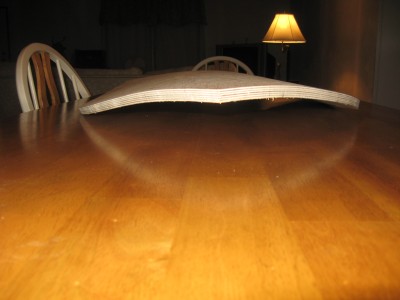
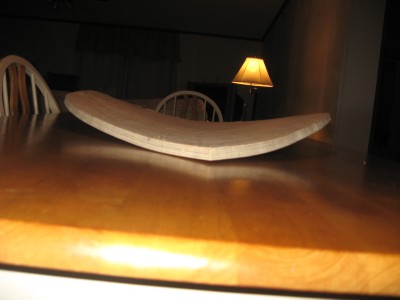
Here are some pictures of the curve, I had used the drum and straps simply because they were available and saved me some money, maybe I will make a press one day if I end up making more, depends on how this one turns out and how much I will end up using it. As you can see the drum and straps were not the best way to go but for a beginner it works fine for no; however, the curve of the shield is not so even or very dramatic. I am hoping after it is all dress up it will be less noticeable. The hefty 10 lbs. weight is what worry me, it seems heavy for a Medieval person to maneuver with. But I do not have it strapped yet so I am just holding with my hands at the moment. 
Attachment: 21.99 KB
Attachment: 23.01 KB
Attachment: 22.21 KB
Attachment: 21.97 KB
|
|
|
|
|
|
Johan S. Moen
Location: Kristiansand, Norway Joined: 26 Jan 2004
Posts: 259
|
| Posted: Mon 22 Sep, 2008 1:28 am Post subject: |
|
|
2 layers of 4 mm plywood or 3 layers of 3 mm would probably have been plenty. A thickness between 8-10 mm usually does it. A 15 mm total seems like a bit of overkill, especially if you are going to cover it with fabric or leather.
My heather shield(2x4mm plywood) probably weighs a bit under 5 pounds, but that is with 5 layers of linen glued on, paint, edging and strapping.
Johan Schubert Moen
|
|
|
|
|
|
James H.
|
| Posted: Mon 22 Sep, 2008 2:17 pm Post subject: |
|
|
|
Well, I still have 2 more 5mm Birch plywood left 2x4 in width and length so I think I will try again with just two this time. Maybe if it's less thick it might curve better also. Thanks.
|
|
|
|
|
Gavin Kisebach
|
| Posted: Mon 22 Sep, 2008 2:22 pm Post subject: |
|
|
I think Johan is right about thickness. If the shield is primarily for display then it doesn't need to be very thick. If you're doing live steel or especially SCA fighting then .5in is still just fine for durability, but you will pay a bit in weight. The good news is that because you've dished it, it won't feel as heavy.
Covering a shield with leather extends the life of the shield by quite a bit, though it is expensive and does add weight, even with light leather.
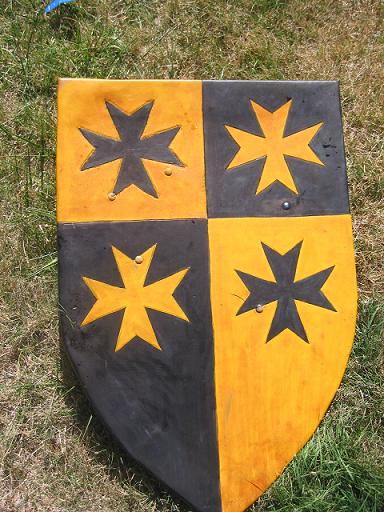
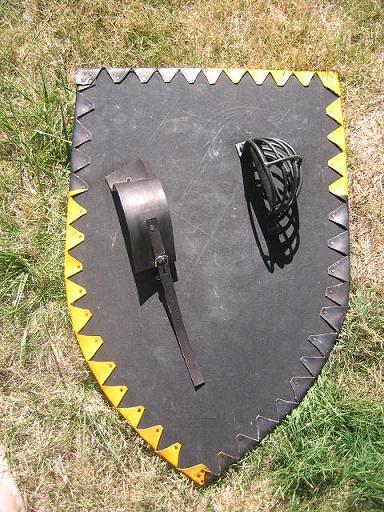
In fact, here is a shield that I just finished for a friend. It was not dished per his request, but you get the idea of how leather looks when dyed. The grass was wet to the face looks a bit sloppy. The other nice thing about leather is that leather dye doesn't scuff of or chip like paint.
Attachment: 61.25 KB
Attachment: 69.07 KB
There are only two kinds of scholars; those who love ideas and those who hate them. ~ Emile Chartier
|
|
|
|
|
|
James H.
|
| Posted: Mon 22 Sep, 2008 3:35 pm Post subject: |
|
|
I like that cup you added for the hand guard, shield looks great.
I believe if I make one with just the 2 left over pieces of 5mm it will be a lot lighter and easier to use if I have the mind to play with it. I'd like to try and use leather but will have to see how much it is first. I am not sure if I will use heredity symbolism yet or do a simple animal art. I fond a site of medieval bestiary that talks of the symbolization of animals in the middle ages and example of art work with them from the time period. I am thinking a stag trampling a serpent or maybe hunting dogs.
http://bestiary.ca/index.html
|
|
|
|
|
Gavin Kisebach
|
| Posted: Mon 22 Sep, 2008 3:45 pm Post subject: |
|
|
I'm glad you like it. They are about $10 from Ashcraft Baker or you can weld one up yourself if you have the tools. Keep in mind that shield baskets are an SCA safety requirement but not even remotely historic.
Since you mention it, a note on strapping. I like my straps as wide as possible because I don't like the way that a narrow strap digs into my forearm, but period illustrations seem to show fairly narrow enarmes. You should give this some though before you cut your leather; find a balance between historical proveability and realistic comfort.
There are only two kinds of scholars; those who love ideas and those who hate them. ~ Emile Chartier
|
|
|
|
|
Nathan Spence

Location: Virginia Joined: 11 Mar 2007
Posts: 66
|
| Posted: Mon 22 Sep, 2008 7:12 pm Post subject: |
|
|
I would really like to thank all of you that have spoken here on this topic. I am new to this forum, but have enjoyed every minute of my time spent here. I want to start reenacting/living history the viking period. I am having some trouble finding a group in my area (WV - MD - VA), but I am going to do it just the same.
I do have a question though. I have read about covering a sheild with canvas and leather. I am going to use the knowledge gathered here to make myself a round viking sheild and a curved Kite sheild.
Which covering would be more authentic looking for the viking period? Leather or canvas?
Also what thickness would more authentic for living history? I suppose edgeing with rawhide is proper as well?
Thanks to you all.
Spence
|
|
|
|
|
Gavin Kisebach
|
| Posted: Mon 22 Sep, 2008 7:33 pm Post subject: |
|
|
Hello Spence, welcome to the forum. Be sure to check out the rest of the site while you're here, the forum is just the tip of the iceberg.
The only covered shield from around the "viking era" that I am aware of is actually a little early, more from the migration era. It appeared to be covered in leather that had been dyed red, but memory fails and it may have been painted. I believe milk paint or egg paint would be the most accurate paint for your shield, in any event.
By far most of the recovered shields that I have seen from that era are bare wood and unrimmed. The rim may have been rawhide or some other material that simply disintegrated long ago. Some of the laws in that period, such as laws for holmganga, tend to suggest that shields were semi-disposeable, so leather would be an expensive and lordly option for a viking shield IMO.
You might also be interested in this recent thread on a newly discovered shield:
http://www.myArmoury.com/talk/viewtopic.php?t=14246
There are only two kinds of scholars; those who love ideas and those who hate them. ~ Emile Chartier
|
|
|
|
|
|
Rick Orli
|
| Posted: Thu 25 Sep, 2008 7:34 am Post subject: |
|
|
There are several viking groups in the wv-md-va area. Look up markland, for example of a group that does some fighting too, also some 'serious living history' groups and I'm doing byzantine/varengian period
-Rick Orli
| Nathan Spence wrote: | I would really like to thank all of you that have spoken here on this topic. I am new to this forum, but have enjoyed every minute of my time spent here. I want to start reenacting/living history the viking period. I am having some trouble finding a group in my area (WV - MD - VA), but I am going to do it just the same.
I do have a question though. I have read about covering a sheild with canvas and leather. I am going to use the knowledge gathered here to make myself a round viking sheild and a curved Kite sheild.
Which covering would be more authentic looking for the viking period? Leather or canvas?
Also what thickness would more authentic for living history? I suppose edgeing with rawhide is proper as well?
Thanks to you all.
Spence |
|
|
 |
|
|
Rick Orli
|
| Posted: Thu 25 Sep, 2008 7:51 am Post subject: rawhide edgeing? |
|
|
I recently edged a kite shield with rawhide, really my first ever experience with rawhide, and I suppose was OK for a first effort but is not exactly perfect.
I soaked the rawhide in warm water for an hour or two but I wonder if I should have soaked it for a few more... it did not seem as stretchable as I though it should be. Also, I wonder if I should have tried to stretch out each piece before applying it to the edge (that is, stand on one end and pull with all my might.). Per instructions, I tried to stretch length (with pliers), tack face, go other side stretch length and over, tack back, then repeat face again. However the total amount of stretching I was able to achieve was minimal. so now (dried) its sort of OK but not as snug as I feel it should be.
I was going to work along the edge to replace the tacks with rawhide stitching (through drilled holes) but I'm wondering if I should just strip it off and start again.
My objective is not a fighting shield but something that looks right.
advice from experts?
|
|
|
|
|
|
James H.
|
| Posted: Thu 25 Sep, 2008 8:37 am Post subject: Re: rawhide edgeing? |
|
|
| Rick Orli wrote: | I recently edged a kite shield with rawhide, really my first ever experience with rawhide, and I suppose was OK for a first effort but is not exactly perfect.
I soaked the rawhide in warm water for an hour or two but I wonder if I should have soaked it for a few more... it did not seem as stretchable as I though it should be. Also, I wonder if I should have tried to stretch out each piece before applying it to the edge (that is, stand on one end and pull with all my might.). Per instructions, I tried to stretch length (with pliers), tack face, go other side stretch length and over, tack back, then repeat face again. However the total amount of stretching I was able to achieve was minimal. so now (dried) its sort of OK but not as snug as I feel it should be.
I was going to work along the edge to replace the tacks with rawhide stitching (through drilled holes) but I'm wondering if I should just strip it off and start again.
My objective is not a fighting shield but something that looks right.
advice from experts? |
I would like to know more about applying the rawhide as well, also how of stitching is best done, over-under or side to side? I am not really a stitching expert here.
Also what kind of glue is used for applying the leather or canvas onto the face of the shield? Would I stick with the Elmer's wood glue? Thanks.
|
|
|
|
|
Gavin Kisebach
|
| Posted: Thu 25 Sep, 2008 6:06 pm Post subject: |
|
|
| Quote: | I would like to know more about applying the rawhide as well, also how of stitching is best done, over-under or side to side? I am not really a stitching expert here.
|
I've edged shields with saddle skirting and rawhide. The rawhide I got from a dog chew toy. A lot of people use chew toy edging, but I found it very helpful to but a giant chewtoy that was shaped like a bone, about two feet long. basically i filled my bath tub with hot water and let it soak overnight. In the morning I put in fresh hot water and let is soak until late evening,
Once the toy had softened enough to unroll, it came out to a 12 inch by 30 inch peice of rawhide, about 3mm thick and fairly consistent truought. This allowed me to edge a 24 inch round shield with just two pieces. A lot of people use smaller dogbones and end up with lots of small rectanges patched around the rim, which I don't care for. I tack my rims down with 3/4 inch carpet tacks, but I'm not at all certain that this has any historical basis. How and why would you be stitching?
| Quote: | | Also what kind of glue is used for applying the leather or canvas onto the face of the shield? Would I stick with the Elmer's wood glue? |
I used contact cement for the cloth (trigger) and leather on the last shield that I covered, but Elmers might work as well. Either way don't overdo it on the glue or it will soak through and discolor your leather, or simply leave your cloth tacky and gross.
You might also research medieval glue if you're really hardcore. http://www.rocks4brains.com/glue.pdf
There are only two kinds of scholars; those who love ideas and those who hate them. ~ Emile Chartier
|
|
|
|
|
|
James H.
|
| Posted: Thu 25 Sep, 2008 10:57 pm Post subject: |
|
|
| Felix Wang wrote: | James H:
Answers to your questions depend on what the purpose of the shield is. As far as a shield rim is concerned, metal is impressive, but poorly documented; rawhide is easier to manage and historically reasonable. I have done rawhide, but not metal. A rim can be fastened with tacks; metal strips could be held by tacks or rivets; a rawhide rim could also be sewn on (this is historically likely, as the Gokstad shields had numerous small holes about the edge where a rim would be). This last method is easy to do - clamp the rawhide strips on the edge, let them dry, and then take a drill to the wood and through the rim. Then run waxed linen thread through the holes.
Canvas is fine for the front, historically speaking, or rawhide or leather could be used.
Milk paint is based on casein, a protein found in cows milk. It can be found on the Web.
Size of the shield depends on what you want it for. Historically, they tended to shrink; so earlier heaters might range up to 36 or 40 inches, later ones (most likely for horsemen) might be as little as 24 inches tall. |
When I say stitching I mean what the above person is talking about, drilling holes through the raw hide and shield and then sewing the rawhide on with waxed linen. I am not sure how they were threaded through the holes, over and around the edge and back through the next hole or through the holes side from side. Basically a picture would help. If it seems too tricky I'll go with tacks though.
And thanks for the info about the glue, saved that pdf. to file for interesting reference though I think I'll try the wood glue since I have it on hand already. Thanks.
|
|
|
|
|
Nathan Spence
Location: Virginia Joined: 11 Mar 2007
Posts: 66
|
| Posted: Fri 26 Sep, 2008 8:35 am Post subject: |
|
|
Rick,
I have found one group and am talking to them.
What is the "Serious living history group" you speak of. I would really be interested in speaking with them.
I would like to make a viking shield and edge it with rawhide as well. I got a very large chew toy and was thinking of tacking it around the edge, however now I think I will stitch it. I too am wondering though, how many stitches per inch and such??
I guess if I am doing a viking shield and trying to make a historically correct one, as close as possible...... I should not cover front or back of my shield then?? Just put a boss on the front and then a handle on the back.
I was thinking of maybe using a round piece of "Oak" plywood. I dont know what sort of plywood is best.
I was going to score it on the front and back to make it look as if it were planks.
Then rivit a boss and handle onto it. I need to know what size and make of rivit is the most correct?
Then edge it with rawhide and paint my design onto it. I was also wanting to mount a strap onto it as well.
Any ideas on how to make my shield more historically correct?
Spence
|
|
|
|
|
|
|

