| Author |
Message |
Antal László

|
 Posted: Fri 11 Jan, 2019 6:23 am Post subject: "Aunlaz" style dagger project Posted: Fri 11 Jan, 2019 6:23 am Post subject: "Aunlaz" style dagger project |
 |
|
Hi guys,
I'm a long time member but not a regular poster, but hopefully that will change. I enjoy following DIY threads and now I have a few DIY projects going on which I would like to share. I'm afraid it's nothing that hasn't been done before but still if you're like me then you probably find it interesting to see how others tackle a certain task. So, I hope some will find this interesting.
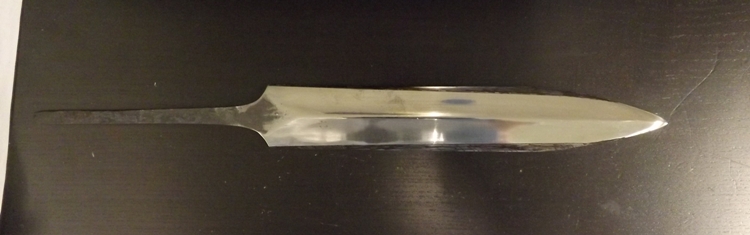
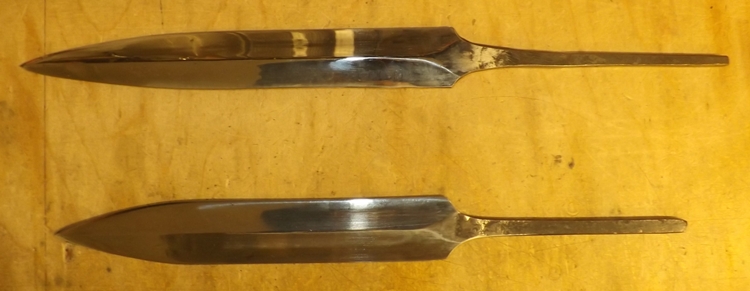
A while back I got two dagger blades from Paul Binns. They were quite cheap so I didn't expect them to be brilliant but even with that in mind I was a bit disappointed. However, now I have two dagger blades to play around with without worrying too much about mucking them up.
The blade in the top of the picture is OK-ish so I will leave it alone for now but the bottom one just looks very odd. The edges are wavy and the whole thing is very unevenly ground. As a first step I want to fix the profile of the blade. Eventually I want to make a hilt similar to the daggers found in The Royal Armouries and the Bayerisches Armeemuseum. For those who aren't familiar with these daggers check out the Aunlaz dagger by Arms & Armor you can also find a review by Chad Arnow in the reviews section.
 Attachment: 140.41 KB Attachment: 140.41 KB
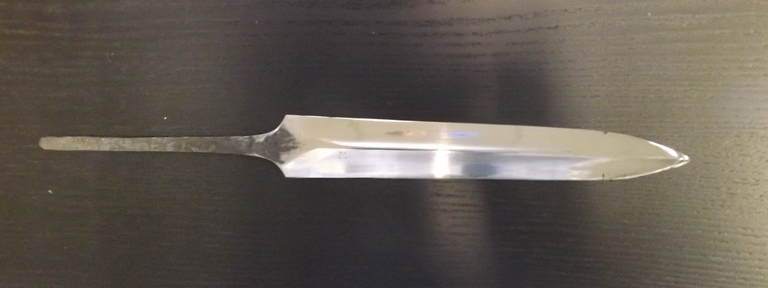
Using a fine tipped permanent marker I drew the new profile on the blade and colored the sections which need to be ground off.
Attachment: 171.28 KB
I'm not sure yet what to do with the top one...
|
|
   |
 |
Antal László
|
| Posted: Sat 12 Jan, 2019 4:13 am Post subject: |
|
|
Ok, I'm pretty sure I removed most of the material I wanted to but it still doesn't look right. I think I want a bit of a more acute profile taper. By the way I used an angle grinder mounted on the workbench with a tool rest in front of it, effectively a disc sander to do this. A belt grinder might be better for this kind of work but I haven't got one... heyho
Attachment: 138.75 KB
|
|
|
|
|
Antal László
|
| Posted: Tue 22 Jan, 2019 5:02 am Post subject: |
|
|
Unfortunately not much to report as I didn't have time to play this past week until last night. I managed to get a bit of grinding done and I think I am happy with this blade shape. Of course now I have to regrind the bevels because removing all that material from the profile resulted in very thick edges. I'm not even sure if I will be able to do this without a belt grinder but I'll try anyway.
I was also playing around with some paper templates to get an idea of the approximate dimensions of the hilt. I think it's going to look ok as it is in the picture. Also I found a piece of scrap steel 75mm long 6mm thick at one end tapering down to 2mm and tried if I can shape it cold. It kind of worked but for the actual guard I might have to use a blowtorch to get more even "curls"...
Attachment: 159.31 KB
|
|
|
|
|
|
Radovan Geist
|
| Posted: Tue 22 Jan, 2019 7:29 am Post subject: |
|
|
|
Looks nice! In my experience heating (even if it´s only to dark-red) helps, otherwise metal could crack. Especially if you need to re-do the shape. Looking forward to see the final thing.
|
|
|
|
|
J. Nicolaysen

|
| Posted: Wed 23 Jan, 2019 5:49 am Post subject: |
|
|
|
Blade shape in the third post is really much better! Paper templates look good. I think you are on the right track for sure.
|
|
|
|
|
Harry Marinakis

|
| Posted: Wed 23 Jan, 2019 10:23 pm Post subject: |
|
|
| J. Nicolaysen wrote: | | Blade shape in the third post is really much better! Paper templates look good. I think you are on the right track for sure. |
Agreed! Love the final blade shape!
With steel that thin, shaping the quillons with a torch should be quite easy.
Firesteel Designs
Hand-crafted good lovingly infused with hemoglobin
|
|
|
|
|
Antal László
|
| Posted: Sat 26 Jan, 2019 2:55 am Post subject: |
|
|
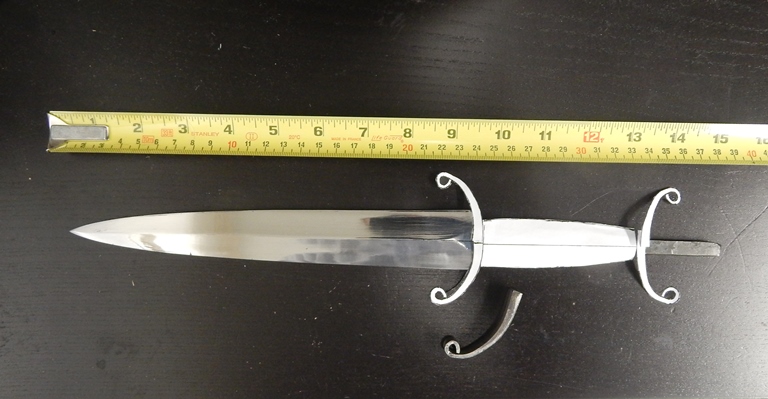
Thanks for the encouragement! I did most of the grinding on the bevels yesterday. It went surprisingly well once I figured out what I was doing. I regret not weighing the blade before all the grinding. I ended up removing quite a lot of material (and some of my fingertips :S), it would be interesting to see how much. I will clean up the blade and share some pics.
Have a nice weekend!
|
|
|
|
|
Antal László
|
| Posted: Fri 08 Feb, 2019 5:10 am Post subject: |
|
|
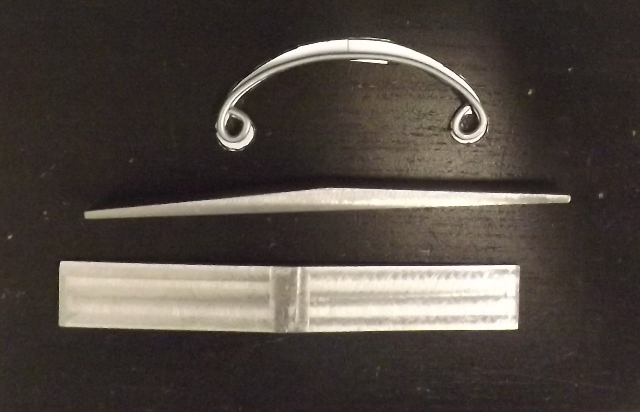
Never enough time to play... but a little progress nevertheless.
I have the blade finished to 800 grit. I might still grind the shoulders slightly but otherwise I'm quite happy with it.
I have started making the guards. I found a piece of 20 by 6mm mild steel flat bar. I already had a pretty good idea on the length I need but just to be sure I cut a piece of wire and shaped to double check.
I cut two pieces of 120mm lengths off the flat bar and milled them down to 17mm in width just because I think that width will look better... also fortunately I have access to a milling machine at work, so tasks like this are easy to do. The tapering was done on the milling machine too. To be continued...
Attachment: 85.99 KB

Attachment: 184.24 KB
|
|
|
|
|
Antal László
|
| Posted: Sat 13 Apr, 2019 1:25 am Post subject: |
|
|
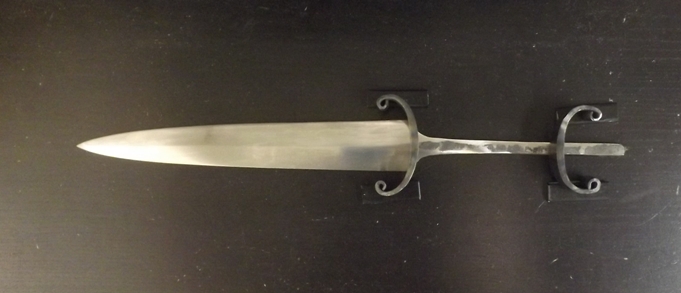
Hi, I hope you all are having a great weekend.
So, this is still happening, just not as fast as I would like it to but I made some progress.
I found it difficult to make the curling uniform at the end of the guards but I think this will do. I was planning to have a uniform bright finish on these but the hammering left the surface way too uneven so I will sand it down a bit to make the whole thing look smoother and then I will heat them up to give them a uniform dark grey finish. To be continued...
Attachment: 149.5 KB
|
|
|
|
|
Antal László
|
| Posted: Thu 20 Jun, 2019 8:54 am Post subject: |
|
|
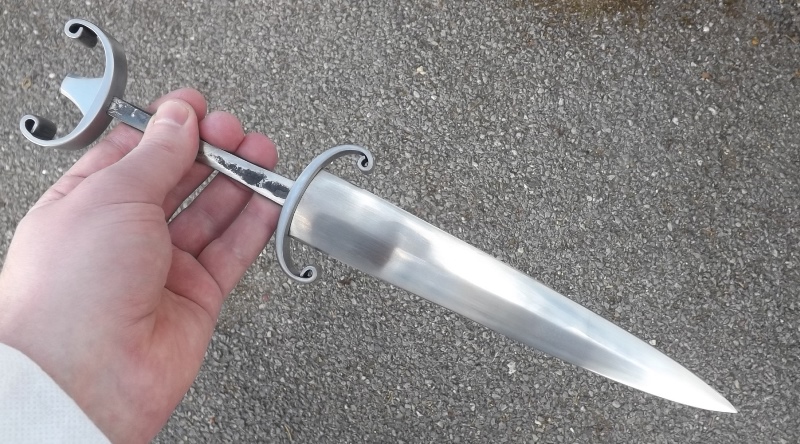
I decided to go for a bright finish on the guards. Using a fine file it was fairly straightforward to blend in the surface defects and then it was just a regular sandpaper job. I also made a peen block. I'm not sure if it's appropriate but I think it looks right. Also the peening should be easier to do this way.
Attachment: 238.8 KB
|
|
|
|
|
Ryan Renfro

|
| Posted: Thu 20 Jun, 2019 6:15 pm Post subject: |
|
|
|
Looking good, mate. With the peen block it reminds me a bit of the Thulsa Doom standard.
|
|
|
|
|
Antal László
|
| Posted: Fri 21 Jun, 2019 12:29 am Post subject: |
|
|
| Ryan Renfro wrote: | | Looking good, mate. With the peen block it reminds me a bit of the Thulsa Doom standard. |
HAHAHA 
I see what you mean.
Disclaimer:
I am not affiliated, associated, authorized, endorsed by, or in any way connected with the wizard known as Thulsa Doom and I deeply condemn his evil machinations.

Attachment: 302.79 KB

|
|
|
|
|
|
|

