Posts: 5,981 Location: Birmingham, Alabama
Wed 17 Jun, 2015 7:47 am
DIY: Thrift Store Eating Knife
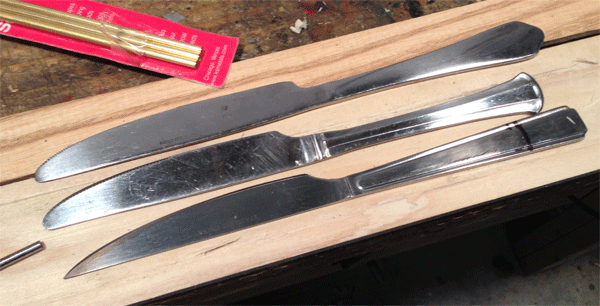
Searching for carbon steel butcher knives at thrift stores turned up nothing but bottomless bins of stainless steel butter knives. 25¢ each seems to be the going rate for those knives. I wondered if they might make cheap medieval-style eating knives. Most of what you'll find just won't work. Their blades are too short, too thin, deeply stamped "stainless china," etc. A handful have thicker, longer blades, no stamping, and a plain flat grip. I chose a handful of those as well as one or two with attractive grips formed of a piece with the blade.
The first photo below shows some typical thrift store types. The blade at bottom in that photo already has the re-shaped blade, which is easily done on the flat sanding disc of a grinder. If you don't want the secondary bevel you can take a bit more time to taper the section. On that knife, you can see the mark for my next step--shortening the handle. At the top of the photo you can see a thin strip of ash wheelbarrow handle leftover from a polearm project. That wood served well for scales, but please note that this is a relatively large-grained wood. If you want perfectly smooth scales you'll want something finer.
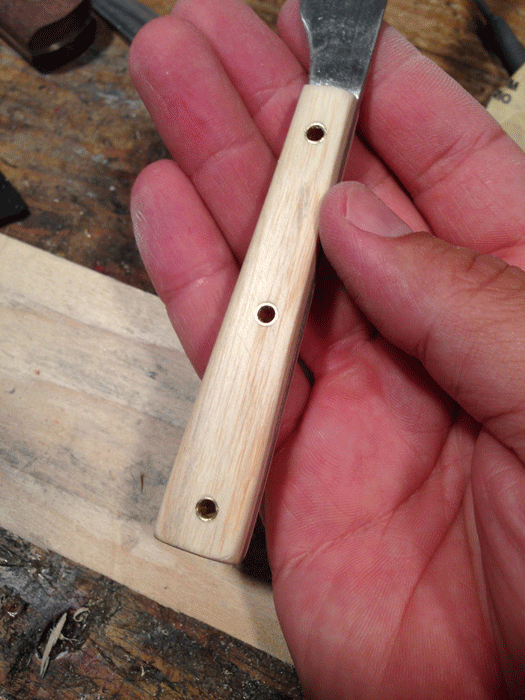
After shortening the grip I marked and drilled the rivet holes. I made the rivets from brass tubing. These are primarily decorative, as I've attached the grips with epoxy. It's a simple matter to countersink the rivet holes and expand the openings of the rivets if you want function as well.
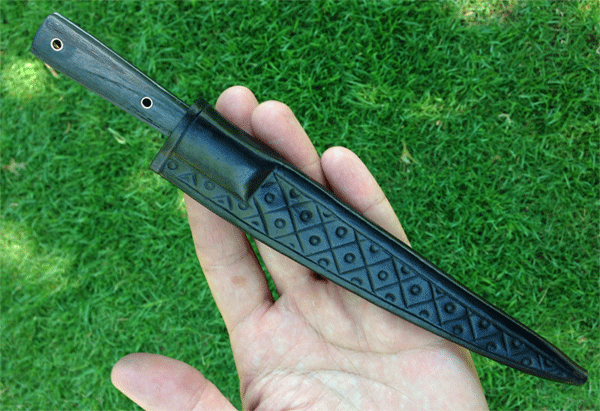
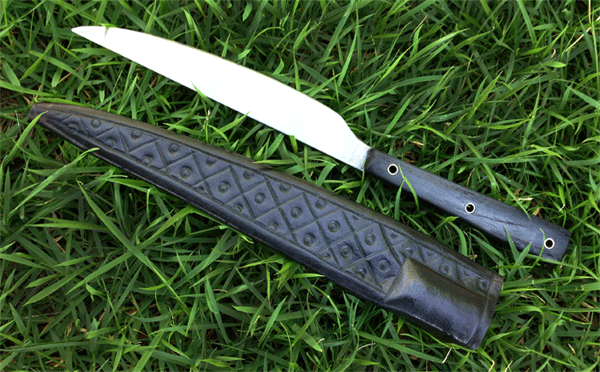
The rest is pretty much what you'd expect of a medieval knife project. I usually make a two-layer sheath but I've used only one for this project because it's meant to be a desk knife/letter opener. It won't see much use. That's also why there's no suspension. Again, these things are easily done if you want more historical accuracy.
 Attachment: 112.4 KB
 Attachment: 241.79 KB
 Attachment: 206.04 KB
 Attachment: 196.94 KB
Posts: 399 Location: Slovakia
Wed 17 Jun, 2015 11:02 pm
nice and simple. now, that´s what i´d call a retro-retrofitting :)
I really like it and shall get inspired...
Posts: 5,981 Location: Birmingham, Alabama
Thu 18 Jun, 2015 8:52 am
reduce, reuse, recycle!
Posts: 182 Location: usa
Sun 21 Jun, 2015 8:52 am
If you'd initially posted just the end pics without explanation we'd be trying to guess who you bought it from. Well, maybe not, your reputation precedes :)
Roughly how much total $ for materials? Where do you get leather for projects? (Old shoes or baseball gloves? :)
Really good idea & nice work, thanks very much for posting here.
Posts: 795 Location: Wyoming
Sun 21 Jun, 2015 11:45 am
| Quote: |
| If you'd initially posted just the end pics without explanation we'd be trying to guess who you bought it from. Well, maybe not, your reputation precedes :) |
I totally agree, great work Sean it's a quick and cheap way to get a nice thing. I wonder if you could make a whittle-tang type out of one of those kitchen knives. Maybe some heavy grinding involved.
Posts: 5,981 Location: Birmingham, Alabama
Mon 22 Jun, 2015 8:00 am
Thanks! Total cost is difficult to figure, but here's what one should expect if plotting a little Ren-Faire business.
• The blades are predictably 25¢.
• I paid about $14 for the ash wheelbarrow handle I used for a polearm haft. The scales for this knife are from one of the long .25" slices I took off of that handle. If there are about 8 50" slices in one handle,that's about $1.75 per slice. If I then used one 5" length of one slice, that would be about 18¢ or 9¢ per scale.
• I used up maybe half the life of one sheet of 60 grit adhesive-backed paper on my grinding wheel. 25¢
• I bought a sheet of top-grain veg tan for $40 from the Tandy sale table last year and it doesn't appear to be running out after at least 7 sheaths (including the inner sheath I usually make and the large dagger sheath I made last year). I'm guessing that I have a least that many sheaths left in the piece, so let's say 14 duplex sheaths for a per-item cost of $2.85.
• One dip of the Feibing's applicator will do an entire small sheath, so let's say 10¢ for that and thread.
• I make my sheath pattern from craft foam. Counting re-use, I can get five sheaths out of one of those sheets for a per-item cost of about 25¢.
• A package of three 12" x5/32" brass tubes is $4. My three rivets are about .5" each, so 15¢ for those.
• Add .05 for a little weather wax, JB Weld, etc.-1¢
My math might be off, but that looks like a hair over $4 in materials costs to make one of these with an inner sheath. Of course, you can't buy a half-used sheet of sandpaper or a 50"x.25" slice of wheelbarrow handle, etc. If you happen to have such things lying around from other projects, here's a good way to put them to use.
Now, what's your labor worth? Let's figure 1 hour to find, mark, shape and drill the blade. Another hour to cut, glue shape and sand the grip scales and insert rivets. Add an hour to create the sheath pattern, transfer it to leather, cut the leather, soak it, roughly form it. Add another half hour for the external sheath if you're doing it that way. Add an hour for piercing and stitching. Add an hour for fine-forming, decoration, dyeing, waxing and adding the suspension. That's 5 hours. If you're allowing yourself $7.25 federal minimum wage, that's $36.25. Do a few of these and the time starts to drop. I'm not that good at it yet (especially stitching).
Total cost per knife/sheath set. $40.25.
That's before any profit or shipping. You can get an import for far less than that, though you're not likely to get something as carefully finished as you'd make yourself
Personally, I don't figure labor costs on my projects. Don't need to. I consider it tuition.
The bottom line is that this is a great, money-saving project for hobbyists who can devote time here and there and not miss it too much in return for a unique knife. They make cool personal gifts, and could be casually sold to friends above your materials costs but below your theoretical labor costs.
I don't have much time for projects anymore, but I'm finding knives more satisfying than swords lately. The increments of time are the same, but start-to-finish is MUCH faster.
Posts: 5,981 Location: Birmingham, Alabama
Mon 22 Jun, 2015 8:09 am
[quote="J. Nicolaysen"]
| Quote: |
| I wonder if you could make a whittle-tang type out of one of those kitchen knives. Maybe some heavy grinding involved. |
The thick grip would shape a bit slower than the blade, but I don't think it would be a problem, especially since you'd be using one with a flat grip surface.
I'm going to answer that question pretty soon. For my next project I'm going to create a thrift store knife/skewer set for a sword scabbard. My plan is to create the skewer by inverting one of these butter knives, using the blade as a tang and grinding the thick handle to the appropriate tapered profile and lozenge section. :D
Posts: 120
Wed 01 Jul, 2015 7:06 am
Ingenious and very outstanding work!
Posts: 5,981 Location: Birmingham, Alabama
Tue 01 Sep, 2015 9:25 am
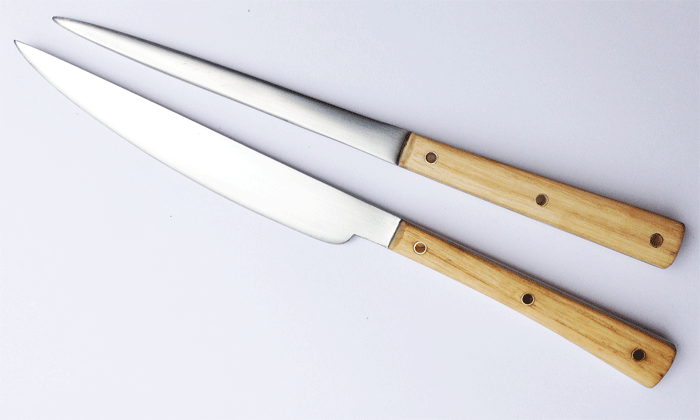
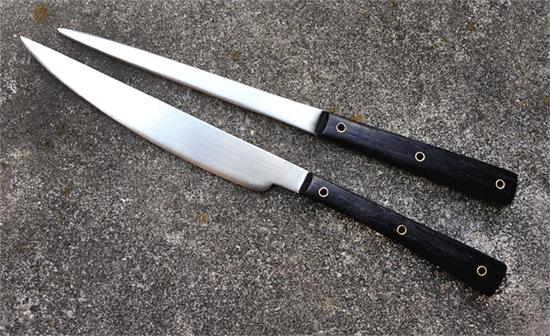
I've finished the thrifty eating/utility set I wanted for scabbard by-knives. In general, I've used the same materials and methods as described above, but the skewer is a bit different.
To have a more robust skewer blade than would be possible with the butter knife blade, I reversed the butter knife, used the blade as a tang and ground the original grip to shape. I'm not sure that's a worthwhile project unless you just really want a stout and/or somewhat oversized skewer that could theoretically be used as a sharpening steel in addition to whatever other uses you might have for it. Most of the skewers I see are slender things that might more easily be made of mild bar stock. The one shown here could be used as weapon on its own.
The photos show the dyed and un-dyed set so you can see details as well as the final effect.
 Attachment: 136.78 KB
 Attachment: 189.69 KB
Posts: 11,553 Location: San Francisco
Tue 01 Sep, 2015 10:38 am
That looks fantastic. It's super clean and the riveting in particular looks fantastic. One would never guess by looking at it that they started out as modern flatware!
Posts: 5,981 Location: Birmingham, Alabama
Tue 01 Sep, 2015 11:24 am
discarded flatware! our ancestors would be appalled by our waste.
Posts: 1,724 Location: Oxford, UK
Tue 01 Sep, 2015 1:27 pm
Fantastic work Sean,
Clean and simple but very well executed - well done.
Another project that shows your off the wall inventiveness.
Tod
Posts: 5,981 Location: Birmingham, Alabama
Tue 01 Sep, 2015 1:34 pm
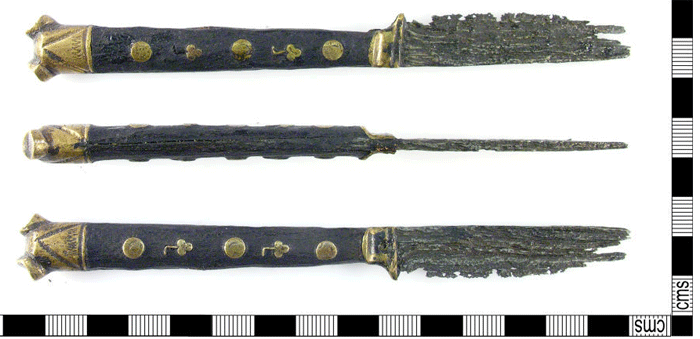
Yes, these are about as plain as they can be. I'd love to try something like this if I can find a bit of brass for the pommel.
 Attachment: 90.77 KB
Posts: 182 Location: usa
Wed 02 Sep, 2015 7:35 am
Reminds me to say sorry for you typing a lot. I meant just materials, in the end result, so I think...
| Sean Flynt wrote: |
• The blades are predictably 25¢.
• I paid about $14 for the ash wheelbarrow handle I used for a polearm haft. The scales for this knife are from one of the long .25" slices I took off of that handle. If there are about 8 50" slices in one handle,that's about $1.75 per slice. If I then used one 5" length of one slice, that would be about 18¢ or 9¢ per scale.
• I bought a sheet of top-grain veg tan for $40 from the Tandy sale table last year and it doesn't appear to be running out after at least 7 sheaths (including the inner sheath I usually make and the large dagger sheath I made last year). I'm guessing that I have a least that many sheaths left in the piece, so let's say 14 duplex sheaths for a per-item cost of $2.85.
• One dip of the Feibing's applicator will do an entire small sheath, so let's say 10¢ for that and thread.
• A package of three 12" x5/32" brass tubes is $4. My three rivets are about .5" each, so 15¢ for those.
• Add .05 for a little weather wax, JB Weld, etc.-1¢
|
.25+.18+2.85+.10+.15+.05 = $3.58 (80% leather)
And a stunning result - a ridiculously excellent DIY topic! Thanks again for sharing.
Posts: 5,981 Location: Birmingham, Alabama
Thu 03 Sep, 2015 7:20 am
No problem–I wanted to figure that out anyway.
Posts: 76 Location: Chicago, IL
Thu 03 Sep, 2015 8:35 am
Sean, I think this is my favorite of the DIY projects you've done, just because the starting materials are so humble. Taking crappy stainless junk butter knives and making something elegant and streamlined out of them, it's really great work.
Posts: 5,981 Location: Birmingham, Alabama
Fri 04 Sep, 2015 7:35 am
Might as well continue the thread to show how I'll be using these. I've just finished and mounted the internal sheaths for this set.
Because these are liners, the rough side is out, smooth side is in. I don't know if these lining sheaths were ever glued in, but that would make sense. If you're gluing the scabbard cover I don't why you wouldn't at least add a spot of glue to the sheaths to keep them in place. Stitching the distal end to the exterior sheath seems to have been common for small sheaths. Maybe that was done with these as well.
As far as I can tell, some scabbards used internal lining sheaths for their byknives and some didn't. Given the very thin leather I use for my covers, I really need a lining. The leather I used here is a bit thicker than I wanted, aesthetically, but I won't be sorry to have a little extra rigidity in the sheaths when I'm adding the suspension.
These are meant to have only the rough shape at this point. I still need to add cord at the tops of each sheath to serve as a stop for the suspension knot.
Once the scabbard is covered I'll burnish everything, refine the lines with a stylus and add whatever decoration makes sense and works.
 Attachment: 109.66 KB

Posts: 1,265 Location: Malaysia
Mon 07 Sep, 2015 5:16 pm
DIY: Thrift Store Eating Knife
Wow! I've never seen a handmade eating knife before.
You
cannot post new topics in this forum
You
cannot reply to topics in this forum
You
cannot edit your posts in this forum
You
cannot delete your posts in this forum
You
cannot vote in polls in this forum
You
cannot attach files in this forum
You
can download files in this forum


