| Author |
Message |
|
Jeroen Zuiderwijk
Industry Professional
|
|
   |
 |
|
Jeremy V. Krause
|
 Posted: Wed 20 Jan, 2016 7:12 am Post subject: Posted: Wed 20 Jan, 2016 7:12 am Post subject: |
 |
|
I am leaving up the specifics to Tod and I can say that we should stick to decorative choices found in contemporary examples as much as possible.
I do like the concept of using some wire inlay in the handle (as Tod mentions) if that has been found on a piece somewhat contemporary with the Seax of Baegnoth. I also like the look/idea of the thin gilded silver bands shown on the handle of the Jesenwang Seax which Jeroen posted. But not necessarily at the same time.
If there is some evidence of horn ferrules being used I am fine with this also.
I am wondering if folks think that plain wood or leather covered wood would be a more conservative choice. I really like the look of the spalted box wood that Tod uses. On the other hand if we were to use gilded silver- or brass or whatever bands on the handle- I think that a leather cover might provide a nice contrast.
Really brainstorming here. I know that the final decorative choices will involve a certain amount of guess work. I just like to keep it at a minimum.
One really positive aspect is that I do believe that we can comfortably surmise a sound overall shape and dimension of the handle given period examples.
|
|
|
|
|
Matthew Bunker

|
| Posted: Wed 20 Jan, 2016 9:28 am Post subject: |
|
|
I followed a 17th century recipe for hardening cavalry boots when making a small sword scabbard a few years ago. That involved adding bone black to the usual beeswax and rosin mix and resulted in something which set HARD and wasn't as susceptible to hotter than usual conditions (putting it into hand-hot water had no impact).
The original instructions specified that the work had to be done over or next to a fire. I had to use a heat gun in order to get it to fully absorb into the leather.
"If a Greek can do it, two Englishman certainly can !"
|
|
|
|
|
Leo Todeschini
Industry Professional

|
|
|
|
|
Matthew Bunker
|
| Posted: Thu 21 Jan, 2016 12:28 am Post subject: |
|
|
| Leo Todeschini wrote: |
By 'bone black' you mean burnt bones I assume?
|
Exactly that.
Ground down to a very fine powder.
"If a Greek can do it, two Englishman certainly can !"
|
|
|
|
|
|
Jeroen Zuiderwijk
Industry Professional
|
| Posted: Thu 21 Jan, 2016 2:03 am Post subject: |
|
|
| Jeremy V. Krause wrote: | I am leaving up the specifics to Tod and I can say that we should stick to decorative choices found in contemporary examples as much as possible.
I do like the concept of using some wire inlay in the handle (as Tod mentions) if that has been found on a piece somewhat contemporary with the Seax of Baegnoth. I also like the look/idea of the thin gilded silver bands shown on the handle of the Jesenwang Seax which Jeroen posted. But not necessarily at the same time.
If there is some evidence of horn ferrules being used I am fine with this also.
I am wondering if folks think that plain wood or leather covered wood would be a more conservative choice. I really like the look of the spalted box wood that Tod uses. On the other hand if we were to use gilded silver- or brass or whatever bands on the handle- I think that a leather cover might provide a nice contrast.
Really brainstorming here. I know that the final decorative choices will involve a certain amount of guess work. I just like to keep it at a minimum. |
Personally I tend to emphasize the things we do know in a reconstruction. So in this case if it were up to me I'd use a nice but plain wooden hilt, shaped to the right dimensions. That way when someone looks at it, it's the blade that stands out. The alternative approach is go wild with the handle, and show it as it could potentially have been, using the maximum level of decoration you can get with period techniques and materials and decoration styles. Same goes for the final treatment of the blade, etch it, and show all the details, or just polish it and leave it like that (my preference). Either way you're not going to be correct, as you simply lack information.
| Quote: | | One really positive aspect is that I do believe that we can comfortably surmise a sound overall shape and dimension of the handle given period examples. |
The Etting full tang hilt was quite surprising to me. It looks a lot like later two hander sword hilts, with a straight first half, and wasted second half of the hilt. It made me question my idea of them being single handers, despite the hilt length. If they were leather covered, the handles would look even more like two hander sword hilts.
Jeroen Zuiderwijk
- Bronze age living history in the Netherlands
- Barbarian metalworking
- Museum photos
- Zip-file with information about saxes
|
|
|
|
|
Leo Todeschini
Industry Professional
|
|
|
|
|
Leo Todeschini
Industry Professional
|
| Posted: Tue 01 Mar, 2016 1:49 pm Post subject: |
|
|
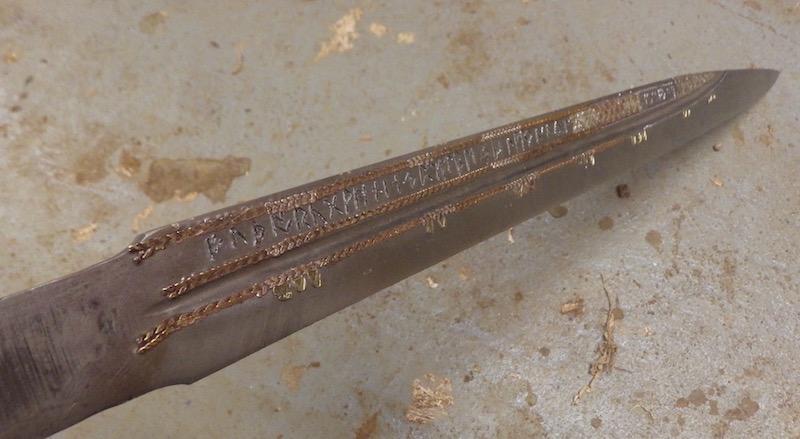
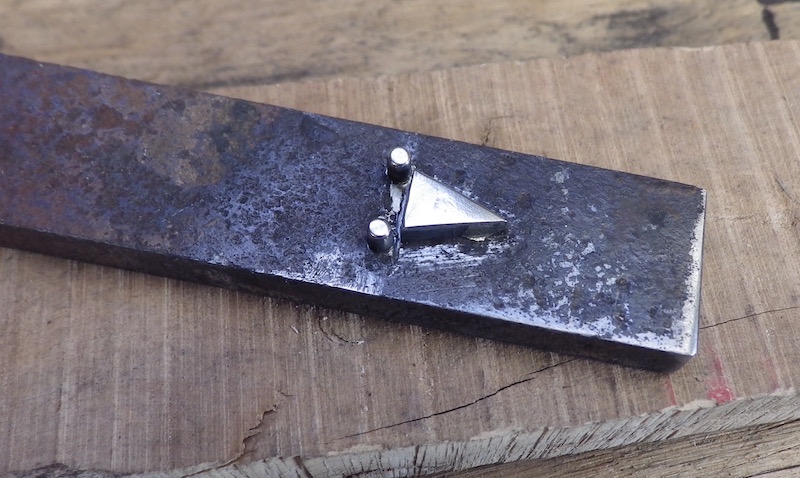
I carried on with the inlay today and it is coming on well as far as I can see and when I have made mistakes and had to pick bits out they have been well seated so it all feels good.
I did in fact make a genuine mistake and for one of the brass triangles I mistakenly put in a copper one, and rather than cut it out I have decided to leave it as the rest of this face is so random I think it is fine, though I will defer to the client.
In the mean time I also tried my hand at a little wire inlay into wood and that looks OK so will post up some tests when I have something a bit more comprehensive.
Tod
 Attachment: 100.02 KB Attachment: 100.02 KB
Attachment: 68.76 KB
www.todsworkshop.com
www.todcutler.com
www.instagram.com/todsworkshop
https://www.facebook.com/TodsWorkshop
www.youtube.com/user/todsstuff1
|
|
|
|
|
Leo Todeschini
Industry Professional
|
| Posted: Tue 08 Mar, 2016 12:17 pm Post subject: |
|
|
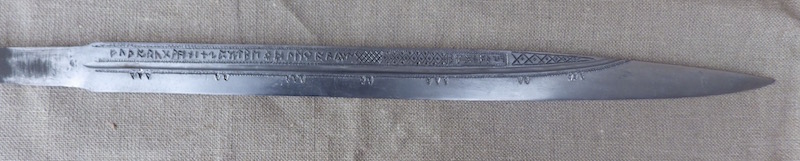
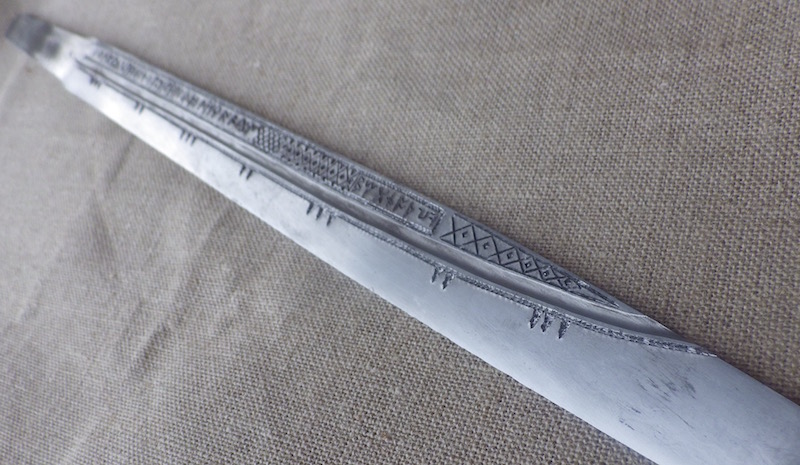
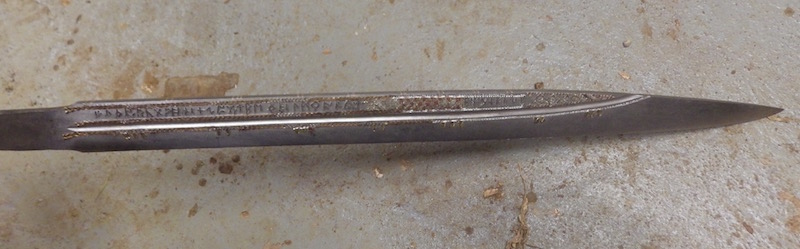
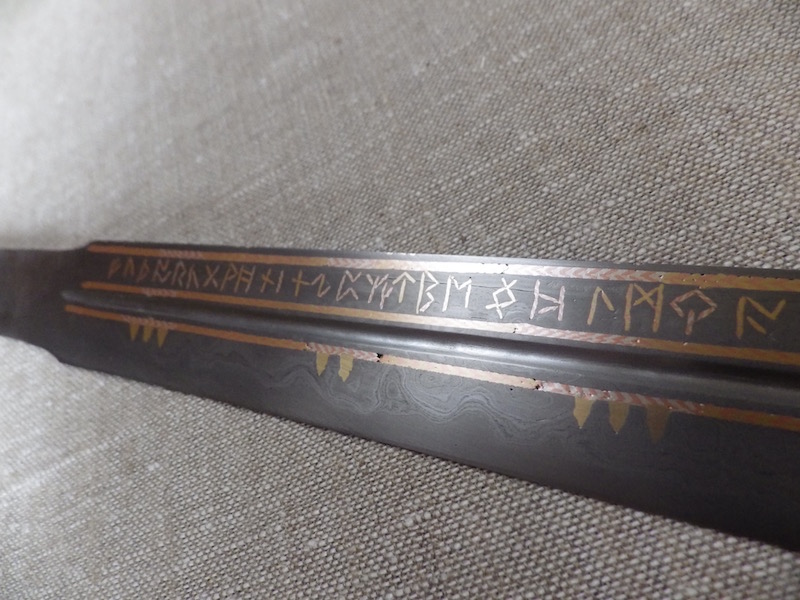
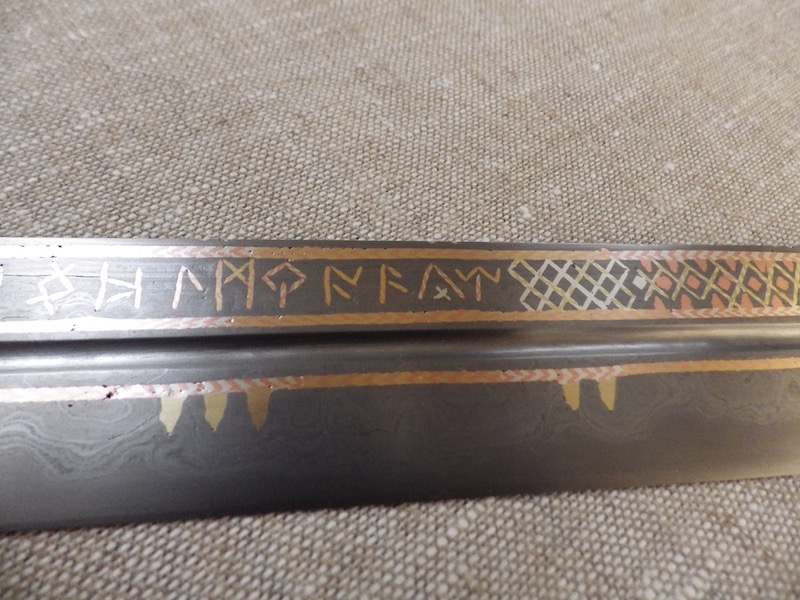
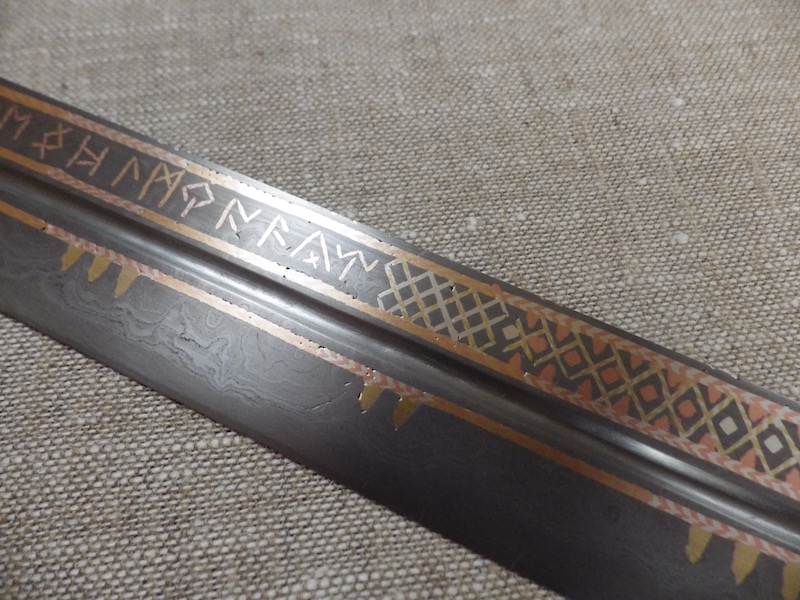
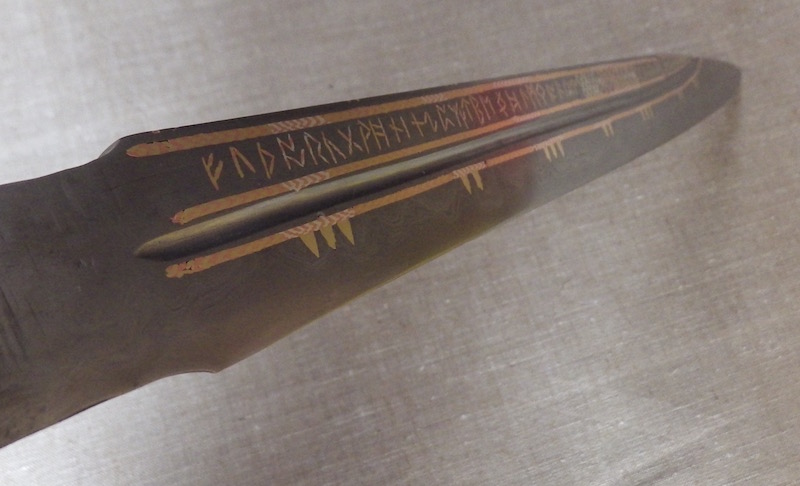
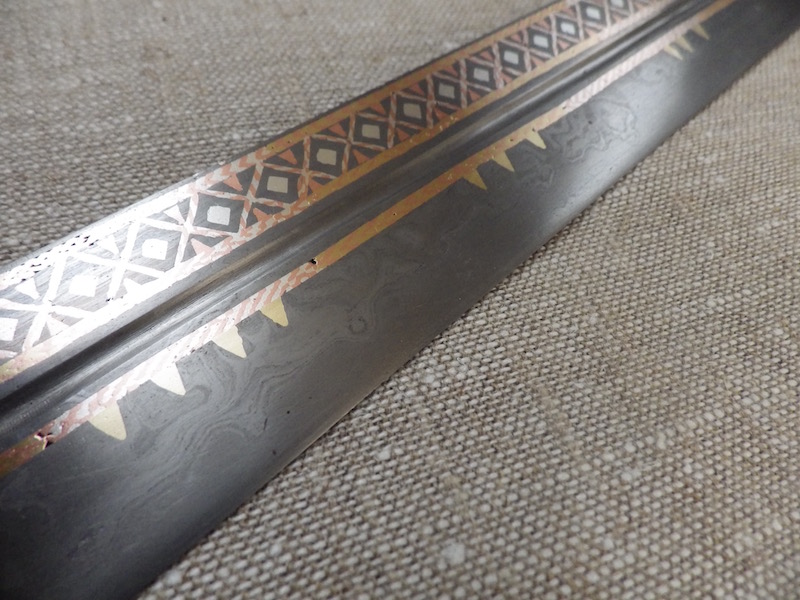
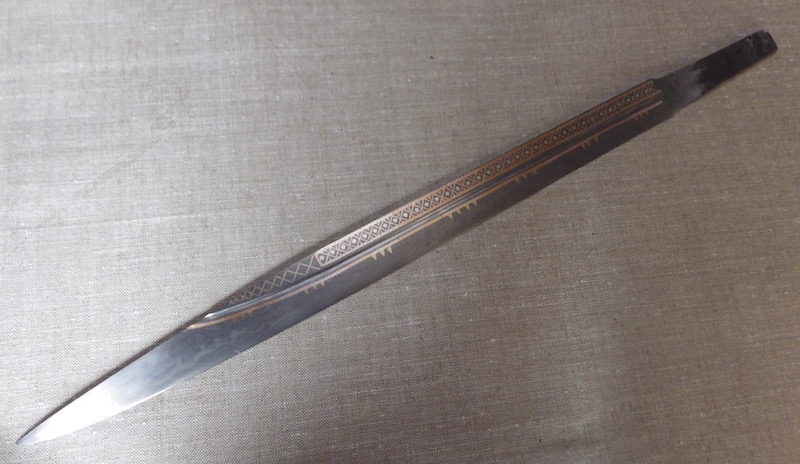
So, the blade is finally finished.
I completed the inlay to the second side, the rune side and it has all gone in very well, I cleaned it down slowly with 120 grit and then onto finer grits and a Scotchbrite. I did not give the blade a polish at this stage, though I may later (client discussion required) but felt at this stage a satin finish would suit.
The blade will naturally age and tarnish and this will show up its composition, but I wanted to speed this a little and so I wiped it over with citric acid to start to subtly show the structure and my personal choice would be to leave it at this and allow the inlay to be the showy part. Again depending on client wishes this could be brought out more with ferric chloride if desired.
One stage I did not show is the step before the colouring. As the inlay is effectively porous, any acids/chemicals put on the blade will go between the inlay and the blade and be very hard to wash away, so before any chemicals touch the blade, the whole blade is heated slightly and wax melted onto all the surfaces so that it impregnates any voids and seals them off. The blade can then be etched or coloured in the normal way without any chemicals getting stuck deep inside.
So far, so good.
Tod
Attachment: 149.94 KB
Attachment: 148.1 KB
Attachment: 158.86 KB
Attachment: 168 KB
Attachment: 85.43 KB
Attachment: 163.68 KB

Attachment: 157.29 KB
Attachment: 119.22 KB
www.todsworkshop.com
www.todcutler.com
www.instagram.com/todsworkshop
https://www.facebook.com/TodsWorkshop
www.youtube.com/user/todsstuff1
|
|
|
|
|
|
Peter Cowan
|
| Posted: Tue 08 Mar, 2016 4:15 pm Post subject: seax of beagnoth |
|
|
|
What an incredible amount of work Tod. This seax is absolutely brilliant. My congratulations to you on such a monumental work.The hours you must have spent on this really shows up. Well done sir.
|
|
|
|
|
|
Tim Lison
|
| Posted: Tue 08 Mar, 2016 4:47 pm Post subject: |
|
|
|
Outstanding!!!! It's remarkable to see this piece recreated so faithfully. I eagerly await the hilt and scabbard.
|
|
|
|
|
Leo Todeschini
Industry Professional
|
| Posted: Fri 15 Apr, 2016 12:08 pm Post subject: |
|
|
HI All,
I have started work on the handle and am considering how to progress the decoration.
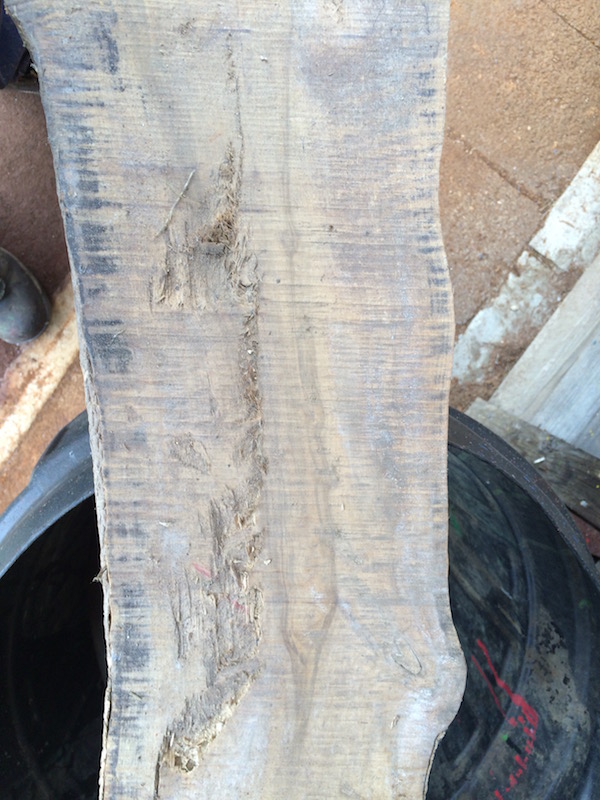
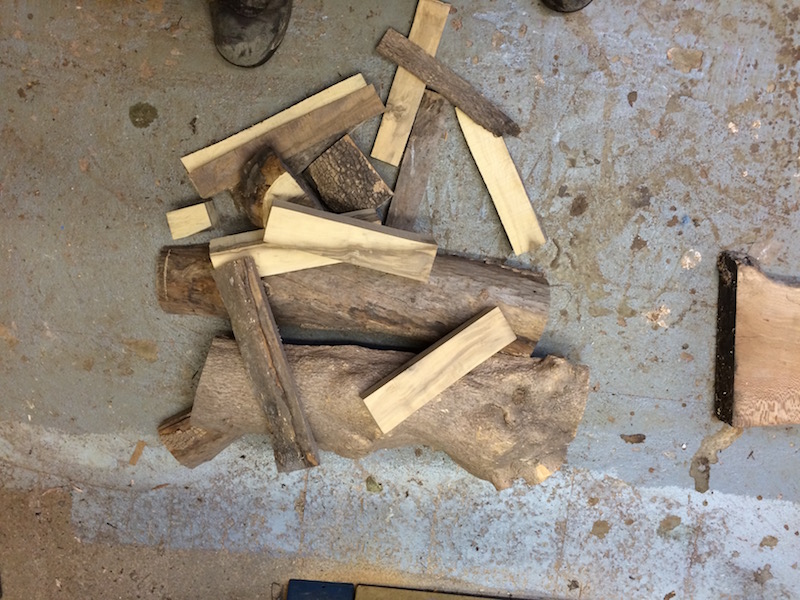
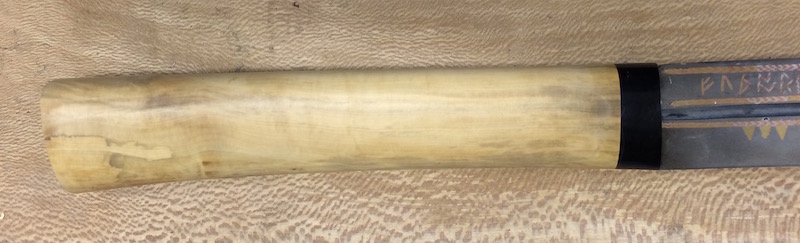
The blade is inlaid now and so we move onto the handle. We decided that we would fit a horn ferrule to the front and follow that with a box wood grip. I know Jeremy really likes the spalted box wood that I have used previously and so I went looking for some of this. Spalting is when the cut wood gets a fungal infection of the cell body, not the wall and so colour gets into the wood without affecting the structural integrity of the wood. With box wood it is possible to get colours from golden brown through to chocolate brown with some greys and sometimes even some dull reds.
I went through my collection of found box wood pulled out some likely logs and started cutting. These are 7-8" logs which for box is almost unheard of, but log 2 gave me a really nice piece.
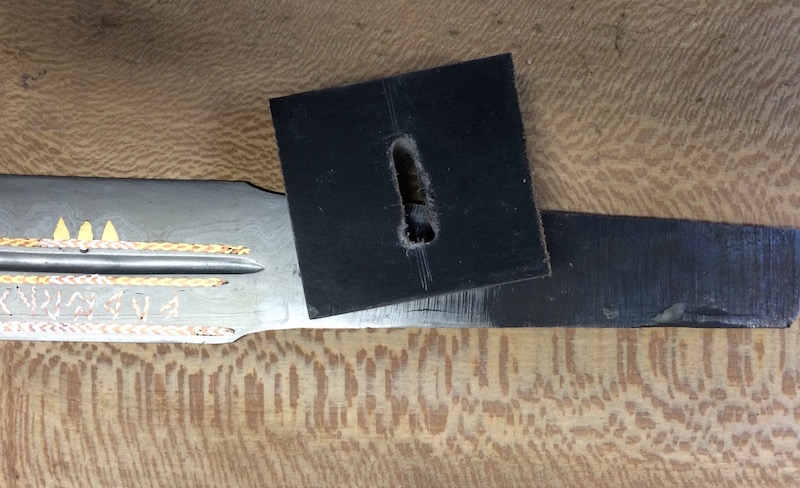
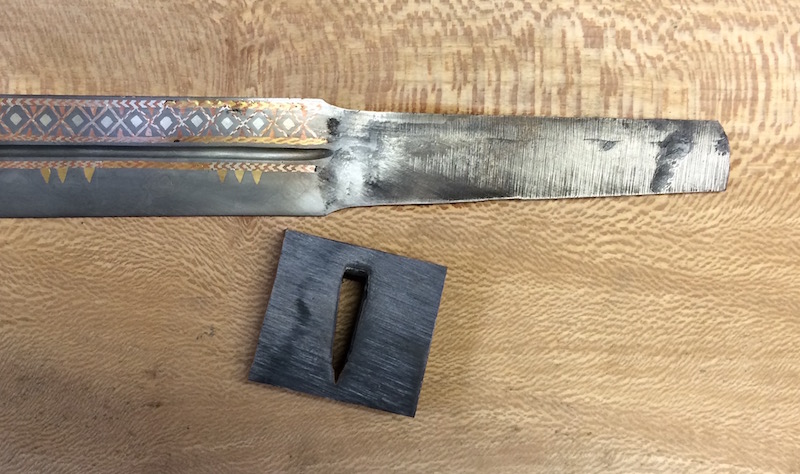
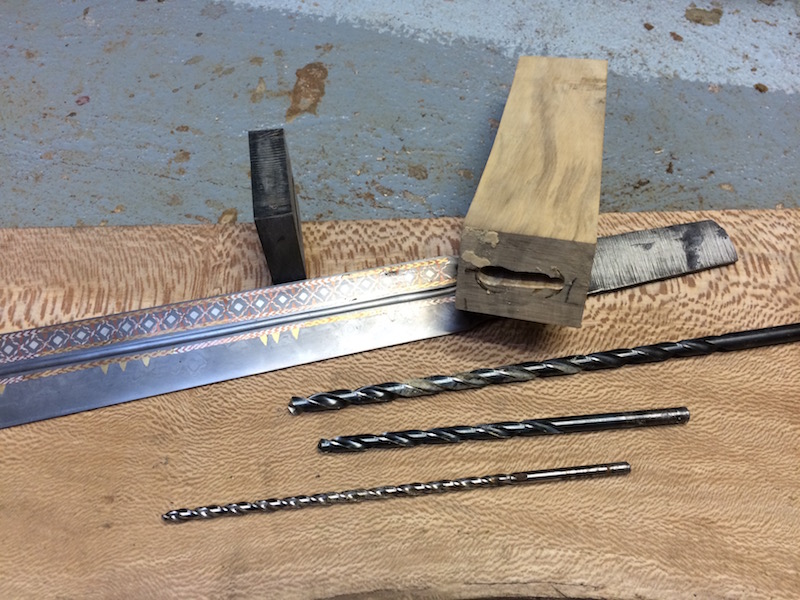
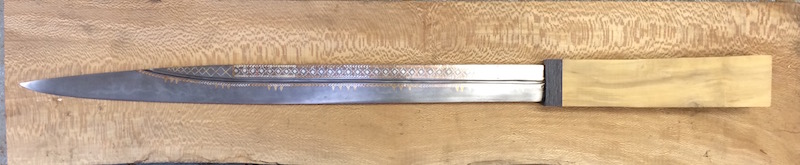
The next step was to cut a slot in a piece of horn, heat the tang and push it down. The horn bubbles and melts and seats itself to a very good fit. The wood was drilled full depth of the tang and slightly undersize and then this was burnt on also. The horn and the wood were then glued together and the shaping started.
We are going for a long handle on this seax, but the real battle is to make the handle fit the hand. The tang is really wide on this knife and so the handle top to bottom must be wide also, leaving a little wood above and below the tang, it became evident that it would have to be quite slim or you simply would not be able to get your hand around it, so in a way the handle shaped itself.
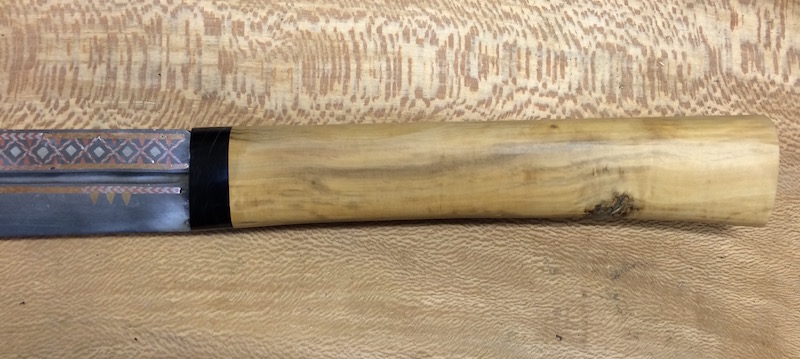
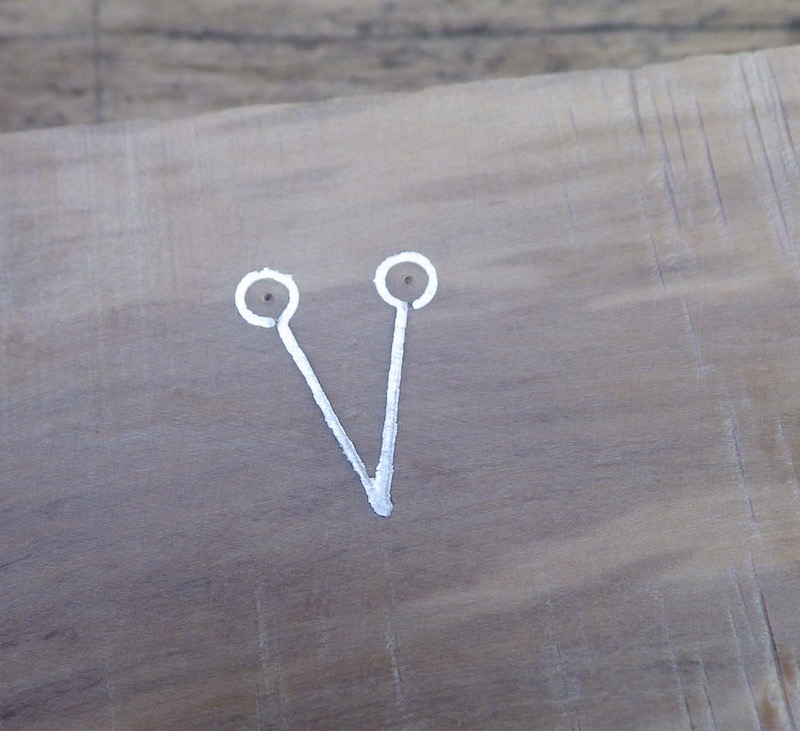
It has been important to this project that it is not too speculative; clearly there are places like handle shape where you have to speculate, but in others we are trying hard not to. It is so easy to go full tilt at the decoration but we are trying to stick with what we know as far as we can. We have decided to use the inlaid silver 'V' decoration of the Cumwhitton seax on part of the grip, it looks like it covered quite a large area, but I am not sure how much of the grip I will cover as yet and I may do part and partition it off with a silver wire encirclement.
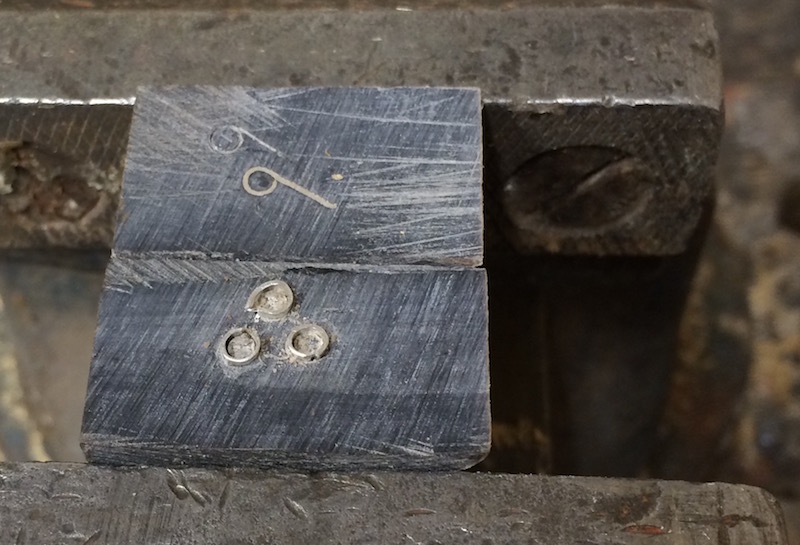
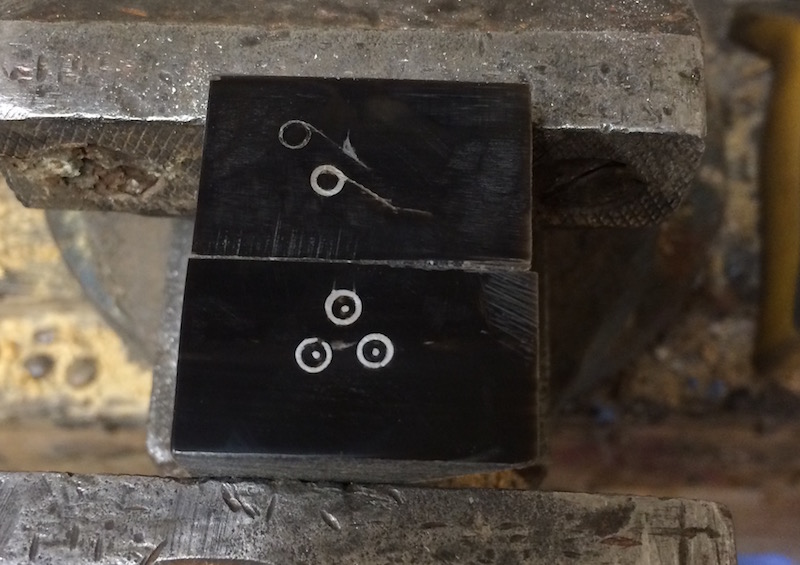
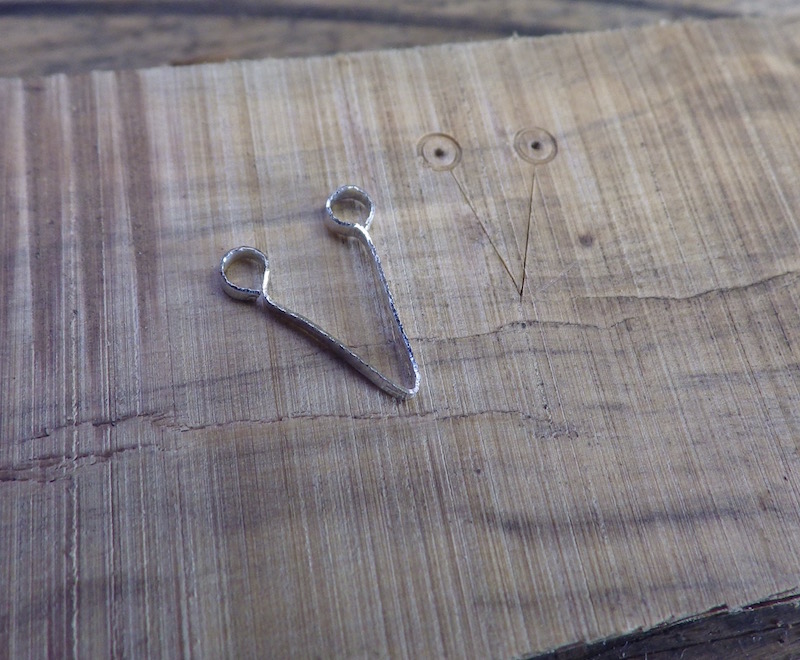
On a slightly more speculative note, I was thinking of inlaying the horn ferrule with some silver dots and circles; clearly the Vikings loved dots and circles and they inlaid horn, so I think this is plausible - thoughts? I have made a sample test to have a look.
The handle is now a very snug fit to the tang, so it will be very easy to glue it it in place and I will do some glue tests with a rosin/wax/bone black mix and see what that reveals.
I hope you like it - it is quite the brute now that it has a grip on it.
Tod
Attachment: 128.82 KB
Attachment: 138.79 KB
Attachment: 160.07 KB
Attachment: 187.72 KB
Attachment: 182.9 KB
Attachment: 53.74 KB
Attachment: 47.7 KB

Attachment: 104.58 KB
Attachment: 67.14 KB
Attachment: 60.87 KB

www.todsworkshop.com
www.todcutler.com
www.instagram.com/todsworkshop
https://www.facebook.com/TodsWorkshop
www.youtube.com/user/todsstuff1
|
|
|
|
|
Leo Todeschini
Industry Professional
|
|
|
|
|
|
Ron Reimer
|
| Posted: Fri 15 Apr, 2016 4:40 pm Post subject: |
|
|
|
Hi Tod, what glue are you using to affix the handle?
|
|
|
|
|
Leo Todeschini
Industry Professional
|
| Posted: Tue 19 Apr, 2016 12:48 am Post subject: |
|
|
Ron Reimer wrote | Quote: | | Hi Tod, what glue are you using to affix the handle? |
I will do some tests, possibly today, and it will contain mainly rosin, some beeswax, probably oil and some 'bone black' Thanks Matthew Bunker.
Basically cutlers resin is a mix of a few different substances and people have their own recipes, but the options are.
pitch
rosin
wax
oil
filler powder
The properties that are looked for are tough (i.e. not brittle), sticky (high adhesion), high melting point, low viscosity at high temperature.
Tough so that the resin does not crack, however if it does, raising the temperature or simply leaving it for a while tends to allow it to self heal, depending on the formulation.
Sticky, so that it adheres well to metal and wood, however it will also create a mechanical bond in that imperfections in the wood or metal will be filled with resin and to create an interference if the blade is pulled away from the handle.
High melting point so that on a hot summers day the resin does not soften and the blade loosen.
Low viscosity at high temperatures, so that the resin will flow into all the gaps and undulations in the handle.
When the blade is set in the handle, the resin is heated to a liquid and the blade tang is also warmed up, a little resin is poured in the handle and the blade inserted. The tang will cause excess resin to be pushed out of the handle in a somewhat messy way and this will then need to be left to cool and scraped away after. It is important to warm the blade tang also, as otherwise the resin will cool and freeze immediately it contacts the metal and flow and adhesion will be poor.
It is usual to include a filler powder of some sort to help increase the melting point and though I have not used 'bone black' before, but Matthew Bunker has an old recipe that uses this and it seems as good a filler as any. In the instance because the horn is black at the blade junction, the black of the resin mix will also be useful to me.
Small changes in proportion make a big change to how it behaves, so I will run some tests today and let you know.
Tod
Attachment: 192.05 KB
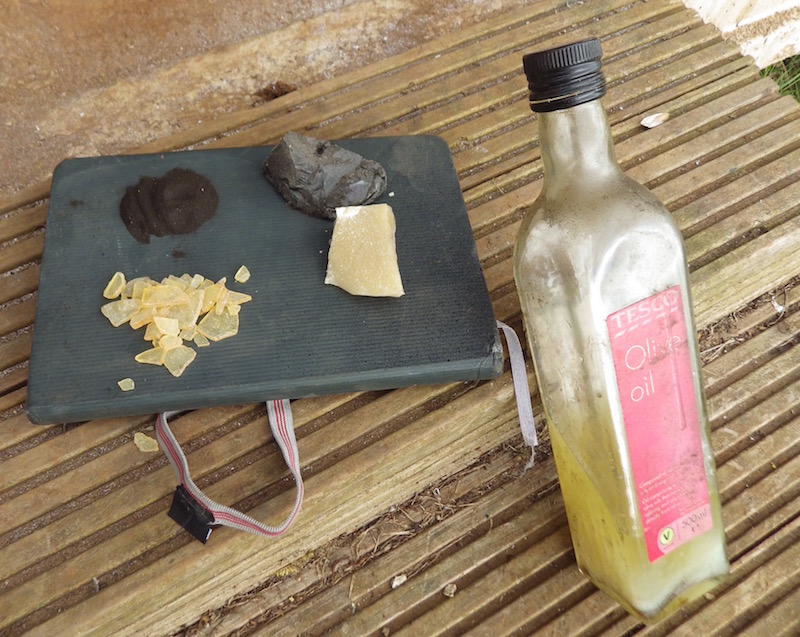
Here are the ingredients used in the resin mix
www.todsworkshop.com
www.todcutler.com
www.instagram.com/todsworkshop
https://www.facebook.com/TodsWorkshop
www.youtube.com/user/todsstuff1
Last edited by Leo Todeschini on Tue 19 Apr, 2016 12:46 pm; edited 1 time in total
|
|
|
|
|
|
Ron Reimer
|
| Posted: Tue 19 Apr, 2016 3:30 am Post subject: |
|
|
|
Thanks for that, I have a couple of rebated seax blades I want to mount for combat.I know people who have used commercial epoxies but I'd rather use something more correct.
|
|
|
|
|
Leo Todeschini
Industry Professional
|
| Posted: Tue 19 Apr, 2016 1:28 pm Post subject: |
|
|
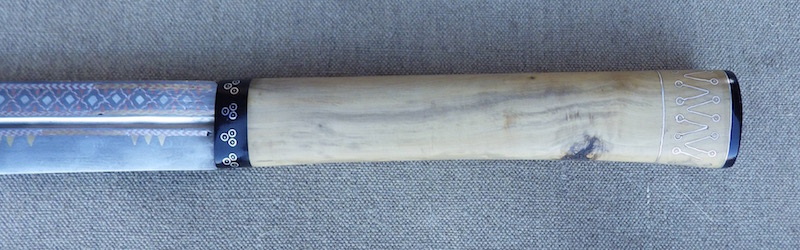
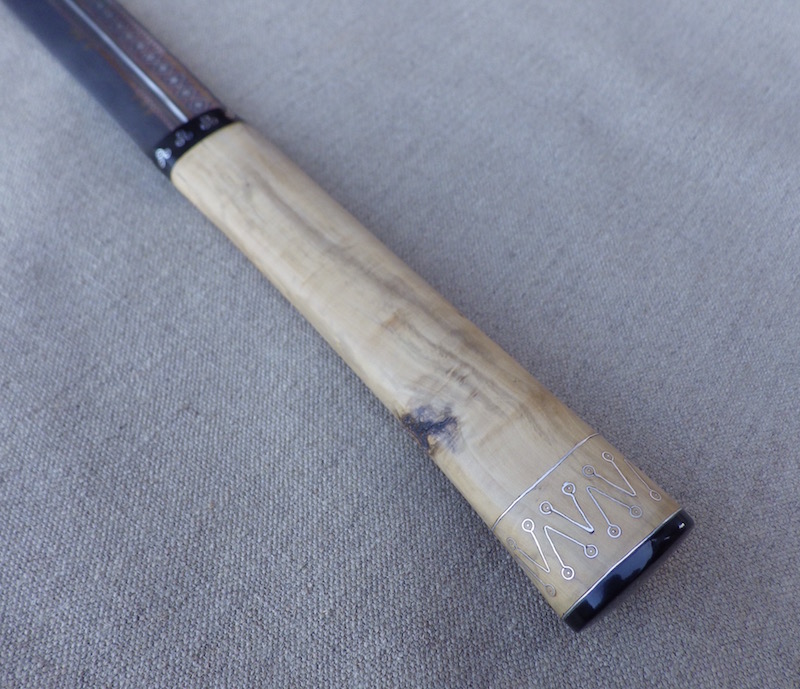
The next step was to inlay the silver wire into the horn and wood.
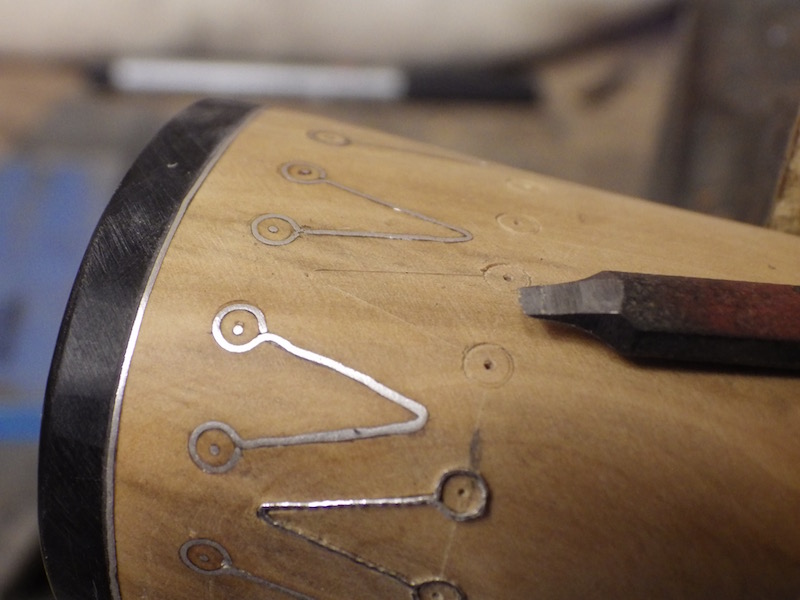
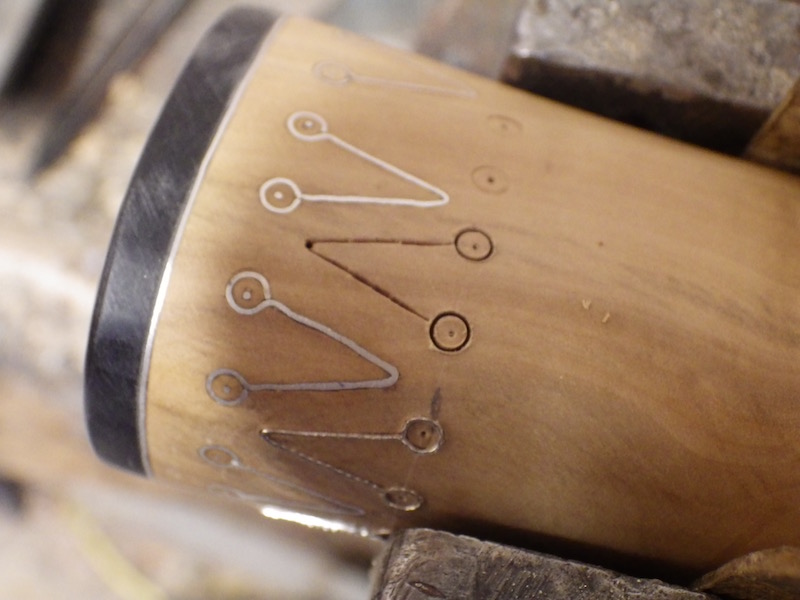
This is done differently to when it is done in metal. First make a chisel in the usual way, but make it very fine. If this went into metal it would chip and snap, but into wood or horn and it will be fine. For the circles I used a piece of tube in a drill and spun it fast to basically burn a circular groove. The lines are then marked on and chiseled in around 2mm deep.
You then take pure silver strip and gently tap it down into the groove to seat it home, file off and burnish.
We decided to use a silver wire motif that was found on the Cumwhitton seax and it is a series of 'V' wires with circles on the ends and so circular grooves were formed and the 'V's were then chiseled in. To make it neat, I made a jig to bend the wires around and I suspect this is how it was done originally, so then each wire set would fit each groove set.
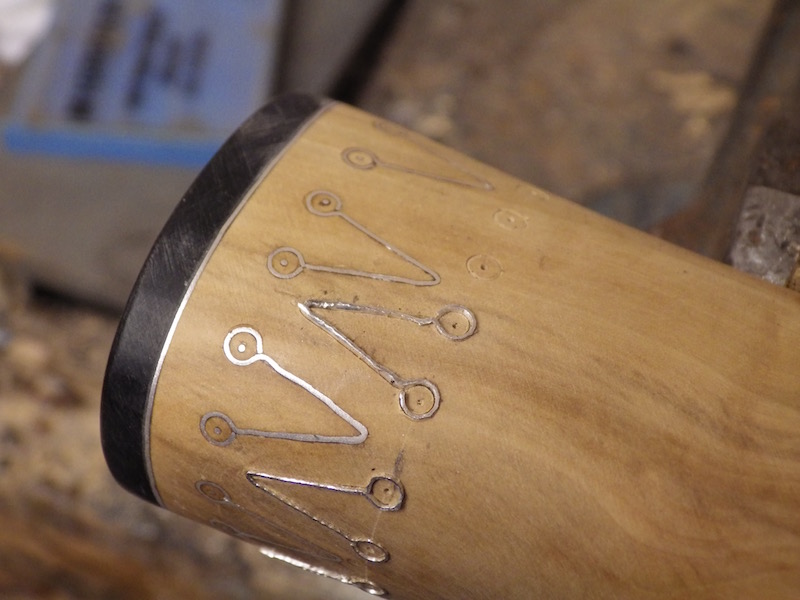
After a couple of abortive tests, I got the knack of laying the wires in and how to make the grooves the right size. Because the wire is so soft, it will not 'find its own place' like a steel wire would, so the groove does need to be exact.
The wire inlay is subtle, perhaps too subtle, but looking at 'The Seax of Charlemagne' subtle low key handles were OK too. I will soak the handle in linseed oil and this will darken it as well, so the contrast with the silver will increase.
I hope you like the finished piece and of course any questions or comments just fire away.
Attachment: 136.03 KB
Attachment: 169.8 KB
Attachment: 135.93 KB
Attachment: 210.28 KB

Attachment: 97.28 KB
Attachment: 93.06 KB
Attachment: 101.71 KB
www.todsworkshop.com
www.todcutler.com
www.instagram.com/todsworkshop
https://www.facebook.com/TodsWorkshop
www.youtube.com/user/todsstuff1
|
|
|
|
|
Leo Todeschini
Industry Professional
|
| Posted: Tue 19 Apr, 2016 1:40 pm Post subject: |
|
|
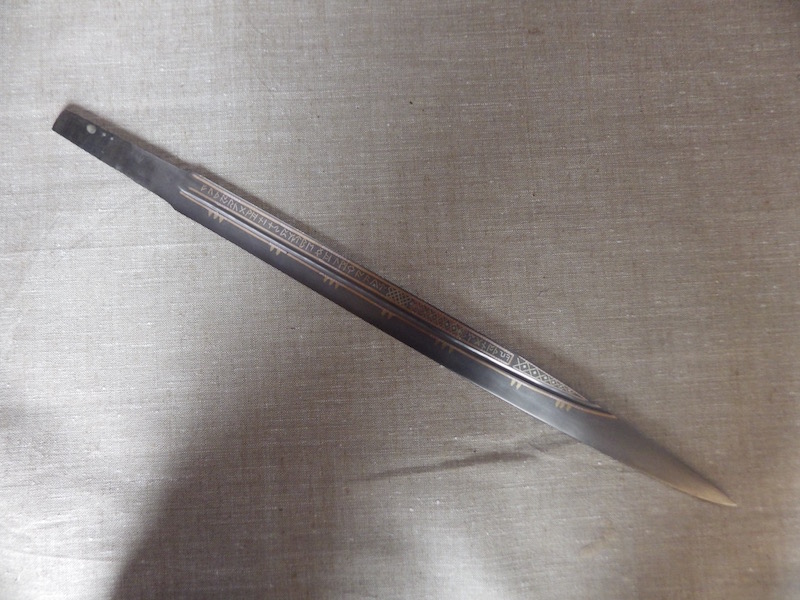
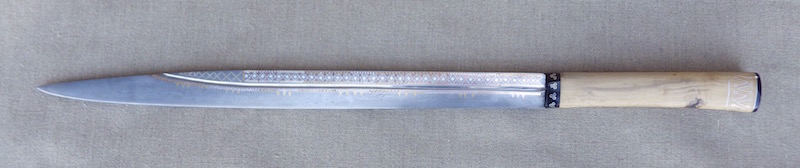
So the last thing to post up right now are the finished shots of the knife.
This really is a monster of a knife. The blade is thick and heavy and of course there is no pommel to offset this weight, so strong wrists and a committed blow are order of the day. Assuming Beagnoth was the owner of this knife, we can also assume he was a big guy.
I still need to make the scabbard and so more will follow and I will also get some good pictures when it is finally all done.
I hope you like it.
Regards
Tod
Attachment: 44.9 KB
Attachment: 46.03 KB

Attachment: 88.56 KB
Attachment: 146.9 KB

Attachment: 144.98 KB

Attachment: 173.49 KB
Attachment: 60.78 KB

www.todsworkshop.com
www.todcutler.com
www.instagram.com/todsworkshop
https://www.facebook.com/TodsWorkshop
www.youtube.com/user/todsstuff1
|
|
|
|
|
|
Jeremy V. Krause
|
| Posted: Tue 19 Apr, 2016 2:19 pm Post subject: |
|
|
Really, she looks fantastic Tod,
I really like the decorative choices you made with the handle. The handle melds well with the blade and the aesthetic of the finished piece is very pleasing to the eye.
I can hardly wait to see what you do with the sheath and I can hardly wait to get my hands on this beauty when she arrives at my doorstep!
You have done a superb job bringing this legendary weapon back to life. I could imagine that paring this reproduction with the original would be a cool exhibit to see at the British Museum but "sadly" I will be the caretaker instead. 
|
|
|
|
|
Leo Todeschini
Industry Professional
|
| Posted: Wed 20 Apr, 2016 12:13 am Post subject: |
|
|
Thanks Jeremy and not too long now.
I have a quick question for the forum and hope somebody can help with my thoughts.
Looking at the scabbard shown in the Psalter below, it looks to me like the blade edge faces the rivet/plate side of the scabbard as you would expect with seax. However if you wear the langseax in this way with the edge upward, it is a rather awkward draw to have the edge in the correct orientation for striking, so logically the edge should be forward/downward, but this would make the blade in the wrong orientation for the scabbard.
Thoughts?
Tod
Attachment: 113.16 KB

www.todsworkshop.com
www.todcutler.com
www.instagram.com/todsworkshop
https://www.facebook.com/TodsWorkshop
www.youtube.com/user/todsstuff1
|
|
|
|
|
|
|