| Author |
Message |
Leo Todeschini
Industry Professional

|
 Posted: Tue 12 Jan, 2016 1:56 pm Post subject: Posted: Tue 12 Jan, 2016 1:56 pm Post subject: |
 |
|
Keep at it Daniel, just accept in your mind it is going to take ages and your fingers will hurt and you will be in the right mindset. Spring steel is fine if you treat it hard.
I finally got up the courage to start and so here we go.
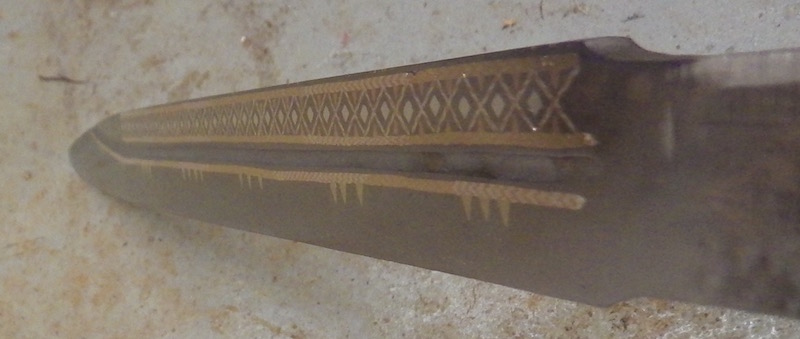
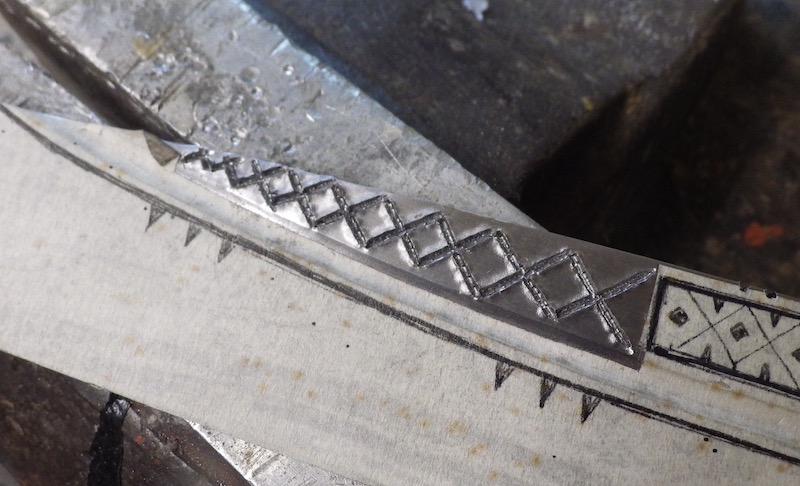
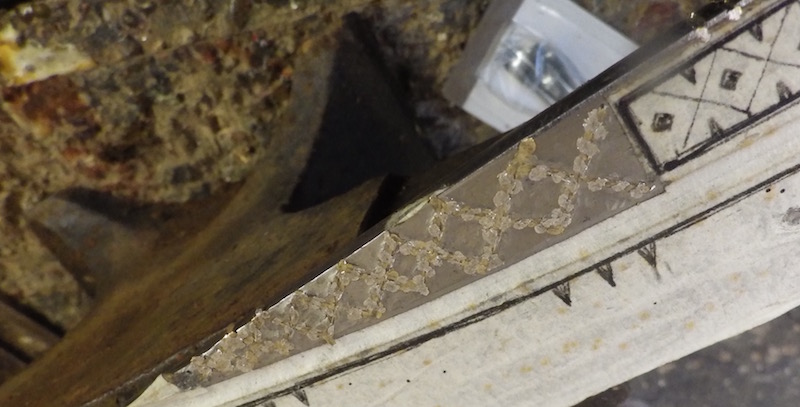
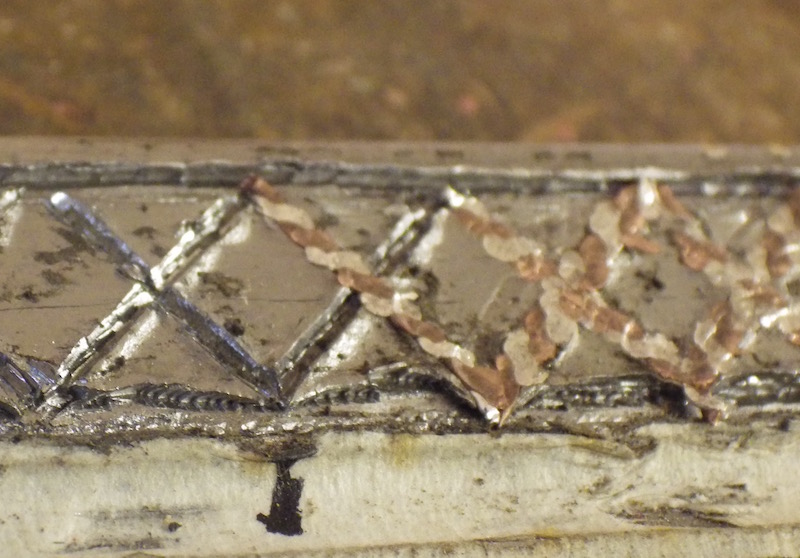
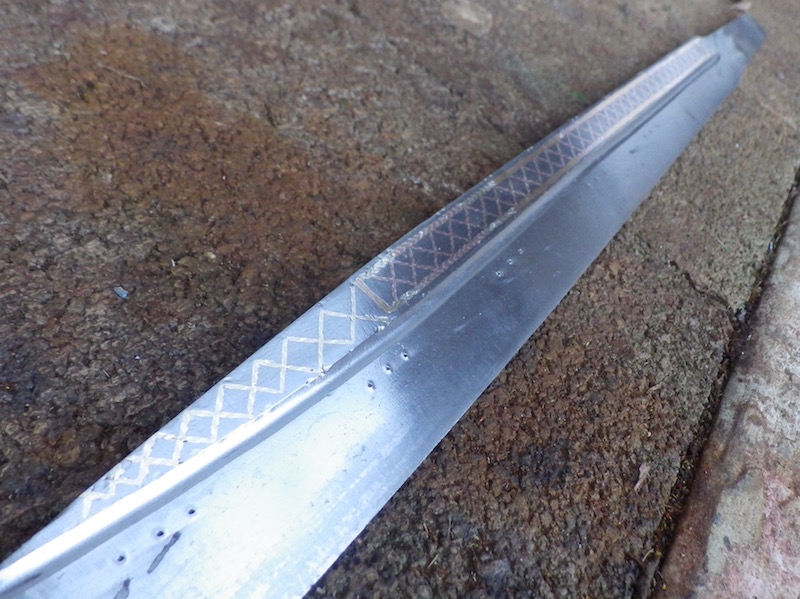
I started on the non-rune side of the blade with the cross hatching near the tip and I went for a silver and brass wire combination. The grooves were hammered in using a small cold chisel with a 2mm edge and then undercut with the same chisel. I was not very happy with the way it cut and later changed the tip profile from a cold chisel to a true 'chisel grind' to allow me to undercut without smudging the edges of the cut too much.
The two long grooves were then cut in and the bottom faced before undercutting the edges and then I went on to cut the main crosshatching. I was then going to lay in the long twin wires and then go back to the shorter cross hatches, but I decided to change the order. By laying in the crosses first I will have to go back and trim off the ends of the wires later, but somehow it felt like the right order. I was also going to punch the triangles and squares in at this stage, but again I changed my mind as I worked the piece and will now finish the inlaid cross hatched wires, then do the squares and triangles and then finish with the paired wires. In-between each stage there will be some clean up so we can start to get an idea of the look of the piece.
Quite why I have changed the order is a little hard to concisely explain, but really it is just that as I see how the metal moves and behaves (this blade has been made from ore so I am not very familiar with it) I have changed my mind. Really it is just a case of one step not messing up the previous nor causing issues for the next step.
I am pleased with the progress and the wires have gone in well and seem secure at this stage.
Tod
 Attachment: 117.47 KB Attachment: 117.47 KB
Attachment: 91.7 KB
Attachment: 133.13 KB
Attachment: 137.42 KB
Attachment: 117.31 KB
Attachment: 153.71 KB

Attachment: 129.37 KB
Attachment: 132.37 KB
Attachment: 133.17 KB
Attachment: 155.17 KB
www.todsworkshop.com
www.todcutler.com
www.instagram.com/todsworkshop
https://www.facebook.com/TodsWorkshop
www.youtube.com/user/todsstuff1
|
|
   |
 |
Leo Todeschini
Industry Professional
|
| Posted: Thu 14 Jan, 2016 2:00 pm Post subject: |
|
|
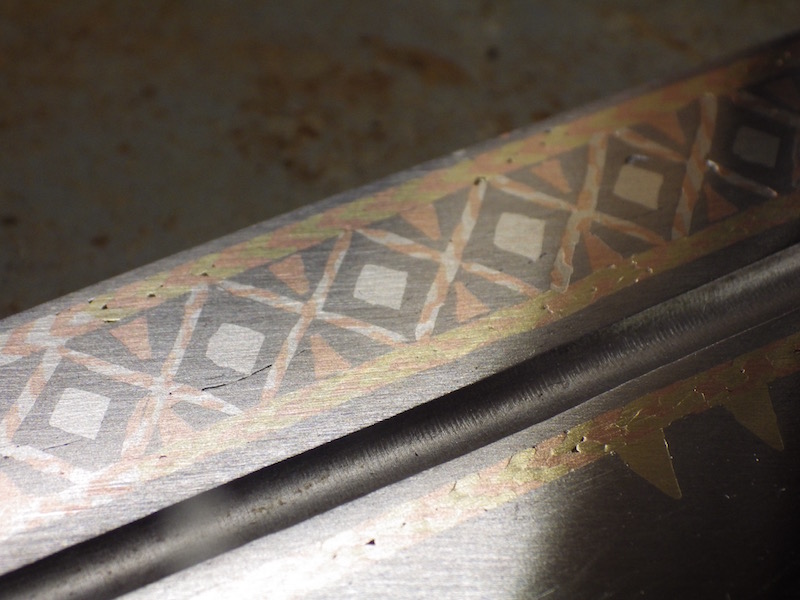
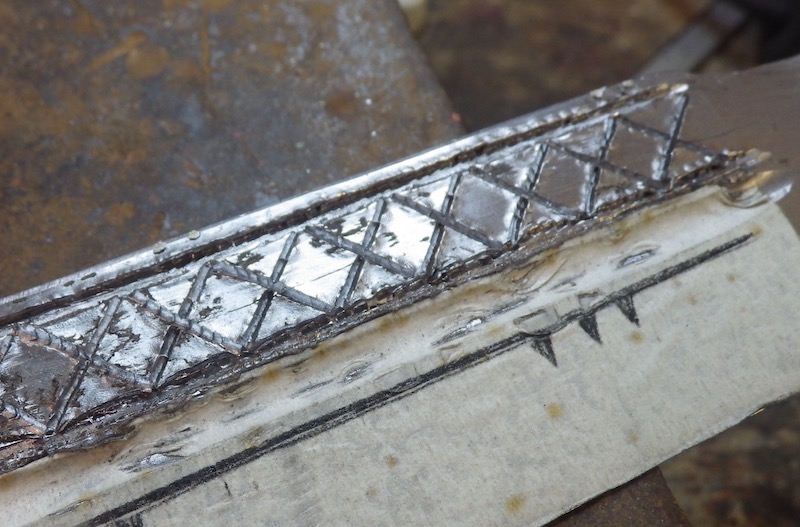
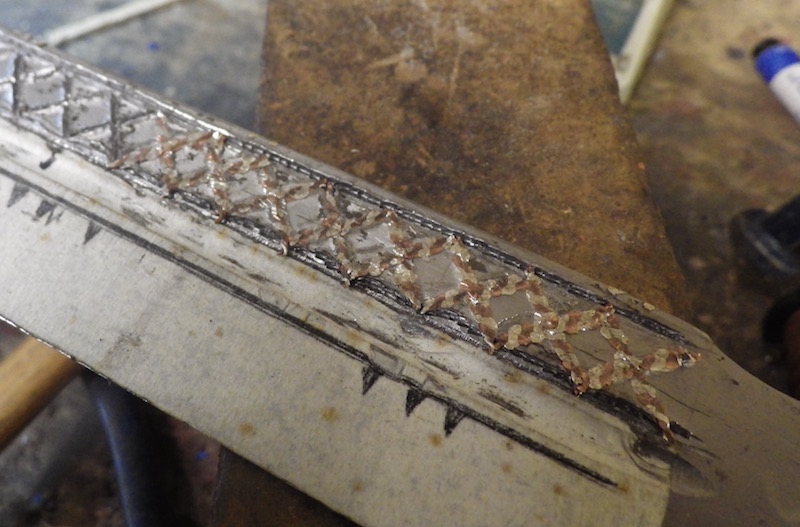
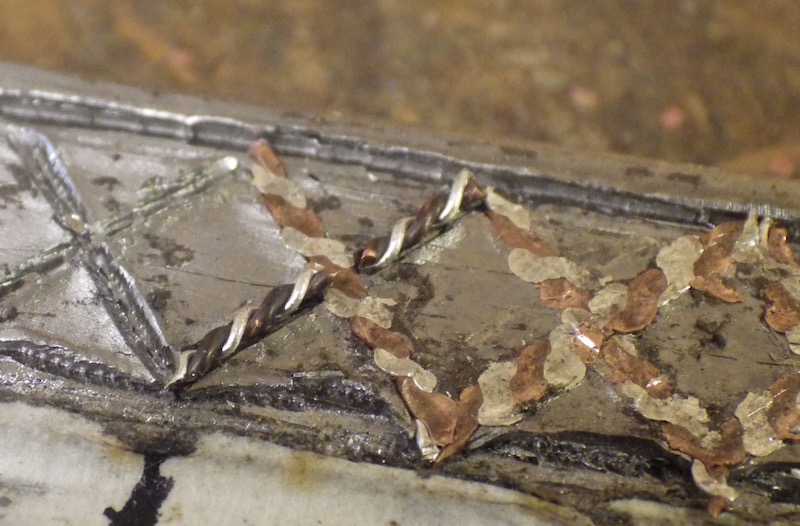
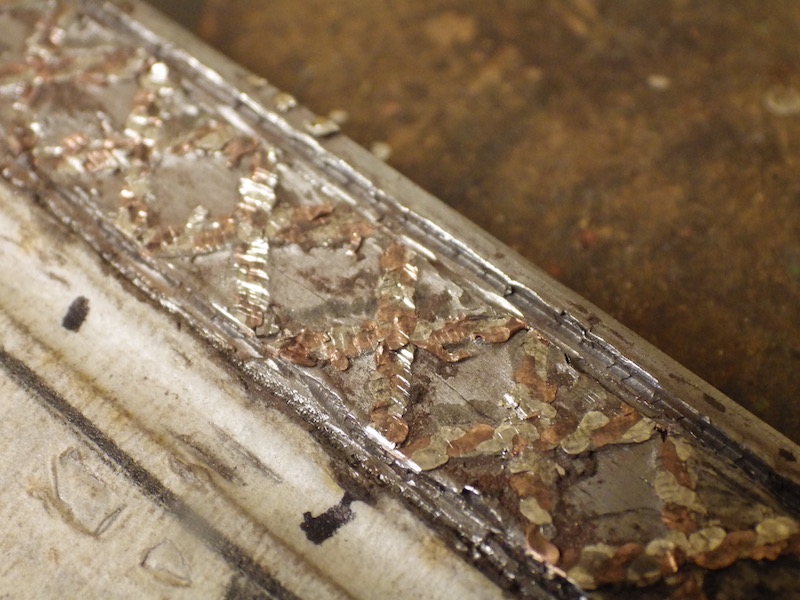
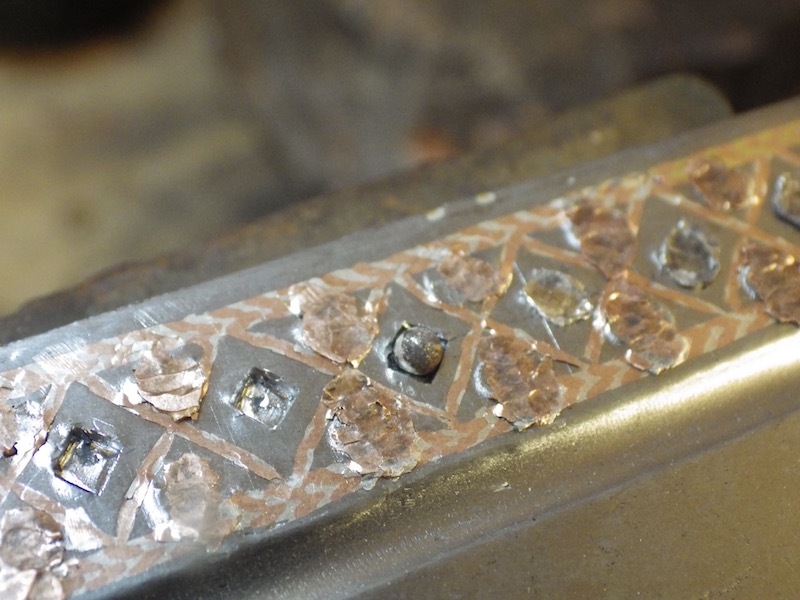
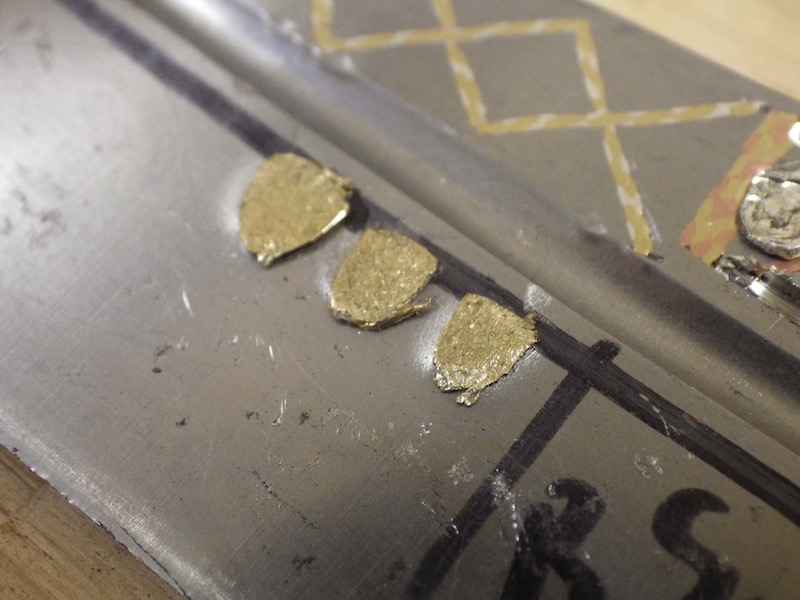
I finished laying in the crosses and then the long twin wire borders and everything is looking pretty good. I then hammered in the triangles for the small copper inserts which upset the twin wires as you can see.
So I think we can assume that I got the order wrong. Damn. I have laid in the copper triangles and will now pick out the twin wires, clean up the trough and lay new ones back in, but before doing that I will lay in the silver squares in the centre of the cross hatching.
it is slowly getting there.
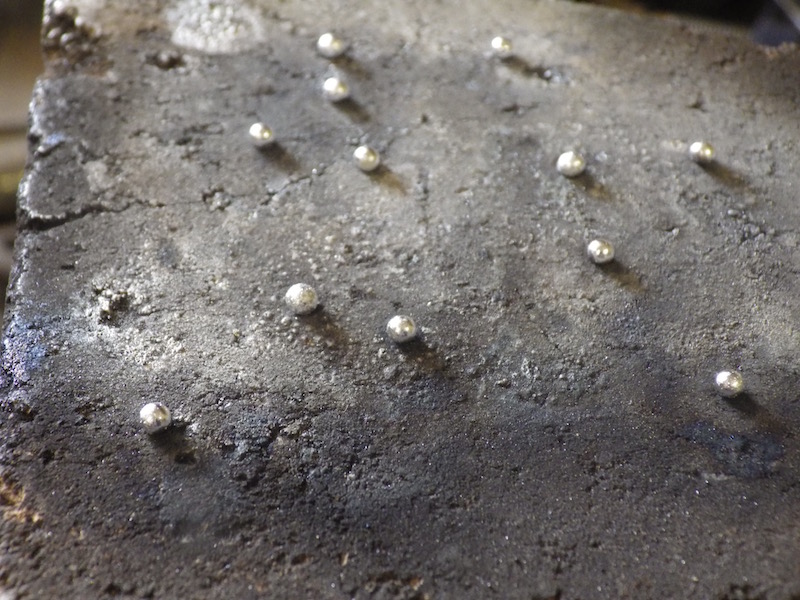
The dots punched in the blade are just markers for where the other triangles will go.
Tod
Attachment: 149.23 KB
Attachment: 69.24 KB
Attachment: 91.83 KB
Attachment: 168.78 KB
Attachment: 109.35 KB

www.todsworkshop.com
www.todcutler.com
www.instagram.com/todsworkshop
https://www.facebook.com/TodsWorkshop
www.youtube.com/user/todsstuff1
|
|
|
|
|
Eric McHugh
Industry Professional

|
| Posted: Thu 14 Jan, 2016 7:21 pm Post subject: Inlay |
|
|
|
Leo, nice work. I appreciate your desire to get it right! Sometimes it is hard to break the code on how ancient craftsmen did things.
|
|
|
|
|
|
Jeremy V. Krause
|
| Posted: Fri 15 Jan, 2016 7:01 am Post subject: |
|
|
This is really coming together Tod!
It looks great and thanks so much for showing your progress. I am really enjoying following along on what is sure to be one of- if not the finest piece in my collection.
|
|
|
|
|
Leo Todeschini
Industry Professional
|
| Posted: Fri 15 Jan, 2016 2:46 pm Post subject: |
|
|
Thanks Eric, I appreciate it and good to see you are up and running again. In my early days you were a legend people talked about and now you are resurrected. Pretty sure I have hilted a couple of your seax blades in my time.
Jeremy Krause wrote | Quote: |
It looks great and thanks so much for showing your progress. I am really enjoying following along on what is sure to be one of- if not the finest piece in my collection. |
Well it had bloody better be as it is killing me! Actually it is fine, just annoying. I will post up progress pics when I can stomach it, but placing the squares and triangles upset all the wires I had already placed too much, so I have picked them all out, placed all the triangles and squares and started again on the wires...
Everything is looking very tight and solid now, but nonetheless it is soul destroying picking out the previous 2 days work. Generally this situation doesn't happen to me very often and you have to take it in your stride, but on this occasion it has happened big time- hey ho. This was always going to be taxing and it has taxed, but I am now confident I am through the bad times.
Every cloud has a silver lining and in this case it is that, I know exactly how to approach the rune side.
Pictures to follow.
Tod
www.todsworkshop.com
www.todcutler.com
www.instagram.com/todsworkshop
https://www.facebook.com/TodsWorkshop
www.youtube.com/user/todsstuff1
|
|
|
|
|
|
Fabrice Cognot
Industry Professional
|
|
|
|
|
Leo Todeschini
Industry Professional
|
| Posted: Mon 18 Jan, 2016 1:00 pm Post subject: |
|
|
Thanks Fab.
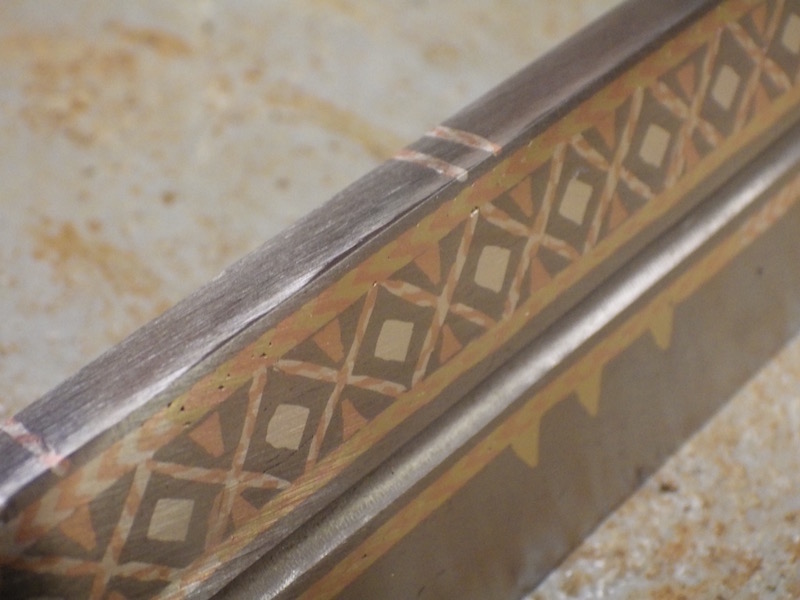
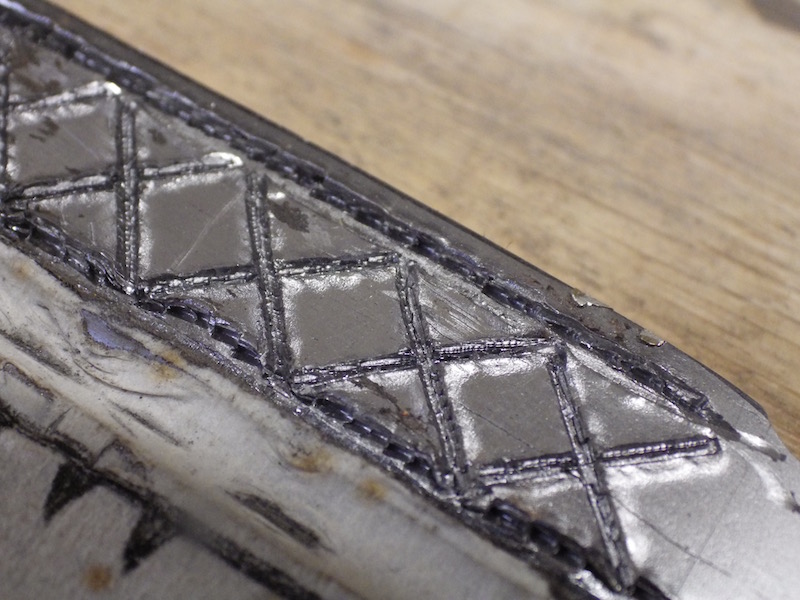
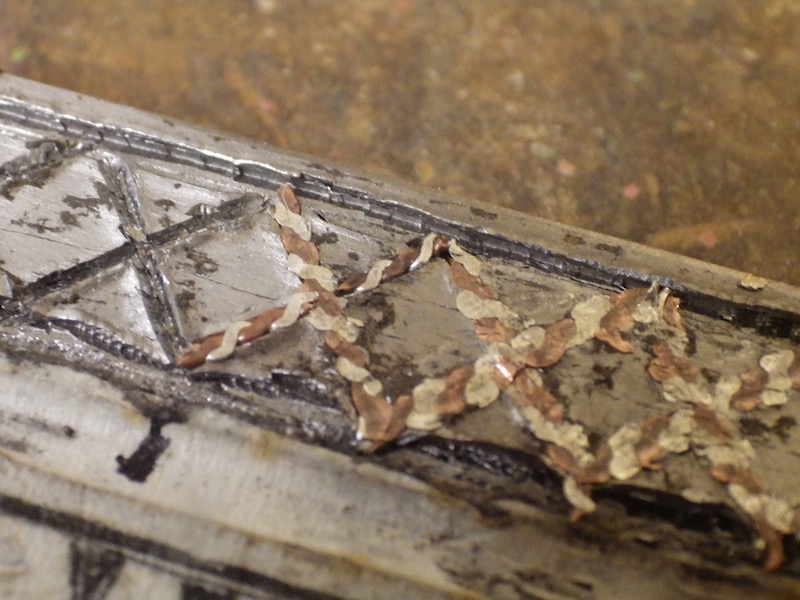
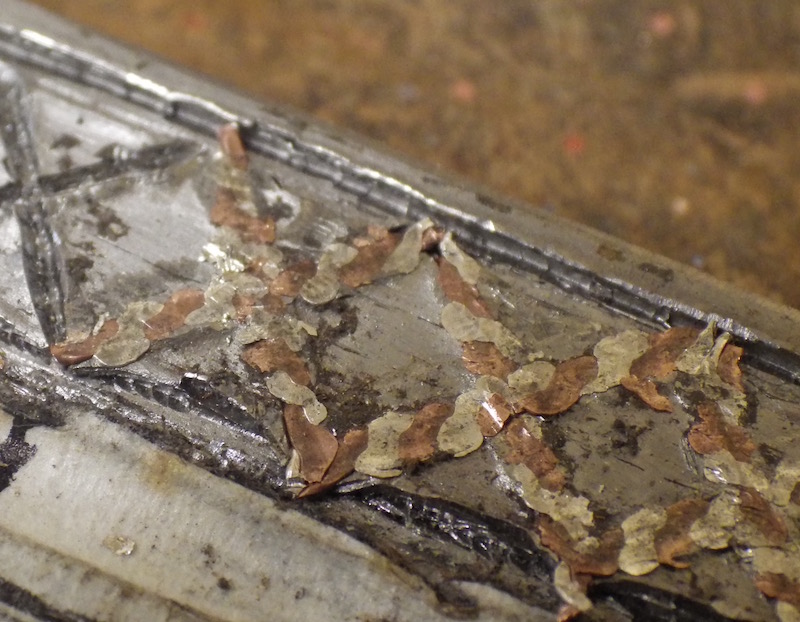
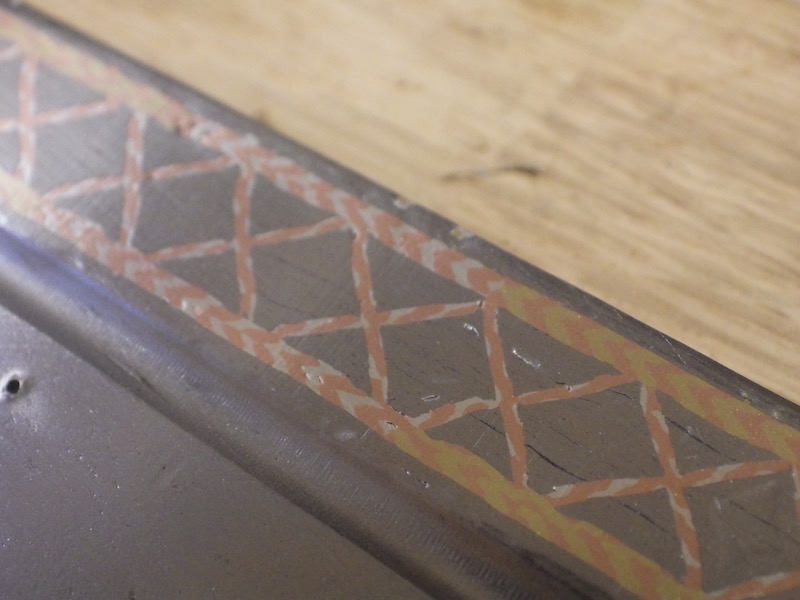
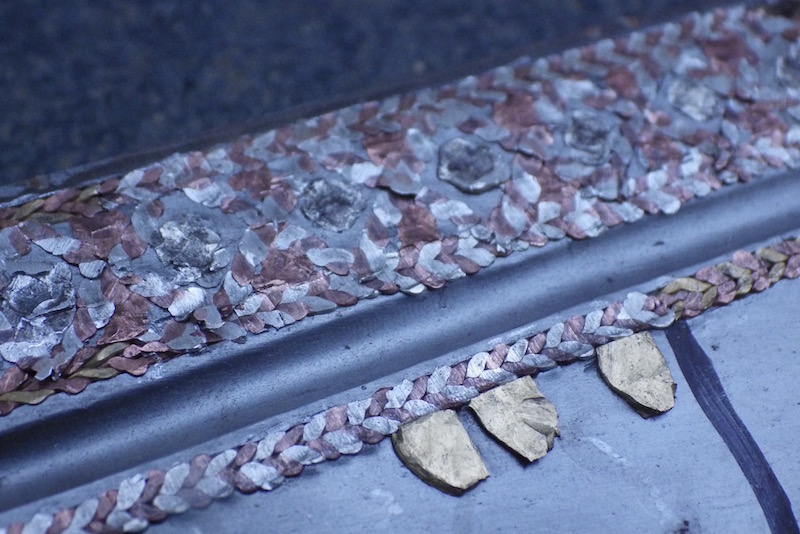
So here are the updated pictures. It started with me having laid in the copper into the triangles and then having punched the squares for the silver. Both of these required punches to be made and these had to be made right and cold hammering into metal onto an anvil is punishing for a small punch, though thankfully the wrought iron of the blade is soft so that helps a lot.
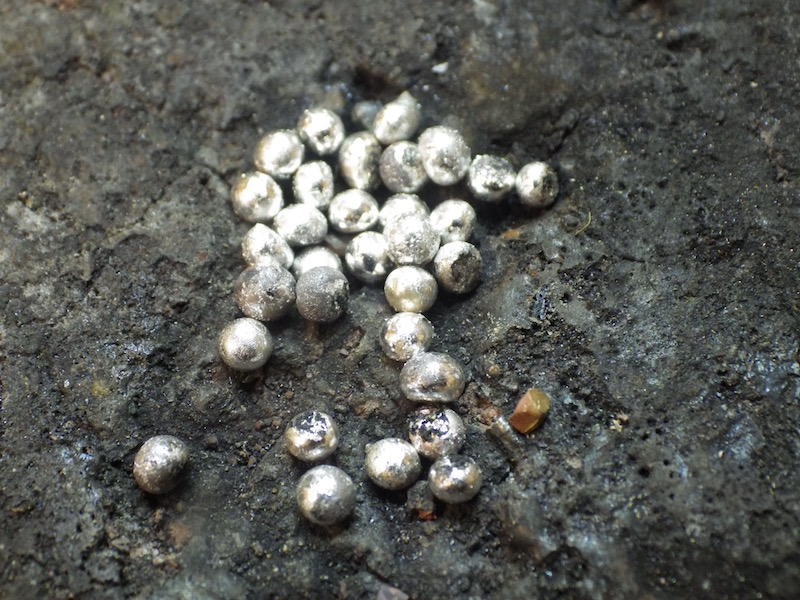
Once the squares were in I made silver spheres out of some pure silver scrap I had. This is easily done by clipping a small amount of silver off and putting it on a brick and hitting it with a torch. It will suddenly reticulate and contract into a sphere, note that the silver is still bright, showing it is pure and not alloyed.
These are then placed into the squares, which have of course been undercut, and hammered home. Once these were all in, I unpicked all the previous wire work, made sure all the undercuts were still there and then laid all the wires in again. In retrospect I should have assumed that the major disturbance created by the shaped punches would do this, but I didn't.
A friend mentioned this over the weekend and described this fiasco as a mistake. I am torn a little on whether this is a mistake or not. In the classic sense I didn't want this to happen and so yes it is a mistake, on the other hand to use an exploring metaphor, when you are sailing in uncharted waters, it is inevitable that sometimes what you thought was a channel between two islands ends up being a river and so to a dead end.
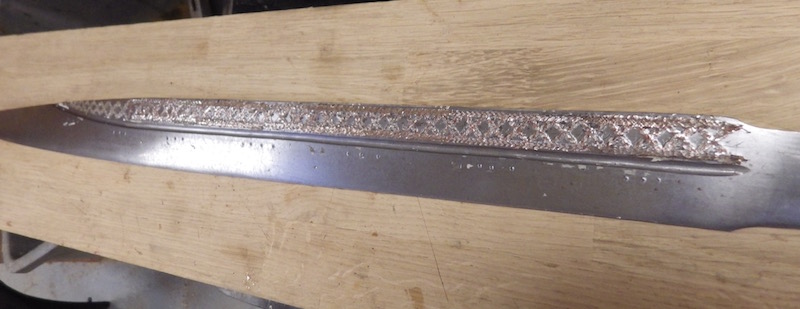
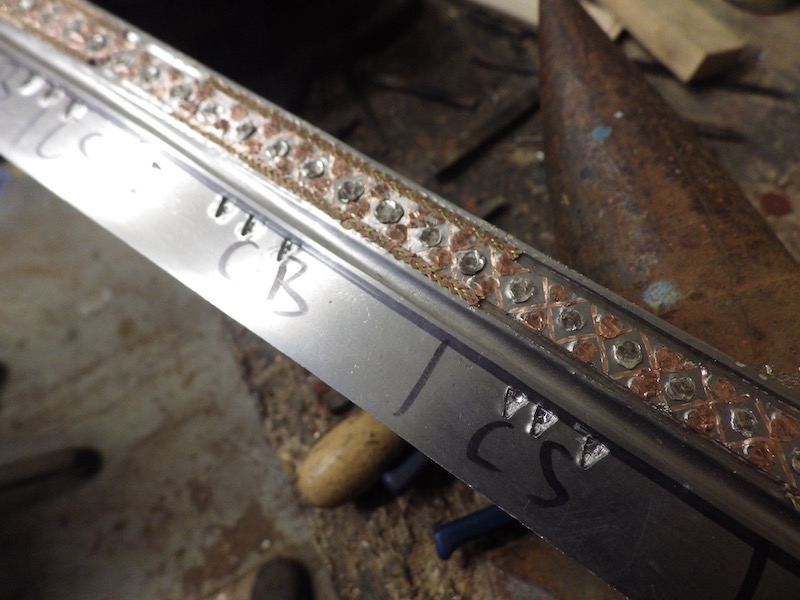
Anyway the last pictures are on the whole inlay in situ, and then to the grind back to flat.
By the time I had finished it was too dark for good pictures, but I hope these will suffice for the moment.
Tod
Attachment: 178.66 KB

Attachment: 177.62 KB
Attachment: 196.84 KB
Attachment: 125.92 KB
Attachment: 114.15 KB
Attachment: 107.87 KB
Attachment: 102.51 KB

Attachment: 49.86 KB

Attachment: 145.2 KB
Attachment: 32 KB

www.todsworkshop.com
www.todcutler.com
www.instagram.com/todsworkshop
https://www.facebook.com/TodsWorkshop
www.youtube.com/user/todsstuff1
|
|
|
|
|
Leo Todeschini
Industry Professional
|
|
|
|
|
Eric McHugh
Industry Professional
|
| Posted: Mon 18 Jan, 2016 1:44 pm Post subject: |
|
|
|
Nice work Leo!
|
|
|
|
|
|
Jeremy V. Krause
|
| Posted: Mon 18 Jan, 2016 3:40 pm Post subject: |
|
|
Congratulations on getting the first side done Tod. a hearty BRAVO to you!
Now Tod and I want to turn to the collective knowledge of the community here before deciding on specifics around the handle. Does anyone know of any intact, or relatively intact seax handles from the period?
I believe we plan on using box wood but are unsure as to what type of decorations to use as a completely plain handle might not look quite right given the extensive amount of inlay on the blade. Were ferules being used during this period (c.e. 900)?
What expert feedback can folks provide as I really want to produce a complete piece staying as close to period examples as possible. I am not a real fan of kind of "guessing" what would have been used or in just making decorative choices on what looks "right".
|
|
|
|
|
|
Tim Lison
|
| Posted: Tue 19 Jan, 2016 8:47 am Post subject: |
|
|
|
One word: WOW!
|
|
|
|
|
|
Patrick De Block
|
| Posted: Tue 19 Jan, 2016 10:23 am Post subject: |
|
|
|
I am aghast.
|
|
|
|
|
Julien M

|
| Posted: Tue 19 Jan, 2016 12:14 pm Post subject: |
|
|
Tod & Owen, what a team! This will be something to behold for sure.
I can only imagine how one must feel before taking the first chisel cut on such an exquisite pattern welded blade, and you make this look as easy as a walk in the park Tod.
Looking forward to see this finished (and to see what you come up with next of course  , and hopefully soon! ) , and hopefully soon! )
Cheers,
J
|
|
|
|
|
|
Jeroen Zuiderwijk
Industry Professional
|
| Posted: Tue 19 Jan, 2016 1:29 pm Post subject: |
|
|
| Jeremy V. Krause wrote: | Congratulations on getting the first side done Tod. a hearty BRAVO to you!
Now Tod and I want to turn to the collective knowledge of the community here before deciding on specifics around the handle. Does anyone know of any intact, or relatively intact seax handles from the period?
I believe we plan on using box wood but are unsure as to what type of decorations to use as a completely plain handle might not look quite right given the extensive amount of inlay on the blade. Were ferules being used during this period (c.e. 900)?
What expert feedback can folks provide as I really want to produce a complete piece staying as close to period examples as possible. I am not a real fan of kind of "guessing" what would have been used or in just making decorative choices on what looks "right". |
I don't know of any fully intact surviving hilts on longsaxes. Some good information of the overall shape can be taken from a rare full tang longsax, which was posted in this thread:
https://myArmoury.com/talk/viewtopic.php?p=301583
Another example of a sax with a good amount of the hilt preserved is the longsax from Jesenwang, Germany:

Another example of a longsax with some remaining hilt is this longsax, from Soest, Germany. This example shows possibly some of the original surface of the hilt. One interesting detail is that the hilt extends beyond the transition from blade to tang.

Ferrules are usually not present. However, there's one exception:

Note that the first three examples are a bit earlier and continental. But it's the closest thing I have at the moment. Earlier broadsaxes and smallsaxes occasionally have a leather covering surviving over the wooden hilt.
Jeroen Zuiderwijk
- Bronze age living history in the Netherlands
- Barbarian metalworking
- Museum photos
- Zip-file with information about saxes
|
|
|
|
|
Eric McHugh
Industry Professional
|
| Posted: Tue 19 Jan, 2016 1:50 pm Post subject: My two cents |
|
|
Hi Leo,
Here are my two cents. First, I apologize for the bad picture. I was without a good camera when I took this. Second, I'm sure that Tim will not want the same grip, so I am not suggesting that you do anything like this, but the guard shape is somewhat common.
You could do something similar to give the wood something to butt up against. The more I think about seaxes the more I think they would have put leather over them. It just makes sense to me. I mean why go to all the trouble of inlaying a blade then sticking a clunky piece of wood on it.
When I did this grip, I was mainly trying to get creative with what could have been. Truthfully, it is more of a sword hilt shape than a seax, but I was tired of the same old chunk of wood treatment that was very popular with reenactors.
In the British Museum there is a seax I think is in the same area as the Seax of Beag. I'm sure you know the one I am talking about. It has a wonderful silver rivet block. You could consider putting a small guard piece on it and then have a butt piece with a rivet block that is inspired from that piece. Then a wood core with a leather wrap...perhaps even with stitching. Please realize I am just offering suggestions...feel free to tell me to mind my own business.
Find me on Facebook, or check out my blog. Contact me at eric@crownforge.net or ericmycue374@comcast.net if you want to talk about a commission or discuss an available piece.
|
|
|
|
|
|
Jeroen Zuiderwijk
Industry Professional
|
|
|
|
|
|
Ralph Grinly
|
| Posted: Tue 19 Jan, 2016 6:21 pm Post subject: |
|
|
|
I've totally no knowledge of 'original" handles for these weapons, but..given the design of the inlays, maybe some form of "chip carving" might complement the blade ? Honestly, I'm not even sure IF "chip carving" was a technique actually used in the period, but it's a possibility ?
|
|
|
|
|
Leo Todeschini
Industry Professional
|
| Posted: Wed 20 Jan, 2016 1:28 am Post subject: |
|
|
Thanks for the input guys and a very interesting post with the handle coming down onto the blade, courtesy of Jeroen.
I find it strange that at the point of highest stress, any question of it breaking, would be removed by using a ferrule and yet it seems they did, but very rarely. The engineer in me says that what this means is that the glue bonded well enough that it effectively turned the wood and metal into a single mass with very little or no chance of a glue failure, because if a glue failure did happen the grip could easily break (imagining the shock caused by a tip strike on a hard object).
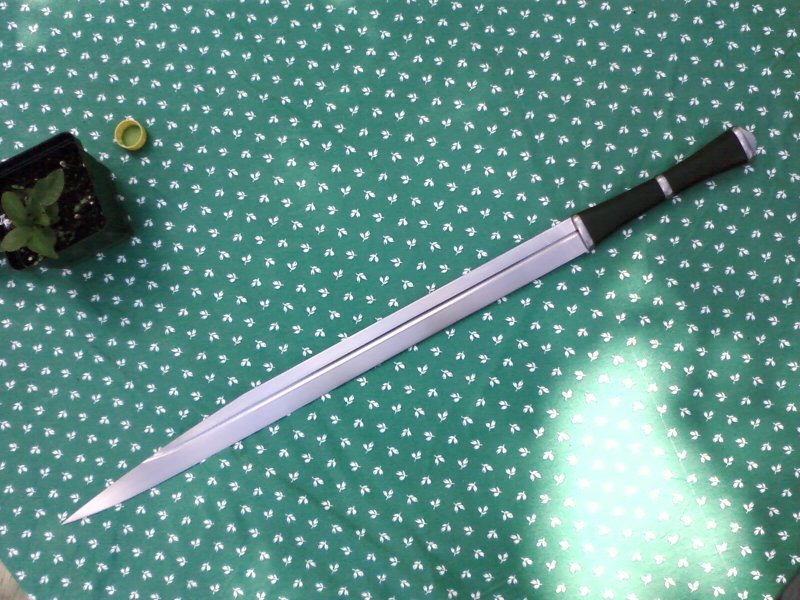
Another good example of a grip that is roughly contemporary with this is the seax of Charlemagne shown below, slim and attractive as I imagine them to be, but again no ferrule. (Matt Bunker)
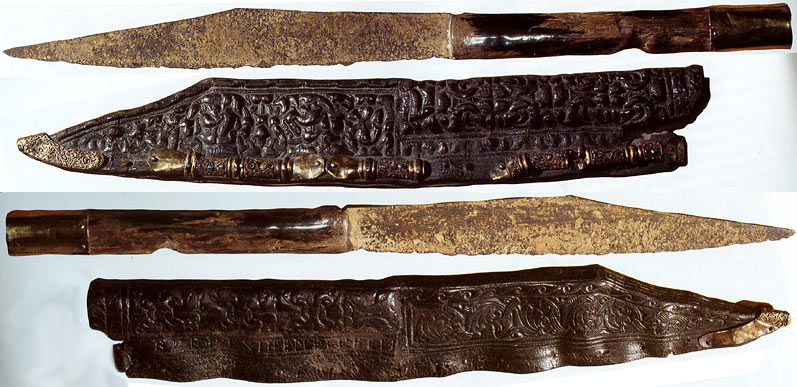
Another very interesting grip has been posted by Jack Sutter on my Facebook timeline, again shown below. Personally I find this amazingly ugly and could only work with a rat tail tang that seax tended not to have, it also does not have the ring of reality to me, but would nonetheless make for a very secure grip on a blade type and weight that would love to slide from your grip in a melee.......
Also an interesting input from James Elmslie on my FB page
"I recall talking to Professor John Hines, from Cardiff university, on the subject of seaxes, and he was saying that a fairly large number of those found with mineralised organic parts still attached have been identified as Horn for ferrules (makes sense, given its better-resistant to splitting, compared to wood), with wood more common for the main body of the grip - so I'd be inclined to look at horn, wood, and perhaps horn for an end-cap to get a sense of symmetry, and then to look things like the Cumwhitton seax x-ray fragments, and think about inlay of silver and brass/bronze in similar \/\/\/\/\/\/\ style patterns into the wood as there?"
I agree about the horn and have used it for this application many times, but still it does come back to adhesive. I am not familiar with the Cumwhitton seax, but that is sounding very interesting and will have a look.
Now I know I can rely on epoxy, but this project is not about that, and so I will go and have a look at historical adhesives for this role. In the past I have made a mixture of pitch and rosin for the main adhesive base, but this can be a little brittle, so I temper it with a bit of oil. Sticky as hell and largely self healing if it does crack, a perfect adhesive for this unless our warrior was fighting in the midday sun in the Sahara. Joking aside though it could get very hot in Byzantium and the Russian Steppes. Thoughts?
https://www.facebook.com/photo.php?fbid=10153459712666647&set=p.10153459712666647&type=3&theater
Tod
Attachment: 98.79 KB
www.todsworkshop.com
www.todcutler.com
www.instagram.com/todsworkshop
https://www.facebook.com/TodsWorkshop
www.youtube.com/user/todsstuff1
|
|
|
|
|
|
Jeroen Zuiderwijk
Industry Professional
|
| Posted: Wed 20 Jan, 2016 2:57 am Post subject: |
|
|
| Leo Todeschini wrote: |
Another very interesting grip has been posted by Jack Sutter on my Facebook timeline, again shown below. Personally I find this amazingly ugly and could only work with a rat tail tang that seax tended not to have, it also does not have the ring of reality to me, but would nonetheless make for a very secure grip on a blade type and weight that would love to slide from your grip in a melee....... |
I'm quite certain that these are fakes, at least the bottom three ones. There are other swords in the collection that give very strong forgery signals. Wire inlay I only know from broken back style saxes, and pretty much only in later examples of that. So to have a 7th century broadsax and a 8th century longsax both with wire inlay is very suspicious. Also the blade shapes don't seem quite right. And the decoration on the bolsters is something I haven't seen anywhere else, which are very rare for broadsaxes and even rarer for longsaxes anyway. They look a lot like they were made by the same maker, who doesn't quite have the hang of all the details that make particular saxes from specific time frames.
| Quote: | Also an interesting input from James Elmslie on my FB page
"I recall talking to Professor John Hines, from Cardiff university, on the subject of seaxes, and he was saying that a fairly large number of those found with mineralised organic parts still attached have been identified as Horn for ferrules (makes sense, given its better-resistant to splitting, compared to wood), with wood more common for the main body of the grip |
Do you know if that has been published, or the examples these conclusions are based on? And is it specifically about saxes, or knives from the period in general? Reason I ask is because there was a very strong difference between construction of utility knives compared to saxes, so I want to make sure they are not mixed up.
| Quote: | - so I'd be inclined to look at horn, wood, and perhaps horn for an end-cap to get a sense of symmetry, and then to look things like the Cumwhitton seax x-ray fragments, and think about inlay of silver and brass/bronze in similar \/\/\/\/\/\/\ style patterns into the wood as there?"
I agree about the horn and have used it for this application many times, but still it does come back to adhesive. I am not familiar with the Cumwhitton seax, but that is sounding very interesting and will have a look. |
I'm not familiar with that sax either. So any info on that one would be highly appreciated I do have an example of a small broken back style sax with a solid undecorated ivory hilt though, preserved in it's sheath found in London. It's not one that's commonly mentioned.
| Quote: | | Now I know I can rely on epoxy, but this project is not about that, and so I will go and have a look at historical adhesives for this role. In the past I have made a mixture of pitch and rosin for the main adhesive base, but this can be a little brittle, so I temper it with a bit of oil. Sticky as hell and largely self healing if it does crack, a perfect adhesive for this unless our warrior was fighting in the midday sun in the Sahara. Joking aside though it could get very hot in Byzantium and the Russian Steppes. Thoughts? |
I'm still very interested in the resin mix recipe they used to fix tulwar blades. Hot climate, yet that resin mix seems sturdy as heck.
Jeroen Zuiderwijk
- Bronze age living history in the Netherlands
- Barbarian metalworking
- Museum photos
- Zip-file with information about saxes
|
|
|
|
|
|
Tommy Johansen
|
|
|
|
|
|
|
You cannot post new topics in this forum
You cannot reply to topics in this forum
You cannot edit your posts in this forum
You cannot delete your posts in this forum
You cannot vote in polls in this forum
You cannot attach files in this forum
You can download files in this forum
|
All contents © Copyright 2003-2024 myArmoury.com — All rights reserved
Discussion forums powered by phpBB © The phpBB Group
Switch to the Basic Low-bandwidth Version of the forum
|