| Author |
Message |
Harry Marinakis

|
 Posted: Fri 08 Feb, 2019 6:15 pm Post subject: Posted: Fri 08 Feb, 2019 6:15 pm Post subject: |
 |
|
Cut out the Poplar spacer along the outer margin line, and then sand it as clean and symmetrical as possible.
 Attachment: 81.64 KB Attachment: 81.64 KB
Firesteel Designs
Hand-crafted good lovingly infused with hemoglobin
Last edited by Harry Marinakis on Sat 09 Feb, 2019 6:19 am; edited 4 times in total
|
|
  |
 |
Harry Marinakis
|
| Posted: Fri 08 Feb, 2019 6:17 pm Post subject: |
|
|
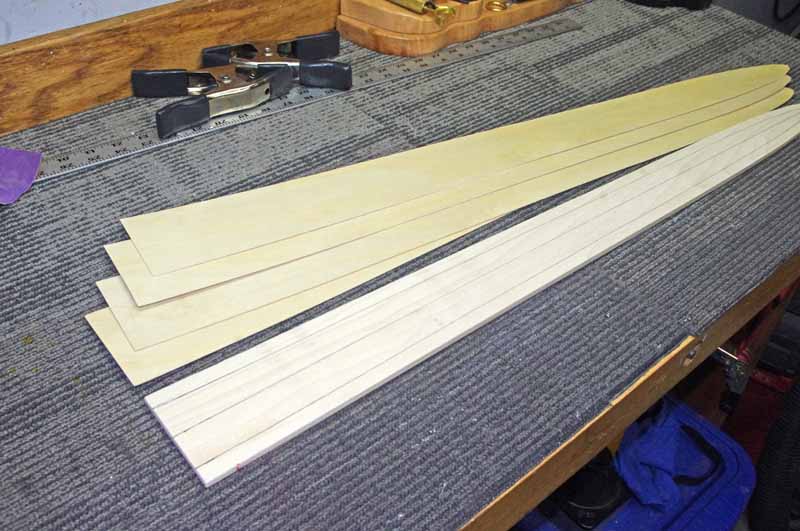
Use this Poplar spacer as a template to make 4 identical copies from 1/32-inch thick Birch plywood.
Attachment: 76.33 KB

Firesteel Designs
Hand-crafted good lovingly infused with hemoglobin
|
|
|
|
|
Harry Marinakis
|
| Posted: Fri 08 Feb, 2019 6:21 pm Post subject: |
|
|
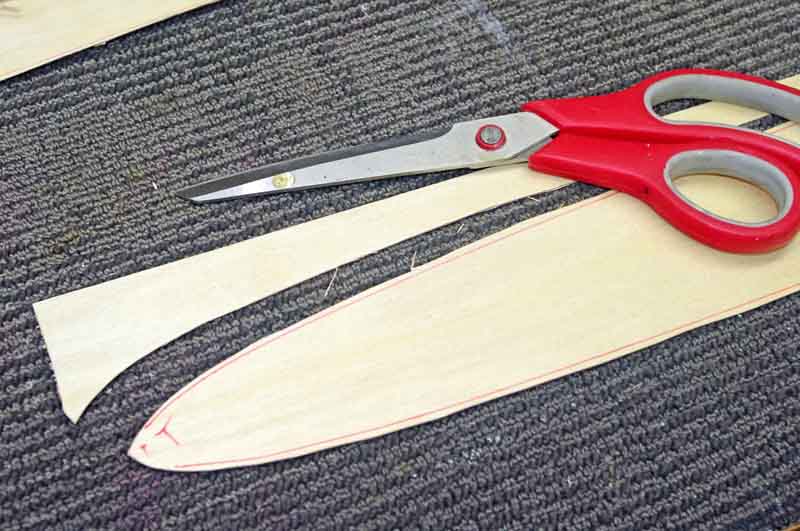
The 1/32-inch Birch plywood is so thin that you rough cut it with scissors.
Once you have all 4 veneer pieces rough cut, sand all 5 pieces together so that they are all identical in size and shape (the Poplar spacer and the 4 Birch veneers).
Attachment: 70.7 KB
Attachment: 79.22 KB
Firesteel Designs
Hand-crafted good lovingly infused with hemoglobin
Last edited by Harry Marinakis on Sat 09 Feb, 2019 6:20 am; edited 1 time in total
|
|
|
|
|
Harry Marinakis
|
| Posted: Fri 08 Feb, 2019 6:25 pm Post subject: |
|
|
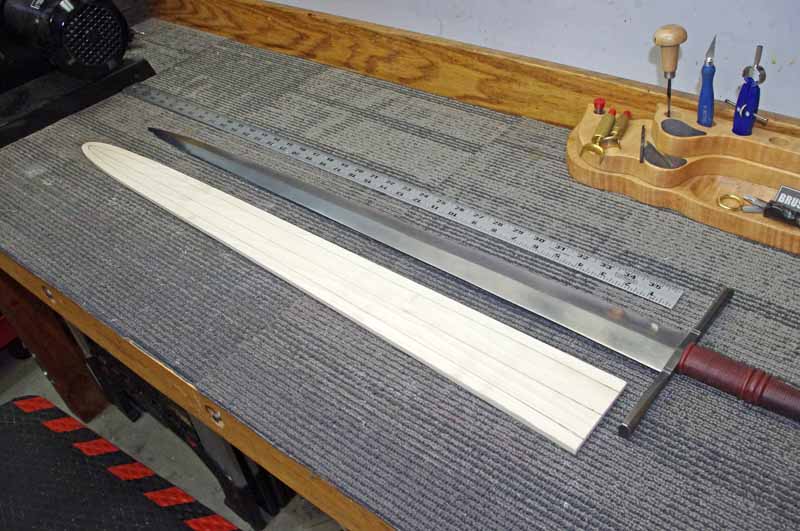
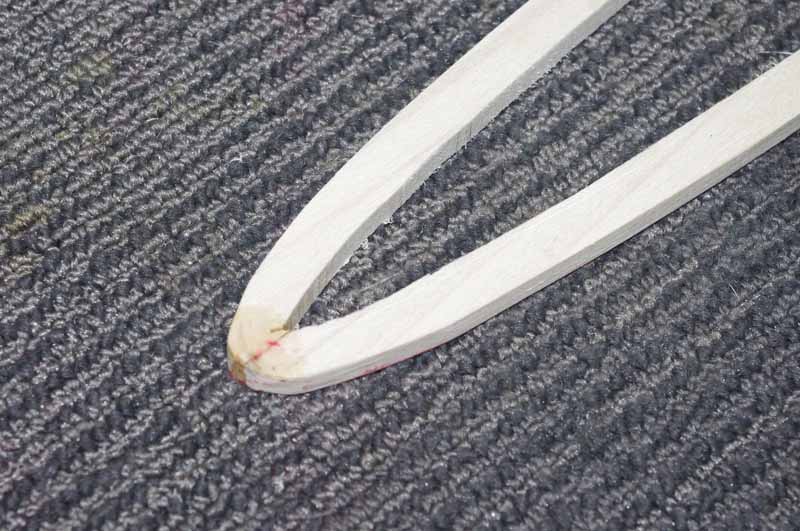
Cut out the profile of the sword from the Poplar spacer. You will end up with a large U- or V-shaped piece of wood.
Consider leaving a thick tab of wood at the point to prevent your Poplar spacer from splitting at the point. You can sand off this tab at the very end.
Here you can see that my spacer split at the point and I had to repair it.
Attachment: 89.23 KB
Firesteel Designs
Hand-crafted good lovingly infused with hemoglobin
Last edited by Harry Marinakis on Fri 08 Feb, 2019 7:10 pm; edited 3 times in total
|
|
|
|
|
Harry Marinakis
|
| Posted: Fri 08 Feb, 2019 6:29 pm Post subject: |
|
|
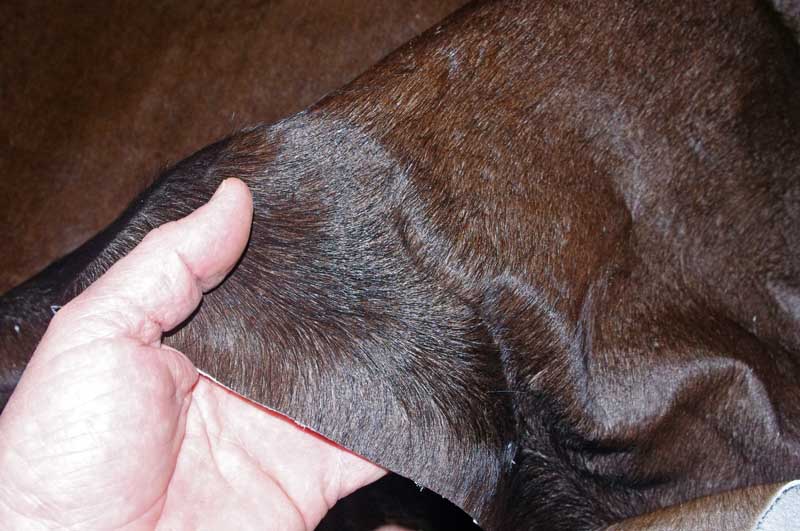
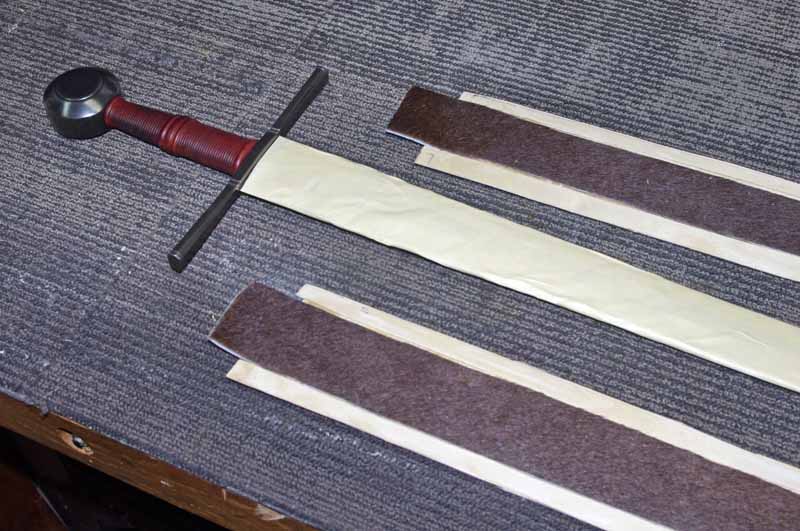
Lining Material
Use the piece of wood that you cut out of the spacer as a template for cutting two strips of lining material.
I use short-hair cow skin, with the hairs running down towards the point.
Glue a lining strip onto one sheet of 1/32-inch Birch veneer. Repeat with the other lining strip, but flip over the Birch veneer so that you have a mirror image not a duplicate.
(In the bottom photo, the sword is wrapped with tape.)
Attachment: 88.18 KB
Attachment: 88.28 KB
Firesteel Designs
Hand-crafted good lovingly infused with hemoglobin
Last edited by Harry Marinakis on Sat 09 Feb, 2019 6:24 am; edited 4 times in total
|
|
|
|
|
Harry Marinakis
|
| Posted: Fri 08 Feb, 2019 6:42 pm Post subject: |
|
|
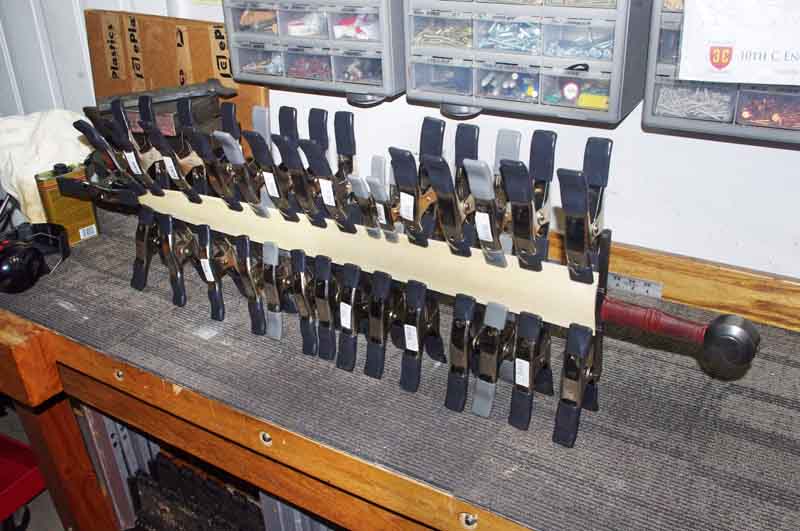
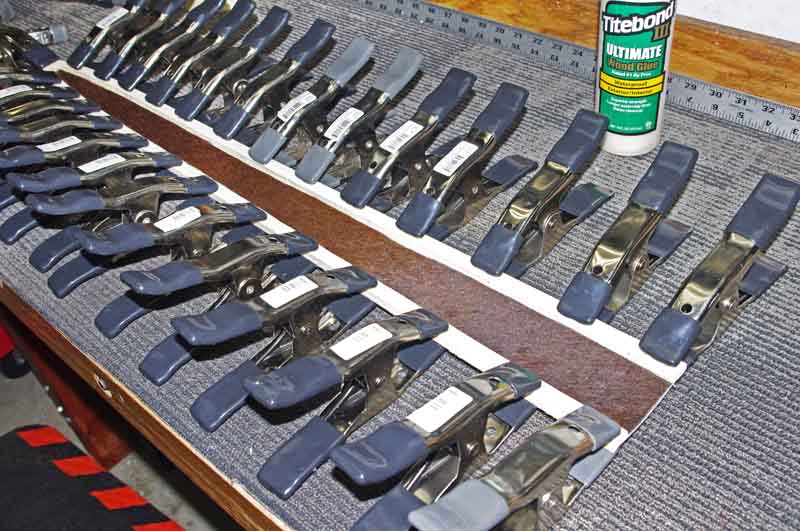
Next you want to glue the 1/32-inch Birch veneers together, so that the front scabbard plate is 2 sheets thick, and the rear scabbard plate is also 2 sheets thick.
Make one scabbard plate by smearing glue all over one veneer and press another veneer on top. Repeat for the other scabbard plate, but make a mirror image not a duplicate.
Clamp the plates over the sword, with no more than 1 inch distance between clamps. You'll need a lot of clamps. Clamp only along the margins.
Do not glue the front scabbard plate to the rear scabbard plate! You are only clamping them together to bend them into a convex shape. When the glue dries, the plates with retain their convex shapes.
If you allow the plates to sag into a banana shape while the glue is drying, then you will have a banana-shaped wood core. I turn the whole assembly onto its side so there is no sag, and I can verify that everything is straight.
And be sure that the sword is perfectly centered on the lining material between the two plates.
When the glue is dry, remove the clamps and separate the front and rear scabbard plates.
Attachment: 90.22 KB

Attachment: 71.18 KB
Firesteel Designs
Hand-crafted good lovingly infused with hemoglobin
Last edited by Harry Marinakis on Sun 10 Feb, 2019 7:07 am; edited 2 times in total
|
|
|
|
|
Harry Marinakis
|
| Posted: Fri 08 Feb, 2019 6:54 pm Post subject: |
|
|
Now glue one scabbard plate onto the Poplar spacer to make half of a wood core.
Smear glue along the margin, and clamp one scabbard plate to the wood core. You've made two scabbard plates, mirror images of each other, so be sure that you glue the correct scabbard plate to the correct side of the Poplar spacer.
(You can never get these plates be be perfectly symmetrical, so they're only going to match if they're flipped one way or the other.)
Attachment: 91.49 KB
Firesteel Designs
Hand-crafted good lovingly infused with hemoglobin
Last edited by Harry Marinakis on Sat 09 Feb, 2019 6:26 am; edited 2 times in total
|
|
|
|
|
Harry Marinakis
|
| Posted: Fri 08 Feb, 2019 6:59 pm Post subject: |
|
|
Now it's time to check the fit of the sword in the wood core, and make adjustments to get the proper fit.
Clamp the other scabbard plate into place (no glue). Be sure to clamp only along the margin.
Insert the sword and check the fit.
If the sword is loose, then it's a simple matter of sanding the face of the Poplar spacer to make it thinner. Be sure to flat sand the face of the spacer. If you sand in any undulation or dips, then your final wood core will have the same undulations and dips, and the scabbard plates are too thin (2/32") to really sand off any major imperfections.
If the fit is too tight, then you're going to have to add thickness to the spacer. That's why I start with a 1/4-inch thick spacer. It always results in a fit that's too loose and I just have to progressively sand the spacer thinner and thinner to get a perfect fit.
When the fit is perfect, then glue the remaining scabbard plate onto the assembly.
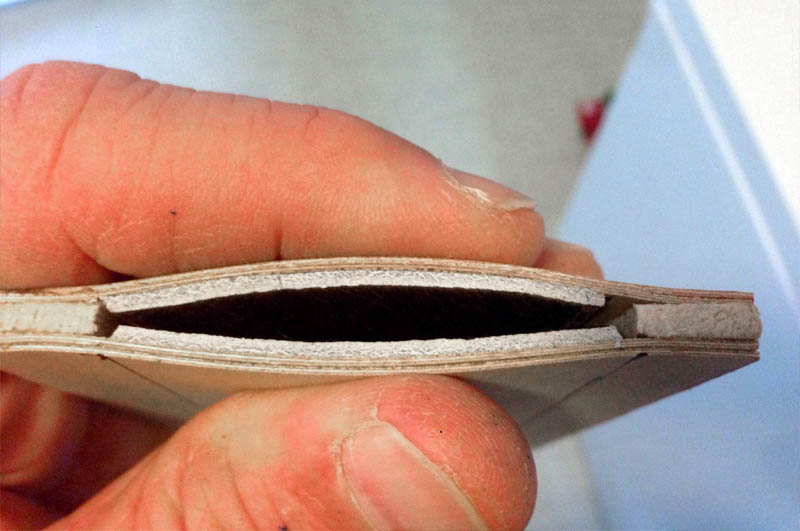
You will end up with a wood core with a cross section as shown below. You can see the:
- 2 layer veneers of the front and rear scabbard plates
- the margins of the Poplar spacer
- the strips of lining material
(If you are more precise in your cutting than I, then you'll end up with a cleaner wood core than me!)
This wood core is so thin that it flexes when you insert the sword. This helps the wood core grip the blade for a smooth draw, and still holds the blade securely when you turn the scabbard upside-down.
Attachment: 68.9 KB
Firesteel Designs
Hand-crafted good lovingly infused with hemoglobin
Last edited by Harry Marinakis on Sun 10 Feb, 2019 7:10 am; edited 5 times in total
|
|
|
|
|
Harry Marinakis
|
| Posted: Fri 08 Feb, 2019 7:05 pm Post subject: |
|
|
Sand the edges of the wood core to get that nice oval shape.
I like to lay the sword onto the wood core to draw its outline as a sanding reference.
Remember, you have that pen mark at the point of the wood core to show you exactly where the point should be.
This wood core is so thin that if you're off by 1/8 inches then you could accidentally sand one edge so thin that you break through.
When done right, this method is quick, easy, and you get a light but strong wood core.
Even though I used thick cow skin for the lining material, the wood core is still remarkably thin.
Attachment: 82.95 KB
Firesteel Designs
Hand-crafted good lovingly infused with hemoglobin
|
|
|
|
|
Harry Marinakis
|
|
|
|
|
|
L Ryan B
|
| Posted: Thu 28 Feb, 2019 7:35 am Post subject: |
|
|
Harry, that guide is amazing! So many clamps!
I haven't gotten my sword yet, but when I do the wood core for its scabbard is going to be made using this method. My biggest concern about the other methods was finishing the core to a smooth, symmetrical face. It looks like you get that pretty much for free using this lamination approach.
One other question I haven't seen answered. When you're stamping the leather, do you stamp it after you've applied it to the core or do you stamp beforehand and just depend on skill and adjustment to center your stamps on the scabbard? It seems to me that trying to stamp a curved surface would be a little too difficult, but on the other hand, stamping while flat, then wetting, stretching, and then drying the leather would result in a severely distorted stamp.
|
|
|
|
|
Michael P. Smith

|
| Posted: Thu 28 Feb, 2019 9:00 am Post subject: |
|
|
This is one I made last fall as a first project. The sword is an older Windlass "Black Prince"


The chape is from Tod Cutler.
I plan to make some more this spring.
|
|
|
|
|
Harry Marinakis
|
| Posted: Fri 01 Mar, 2019 12:52 am Post subject: |
|
|
| L Ryan B wrote: | | One other question I haven't seen answered. When you're stamping the leather, do you stamp it after you've applied it to the core or do you stamp beforehand and just depend on skill and adjustment to center your stamps on the scabbard? It seems to me that trying to stamp a curved surface would be a little too difficult, but on the other hand, stamping while flat, then wetting, stretching, and then drying the leather would result in a severely distorted stamp. |
Other people may have other answers.
You cannot stamp the leather after its been sewn onto the wood core, because you could break the wood core and you can't hit the stamp hard enough to get a satisfactory imprint. I have tooled leather with a swivel knife after the leather was sewn onto the wood core, but it's rather awkward.
Generally I cut out the leather and then stamp/tool while the leather is on a flat surface. I allow the leather to dry before sewing the leather onto the wood core. This way the tooling does not get smudged while I'm stitching.
I align the tooling on the wood core and glue the leather into place. I run a small line of glue along the front of the wood core, align the tooling on the wood core, and apply some weight until the glue dries. Then I can sew the leather up the back without worrying about the alignment shifting. You don't want to over-do the glue. Just enough to keep everything aligned. Hide glue is the optimal glue, but a small amount of contact cement is convenient. (Too much contact cement will soak through the leather.)
Firesteel Designs
Hand-crafted good lovingly infused with hemoglobin
|
|
|
|
|
Harry Marinakis
|
| Posted: Fri 01 Mar, 2019 12:53 am Post subject: |
|
|
| Michael P. Smith wrote: | | This is one I made last fall as a first projec. |
Great job with the stamping. Everything is really clean and lined up perfectly. How long did that take to stamp???
Firesteel Designs
Hand-crafted good lovingly infused with hemoglobin
|
|
|
|
|
Michael P. Smith
|
| Posted: Sun 03 Mar, 2019 6:20 pm Post subject: |
|
|
| Harry Marinakis wrote: | | Michael P. Smith wrote: | | This is one I made last fall as a first projec. |
Great job with the stamping. Everything is really clean and lined up perfectly. How long did that take to stamp??? |
Thanks! I think it took about 2 hours overall to do that section of the scabbard. I hadn't done any stamping in years, and practiced on some scrap for a bit first.
|
|
|
|
|
|
Mark Moore
|
| Posted: Fri 08 Mar, 2019 8:46 am Post subject: |
|
|
Excellent DIY advise, Harry! Now I'm going to have to save up enough money to buy all those clamps!  What is that? About an Albion's worth? ...........McM What is that? About an Albion's worth? ...........McM
''Life is like a box of chocolates...'' --- F. Gump
|
|
|
|
|
Harry Marinakis
|
| Posted: Sat 09 Mar, 2019 5:45 am Post subject: |
|
|
| Mark Moore wrote: | | Excellent DIY advise, Harry! Now I'm going to have to save up enough money to buy all those clamps! What is that? About an Albion's worth? ...........McM |
I get those clamps for 89 cents apiece at my local hardware store.
Firesteel Designs
Hand-crafted good lovingly infused with hemoglobin
|
|
|
|
|
|
P Sampson
Location: Australia Joined: 17 Feb 2019
Posts: 4
|
| Posted: Sun 10 Mar, 2019 11:13 pm Post subject: |
|
|
I have just read this thread through in it's entirety.I knew nothing about scabbard making at the start,now I have a good base knowledge that has put some ideas into my head.Very impressed with the sharing of information here,and the lamination tutorial by Mr.Marinakis is outstanding.
Thanks to all that have contributed.
Pete.
|
|
|
|
|
Harry Marinakis
|
| Posted: Tue 12 Mar, 2019 9:00 pm Post subject: |
|
|
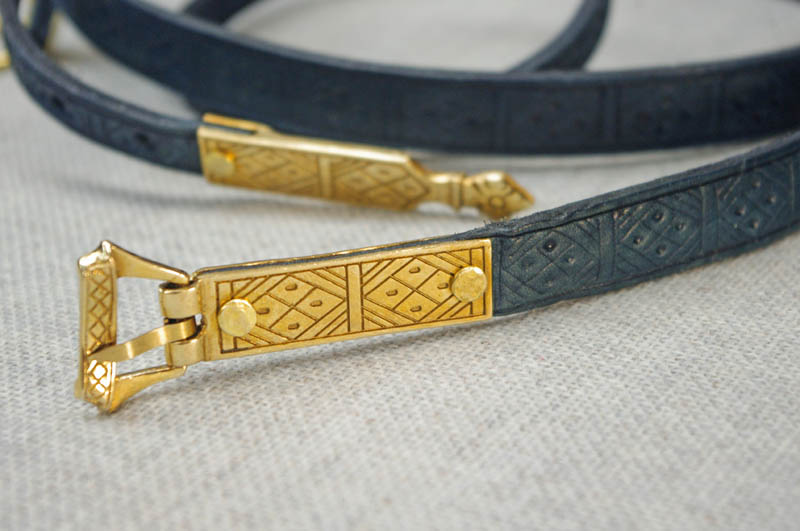
I finished another scabbard.
I bought the belt buckle from Armour & Castings.
The blue color is made from modern commercial dyes, but the color matches a medieval indigo leather dye that I've replicated.
I would appreciate some constructive feedback on this scabbard. I like it, but I'm too close to form an educated opinion about it.
This is the first time that I tried making metal suspension fittings and a chape, so I know that it's all rather simple. I'd love to learn hand engraving to make the brass fittings a bit fancier. i guess that I could have soldered on some decorations.
I also wanted this to be inexpensive, so I did not purchase a hanger for the belt. I won't make that mistake again.
Attachment: 72.63 KB
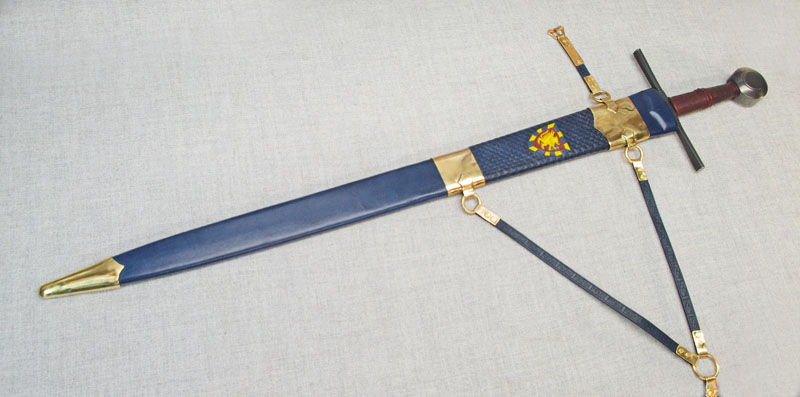
Attachment: 81.96 KB
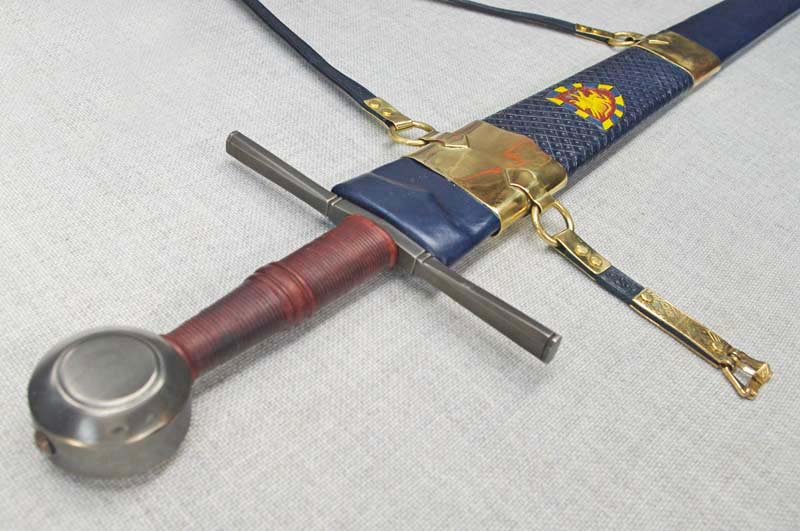
Attachment: 75.49 KB
|
|
|
|
|
|
Michael Zimmermann
|
| Posted: Mon 01 Apr, 2019 3:58 pm Post subject: |
|
|
Harry,
thanks for starting this thread and congratulations on your first metal hangers. Since you asked for constructive criticism, I would suggest adding some tracery to break up the surfaces: a couple of rows of holes, perhaps with a trefoil every so often.
I have a question myself, too, and would appreciate your advice.
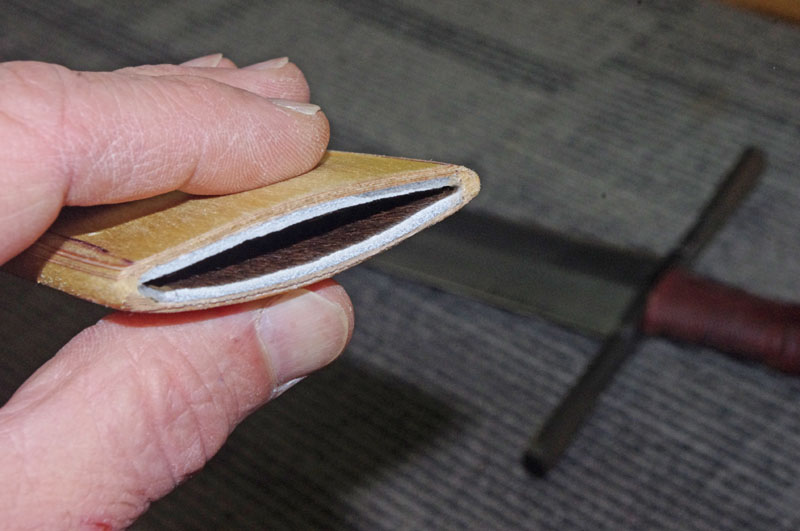
This is a test scabbard core for a sword I have commissioned. I made it for my Burgundian to see how the laminate method works for a hollow ground diamond section.
The actual scabbard is going to be clad in bone/horn plates and so I was pondering, if I should seal the core, to protect it from damp &c. and ensuing warpage. I'm thinking a thin fabric soaked in resin might be the way to go. Thoughts?
Attachment: 638.45 KB
Lateral [ Download ]
Attachment: 560.49 KB
Mouth [ Download ]
Attachment: 759.35 KB
From the grip [ Download ]
Attachment: 709.01 KB
Overall [ Download ]
- Michael
|
|
|
|
|
|
|

