Very nice work, Simon, solid work.
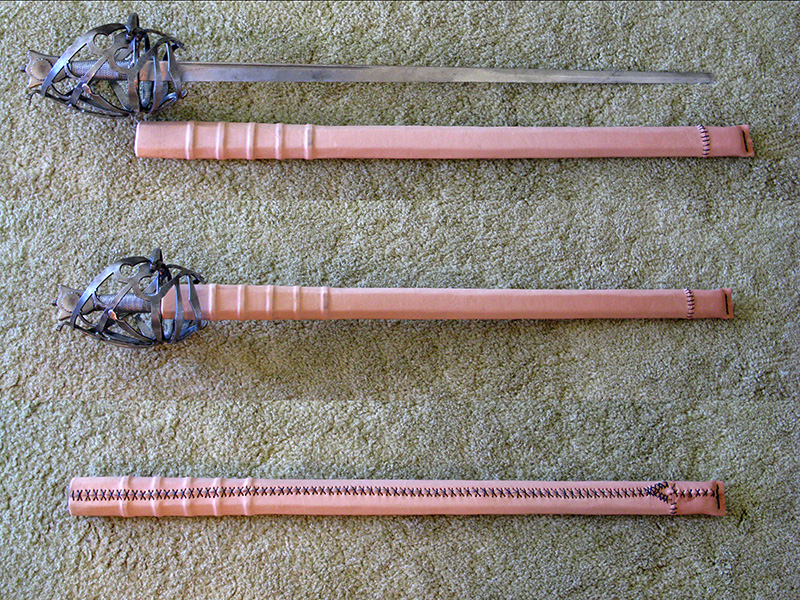
You could get by with a wider stitch spacing in the back. Typically in the medieval period, the stitches were about 1/4-inch apart, or very slightly less than that. Your sewing is really clean.
Thanks Harry, having seen the quality of your work I'll take that as high praise!
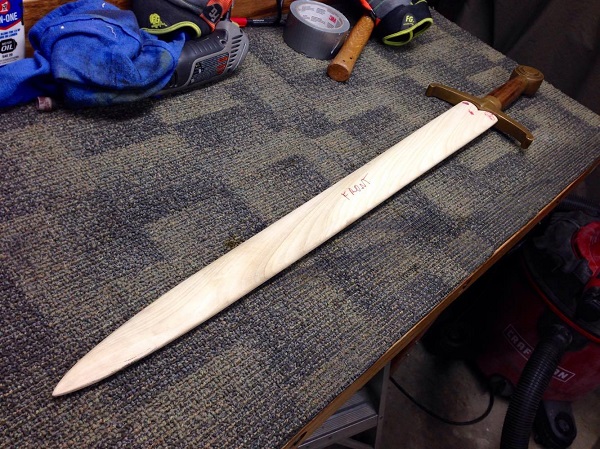
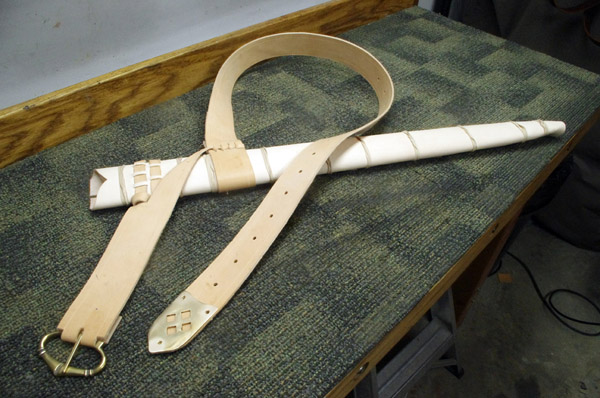
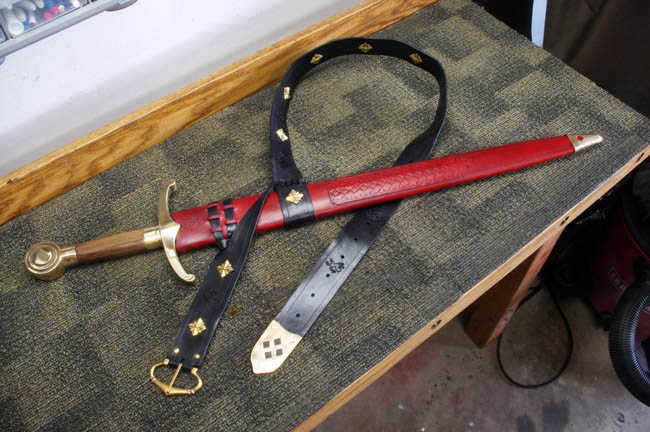
Your point about stitch spacing is a good one - it took me about 4 hours and seriously sore hands to stitch the seam (6 stiches per inch) and I'll definitely try to space them out more next time. The photos don't show it but my stitching is not very pretty in a couple of places - in particular I think I cut my leather a bit short and then struggled to get a clean finish around the scabbard mouth.
The one tip/trick that probably saved me the most pain (and I can't remember which thread I picked it up) was the use of aluminium foil and then masking tape wrapped around the core (and then cut off down the stitch line) to make a template for my leather cover. Admittedly not an authentic historical method, but cutting the leather to the right size was the thing i had dreaded most and it really took the pain out.
| Simon McKenna wrote: |
| ....but cutting the leather to the right size was the thing i had dreaded most.... |
Me, too
But rest assured that it gets easier with every scabbard that you make
I wouldn't be too quick to assume that a template of some sort was not a historical method. It would be possible to use cheap fabric to make a quick pattern, especially as it would not require a large piece-- an offcut would be fine as long as it was approximately the right size. Honestly the main concern is cutting the width correctly, and then having enough space at the tip to wrap it around the scabbard neatly without wasting too much leather.
I agree, templates may have been a common method, not sure about 'foil and masking tape' though :)
As you get better, you don't need a template.
.
Hi Everybody!
My wood working skills are crude and leather working skills are minimal, so I found this thread to be thoroughly educational and a fantastic resource to help me improve. At this point, I was considering focusing more on the woodworking aspect and skipping the leather work. My idea is to paint the scabbard so that the paint seals the wood from moisture. I also toyed with the idea of putting a finish over the paint for good measure.
However, as I am beginning my search into the subject, it seems that it was uncommon for scabbards to be painted and were instead coated in leather. Does anyone have any information on painted scabbards? If I am going for historical accuracy, is wrapping it in leather the way to go?
For what it is worth, I am planning to make scabbards for a rapier (1550s) and a schiavona (1590s/1600s).
.
Craig, sorry I can't answer your question about painted scabbards.
On a different note, here is the start of my latest project - I'm making a scabbard for a friend, aiming for a style from the early 14th Century.
I found a new way to fine tune the fit of the sword in the wood core:
1st, when mating the scabbard plates together to check the fit of the sword, don't use clamps. Doing so will compress and distort the wood core, and thus affect the fit of the sword. Instead, wrap duct tape transversely around the wood core at several locations. This prevents the scabbard plates from separating when you insert the sword, but also avoids the compression that would be caused by clamps. The end result is that you get a fit that more matches the fit when you actually glue the two scabbard plates together.
2nd, use a reversible glue (hide glue) when you glue to scabbard plates together. This way, you can easily separate the wood core if you need to make some adjustments at a later time.
 Attachment: 151.21 KB
On a different note, here is the start of my latest project - I'm making a scabbard for a friend, aiming for a style from the early 14th Century.
I found a new way to fine tune the fit of the sword in the wood core:
1st, when mating the scabbard plates together to check the fit of the sword, don't use clamps. Doing so will compress and distort the wood core, and thus affect the fit of the sword. Instead, wrap duct tape transversely around the wood core at several locations. This prevents the scabbard plates from separating when you insert the sword, but also avoids the compression that would be caused by clamps. The end result is that you get a fit that more matches the fit when you actually glue the two scabbard plates together.
2nd, use a reversible glue (hide glue) when you glue to scabbard plates together. This way, you can easily separate the wood core if you need to make some adjustments at a later time.
Last edited by Harry Marinakis on Sat 11 Jun, 2016 5:34 pm; edited 1 time in total
| Craig Shira wrote: |
| .
Hi Everybody! My wood working skills are crude and leather working skills are minimal, so I found this thread to be thoroughly educational and a fantastic resource to help me improve. At this point, I was considering focusing more on the woodworking aspect and skipping the leather work. My idea is to paint the scabbard so that the paint seals the wood from moisture. I also toyed with the idea of putting a finish over the paint for good measure. However, as I am beginning my search into the subject, it seems that it was uncommon for scabbards to be painted and were instead coated in leather. Does anyone have any information on painted scabbards? If I am going for historical accuracy, is wrapping it in leather the way to go? For what it is worth, I am planning to make scabbards for a rapier (1550s) and a schiavona (1590s/1600s). . |
Well, there are linen covered scabbards, but much earlier, I know of no wooden european scabbards around that time.
| Harry Marinakis wrote: |
| Craig, sorry I can't answer your question about painted scabbards.
On a different note, here is the start of my latest project - I'm making a scabbard for a friend, aiming for a style from the early 14th Century. I found a new way to fine tune the fit of the sword in the wood core: 1st, when mating the scabbard plates together to check the fit of the sword, don't use clamps. Doing so will compress and distort the wood core, and thus affect the fit of the sword. Instead, wrap duct tape transversely around the wood core at several locations. This prevents the scabbard plates from separating when you insert the sword, but also avoids the compression that would be caused by clamps. The end result is that you get a fit that more matches the fit when you actually glue the two scabbard plates together. 2nd, use a reversible glue (hide glue) when you glue to scabbard plates together. This way, you can easily separate the wood core if you need to make some adjustments at a later time. |
Harry? Nothing wrong with clamps. People just don't use them properly....
Clamps should be use with THICK wood blocks. They should be used BEFORE the exterior core is rounded. Pressure must be applied to the core EDGES, not the center that has been thinned. Pin the EDGES - not the center.
Set a clamp on the center of a thinned & shaped core? Oh yes, it will be distorted - if not cracked :).
| Dean F. Marino wrote: |
| ...They should be used BEFORE the exterior core is rounded... |
I like to fine-tune the fit after the scabbard has been fully shaped and rounded down to 1/8" thick..
I carve the internal cavity just a tiny bit deeper than necessary - then to get a perfect fit all I have to do is run the flats on the belt sander. (The flats are the two faces where the two scabbard plates mate together.) I find that I get a much better fit if the scabbard is already as thin as it is going to get when I do the final tuning.
The dry build turned out pretty nice.
The further along I get, the more anxious and depressed I get - because if I screw it up now, I'll have ruined all that work. :\
Attachment: 107.78 KB
The further along I get, the more anxious and depressed I get - because if I screw it up now, I'll have ruined all that work. :\
Damn fine work Harry
This scabbard is done, it was project for a friend.
My work work is still very primitive, but his only my 6th or 7th scabbard. No matter how careful I am, I just can't get it looking clean and neat like the masters.
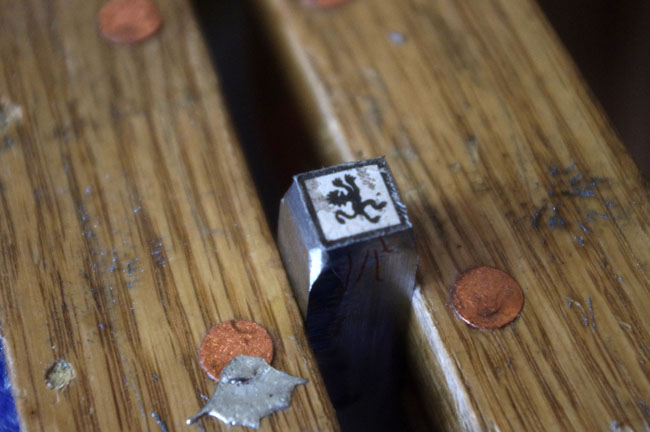
I finally figured out how to make a chape, but my brazing skills leave a lot to be desired.
I forged my own custom 3/8-inch leather stamp for the diamond tooling pattern, from an automobile coil spring. What are people using for really small engraving like this? The smallest Dremel bit is okay but it doesn't last very long, even on annealed steel.
Attachment: 88.47 KB
Attachment: 72.84 KB
My work work is still very primitive, but his only my 6th or 7th scabbard. No matter how careful I am, I just can't get it looking clean and neat like the masters.
I finally figured out how to make a chape, but my brazing skills leave a lot to be desired.
I forged my own custom 3/8-inch leather stamp for the diamond tooling pattern, from an automobile coil spring. What are people using for really small engraving like this? The smallest Dremel bit is okay but it doesn't last very long, even on annealed steel.
| Harry Marinakis wrote: |
|
I forged my own custom 3/8-inch leather stamp for the diamond tooling pattern, from an automobile coil spring. What are people using for really small engraving like this? The smallest Dremel bit is okay but it doesn't last very long, even on annealed steel. |
Hi Harry,
I use the the bits discarded by dentists. Asked a friend of mine who is a dentist to save for me what she'd normally throw away, real goodies in there with very fine diameters at top quality where material is concerned.
I made a very simple scabbard for my Albion Gallowglass. I didn't base it off one pictorial source but combined a few to get an idea of what a Gaelic Irish scabbard would have looked like at the time. I also tried my had at carving in a Claddagh on the leather chape. I'd like to make a new one once I get more practice under my belt.
http://imgur.com/dPNoDU9
http://imgur.com/NfVkyXb
http://imgur.com/dPNoDU9
http://imgur.com/NfVkyXb
Nice work Zachary. You are commended for trying new things. Has anyone ever made such a scabbard before, or are you breaking new ground?
Thanks! I am not the first to make such scabbards. There is an Irish reenactment group called Claiomh who have done some really impressive ones. https://www.facebook.com/ClaiomhLivingHistory/?fref=ts
.
Hi Everybody! I had asked before if scabbards were painted as a way to protect the wood instead of being wrapped in leather.
Since I wasn't able to find much information on it and I didn't want my scabbard to be wrong, I gave leather work my best shot and here are the in-progress results. I glued some leather strips to my wooden scabbard and then wrapped the wooden core in wet leather.
I had a little boo-boo with my pattern at the bottom: what worked on my paper pattern didn't work on the leather. My best guess is the leather shrank a bit--it was definitely wide enough but I lost quite a bit length-wise. I am considering dying the boo-boo portion yellow so it looks decorative and intentional. The rest will be dyed black. I stitched the seam using two needles and worked from the throat to the tip.
I have one more wooden scabbard that I made for my 16th century Swedish rapier. I will take the lesson I learned from from this scabbard and cut the leather a little longer so I don't run out of leather at the bottom.
.
Attachment: 466.59 KB
My work-in-progress. Lessons have been learned.
Hi Everybody! I had asked before if scabbards were painted as a way to protect the wood instead of being wrapped in leather.
Since I wasn't able to find much information on it and I didn't want my scabbard to be wrong, I gave leather work my best shot and here are the in-progress results. I glued some leather strips to my wooden scabbard and then wrapped the wooden core in wet leather.
I had a little boo-boo with my pattern at the bottom: what worked on my paper pattern didn't work on the leather. My best guess is the leather shrank a bit--it was definitely wide enough but I lost quite a bit length-wise. I am considering dying the boo-boo portion yellow so it looks decorative and intentional. The rest will be dyed black. I stitched the seam using two needles and worked from the throat to the tip.
I have one more wooden scabbard that I made for my 16th century Swedish rapier. I will take the lesson I learned from from this scabbard and cut the leather a little longer so I don't run out of leather at the bottom.
.
My work-in-progress. Lessons have been learned.
Nice job!
You could just cover up the boo-boo with a chape, like I do. :D
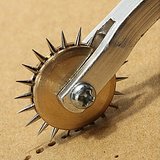
Try a paper pricker wheel to get your stitching holes more evenly spaced. If you get a wheel with an even number of spikes, you can cut off every other one to get a wider stitch spacing. For medieval scabbards, 1/4 inch spacing is about right. The X stitch, though, is not period.
Attachment: 8.13 KB
You could just cover up the boo-boo with a chape, like I do. :D
Try a paper pricker wheel to get your stitching holes more evenly spaced. If you get a wheel with an even number of spikes, you can cut off every other one to get a wider stitch spacing. For medieval scabbards, 1/4 inch spacing is about right. The X stitch, though, is not period.
Page 5 of 10
You cannot post new topics in this forumYou cannot reply to topics in this forum
You cannot edit your posts in this forum
You cannot delete your posts in this forum
You cannot vote in polls in this forum
You cannot attach files in this forum
You can download files in this forum
All contents © Copyright 2003-2006 myArmoury.com — All rights reserved
Discussion forums powered by phpBB © The phpBB Group
Switch to the Full-featured Version of the forum
Discussion forums powered by phpBB © The phpBB Group
Switch to the Full-featured Version of the forum