| Author |
Message |
|
Ryan Thorpe
Location: Guelph, Ontario Joined: 09 Apr 2018
Posts: 8
|
 Posted: Wed 15 Jan, 2020 9:55 am Post subject: Re: Leather weight/thickness Posted: Wed 15 Jan, 2020 9:55 am Post subject: Re: Leather weight/thickness |
 |
|
[quote="Harry Marinakis"] | Ryan Thorpe wrote: |
4-5 ounce is a good all-around compromise. |
Thank you! Much appreciated.
Lespee au fourrel blesse quand mesme.
Known in the Society for Creative Anachronism as Beathán MacFinnon
|
|
  |
 |
|
Ryan Thorpe
Location: Guelph, Ontario Joined: 09 Apr 2018
Posts: 8
|
| Posted: Tue 31 Mar, 2020 2:31 am Post subject: Scabbard and suspension complete |
|
|
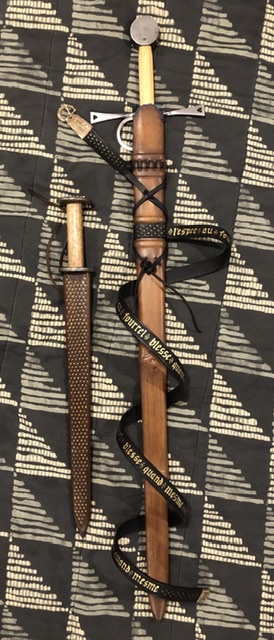
Hello. I wanted to thank those who helped with answers and support. Other than the chape for the tip of the scabbard, I finished my project. Here is my James the Just rondelle dagger (modified handle with escutcheon pins), and my Alchem gothic hilt sword. Poplar scabbards covered in leather, tooled with antler, dyed with walnut and copperas, gold acrylic paint (did not have shell gold), and Raymonds Quiet Press buckle and belt tip.
 Attachment: 97.32 KB Attachment: 97.32 KB
Lespee au fourrel blesse quand mesme.
Known in the Society for Creative Anachronism as Beathán MacFinnon
|
|
|
|
|
Michael P. Smith

|
| Posted: Tue 31 Mar, 2020 7:42 am Post subject: |
|
|
|
That looks great! I'd love to see a close up of the sword belt and dagger sheath.
|
|
|
|
|
|
Ryan Thorpe
Location: Guelph, Ontario Joined: 09 Apr 2018
Posts: 8
|
| Posted: Tue 31 Mar, 2020 9:02 am Post subject: Photos on Facebook |
|
|
Hi, Michael.
Tried replying privately, but the 1MB and pixel limitations made it rather difficult. Maybe Im just new to forums and theres a better way.
Im on Facebook, and pretty sure my albums are set to public, if anyone wants to take a look at progress photos. Ill be getting my wife to take high resolution photos soon.
Ryan Thorpe
Guelph, Ontario, Canada
Lespee au fourrel blesse quand mesme.
Known in the Society for Creative Anachronism as Beathán MacFinnon
|
|
|
|
|
Harry Marinakis

|
| Posted: Mon 06 Apr, 2020 8:16 am Post subject: Re: Photos on Facebook |
|
|
| Ryan Thorpe wrote: | | Tried replying privately, but the 1MB and pixel limitations made it rather difficult. |
If you have a photo processing program like Photoshop, save the JPEG image at a lower quality level until you get below 100 KB. I also like to change the image size to a resolution of 72 dpi and a width of 800 or 900 pixels.
If you don't have an image processing program, then you can load the image to a photo sharing website, and paste the link here.
|
|
|
|
|
|
Ryan Thorpe
Location: Guelph, Ontario Joined: 09 Apr 2018
Posts: 8
|
| Posted: Wed 29 Apr, 2020 1:37 am Post subject: Instagram photos |
|
|
I tried figuring out Instagram, but will have to spend more time on it at a later date.
Here is a link to the first of three posts: https://www.instagram.com/p/B_jyDbnJ6hg/?igshid=1m8s58awk3l5g
Unfortunately, I did not realise that Instagram crops everything square.
Lespee au fourrel blesse quand mesme.
Known in the Society for Creative Anachronism as Beathán MacFinnon
|
|
|
|
|
|
Lloyd Winter
Location: Los Angeles Joined: 27 Aug 2011
Posts: 201
|
| Posted: Fri 01 May, 2020 1:34 pm Post subject: |
|
|
Heres my latest attempt.
A new scabbard for my Tod Cutler antennae dagger.
Attachment: 153.34 KB
[ Download ]
Why then the worlds mine oyster
Which I with sword will open.
|
|
|
|
|
Artur Zima

|
| Posted: Fri 19 Jun, 2020 3:01 pm Post subject: |
|
|
I have a question, which hopefully some of you can help me with. I'm in the process of making a scabbard for a viking sword 9th/10th century. From what I could find it seems that the wooden cores were often covered with textile and then in some cases leather.
My question relates to the textile wrap (in my case I'll be going with linen) - how exactly is the textile wrapped? Is it a thin strip tightly wound around the core or one big piece wrapped similarly to the leather cover?
Is there evidence any for both examples? Are there any advantages of doing one method over the other?
Looking forward to your answers, thanks!
|
|
|
|
|
Chad Arnow
myArmoury Team


|
| Posted: Sat 11 Jul, 2020 12:10 pm Post subject: |
|
|
Im considering doing some scabbard work (leather covers/belts). What weight of leather is best for belts and for scabbard covers? How big a hide (shoulder/double shoulder/half, etc.) do I need for 2-3 scabbards? Is Tandy the best source for leather or somewhere else? Thanks!

ChadA
http://chadarnow.com/
|
|
  |
|
|
Lloyd Winter
Location: Los Angeles Joined: 27 Aug 2011
Posts: 201
|
| Posted: Sat 11 Jul, 2020 8:28 pm Post subject: |
|
|
Chad
For sword belts I prefer 7/8 oz leather, I use 5/6 oz for lighter belts.
For covering a wood scabbard core Id use 2/3 oz at the light end if Im planning light to no tooling, and up to 4/5 oz for heavy tooling.
For comparison most of Tods dagger scabbards are 2 layers of what seems to me to be something a little lighter than 2oz leather.
As far as what cut you need it all really comes down to how long your belts need to be unless youre planning on some really long scabbards. Double shoulders are usually good for 54 inches more or less you can probably get 4-6 scabbards depending on the scabbards and a bunch of belts out of a double shoulder. If you need anything longer that that youre going to have to buy a side.
Since Tandy is online only these days check out hidehouse.com in Nappa CA and zackwhite.com, theyre in New York as I recall. I havent bought veg-tan online in many years so Im not sure what current prices are.
Hope this helps
Your mileage may vary.
Why then the worlds mine oyster
Which I with sword will open.
|
|
|
|
|
Harry Marinakis
|
| Posted: Mon 13 Jul, 2020 12:39 pm Post subject: |
|
|
| Chad Arnow wrote: | | Im considering doing some scabbard work (leather covers/belts). What weight of leather is best for belts and for scabbard covers? How big a hide (shoulder/double shoulder/half, etc.) do I need for 2-3 scabbards? Is Tandy the best source for leather or somewhere else? Thanks! |
Depends
What type of scabbard?
What type of suspension?
What type of belt?
What type of sword (how heavy)?
Do you plan to do any tooling?
Do you want clean, blemish-free leather, or "munitions grade" quality?
Do you need plain veg-tan tooling leather, or drum-dyed leather?
Are you trying to remain historically accurate or not?
A double shoulder or half should be enough leather for 3 scabbard wraps.
As for the belt - that depends of what type of suspension/scabbard you are making.
|
|
|
|
|
Chad Arnow
myArmoury Team
|
| Posted: Mon 13 Jul, 2020 4:43 pm Post subject: |
|
|
Harry,
Fair question that I haven't fully answered for myself yet.
1st scenario: re-cover Albion Campaign scabbards and make belts for Baron and Sempach. The Baron would be an interwoven belt a la the late 13th century. Sempach would lean more toward late 14th/early 15th century suspension.
2nd scenario: cover cores made by someone else for Gaddhjalt and Regent and make belts. Interwoven belt for Gaddhjalt. 15th century suspension for Regent.
Simple tooling (lines/grooves, maybe some stamping). No fancy carving. Reasonably blemish-free but doesn't need to be super perfect. I'll dye the leather myself. I want it to be reasonably historically accurate: no modern rivets but I'm okay with modern dyes.
Might not have the cash/time to do both (or even either) scenarios.
ChadA
http://chadarnow.com/
|
|
|
|
|
Harry Marinakis
|
| Posted: Wed 15 Jul, 2020 1:49 pm Post subject: |
|
|
| Chad Arnow wrote: | Harry,
Fair question that I haven't fully answered for myself yet. |
By "interwoven belt" do you mean an offset type belt that is laced (woven) into the scabbard?
For the German-style interwoven belts that tie (no buckle), you really want a very soft (almost cloth-like) 6-8 oz. leather that does not stretch. The usual veg-tan tooling leather is a poor choice - it's too stiff. I found the perfect leather - a latigo leather - from Promisland Tannery in Washington state. They used to make the leather in a light cream color, which was nice. If I recall correctly, it was 7-8 oz. and I used a belt sander to thin out the belt to my taste.
For the interwoven belts with a buckle, veg-tan leather is fine. Leather that is 7-9 oz. holds up better, but you are going to have to thin the tails that you weave into the scabbard cover. A belt sander is the tool of choice for this task.
These interwoven belts are LONG so you are going to want to buy an entire side, but make some measurements and a paper mock-up of the belt to be sure that the side you are buying is truly long enough.
For a regular belt, I just buy a belt strap from Tandy, 72" in length. You can get them in widths of 3/4" or 1" or whatever you want. I think that they're like 8-9 oz. leather, which is perfect for a belt like that.
As far as the scabbard cover is concerned - sounds like 4-5 oz. leather would be fine. It's a bit harder to form over risers, and around tight corners, because it's thicker -- but it takes stamping well. I skive the leather thin near the mouth of the scabbard so that I can fold and bend it more easily in that area.
Be mindful that all leather shrinks when it dries, even the 4-5 oz. So if you are going to stitch the leather onto the scabbard and then dye the leather -- make sure that the leather cover is a bit loose before you dye. Leather covers that shrink really tighly onto the wood core really loosen the fit of the sword in the scabbard.
Poorly organized web site, and it takes a lot of searching, but you can find some deals here.
http://www.theleatherguy.org/
Promiseland Tannery
https://promiselandtannery.com/
Similar to Tandy - sometimes cheaper, sometimes more expensive
http://springfieldleather.com/
My "Go-To" for high quality veg-tan tooling leather
http://www.waterhouseleather.com/
http://www.zackwhite.com/
Sometimes you can get fair-quality veg-tan leather on sale for $3 per square foot.
Expect $8-$10 per square foot for top-quality veg-tan.
|
|
|
|
|
Michael P. Smith
|
| Posted: Tue 02 Mar, 2021 9:51 am Post subject: |
|
|
So, I did my first of these a few years ago. I've made 4 more DIY scabbards since then, and haven't gotten around to posting them. I'll make a post for each.
This first one was made in the autumn of 2019. After my reasonable success of my first build, I decided to move on and try to make scabbards for all my bare swords. Along the way, I picked up some scabbards from Tod as well for a few of the swords, so that helps!
This first one is for an Albion Poitiers. It's a fairly basic Type XV of a type that could have probably seen used from 1300-1450. It is, like all Albions, well made, but this one is fairly plain.... no bling. A simple Type I pommel and Style 7 guard. I think of this sword as a mid-status sword..... the kind of sword where someone can afford quality, but won't splash for pizzazz.
So the brief for this one was a mid-status sword of about 1350-1400. The user would either be a mid-status soldier, or a reasonably well-off merchant/craftsman who needs a travelling companion.
I learned from my first attempt to have the chape in hand when making the core to ensure a good fit! I decided that I wanted to try and expand my skillset a bit with each new scabbard, so for this one, I decided to try and do a better job of fabricating a metal locket with some attached suspension loops.
As with the first scabbard I made, this was made using the soak and bend method... I soaked the wood slats and then allowed them to dry clamped over a form. I then cut out the profile shape of the scabbard. I inserted some wedges between the slats on the tip to ensure room for the tip. I then trimmed for shape and fit to the blade. I use duct tape to hold the slats together while test fitting. Once I got a good fit, I glued it all together and Once the glue dried, I insert the sword (which is a little tight at this point) to let the scabbard "settle in." Finally, I shape the core using the belt sander, files and sandpaper. I then cut a slightly oversized piece of 3-4 oz leather and start fitting. I wet the center of the leather to get a good form fit on the wood core, trim the leather to meet at the center (sometimes more successfully than others) and stitch it up. To fabricate the locket, I used some sheet brass. The locket is mainly plain, though I cut and filed the bottom edge to reflect the decorative style of the chape, which is a Tod Cutler product. used dowels I shaped to be close to the edge shape of the scabbard and bend it. This worked okay, but I need to work on a better fit. I then silver soldered it closed on the back. I cut out the suspension loops from the sheet brass and the I cut and file the front "pads" to resemble shells. I silversolder those in place and clean everything up. The belt was made using fittings from Polish maker Lorifactor and Ukrainian maker Armour and Castings.
I added some very simple and subtle incised line and punch decoration on the leather.
Lessons learned:
Overall, I am pleased with the result, but I believe in constant improvement. So here's what I think of my own work.
I need to work on fitting the metal work to the scabbard. It's okay, but not as precise as I'd like.
I wanted the incisions to be subtle (and I didn't want to cut through the leather), but the impressions have faded over time.
The metal locket matches the chape nicely, and I'm pleased, but there is a LOT of blank space there. If I do something like this again, I'll do something about that.... pierce work or something.
My back stich is overkill. The stitched can be WAY less dense. I did not know at the time that cross stitching isn't really seen in this context in period.
So here's the pics. I didn't polish the brass and bronze after pulling it out of storage, so forgive the "rustic" look.


|
|
|
|
|
Michael P. Smith
|
| Posted: Tue 02 Mar, 2021 10:25 am Post subject: |
|
|
Scabbard number two!
This one is for a Del Tin 5159 "15th century infantry sword." It is based on one of the "Wakefield" group swords. I've always admired this sword type since I first saw it in the Osprey book "English Longbowmen 13303-1515." In that book, the scabbard includes two by-knives (or a knife and a pricker), so I wanted to include that feature. The brief on this one was simply as a side arm for a Wars of the Roses archer.
So this build would offer a couple challenges: 1) It's a single edged sword, 2) The blade is not symmetrical and 3), I have never done by knives before.
The chape is, as usual, from Tod Cutler.
The core was made a little differently. I still steamed and bent the wood, but I traced the blade shape with the spine near the apex of the bend, and cut a "sandwich" piece to act as a space for the spine. I sanded it thinner towards the point to allows for the chape (and a good fit to the blade. That was actually easier to make work than I thought.
I then made the "inner sheath" for the pricker and knife. Simply put, I used damped thin leather, skin side in, to wrap the well-oiled blades and lower handle. I wrapped these in ribbon and let them dry. The result worked great, and I then glued them to the core where I wanted them.
The next bit was WAY harper than it had to be. I should have cut the leather cover quite large and then trimmed,, but I was trying to save leather, and cut the piece close to the size I thought it should be. But I didn't know how much I needed for the by-knives, and how much that would stretch. The result was ultimately a back seam that is less neat than I'd prefer, but it did work. Wet-forming the leather over the inner sheathe worked pretty well. I used an agate burnishing tool and a bone folder to shape and stretch, and ultimately I was extremely pleased with the result. The result was rigid, distinct, and held the knife in pricker in securely, but they could be easily removed as well. I cut the opening such that they folded into the inner shealths, resulting in a very neat looking opening. I decorated the scabbard with kind of crude incised decoration inspired by the "knives and scabbards" patterns. I imagine that this decoration might have been added by the owner, and so the finishing was not so finely done. I used a simple "running loop" belt suspension.
The belt on the Poitiers scabbard was a a basket-weave pattern which is nice, but takes forever to punch. This one has a simpler incised line and circle and dot decoration.
Overall, I achieved the effect I wanted!
Lesson learned:
Cut the leather big and trim to size.
For wet forming, forming the leather to the front of the scabbard and then securing it in place before trimming the back seam works best.
The stitching is way less dense on the back, but I still didn't know about the cross stitch.
Pics!


Last edited by Michael P. Smith on Tue 02 Mar, 2021 11:14 am; edited 1 time in total
|
|
|
|
|
Michael P. Smith
|
| Posted: Tue 02 Mar, 2021 10:36 am Post subject: |
|
|
Number three!
Kingmaker scabbard made summer 2020. Less to talk about on this on. The brief here is a mid-status sword similar to the Poitiers build, but maybe a a little more upper end.
I was trying to make a scabbard with more distinct incised decoration, some risers, and a diamond crossection.
Chape as usual, from Tod Cutler as was the belt hardware.
The core was made in my usual way, but I tried to get a nice diamond cross section. I only moderately succeeded at that. It's there, but a little mushy.
I made the risers with leather glued and shaped on the wooden core, and then wet formed the leather over the top. This all went without incident, and I cut the leather large enough that trimming went well.
I used a "z-stitch" on the back and that worked great.
Pretty much a no-drama built.
For the suspension with this one I went with the almost-cliche-in-todays-replica-market "15th century scabbard knots." I don't have another scabbard with those, and they went well with the risers.
The belt is a narrow black belt which contrasts nicely with the dark red scabbard, and a hand stamped basket-weave pattern.
Lessons learned:
My belt sander game needs work.
I watched a decoration tutorial video by Tod and did a much nice job on the incised lines.


Last edited by Michael P. Smith on Tue 02 Mar, 2021 11:20 am; edited 1 time in total
|
|
|
|
|
Michael P. Smith
|
| Posted: Tue 02 Mar, 2021 11:07 am Post subject: |
|
|
Last one for now!
Made for an Albion Sempach in Winter 2021.
This one was for suspension from a plaque belt, from about 1380-1420.
As with my first scabbard, I used Ian LaSpina's interpretation with a simple metal staple secured to the back of the locket.
For this one I had two goals: A better execution of the diamond cross section and a fancier metal locket.
In researching this piece, I found that most military scabbards for longswords in this period had relatively plain leather, with a few exceptions. I was inspired by this one quite a bit:
So although I like the decorated leather, I went untooled leather for this one. The focus would be on the metalwork. Core construction was uneventful, and I did do better defining the diamond shape, though my core shaping skills still need work. There are still wavy surfaces and lines are not always crisp.
Leather wrapping and sewing was also uneventful. I feel like I have that pretty well down.
The work on this one was in the locket.
I decided to make it octagonal, like the core. Two flat bevels on either side , with flat edges. This turned out to be easier said than done.
The chape was made by Tod Cutler, but I modified slightly (see pics). I cut off the heart at the top and scalloped the top edge.
For the locket, I made a mock up in thick card and defined the basic shape which I then cut out in brass. I did learn something here (see later), but what I did mostly worked. When I knew where the center was, I scored the brass sheet on the inside and with a a Dremel. I then used a vice to execute a a sharp bend. I then marked and di the same. So far so good. Time for decorating the front. I scalloped the bottom edge to match the chape. Then I decided I would create "plaques" that seems to appear frequently on scabbards of this era... on each bevel. I cut out some squares and soldered them in place. The center bits are some belt mounts I had lying around which I riveted in place Finally, I did not like the plain top edge. I solder on a strip of brass (see lessons learned) and then after clean-up, I added six small silver plated escallop rivets I got from a jewelry supply store. I am very pleased with the result.
I though the rest would be a piece of cake. I'd make the final needs, solder it together and DONE. But I couldn't find a good way to make the final bend. It kept wanting to bend at the front corner, and eventually this caused work hardening and a stress crack (which I repaired with some solder).Eventually, I worked up a jig that worked. But boy, was THAT a pain.
Attaching the staple went without incident.
This was my most complex metal fabrication for a scabbard so far, but I am really pleased with the result. The fit is very good and the result is clean and (IMO) attractive.
Lessons Learned:
Here is is: MAKE SURE YOU CLAMP PREVIOUSLY SOLDERED ELEMENTS BEFORE SOLDERING SOMETHING NEW NEARBY. I knew this, but forgot it. The clamp acts as a heat sink too. Also, allow some cooling time between elements on the same piece if it's relatively small like this.


|
|
|
|
|
Chad Arnow
myArmoury Team
|
| Posted: Wed 03 Mar, 2021 5:52 am Post subject: |
|
|
Michael,
Those look pretty good! I've thought about trying my hand at similar things, but doubt my results would be as successful. Nice job!
ChadA
http://chadarnow.com/
|
|
|
|
|
Michael P. Smith
|
| Posted: Wed 03 Mar, 2021 6:45 am Post subject: |
|
|
| Chad Arnow wrote: | Michael,
Those look pretty good! I've thought about trying my hand at similar things, but doubt my results would be as successful. Nice job! |
Thanks very much! Each one has flaws, but I am certainly developing my skills as I go along, and do feel like I improve with each one.
My "minimum standard" was to have a scabbard that was at least good enough to store and transport the sword safely. So anything above that was gravy, though now I have higher expectations.
Interestingly, the thing I've found the MOST frustrating is finding out information AFTER I complete the project. But such is life.
Thank you and MA for all these great resources and the generosity of knowledge.
|
|
|
|
|
Harry Marinakis
|
| Posted: Thu 04 Mar, 2021 12:20 pm Post subject: |
|
|
EDITED POST
Michael
Nice work. It feels good to start making your own hardware.
A couple of suggestions
1. Use solder with different melting points. Then you don't have to clamp. Start with a solder with a really high melting point for the joint that holds your chape together. Then start attaching other pieces by using solder with lower and lower melting points. Use a very focal torch, like the Smith mini torch with the #1 tip, to avoid heating up your entire workpiece. I submerge most of my piece in a water bath as well.
2. You've got a lot of excess solder around the edges of your joints. Try this:
-Consider the case when you are attaching a small decorative piece to the chape.
-Polish and clean and degrease the chape.
-Apply flux to the chape where you are going to attach the smaller decorative piece, then melt a small puddle of solder in that spot. The puddle should NOT be larger than the piece you are going to attach to that spot. Allow the solder to cool.
-Using a wire brush, flatten out the puddle of solder so it's paper thin, and reduce it's size if necessary so that it's not larger than the small decorative piece that you will attach.
-Polish and clean and degrease the chape again.
-Also polish, clean, and degrease the smaller decorative piece.
-Apply flux to both pieces, clamp into place.
-Focally heat the smaller decorative piece until you see the solder flow to the edges
The point of this exercise is that you can solder pieces together without using an excess amount of solder, and there will be little-to-no excess solder around the margins to clean up.
There is a name for this process, called "pre-tining." I discovered this process myself by accident. But when I took lessons at a jewelry academy, they taught me this process and I recognized it instantly because I had already discovered the process.
|
|
|
|
|
|
|
You cannot post new topics in this forum
You cannot reply to topics in this forum
You cannot edit your posts in this forum
You cannot delete your posts in this forum
You cannot vote in polls in this forum
You cannot attach files in this forum
You can download files in this forum
|
All contents © Copyright 2003-2024 myArmoury.com — All rights reserved
Discussion forums powered by phpBB © The phpBB Group
Switch to the Basic Low-bandwidth Version of the forum
|

