Go to page Previous  1, 2, 3, 4, 5

Thx Lukas!
Well the Durer is no Albion Munich, but it's quite a looker when properly dressed :) It also has decent if not mind blowing handling characteristics...it's all good practice anyway and I made quiet a leap forward.
Working on the shape for now - rolled sheet of steel with plumber solder. I'm exploring further decorations - I have no chisel able to bite in steel to do line work so I'll work around that.


 Attachment: 79.89 KB
IMG_1826.JPG


Last edited by Julien M on Sun 20 Nov, 2016 12:46 am; edited 1 time in total
I've been really eager to see thing come together. It looks fantastic! Really seriously impressive. Julien, your work is impressive. I also happen to agree with you about the Durer's handling properties.
Did you ever regrind the point? I was looking forward to blade work! But that rain guard is awesome!
Outstanding craftsmanship. I truly enjoy your DIY projects and admire your work!
Nathan and Brian - many thanks, I appreciate the positive feedback very much - means I'm on the right track (it's easy to loose the plot and stray away from the correct aesthetic with these complex carving projects).
Matthew - I have not re-grinded the tip yet. This will be quick work, I just want it to be less rounded and more threatening.
I have started work on the metal brackets for the scabbard. I have more ideas to continue decorating the shape (I will make a proper tip instead of the rounded end. Stay tuned!
Metal fittings...
One is a converted windlass bracket, the other is made from scratch (upper), a rolled up sheet of steel, brazed at the back. First time doing this (on my own). I did not put enough flux and burned too much silver solder, but by heating more, it went under eventually. It's very solid I'm not worried it will break anytime soon.

I have to be careful when pulling these in and out, it tends to scratch the scabbard. So far it is manageable. A pass of dye and beeswax, some buffing and it won't leave a trace.

Now it's down to file work for details, making rings to be attached to the brackets.


[


 Attachment: 46.42 KB
IMG_0949.JPG

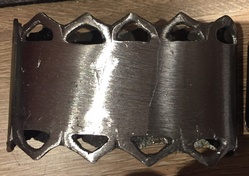
Almost done with the peen block.
It needs more sanding underneath to fit the pommel more closely.
This was an old hexagonal bolt lying around my shed - easy to clamp for file work, then drilled two holes for the tang to pass through, chopped the thread off once done then used a dremel to enlarge the tang hole to a rectangle which was in turn extended on the anvil after being heating to red (got rid of the thread assembly for good).


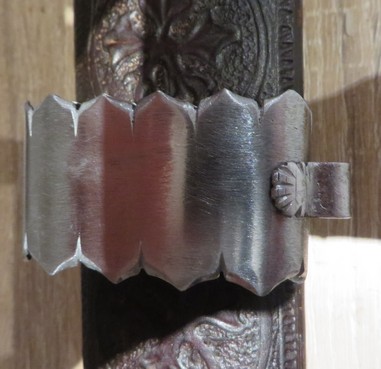
I'm VERY eager to wrap this up now and move on to tackle other projects, but the file work on the metal brackets is taking me ages (drill holes, then small files work). It has to match the shape so no turning back.

I've failed repeatedly at soldering the bottom of the shape (a raw bit of steel I'm planning to shape to a filed ball). Wonder how I managed to braze the bracket at the first attempt now that I'm nicely messing this up :)


 Attachment: 32.99 KB
IMG_1943.JPG

Hi Julien,

I missed this when you posted it and just seen it.


This is fantastic work, it really is. The scabbard work is simply stunning and the fittings are coming on great.

Keep it up; I too am eager to see it all together.

Tod
Keep up the beautiful work julien! :eek:
At last, the sword is assembled!
A few quick pictures, of poor quality as it's dark now but more to come.
I've carved out the floral peen block from an old nut lying about.
The guard as been secured with steel wedges.
The tip has been reground to a more pointy shape, which does a lot to improve the look of the sword.
It's beautifully balanced now.
Now I need to finish the scabbard brackets..


It looks beautiful Julien. :)
Finished product if very nifty, at least from photos.
Looks spectacular all around. Did you ever re-grind the tip? I was wondering what the best method of going about it was, bench grinder or is it safer to use a file or something?
Very nice. I ordered a Albion Munich in "Gothic" and looking at your work is getting me excited ! Just 8 or 9 months and I will be even more excited!!!
Thanks guys! This reminds me I really need to carve some time to finish this one...
I still have to finish the metalwork on the scabbard, but I used former windlass scabbard brackets and the steel is rather thick making filework a real pain (mini diamond files). I got frustrated and gave up.
I then need to solder the bracket rings attachments (I've lost two of the shell brackets I had done which is a shame...) work on straps and buckles and braze the tip of the shape (which I repeatedly failed). I have found a potential shortcut though (bought a couple of ball nuts that will fit right in).

Philip - I have reground the tip yes. I used my cheap belt sander and eyeballed it (sharpie first) then finished with file and sandpaper. I can't afford to go too narrow, or the tip would be too weak. You can do it with just a file though, if the change of profile is superficial - in fact it may be better if you have not done this before. Mistakes can happen and they are final on this sort of thing. With a file, risks are minimal.
Go to page Previous  1, 2, 3, 4, 5

Page 5 of 5

Jump to:  
You cannot post new topics in this forum
You cannot reply to topics in this forum
You cannot edit your posts in this forum
You cannot delete your posts in this forum
You cannot vote in polls in this forum
You cannot attach files in this forum
You can download files in this forum


All contents © Copyright 2003-2006 myArmoury.com — All rights reserved
Discussion forums powered by phpBB © The phpBB Group
Switch to the Full-featured Version of the forum