| Author |
Message |
|
Mart Shearer
|
 Posted: Thu 18 Sep, 2014 10:58 am Post subject: Posted: Thu 18 Sep, 2014 10:58 am Post subject: |
 |
|
Wade's M-10 has a very heavy collar. I think we found the rivets, which had been clipped to a flat point were 5mm in length with massive deformation.
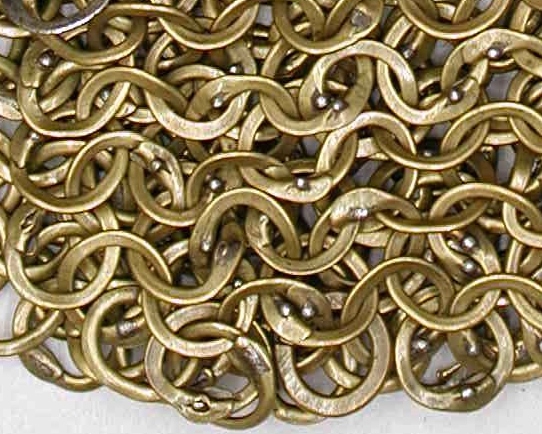
Here's a detail from a German mail shirt at the Met showing the front and back on the latten edging of a long sleeve. The latten rings often show the tooling better, since they suffer less from corrosion and can't be heated after assembly. The split on the front around the rivet point is evident, showing the drift came to a chisel edge, more like a screwdriver than an awl.
 Attachment: 218.09 KB Attachment: 218.09 KB
Met 14.25.1540
ferrum ferro acuitur et homo exacuit faciem amici sui
|
|
  |
 |
|
Mark Griffin
Location: The Welsh Marches, in the hills above Newtown, Powys. Joined: 28 Dec 2006
Posts: 802
|
| Posted: Thu 18 Sep, 2014 1:15 pm Post subject: |
|
|
Well as we are looking at tiny links, just for some light relief here is some mail in the opposite direction I've just driven by in the Swiss Alps on my way to Churburg (yes, I'm so excited my wife is thinking of sedating me and leaving me by the side of the road)
Int. diameter about 3ft.....
I've taken a load more from other sites so will post up as soon as i can.
Attachment: 418.74 KB
[ Download ]
Attachment: 447.27 KB
[ Download ]
Currently working on projects ranging from Elizabethan pageants to a WW1 Tank, Victorian fairgrounds 1066 events and more. Oh and we joust loads!.. We run over 250 events for English Heritage each year plus many others for Historic Royal Palaces, Historic Scotland, the National Trust and more. If you live in the UK and are interested in working for us just drop us a line with a cv.
|
|
|
|
|
Eric S

|
| Posted: Fri 19 Sep, 2014 12:09 am Post subject: |
|
|
| Mart Shearer wrote: | Wade's M-10 has a very heavy collar. I think we found the rivets, which had been clipped to a flat point were 5mm in length with massive deformation.
Here's a detail from a German mail shirt at the Met showing the front and back on the latten edging of a long sleeve. The latten rings often show the tooling better, since they suffer less from corrosion and can't be heated after assembly. The split on the front around the rivet point is evident, showing the drift came to a chisel edge, more like a screwdriver than an awl. |


Mart, after closely examining the methods of several people who have posted their attempts of making authentic looking wedge riveted links, and after observing the detailed images available of links showing the wide part of the rivet on the back side of the link and the rivet head protruding out of the front side of the link I have developed the opinion that an awl was not used.
From what I am seeing it seems that a much slimmer edged chisel was used instead of the brute force awls that most people are currently using. It looks like the edge of the chisel penetrated through the back of the link and instead of punching out the front like an awl would do it instead made a rather neat cut. It would then be the hardened wedge rivet that would be punched through the initial cut, which would force it open and seal the rivet inside the link.
I just do not see the huge gaping holes that are currently being made for the rivet by many people as the method used on period wedge riveted mail. To me it looks like the wedge rivet was almost an exact fit with just enough material to fill the void created by the chisel cut.
Here is an image of the type of awl used and recommended by one one wedge rivet mail maker, and the type of rivet holes it produces, below that it is the type of chisel shape that I think would more likely have been used, something less blunt, more slender and extremely sharp and hard.


Last edited by Eric S on Fri 19 Sep, 2014 7:53 am; edited 1 time in total
|
|
 |
|
|
Mart Shearer
|
| Posted: Fri 19 Sep, 2014 2:37 am Post subject: |
|
|
I think if you take your chisel and bevel the edges inward to a trapezoidal section narrowing to a near point, you'll be closer.
ferrum ferro acuitur et homo exacuit faciem amici sui
|
|
|
|
|
Eric S
|
| Posted: Fri 19 Sep, 2014 2:44 am Post subject: |
|
|
| Mart Shearer wrote: | | I think if you take your chisel and bevel the edges inward to a trapezoidal section narrowing to a near point, you'll be closer. |
Mart, I was looking for an image of a chisel exactly like you describe but have not found it so far, mainly I think the thickness of whatever tool was used was less than imagined, if you look at some of the images showing the rivet slot they do not seem to be mashed in, they appear to be neatly cut.
|
|
|
|
|
Luka Borscak

|
| Posted: Fri 19 Sep, 2014 3:23 am Post subject: |
|
|
| Mark Griffin wrote: | Well as we are looking at tiny links, just for some light relief here is some mail in the opposite direction I've just driven by in the Swiss Alps on my way to Churburg (yes, I'm so excited my wife is thinking of sedating me and leaving me by the side of the road)
Int. diameter about 3ft.....
I've taken a load more from other sites so will post up as soon as i can. |
Cool, shame it's not a 4 in 1 pattern. 
|
|
|
|
|
|
Mart Shearer
|
| Posted: Fri 19 Sep, 2014 4:22 am Post subject: |
|
|
Eric,
Perhaps it's time to look at jewelry chisels or gravers?
ferrum ferro acuitur et homo exacuit faciem amici sui
|
|
|
|
|
|
Robert MacPherson
Industry Professional
Location: Jeffersonville USA Joined: 27 Feb 2008
Posts: 141
|
| Posted: Fri 19 Sep, 2014 7:26 am Post subject: |
|
|
I think that the chisel should cut a slot which is a good approximation of the shape of the rivet. To do more is a waste of effort and is more likely to split and ruin the ring. To do less makes it difficult to seat the rivet.
That said, a "good approximation" might not be quite as wide as the rivet is thick at the place where the chisel exits the ring. If the rivet is obliged to spread that exit slit a little it might be more inclined to stay seated while the mailmaker switched over to the closing tool.
Mac
Robert MacPherson
http://www.lightlink.com/armory/
http://billyandcharlie.com/
|
|
|
|
|
|
Robert MacPherson
Industry Professional
Location: Jeffersonville USA Joined: 27 Feb 2008
Posts: 141
|
| Posted: Fri 19 Sep, 2014 8:14 am Post subject: |
|
|
Something like this. Blacksmiths call this shape a "cat's tongue". They use them when a hole is to be slit and drifted to shape in one heat. For mail purposes, it would have to be used cold, but it's all the same.
The point can not be literally the shape of the rivet. It has to be rounded a bit or it will be too fragile to do the job. The cross section near the point is an ellipse or lens. The section grades into something more rectangular for the base of the rivet.

You are not going to find anything like this commercially. For serious production, you would want to make it on tool steel. For experimental purposes, you can grind one out of a hardened masonry nail if you are careful not to draw the temper.
Mac
Robert MacPherson
http://www.lightlink.com/armory/
http://billyandcharlie.com/
|
|
|
|
|
|
Mart Shearer
|
|
|
|
|
James Arlen Gillaspie
Industry Professional

Location: upstate NY Joined: 10 Nov 2005
Posts: 587
|
| Posted: Fri 19 Sep, 2014 4:22 pm Post subject: |
|
|
I measured a number of the rings, most across the part of the rings without the rivet. It is complicated by the fact that they are usually a bit oblate in shape, not truly round, though I chose rings that were more round than others. These measurements are from the body of the piece, given in inches first and millimeters in parenthesis; .165 (4.19), .174 (4.43), .173 (4.4), .173 (4.41, must be due to +- range of the digital caliper), .167 (4.25), .180 (4.58), .172 (4.36), .174 (4.44), .172 (4.39), .173 (4.4), .172 (4.39). Then I did some across the rivet, .168 (4.28), .172 (4.38), .163 (4.15), .169 (4.31), and a last one across both axes, .168 (4.28) and .166 (4.21). Then I measured some of the thicker links on the top strip; .173 (4.4), .182 (4.63), .179 (4.55), and .184 (4.69). All a significant bit bigger than 4mm.
jamesarlen.com
|
|
|
|
|
|
Mart Shearer
|
| Posted: Fri 19 Sep, 2014 5:30 pm Post subject: |
|
|
It's certainly more trustworthy figures than trying to measure a ring laying at an oblique angle from a computer screen! I suppose we would have to consult a statistician to find out how many rings we need for a statistical average to be valid, but I think you've done a good amount. A significant bit larger than 4 mm, and a more significant bit below 5 mm other than the reinforced area.
I really think hundredths of a millimeter is too insignificant to matter in this type of work, and have started to round to tenths. It reminds me too much of digital gas pumps measuring thousandths of a gallon.
For reference, the welded AZON mail used for butcher's gloves and such comes in two sizes:
0.150" (3.8 mm) outer diameter, and the one sold for re-enactor/ fencing/ etc. use being 0.210" (5.3 mm) diameter.
http://www.ringmesh.com/category_s/54.htm
ferrum ferro acuitur et homo exacuit faciem amici sui
|
|
|
|
|
James Arlen Gillaspie
Industry Professional
Location: upstate NY Joined: 10 Nov 2005
Posts: 587
|
| Posted: Sat 20 Sep, 2014 10:58 am Post subject: |
|
|
The ID's are running very close to 1/8". My wrists are tiny.
Attachment: 316.22 KB
[ Download ]
jamesarlen.com
|
|
|
|
|
|
Mark Griffin
Location: The Welsh Marches, in the hills above Newtown, Powys. Joined: 28 Dec 2006
Posts: 802
|
| Posted: Sun 21 Sep, 2014 1:19 am Post subject: |
|
|
| Quote: | | Cool, shame it's not a 4 in 1 pattern. |
there's always a critic...
Churburg- tick!
Mantua- tick! Worshipping at the altar of milanese armour..... Proud to say I was escorted out of yet another museum well after closing time :-)
If my wifi was anything other than brought up in a bucket by a man from the village below I'd put the other pics up.
Currently working on projects ranging from Elizabethan pageants to a WW1 Tank, Victorian fairgrounds 1066 events and more. Oh and we joust loads!.. We run over 250 events for English Heritage each year plus many others for Historic Royal Palaces, Historic Scotland, the National Trust and more. If you live in the UK and are interested in working for us just drop us a line with a cv.
|
|
|
|
|
Eric S
|
| Posted: Sun 21 Sep, 2014 10:11 pm Post subject: |
|
|
| Robert MacPherson wrote: | Something like this. Blacksmiths call this shape a "cat's tongue". They use them when a hole is to be slit and drifted to shape in one heat. For mail purposes, it would have to be used cold, but it's all the same.
The point can not be literally the shape of the rivet. It has to be rounded a bit or it will be too fragile to do the job. The cross section near the point is an ellipse or lens. The section grades into something more rectangular for the base of the rivet.
You are not going to find anything like this commercially. For serious production, you would want to make it on tool steel. For experimental purposes, you can grind one out of a hardened masonry nail if you are careful not to draw the temper.
Mac |
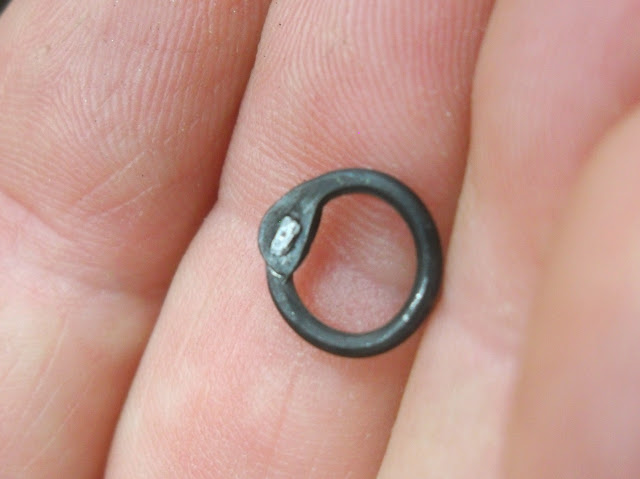
Mac, when I look at the images posted of antique wedge riveted link back sides I do not see any indent, I think the tool you picture would indent the area of the link when struck, and the resulting links made with it would be misshaped where they were struck in the back. This type of tool also causes the front of the link to protrude outward as well in a dome shape.
Here is a comparison of one such link next to the back side of the links that James posted, notice how the surface of the antique links shows no sign of being indented despite being struck and cut, it seems to me that a different type of tool was used, something not so thick, with a sharp beveled end much like a chisel, of course the links would have to be very soft and the chisel would have to be hardened steel.

Here are some links made with the method that has previously been described for making wedge riveted links, in reality the holes cut / punched look nothing like the antique wedge riveted link slots we have been discussing, I think an entirely different method needs to be discussed in order to replicate reproduced links more authentically.
Here is a batch of links ready for rivets, notice the shape of the back side of the links, they are not neatly cut slots as in the antique examples recently posted here, they are gaping holes. The front of the links are not any better, on the antique examples there seems to be a neatly cut slit which is then opened up when the head of the wedge rivet is forced through the cut from the back side, on the reproduced examples the cut is domed


Here is another example by another maker, once again you see the indented back side and the domed front side, not a neatly cut slot.

Here is a close approximation of the type of tool shape that I think was used, a hardened, long narrow, beveled chisel, I suspect that the tip of the blade would have been ground slightly to a trapezoid shape, and that there would have been several of these in use at the same time so that they could be rotated and sharpened without having to stop the cutting process, this way links could be mass produced, the links would have been placed in a wood block (possibly a lead block) with a link shaped depression and each would be struck making a neatly cut slot as seen in the antique examples, just my personal opinion based on the detailed images now available of antique mail rivets, rivet heads and rivet slots.

|
|
|
|
|
|
Mart Shearer
|
| Posted: Mon 22 Sep, 2014 7:11 am Post subject: |
|
|
| Eric S wrote: | Here is a close approximation of the type of tool shape that I think was used, a hardened, long narrow, beveled chisel, I suspect that the tip of the blade would have been ground slightly to a trapezoid shape...
|
Pretty close, though I wouldn't want it so long. The chisel already has a trapezoidal section, and I agree that it should be beveled to a narrower edge, though not necessarily a point.
Attachment: 302.25 KB

Jost Amman mail-maker at work
ferrum ferro acuitur et homo exacuit faciem amici sui
|
|
|
|
|
|
Robert MacPherson
Industry Professional
Location: Jeffersonville USA Joined: 27 Feb 2008
Posts: 141
|
| Posted: Mon 22 Sep, 2014 9:22 am Post subject: |
|
|
Eric,
I really don't think we are talking about an entirely different process, but only some refinements of the one that the modern riveted mail folks are using.
The "roll in" in the back is a bit excessive here, but with a properly shaped closing tool, that can all be brought to a nice shape.
The bulge on the upper side is far from a defect. It's really necessary to get some metal in the right place to be pressed into shape during the final closing. We can not generate enough pressure for the metal to flow "up" into the shaped cavity of the closing tool. The rivet bulge can only get smaller, so it's best to start with it higher then you need.
Mac
Robert MacPherson
http://www.lightlink.com/armory/
http://billyandcharlie.com/
|
|
|
|
|
|
Robert MacPherson
Industry Professional
Location: Jeffersonville USA Joined: 27 Feb 2008
Posts: 141
|
| Posted: Mon 22 Sep, 2014 9:46 am Post subject: |
|
|
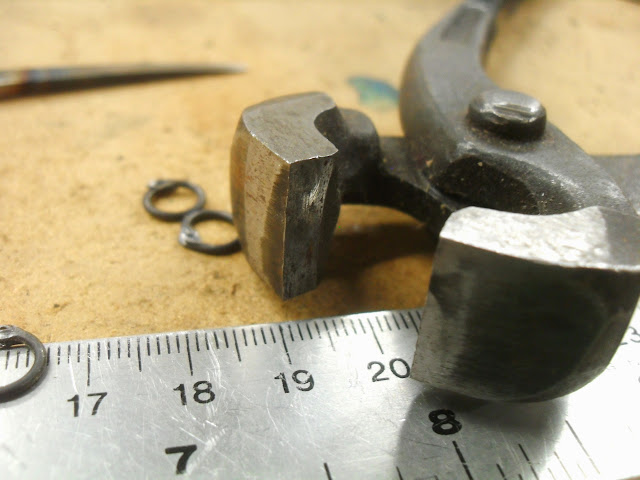
I thought I would but money where my mouth is this morning, so I spent some time experimenting with mail.
Here is the punch I made from a masonry nail. It differs from the tool I sketched the other day in having a gradual lead in to the point. This will make it easier to resharpen. I also re-did the heat treating because these nails are really a bit too soft as they come.

Here are two views of the point.
 
For the rivets I used the same wire as the rings, flattened under the hammer and cut to a point with a nipper.

I jammed the rivet into the slot and broke it off at the pre-nipped line. I never tried this before, but it seems to work pretty nicely.

After pressing the rivet home, it looks like this.
 
The final closing was a bit disappointing, but I knew it would be.
I used this old tool I got from Steve Sheldon many years ago. The faces are too flat to give a sexy final shape to the overlap, and the central depression is sized for a much larger ring.
So, it seems like the next thing I must do is make new tooling for closing the rings. That's a lot more trouble than just making a slitting punch. I will have to think on this for a while and see if I come up with something simple.
Mac
Robert MacPherson
http://www.lightlink.com/armory/
http://billyandcharlie.com/
|
|
|
|
|
|
Mart Shearer
|
| Posted: Mon 22 Sep, 2014 11:39 am Post subject: |
|
|
Grinding or cutting those end cutters is a bear. Get it down to about a 5 mm square end, and maybe groove through the center of it with the edge of a triangular file?
ferrum ferro acuitur et homo exacuit faciem amici sui
|
|
|
|
|
|
Robert MacPherson
Industry Professional
Location: Jeffersonville USA Joined: 27 Feb 2008
Posts: 141
|
| Posted: Mon 22 Sep, 2014 2:19 pm Post subject: |
|
|
I made up a hand held punch for finishing the upper surfaces, and prepared a slightly concave spot on the corner of a steel block for the backs of the rings to sit.
The results are an improvement.
 
I'll go back and look at the pics of the real stuff and see if I can figure out what direction to go in next.
Mac
Robert MacPherson
http://www.lightlink.com/armory/
http://billyandcharlie.com/
|
|
|
|
|
|
|
You cannot post new topics in this forum
You cannot reply to topics in this forum
You cannot edit your posts in this forum
You cannot delete your posts in this forum
You cannot vote in polls in this forum
You cannot attach files in this forum
You can download files in this forum
|
All contents © Copyright 2003-2024 myArmoury.com — All rights reserved
Discussion forums powered by phpBB © The phpBB Group
Switch to the Basic Low-bandwidth Version of the forum
|

