| Author |
Message |
Sean Flynt

|
 Posted: Thu 21 Feb, 2008 7:16 am Post subject: Making A Buckle Posted: Thu 21 Feb, 2008 7:16 am Post subject: Making A Buckle |
 |
|
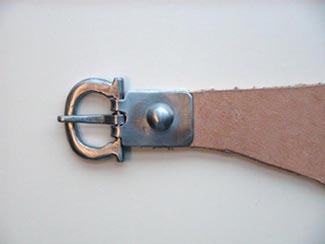
Dan Dickinson has mentioned here the possibility of making medieval-style buckles without welding or casting simply by drilling and cutting them from bar stock (see this thread: http://www.myArmoury.com/talk/viewtopic.php?t...mp;start=0 ). I just had to try this, even though buckles are not terribly expensive. The results of my experiment are shown below in actual size--very crude, but fully functional. I'll do a bit more filework and finishing to clean things up, but I'm calling this finished. Both buckle and plate are inspired by forms found at the Towton battlefield. I made flexible foam templates to reduce the need for trial and error.
Lessons learned:
• Creating the buckle is the easy part. You just drill, cut and file away everything that doesn't look like the buckle you want.
• Creating the plate is the hard part. You can't make it slightly large (or the cutouts slightly small) and gradually refine it by repeated fittings to the buckle. Every time you bend the plate, the bend will get weaker until it finally fails. I knew that before starting the project, thus the foam template--that can be bent and refined any number of times, then used to get the steel plate right on the first try. Theoretically. In practice, the foam is too flexible to get a highly accurate tracing onto to the steel. The small error introduced is enough to make the central slot and side cutouts either too long or too short, and the only way to discover that is after the plate is bent around the buckle. And most of the finishing of the plate--beveling the edges, sanding, etc.--has to take place before the bend. Yes, I had to discard two completely finished buckle plates before I got one that would work.  Fortunately, these are made very quickly. Fortunately, these are made very quickly.
• IIRC, I used 22 ga. steel for the buckle plate. That's a bit too thin. I thought it would be plenty strong enough to secure the buckle, and I still think that's true. The problem is with securing the plate to the strap. The plate that inspired this one had two small rivet holes at its free end. I decided to use a large single rivet in the center of the plate. The problem with the thin plate is that it can drift slightly during drilling, causing misalignment of the front and back (and thus the rivet holes). To keep the front and back aligned, the rivet then has to be on a slight angle, but the thin stock tends to warp on one side during the peening of the rivet if the shaft of the rivet is on an angle. You can see the slight warping in the surface around the rivet. The good news is that the thin plate also allows a certain amount of correction of this problem--you can simply press the plate back into shape with a piece of wood. A thicker plate will also allow a deeper countersink in the back of the plate. You don't need much, but a deeper countersink will create a stronger hold after the peened end of the rivet is filed or ground flush.
• A nail works fine as the tongue. Just flatten one end and carefully bend it in a vise until the buckle will just fit into the loop, then close the loop with light taps of a hammer.
 Attachment: 42.72 KB Attachment: 42.72 KB
-Sean
Author of the Little Hammer novel
https://www.amazon.com/Little-Hammer-Sean-Flynt/dp/B08XN7HZ82/ref=sr_1_1?dchild=1&keywords=little+hammer+book&qid=1627482034&sr=8-1
|
|
   |
 |
Bill Grandy
myArmoury Team


|
| Posted: Thu 21 Feb, 2008 8:10 am Post subject: |
|
|
Sean,
Your ability to do these home-projects with simple methods never ceases to amaze me. That looks fantastic.
HistoricalHandcrafts.com
-Inspired by History, Crafted by Hand
"For practice is better than artfulness. Your exercise can do well without artfulness, but artfulness is not much good without the exercise.” -anonymous 15th century fencing master, MS 3227a
|
|
|
|
|
Sean Flynt
|
|
|
|
|
Gary A. Chelette

|
| Posted: Thu 21 Feb, 2008 12:56 pm Post subject: |
|
|
| Sean Flynt wrote: | Thanks! Sadly, I'll be a hunchback with claws for hands by the time I'm 50  |
Naw, I'm over 50 and find I'm still as good as I was when I was 20, or 30..sometimes 40 er..maybe early 50's sometimes.
What I use to do all day now takes all day to do!  
Are you scared, Connor?
No, Cousin Dugal. I'm not!
Don't talk nonsense, man. I peed my kilt the first time I went into battle.
Oh, aye. Angus pees his kilt all the time!
|
|
 |
|
Jean Thibodeau

|
| Posted: Thu 21 Feb, 2008 1:12 pm Post subject: |
|
|
| Gary A. Chelette wrote: | | Sean Flynt wrote: | | Thanks! Sadly, I'll be a hunchback with claws for hands by the time I'm 50 |
Naw, I'm over 50 and find I'm still as good as I was when I was 20, or 30..sometimes 40 er..maybe early 50's sometimes.
What I use to do all day now takes all day to do! |
58 here and I'm in better shape, if heavier, than when I was 20 or 30: A lot stronger anyway even if I do neglect the aerobic side a bit. ( But then I was very much a couch potato then )
You can easily give up your freedom. You have to fight hard to get it back!
|
|
|
|
|
Sean Flynt
|
|
|
|
|
Dan Dickinson
Industry Professional

|
| Posted: Thu 21 Feb, 2008 7:06 pm Post subject: |
|
|
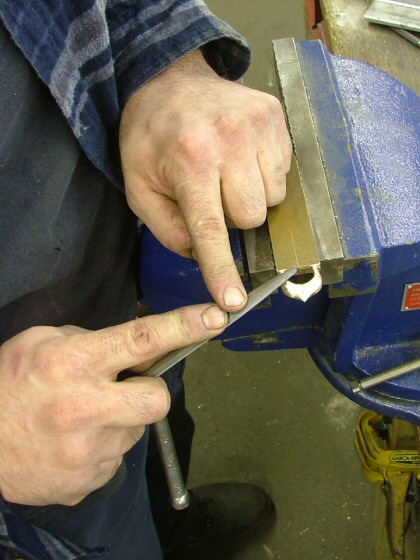
It appears that the guys at albion use the same process (at least in bronze).
A pic from the Arn site shows the process.
Dan
Attachment: 121.05 KB
|
|
|
|
|
Merv Cannon

|
| Posted: Fri 22 Feb, 2008 3:41 am Post subject: |
|
|
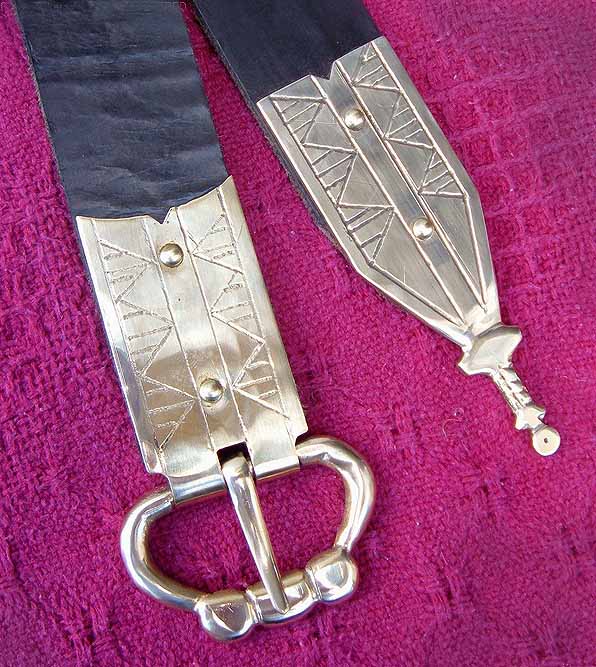
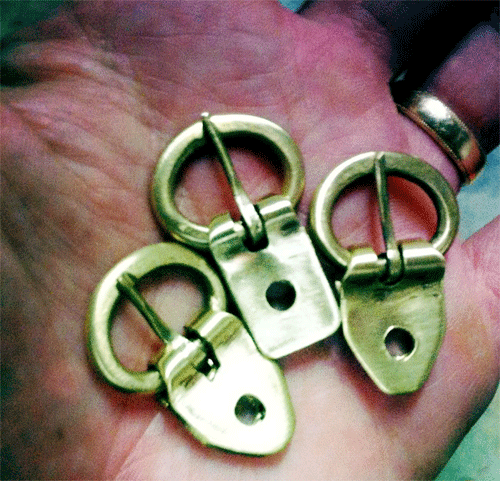
Hi Sean......
Just thought Id show you a buckle and end I "carved" from brass bar-stock with the help of a drill some files and a Dremel. It was for my own kit ( for a change ) but I havent tried it yet in steel.
Best wishes....
Merv Cannon
Attachment: 87 KB
Merv ....... KOLR
http://www.lionrampant.com.au/
"Then let slip the dogs of war ! "......Woof !
|
|
 |
|
|
Russ Ellis
Industry Professional
|
|
|
|
|
Sean Flynt
|
|
|
|
|
Sean Flynt
|
|
|
|
|
M. Eversberg II

|
| Posted: Fri 22 Feb, 2008 9:50 am Post subject: |
|
|
Very impressive, everyone.
M.
This space for rent or lease.
|
|
  |
|
|
Arthur Smith
|
|
|
|
|
Sean Flynt
|
| Posted: Wed 29 May, 2013 6:36 am Post subject: |
|
|
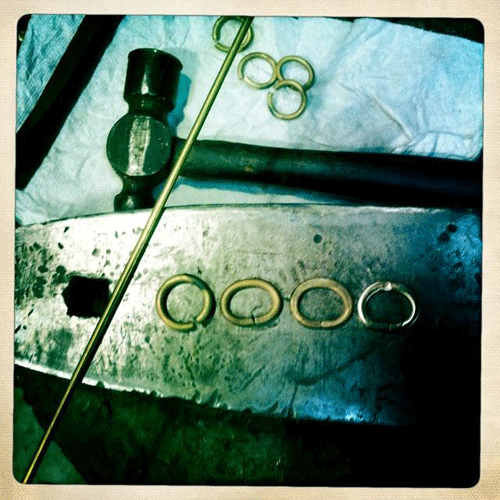
By coincidence, I was discussing buckles just this morning after posting an armour project on Facebook. The type of buckle shown below works well at this size for sword belts. Butted buckles of this type were recovered from Mary Rose, so there's a precedent for butted construction over cast. These are dead simple to make with simple tools. You just anneal a brass rod, clamp one end to a mandrel and wind the rod around (like making mail rings). Then you just use a dremel to slice up the middle of that "spring" form. The rings fall off and you tap them into the desired shape before hammering them flat, which also work-hardens the brass. Brass sheet for the plates. Brass wire for the tongue. Just remember to work harden the tongue a bit after it's mounted. It has to be pretty soft to flatten cleanly and again to get a clean bend, and you don't want it that soft in use.
FIW, I used a similar technique to make a quick-n-dirty large steel buckle and plate for a waist belt that secures a breastplate. That has held securely.
Attachment: 151.82 KB
Attachment: 165.42 KB
-Sean
Author of the Little Hammer novel
https://www.amazon.com/Little-Hammer-Sean-Flynt/dp/B08XN7HZ82/ref=sr_1_1?dchild=1&keywords=little+hammer+book&qid=1627482034&sr=8-1
|
|
|
|
|
|
Aleksei Sosnovski
|
| Posted: Thu 30 May, 2013 2:48 am Post subject: |
|
|
I use a process similar to the one described by Sean, though I use steel and make my buckles rectangular not oval. buckle plates are actually the easiest part to make. My technology is following:
- Cut a strip of metal, as wide as you want your buckle plate to be and long enough. Making it longer than necessary won't hurt. Deburr/sand/file/bevel/whatever the long edges.
- Using pliers and vice bend it in half over some scrap piece of leather. Do so even if you are not going to attach the buckle to a strap! Ideally the leather should be as thick as the buckle. If one side of the bent plate extends over another-no problem, you will just cut it off later.
- Using a hack saw and needle files make the slot for the tongue and otherwise shape the "buckle" end of the plate. You will be cutting/filing 2 layers of metal simultaneously. The leather you were bending the plate over should still be in place. Placing the buckle over the end of the plate being shaped you can check if it fits.
- Once the "buckle" end of the plate is shaped, unbend the plate just enough to fit it over the buckle and then close it back. Either over the same piece of leather if you will be attaching the buckle to the strap, or without it if you will be riveting the buckle straight to the armor.
- Shape the other end of the buckle plate using whatever tools you want.
And basically you are done. Since you were shaping the buckle plate already bent to shape, both of its sides should be perfectly symmetrical. And the only hole you will need to drill is for a rivet. Drill it, remove the piece of leather (if it is still there) and attach your buckle to whatever you want.
|
|
 |
|
|
|

