| Author |
Message |
Kai Lawson

|
 Posted: Mon 10 Feb, 2014 2:36 pm Post subject: Posted: Mon 10 Feb, 2014 2:36 pm Post subject: |
 |
|
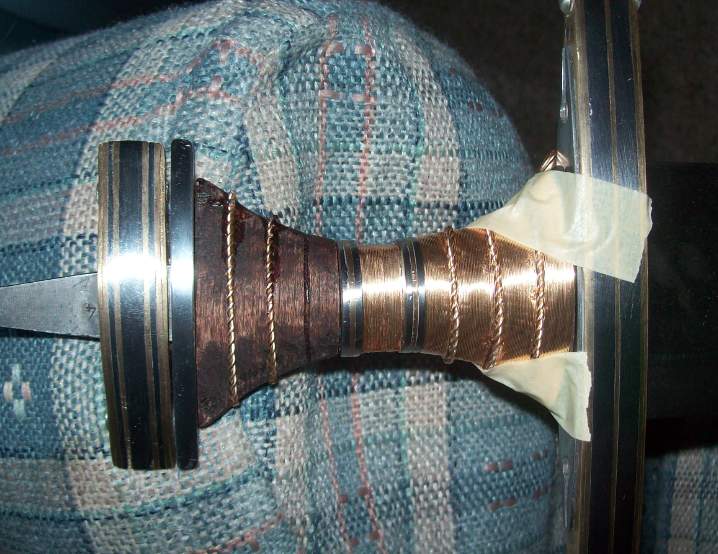
Getting ever closer. I decided to wait on the etch work for the blade. I have one more little wire-twist 'riser' to put in, and have to bind the rest of the grip in wire, but you can get a better idea of what I intend. For the first thing I've ever hilted, it's an ambitious project.
 Attachment: 73.93 KB Attachment: 73.93 KB
Attachment: 21.56 KB
[ Download ]
Attachment: 41.46 KB
[ Download ]
"And they crossed swords."
--William Goldman, alias S. Morgenstern
|
|
  |
 |
Bryan Heff

|
| Posted: Mon 10 Feb, 2014 2:52 pm Post subject: |
|
|
|
It's more than ambitious, it's mind boggling ambitious! Wow. You jumped in with both feet and more. I have dabbled with projects but never anything like what you are tackling. Keep it up. It looks really great!
|
|
|
|
|
|
Mark Moore
|
| Posted: Tue 11 Feb, 2014 3:48 am Post subject: |
|
|
Absolutely kick-ass........Can't wait to see it finished. If you put as much effort into a scabbard, you will have a piece that is priceless. Beautiful, man!..............McM
''Life is like a box of chocolates...'' --- F. Gump
|
|
|
|
|
Matthew Bunker

Location: Somerset UK Joined: 02 Apr 2009
Posts: 483
|
| Posted: Tue 11 Feb, 2014 6:14 am Post subject: |
|
|
More Ejsbol than an Ejsbol sword....brilliant.
Really nice work.
"If a Greek can do it, two Englishman certainly can !"
|
|
|
|
|
Boris Bedrosov
Industry Professional

Location: Bourgas, Bulgaria Joined: 06 Nov 2005
Posts: 700
|
| Posted: Tue 11 Feb, 2014 1:30 pm Post subject: |
|
|
Looks perfect so far - really waiting to see the result.
Little secret revealed - I'm making something similar, but not so gorgeous. This will be shown in "Show Us Your Seaxes" thread soon.
"Everyone who has the right to wear a long sword, has to remember that his sword is his soul,
and he has to separate from it when he separates from his life"
Tokugawa Ieyasu
Find my works on Facebook:
Boris Bedrosov's Armoury
|
|
 |
|
Johan Gemvik

|
| Posted: Tue 11 Feb, 2014 1:38 pm Post subject: |
|
|
Inspiring work! For a first sword handle it's almost unbelievable. 
"The Dwarf sees farther than the Giant when he has the giant's shoulder to mount on" -Coleridge
|
|
|
|
|
Jussi Ekholm

|
| Posted: Wed 12 Feb, 2014 2:21 am Post subject: |
|
|
You are doing amazing job, that will be spectacular when finished.
Jussi Ekholm
|
|
|
|
|
Kai Lawson
|
| Posted: Wed 12 Feb, 2014 9:04 am Post subject: |
|
|
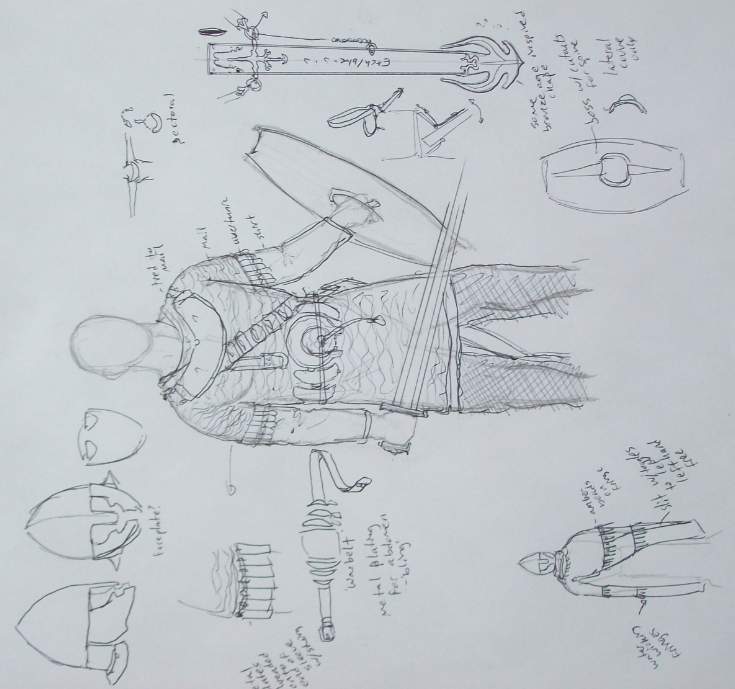
Almost there. I'm going to wait on the blade etch until I've done a few. The piece is ready for peening; just a few tiny shims/adjustments left, then the pommel cap. I've added a quick n' dirty sketch of my anticipated kit. I'll start a new thread when I work on the helm, pectoral and 'war belt,' and I'll add photos of my metal scabbard endeavors here.
I've done a quick estimate: roughly 1800 years and more than half the world's land surfaces went in as inspiration for this kit and sword.
Attachment: 111.67 KB
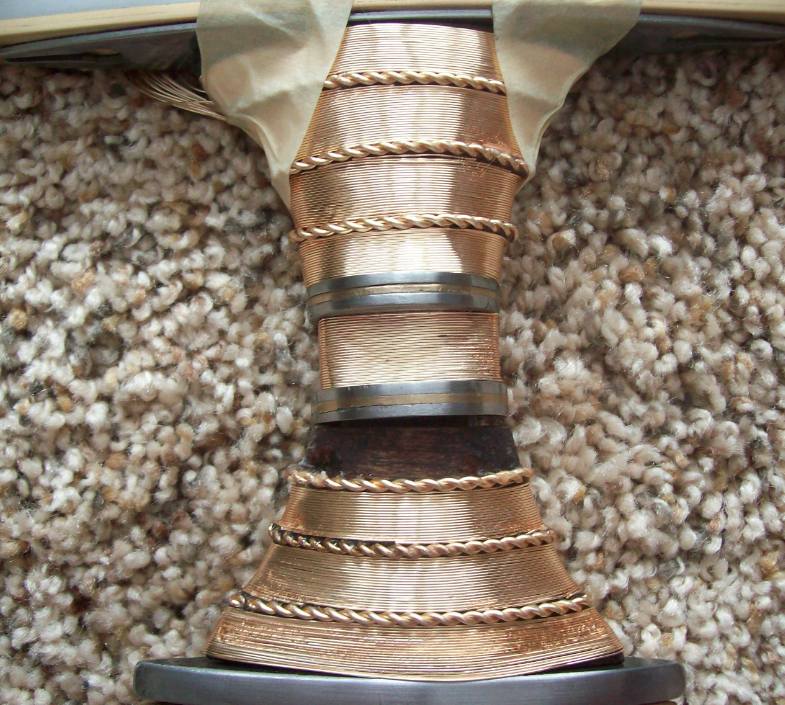
The wire 'inlay, ' as I call it, where a full wrap won't fit. I glue in short wire segments to fill the gaps.
Attachment: 52.47 KB
Attachment: 118.76 KB
All the unevenness is rather apparent in the brighter light... [ Download ]
"And they crossed swords."
--William Goldman, alias S. Morgenstern
|
|
|
|
|
Kai Lawson
|
| Posted: Mon 12 May, 2014 3:14 pm Post subject: |
|
|
So I'm almost done. I annealed the tang today, and once the blade is etched, I'll assemble the lot of it with brass shims and epoxy, and peen it tight before the epoxy sets (to get a tight, snug fit and let the shims 'cure' to the hilt components). I have a new respect for Kirk Lee Spencer, as drawing clean lines on a gently curved metal surface proved trickier than I thought it'd be. I'm no artistic slouch, but maybe it was my sweaty hands, my fear of messing up and having to erase line, or something else, but I was awfully wiggly with my line work
The image is a 'serpent in the sword' motif, with a U shaped serpent head, but I wanted the 'body' to look scaly, hence the twists. As I intend to make this a fairly light etch anyway, I'm not too bothered by all the bunching and clumping of the lines.
Attachment: 103.92 KB
[ Download ]
"And they crossed swords."
--William Goldman, alias S. Morgenstern
|
|
|
|
|
Kai Lawson
|
| Posted: Thu 15 May, 2014 2:05 pm Post subject: |
|
|
Question for the DIY'ers here: should I worry about structural integrity if I want to step down my tang for the last 5mm or so? I'd take it down from 13mm x 4mm to something more like 6mm x 4mm, and partially hold on the grip with the small plate. Everything will be shimmed/glued/friction fit, but the plate will allow for the large tang to take up space in the slightly over-sized upper guard (I'd rather not fill it with JB weld and re-tap it unless I have to) while keeping the final peened bit small enough to pass through the pommel cap. Thoughts?
Attachment: 106.83 KB
[ Download ]
"And they crossed swords."
--William Goldman, alias S. Morgenstern
|
|
|
|
|
|
Lukas MG
Industry Professional
|
| Posted: Fri 16 May, 2014 3:01 am Post subject: |
|
|
That'll be fine I think. Just make sure you have enough material for peening (which isn't much, really). If you're doing a cold peen, too much material is really a huge pain. With a hot peen, it's not as much of a problem.
Looking stellar, btw!!!
|
|
|
|
|
Kai Lawson
|
| Posted: Fri 16 May, 2014 2:07 pm Post subject: |
|
|
Only a few steps left:
1. Scrub parts with scotchbrite
2. Insert brass shims
3. PEEN!!
4. Finish wire wrap
5. Cut stuff!! (I've done this already by just gripping the tang, which was enormous, and the blade performs very well.)
Next steps are the decorated, etched and blued metal scabbard and brass plated baldric
whew!
Attachment: 76.54 KB
[ Download ]
Attachment: 75.47 KB
[ Download ]
Attachment: 83.46 KB
The blade is dusty from filing and fitting things
it's not all that scratched up [ Download ]
"And they crossed swords."
--William Goldman, alias S. Morgenstern
|
|
|
|
|
Kai Lawson
|
| Posted: Tue 20 May, 2014 2:00 pm Post subject: |
|
|
I still need to clean up the peen and re-wrap places, and maybe a tweak or two here and there, but otherwise it's finished. Sorry for the shirtlessness, my garage is very humid, and I was very excited and had this taken immediately...
Attachment: 108.97 KB
[ Download ]
Attachment: 135.13 KB
[ Download ]
"And they crossed swords."
--William Goldman, alias S. Morgenstern
|
|
|
|
|
Kai Lawson
|
| Posted: Tue 27 May, 2014 10:04 am Post subject: |
|
|
It's done. The faux pattern welding isn't as nice as I'd like it to be, but I'll live with it as a first attempt on a beater sword.
Attachment: 90.61 KB
[ Download ]
Attachment: 80.35 KB
[ Download ]
Attachment: 85.32 KB
[ Download ]
"And they crossed swords."
--William Goldman, alias S. Morgenstern
|
|
|
|
|
Daniel Wallace

Location: Pennsylvania USA Joined: 07 Aug 2011
Posts: 580
|
| Posted: Tue 27 May, 2014 11:17 am Post subject: |
|
|
|
that grip came out good, I like the transition at the top and bottom of the braded wire wrapped with the single.
|
|
|
|
|
|
|

