I'm now on my second (failed) attempt at making a scabbard for my broken back seax and I could use some insight from some experts. I'm trying to make the scabbard in such a way that it follows the outline of the broken back part of the seax with the seam along the edge. I know it's possible and I'm sure there's a trick to it, but I can't for the life of me figure it out. I should say that I do have some leather working experience and I'm pretty good at wet forming leather. I'm convinced that there is more to it than just moulding the wet leather around the shape because that just results it the tip or the mouth springing back out along the straight part of the spine. So I'm guessing the trick must be a certain way to cut the leather beforehand, or some kind of sorcery. :wtf: To date I've ruined a decent amount of my leather supply and gravely wounded my pride, so I'm hoping somebody can point me in the right direction so my next attempt may be more fruitful. Thanks in advance, and I apologize for the whiny tone of this post.
- JM
I think you've discovered first hand why seaxe knife sheathes have the seam along the blade spine. Why in particular do you want to make one with the seam along the blade, considering that a historical mounting system is much easier with the top seam? If you are dead set for it, you may want to stretch the wet leather over a wooden form of the blade to give you the proper shape. You may have to curboile the sheath to keep it stressed into that shape.
First the leather needs to be vegetable tan, otherwise it won't mould right...
Next you will need grease/vaseline and saran wrap (sounds like the start to a sick joke)
Slather up that blade and wrap it up to keep it from getting rusty.
Wet the leather... let it dry to about tooling wetness and then form it about your knife using your fingers or tools to massage it into place.
Now you can sew it up and do your decoration on the leather add metal trim etc.
As far as the reasearch I have done... Seax are carried blade up towards the top seam.
| Tom King wrote: |
| I think you've discovered first hand why seaxe knife sheathes have the seam along the blade spine. Why in particular do you want to make one with the seam along the blade, considering that a historical mounting system is much easier with the top seam? If you are dead set for it, you may want to stretch the wet leather over a wooden form of the blade to give you the proper shape. You may have to curboile the sheath to keep it stressed into that shape. |
Most of the historical seax scabbards I have seen (or at least the remains of such) indicate that the seam was commonly oriented along the edge; often with metal edging riveted along the seam to reinforce the stitching. Period artwork depicted broken back seaxs tend to support this. I suppose it's plausible to have the seam on the spine as well, but for me it's really more of an aesthetic choice.
Hi Josh,
Lay out a piece of veg tan and fold in half so that it has maybe 25mm surplus above the edge of the knife i.e quite a bit to spare.
Wet it down, but not soaking wet so if the leather is 2.5mm thick (sorry don't know the oz weight - different system over here) about 10 seconds immersion max and 3.5mm 20 seconds max. do not leave to soak for 5 minutes or similar.
place blade in folded leather and rub down along spine to form it to this edge. Hold it down then rub down along clipped edge and mould it to this edge. A large crease will form at the juncture of the two angles and the previously rectangular piece of leather will now have a kink caused by the clipped point. Rub the crease down and any smaller creases that form until it is flat and keep at it every 20 minutes for the next couple of hours. I find a long evening of bad telly works well.
When it has dried a little and is holding its form lay on a straight edge and trim the kinked up bit off to create a straight.
Not hard, just takes some time and continued attention. Try it will a bit of 1.6mm to get the vibe and then you will see how to tackle the thicker leathers.
I hope that helps
Tod
Tod (as you might expect) has the trick of it; allow yourself plenty of surplus along what will become the straight, uppermost blade edge rather than trying to start with it cut to more or less the right size and shape.
What I do is, in principle, the same as Todd but I shorten the process and get around the kinking problem by doing some stitching whilst wet forming. I form it over the handle and up the blade as far as the 'break' and then stitch the seam up to about half that distance.
Then I alternate between starting to form the leather around the angle of the blade and generally stretching the leather away from the angle. The stretching pulls out the kinks that Tod describes. Once I've got the shape i want, I use two bits of smooth perspex to clamp the leather along the straight blade edge until it's dried.
I find this works better than trying to just stitch the edge up as the leather can tear around the stitch holes as it dries and tries to shrink back.
Regardless of weight, I soak mine until it's stopped bubbling, usually takes 30 seconds max. If it's still fizzing, it' still got air in it...you don't want that.
| Tom King wrote: |
| I think you've discovered first hand why seaxe knife sheathes have the seam along the blade spine. Why in particular do you want to make one with the seam along the blade, considering that a historical mounting system is much easier with the top seam? If you are dead set for it, you may want to stretch the wet leather over a wooden form of the blade to give you the proper shape. You may have to curboile the sheath to keep it stressed into that shape. |
I have never seen one (an original) with the seam along the spine... I do not doubt they exist, only I have never seen one. Do you have any examples?
I do it very much like the others have described, but I also spend some time stretching the the leather at the 'hump', using the corner of a piece of 1/4" plexiglass, it seems to help minimize the kinking.
Thanks to Matt and Tod for your advice! It was very helpful. I finished up the scabbard a while back and I'm pretty happy with how it turned out; quite a learning curve for me. Here is the result. More pictures of whole project in the "Show us your Saxes" thread. Feedback welcome! Thanks again.
 Attachment: 141.67 KB
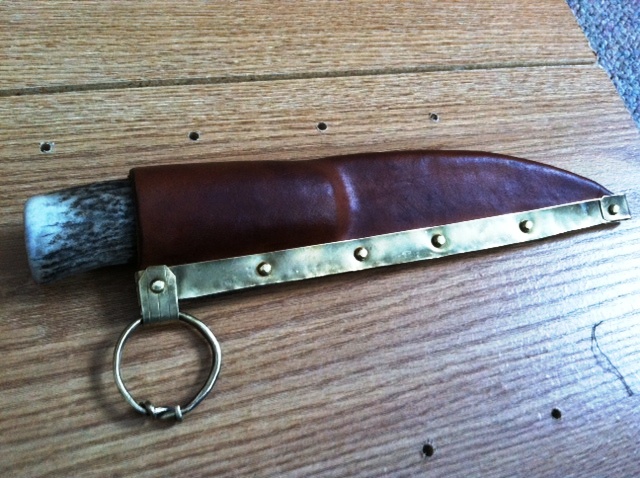
Nice one! Now make some notes for yourself on what I'd do different/better next time so you can assess things for your next project.
Looks great Josh, really crisp and well executed.
From a purely personal point of view I really like the stepped area of transition from handle to blade, but you may find after a while that the point of the knife starts to make its own path through the shoulders and a lack of transition at this point may make for a longer lasting sheath.
Good work though.
Tod
Page 1 of 1
You cannot post new topics in this forumYou cannot reply to topics in this forum
You cannot edit your posts in this forum
You cannot delete your posts in this forum
You cannot vote in polls in this forum
You cannot attach files in this forum
You can download files in this forum
All contents © Copyright 2003-2006 myArmoury.com — All rights reserved
Discussion forums powered by phpBB © The phpBB Group
Switch to the Full-featured Version of the forum
Discussion forums powered by phpBB © The phpBB Group
Switch to the Full-featured Version of the forum