| Author |
Message |
Julien M

|
 Posted: Sun 26 Jun, 2016 11:58 am Post subject: Posted: Sun 26 Jun, 2016 11:58 am Post subject: |
 |
|
| Gary Gibson wrote: |
Can you please detail the methodology / process for slotting the hilt and (1-piece) pommel ?
|
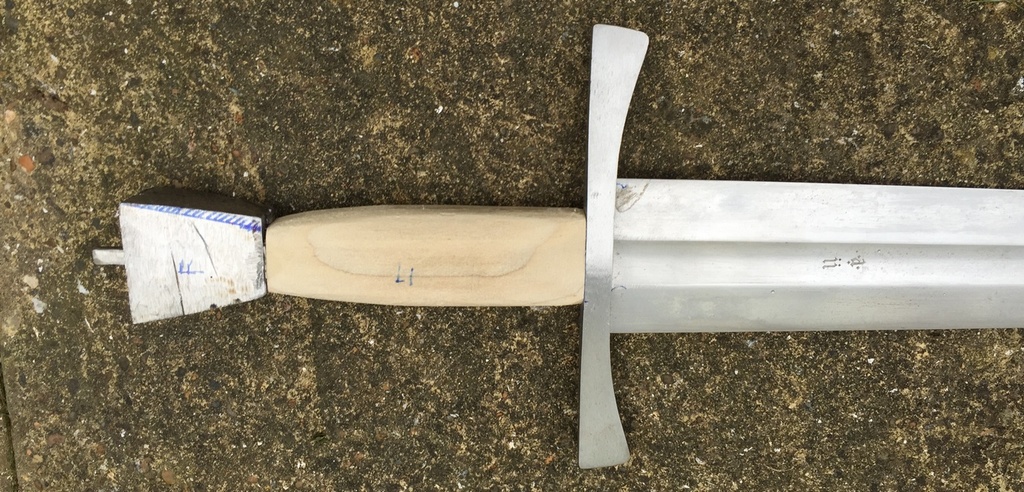
Thx Gary! I measure the tang thickness and width - trace the shape (a rectangle) with a fine sharpie on the guard. I drilled 4 holes as close as I could. Take a smaller bit that your pattern, and use a plunge attachment for it.Once you have your holes use a dremel with carbide cutters to remove the walls between the holes. Finish with the file, checking if the tang fits in regularly, you want to stay close to get the best fit possible (the best is for you to be able to hammer down the fittings). For the pommel, as shown above I've simply traced the tang on the inside, then cut guiding groves with an angle grinding cutting disk, then used these to stabilize the grinding with a grinding disk. Then I used the power file to flatten the pattern down. Once the tang was sitting in it, I closed the pommel - arc welding it. Hope that makes sense 
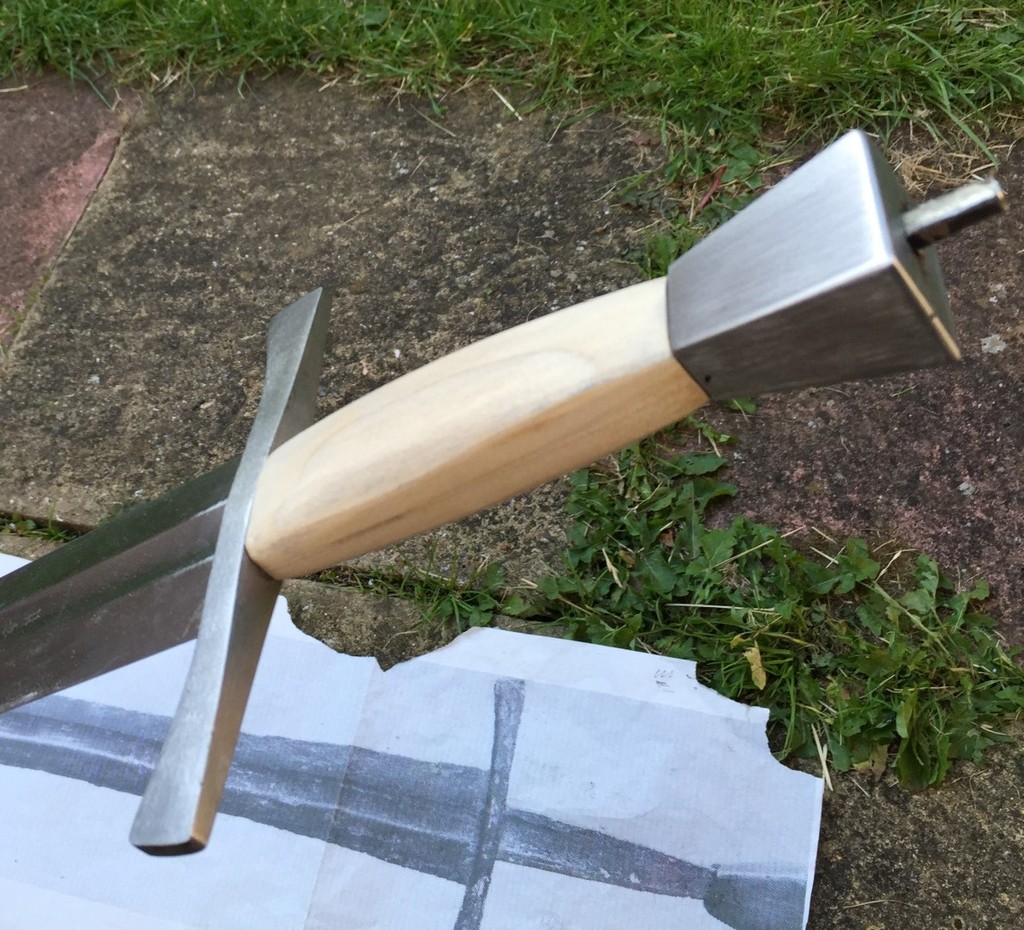
Some progress. After a bit of grinding, the weld of the pommel snapped. That was expected, it's the shaping phase and I'm eating away a lot of metal on all sides and the weld along with it. Welded again, this time moving slowly along, dragging the puddle as I've seen online. Quiet a difference - getting more confident with this. There are still gaps where the two parts join, but most will go away with the final grinding on the belt, if any persist I'll fill them with weld later (same goes for the tang hole at the top, that I will narrow as much as possible for the peen). On the picture I've traced what I need to remove on one side. I'll be very close once it's done. Progressing slowly allows me to align the fittings on the tang precisely - so nothing gets misaligned. Refining the grip at the same time, planning to do it slightly angular (4 sides matching the pommel faces+ roping effect on the edges like the falstoff sword in Norwich).
Point of balance is now 10cm down the guard where it should be, total weight: 1170g, also as expected. All goes well, ETA end of next week.


|
|
  |
 |
|
Scott Kowalski
Location: Oak Lawn, IL USA Joined: 24 Nov 2006
Posts: 818
|
 Posted: Sun 26 Jun, 2016 12:40 pm Post subject: Posted: Sun 26 Jun, 2016 12:40 pm Post subject: |
 |
|
The pommel is coming along nicely Julien. I like how you went about creating it.
Chris Landwehr 10/10/49-1/1/09 My Mom
|
|
  |
 |
Julien M

|
 Posted: Mon 04 Jul, 2016 1:00 pm Post subject: Posted: Mon 04 Jul, 2016 1:00 pm Post subject: |
 |
|
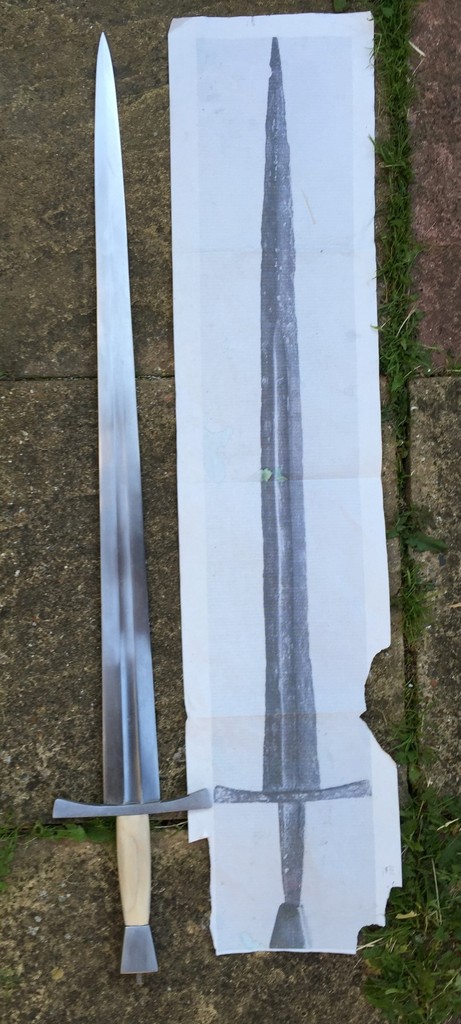
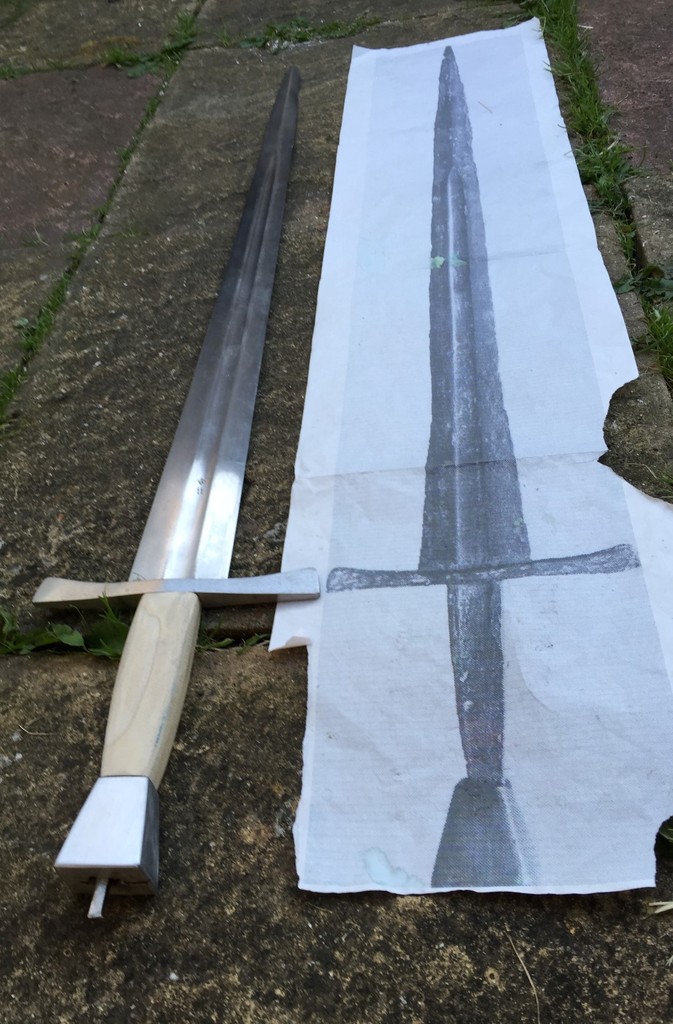
Ok I'm almost done here - got the pommel where I want it, well centered on all sides sitting nicely on the tang and very very close to the original. I will narrow the tang hole at the top with weld, will also fill any pits - then I will pin. I will also thin down the guard quillons, but from this point it's fine tweaking. I may also round the angle on the pommel a bit more - haven't decided yet if it enough or not.
I've also cut an inch at the tip of the blade and started re profiling it - it will be more slender when I'm done. There were subtle grinding mistakes that cost this blade it's place in the next gen line - slightly wavy towards the tip so it needed fixing anyway. Cutting one inch off also happen to match precisely with the length of the copenhagen sword, and I'll manage to finish the profile nicely.
I'll move on to the grip next, which will be 4 sided with roping effects like the Falstoff sword below.
Hope you like it!
J


|
|
  |
 |
Julien M

|
 Posted: Wed 06 Jul, 2016 1:37 pm Post subject: Posted: Wed 06 Jul, 2016 1:37 pm Post subject: |
 |
|
Rounded the pommel further (no pics yet). Total weight 1028g. Pommel weight 207g: is that too light? the Spare pommels I have weight a little more, around 240g. When I lay the hilt parts on the original sword pics, I'm bang on thought, and everything matches all measurements I have fort his sword (pommel especially).
The sword fells very good in hand, the point of balance is at 10 cm down the guard...but I have the feeling it could feel even better in hand with slightly more weight towards the pommel (some swords virtually feel weightless with proper balance, that's what I'm aiming for). Since I will reshape the last third of the blade towards the point to match the original (more slender if I have enough thickness), it may do the trick - so I will sit on this and not make any harsh decisions. If not it may just be fine once everything is secured in place (I'm judging this with an assembly secured by the pommel hammered with a piece of paper inside, which is enough to require hammering the other way around to take it out, but still, the wooden grip moves along a bit so it may skew things a bit. If I need tweaking, I'll have two options, lengthen the grip to move the pommel further up the tang, weld a slice on top of the pommel and grind some (I've got only 1.5 cm thick plate, which will be too much...that would be a lot of hassle for a vague feeling, not to mention that I'm not I.33 fighter...I can judge a sword balance to a good degree, but I'm in the end no expert.
Anyway, let me know your thoughts, as I will move fast on peening this one.
cheers,
J
|
|
  |
 |
Luka Borscak

|
 Posted: Wed 06 Jul, 2016 1:42 pm Post subject: Posted: Wed 06 Jul, 2016 1:42 pm Post subject: |
 |
|
|
Some of the sword makers I respect the most say the lighter the pommel you can manage, the better. Since your PoB is good and overall weight is low, I would go with lighter pommel.
|
|
  |
 |
|
T. Kew
Location: London, UK Joined: 21 Apr 2012
Posts: 256
|
 Posted: Thu 07 Jul, 2016 10:40 am Post subject: Posted: Thu 07 Jul, 2016 10:40 am Post subject: |
 |
|
It's worth noting that the pommel of the original may be hollow or partially hollow: even if the dimensions are the same, that could be throwing your weights off.
HEMA fencer and coach, New Cross Historical Fencing
|
|
  |
 |
Julien M

|
 Posted: Thu 07 Jul, 2016 11:51 am Post subject: Posted: Thu 07 Jul, 2016 11:51 am Post subject: |
 |
|
| T. Kew wrote: | | It's worth noting that the pommel of the original may be hollow or partially hollow: even if the dimensions are the same, that could be throwing your weights off. |
Yes considered that - but with identical dimensions one would expect my pommel, that is mostly solid, to be somehow heavier. I don't know the weight of the original pommel, so it has to be a guess. That said, the balance is far from being off, and I have no clue how the original sword handles too. I find the overall balance to be very slightly forward, even thought the POB is right. The more I think about it, the more I think it's fine, especially considering I will grind off some mass off the lower third of the blade.
Thing is, I do have a spare wheel pommel and the temptation to use it remains instead of fitting this rather unusual chunk of squarish metal - that might appeal to more people aesthetically...but I like the idea that it matches the original sword closely - plus it kind of grows on me even if it's appeal was not obvious at first. Same goes for the grip - an Albion leather + cord imprint would do well, but I want to try something else rather than go down familiar avenues.
| Luka Borscak wrote: | | Some of the sword makers I respect the most say the lighter the pommel you can manage, the better. Since your PoB is good and overall weight is low, I would go with lighter pommel. |
Thx Luka, will do!
|
|
  |
 |
|
Radovan Geist
|
 Posted: Thu 07 Jul, 2016 11:18 pm Post subject: Posted: Thu 07 Jul, 2016 11:18 pm Post subject: |
 |
|
I really like this. At first sight, the sword looks like a thing from the 1970s movie:) But it is definitely an interesting piece, and if it handles well, I would keep the original idea and use this atypical pommel. There are so many disc-pommel swords in the world... 
The way youīve made your pommel is interesting. You could actually make hollow pommels like that, but then I suppose itīs more time consuming than simply cutting & shaping it, and then grinding the tang-hole.
Recently Iīve acquired a TIG welder - itīs more expensive and little more difficult to use, but it gives superb results compared to classic arc welder - much cleaner and more precise welds.
|
|
  |
 |
Sean Flynt

|
 Posted: Fri 08 Jul, 2016 7:26 am Post subject: Posted: Fri 08 Jul, 2016 7:26 am Post subject: |
 |
|
I think it looks great, and I'd like to see it finished. I actually like yours better than the original that inspired it. I'd like to see what it looks like with a wheel pommel, but I would tend to continue along the current path unless the wheel just screams that it belongs on that sword.
Rather than try to widen the top of the pommel, I think I'd just narrow the foot. It's impossible for me to tell how it feels in the hand, but if it were on my bench I think I'd want the grip rounded a bit and reduced all over, especially at the top. Sloping the pommel to a narrower top of the grip would give the same visual effect of widening the top of the pommel. Try it with clay or balsa and see if that makes sense.
My best advice at this point would be to put away the photos of the original and finish it as a representative of a sword of that type and in a way that looks and feels right to you. Good photos and stats are wonderful inspiration, but can be tyrannical.
-Sean
Author of the Little Hammer novel
https://www.amazon.com/Little-Hammer-Sean-Flynt/dp/B08XN7HZ82/ref=sr_1_1?dchild=1&keywords=little+hammer+book&qid=1627482034&sr=8-1
|
|
   |
 |
|
Jonathan Hodge
Location: East Tennessee Joined: 18 Sep 2015
Posts: 132
|
 Posted: Sun 10 Jul, 2016 8:10 am Post subject: Posted: Sun 10 Jul, 2016 8:10 am Post subject: |
 |
|
|
Very nice work Julien. Also, glad to see you stepping out to try new tools and techniques. I've been wanting to learn some welding techniques myself. This has given me some renewed gumption to give it a try.
|
|
  |
 |
|
Fisher Lobdell
|
 Posted: Sun 11 Dec, 2016 11:24 pm Post subject: Posted: Sun 11 Dec, 2016 11:24 pm Post subject: |
 |
|
Nice work! Wish you would have kept the bit that protrudes down the blade. Though it wouldn't be like the original. 
"Absence of evidence is not necessarily the evedence of Absence." Ewart Oakeshotte.
|
|
  |
 |
|
Eric Lu
|
 Posted: Tue 13 Dec, 2016 9:25 am Post subject: Posted: Tue 13 Dec, 2016 9:25 am Post subject: |
 |
|
|
Beautiful work. Love the look of this sword already!
|
|
  |
 |
Julien M

|
 Posted: Sun 13 Feb, 2022 11:04 am Post subject: Posted: Sun 13 Feb, 2022 11:04 am Post subject: |
 |
|
Hi all,
After a long break from sword tinkering and a long detour into miniature wargaming I am back at the workbench...to finish this project, among others (started in 2012 so a fast paced 10 years in the making  ). ).
I could have wrapped it up sooner as the pommel was pretty much done - just needed to be peened, but I was slightly bothered by the balance of the sword (was good, but this is an Albion blade and it deserved to be spot on).
Just bought an small flux welder and welded a plate of 8mm steel on top of the pommel. A lot of efforts for what can seem to be fine tuning but considering how the sword now feels in hand I think it was well worth it ('balanced like a good fishing rod' as Mr Oakeshott would out it). The welding left a few spots here and there which would have bothered me in the past...as I try to fill them a do more damage right next to it so I'll live with it (for now  ). ).
Next onto the grip and scabbard (I'm still considering a different grip choice than the usual cord over leather and still considering sthng like the Falstaff sword above, with longitudinal ridges that could complement the pommel straight angles pretty well).
Now onto the A466, with bronze sand cast grip and pommel.


|
|
  |
 |
|
|
You cannot post new topics in this forum
You cannot reply to topics in this forum
You cannot edit your posts in this forum
You cannot delete your posts in this forum
You cannot vote in polls in this forum
You cannot attach files in this forum
You can download files in this forum
|
All contents © Copyright 2003-2024 myArmoury.com — All rights reserved
Discussion forums powered by phpBB © The phpBB Group
Switch to the Basic Low-bandwidth Version of the forum
|

