Go to page Previous  1, 2

Hello,
There is loads of variation historically. I was simply mentioning what I find easiest to use to create the desired result.
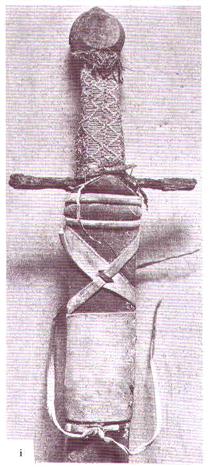
About the suspension... I would really not be scared away from lacing it as per the Peter Johnson directions, it's really not that hard. Even with thicker stuff. You may want to soften the leather up a bit before you lace it, but it's not necessary.
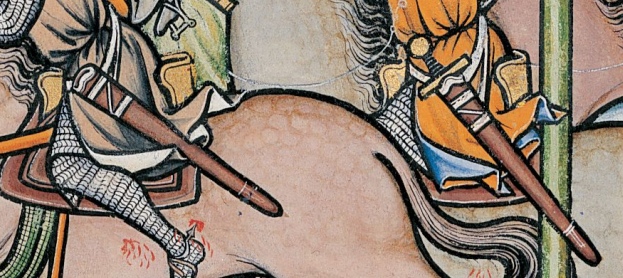
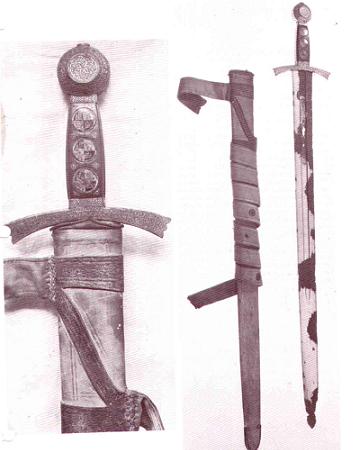
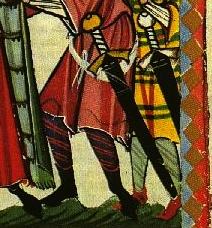
Here are a few images of laced scabbards.
Best,
Hadrian

P.S. What year/ region are you going for? That will help in determining the exact form of lacing and such you may want... as well as what is historically most sound.


 Attachment: 137.13 KB
Maciejowski scabbard lacing.jpg


 Attachment: 21.51 KB
Sword of King Sancho IV of Castile, circa 1298..JPG


 Attachment: 24.14 KB
Sword of the Infante Fernando de la Cerda, circa 1270..JPG


 Attachment: 42.75 KB
tempora nostra.jpg


 Attachment: 39.46 KB
Maciejowski bible lacing II.jpg

I've done a mock up with paper and I think I will likely try to follow Peter's illustration, now that I understand it. I may change my mind once I get the leather for the belt in hand and get a feel for it.

I'm not terribly concerned with time period or place. I really just want it to match the sword. Albion dates the knightly to the second half of the thirteenth century. I assume this is fairly accurate. Historical accuracy is not a huge deal for me but at the same time I don't want any huge glaring problems. Chances are that even a smaller problem will bug me down the road as I become more discerning. At least that's the way it's gone so far. Which is of course why I bought this sword to begin with.
Update:

I typed up a big update but then waited too long to post it and got automatically signed out. I don't really have the energy to retype the whole thing so I'm going to do a short version.

I sewed the leather on wet but haven't dyed it yet. My dyes are oil based so i didn't think it would be worth doing at the same time. Any experience during this process?

I'm a little worried about the upper set of risers. In retrospect i probably shouldn't have pressed the leather down between them as that's the leather that's going to be cut into slits. I'm afraid the depressions may not looks o great over the belt. We'll see I guess.

Also, the chape turned out a little big. It's not a huge deal, but enough to bug me. I'm not really sure what to do about it. I might just make a new one.

Also there was a split on the seem of the wood core that I thought would just get glued shut when I glued on the leather. It did but some of the epoxy got inside the slit and I noticed some on the blade. Epoxy isn't corrosive is it? that would pretty much ruin the scabbard. I've had that experience with wood glue before.

Anyway, here are some pictures,


Finished Dyeing the scabbard. Next time I'll dye first and cut the loops afterward. The slit areas absorbed more dye than the rest of the leather.
I decided that the leather for the belt was really too thick for the more complex lacing pattern so I went with something a little more simplistic.
I'm going to order a lighter dye to do the belt, I think. The scabbard came out a lot darker than I thought it would. I'm tempted to leave the belt natural but i think I'll try something at least a little darker, perhaps a dark tan.
What do you guys think of the lacing pattern? Historically plausible? Next time I'll be sure to get some thinner leather for the belt.


Hi Nathaniel,

Very clean work on the wood core and leather covering. I like the well defined risers and scabbard mouth a lot. Simple, but well made all around. Hard to say from your last blurry picture (with the laced suspensions on) but the sewing (which you nailed on the back of the scabbard) does not seem to have been made with equal care to secure the lower belt (in fact, it seems to have been done in a hurry :)

I like the overall lacing pattern, and as far as I am concerned it does look "historically plausible" and is also aesthetically pleasing, it looks a bit loose though...on the pictures at least (maybe damping/molding the leather a bit would not hurt). The thickness of the leather belts seems right to me btw (3 mm thick?)

Anyway...very nice work and looking forward to see the final piece.

Cheers,

Julien
Your quite right. I did that lacing sometime around 3 in the morning. I wanted to see what it would be like assembled but i don't plan to keep that lacing. The belt has a lot of extra length so I will very likely do that part over. I'd also like to dye the belt and i think that would be easier done off the scabbard. I'm going to have to wait for some lighter colored dye to get here because I like the contrast between the belt and scabbard but I don't want to leave it totally plain.
Hi Nathaniel,

Your scabbard is looking really good. I would most definitely recommend coloring it off of the scabbard. What I do for lighter colors is take a base color I like and delute it for a lighter version. But I wouldn't leave it uncolored, as that just looks unfinished.

Once again, looking good. I like your chape work.

Brian
I like the clean "no opening" look of the back seam stitch. Did you tuck a fold underneath each side to get such smooth edges at the joint?

Also, I am wondering what brand and type of die you have. Fiebings is fairly easy to use at the stage that you are at.
Yes I'm using Fiebings "light" brown. I don't think it came out very light though. This also pertains to the question I have.

Brian mentioned diluting dyes. Can I dilute Fiebings oil dye with water? I assumed not sense it's an oil based dye but I could easily be wrong.

As far as the back stitch goes, I'm not really sure what you mean. I didn't fold the leather over or anything. I sewed it while the leather was wet which allowed me to pull the leather really tight and cinch each stitch up really well.
Nathaniel C. wrote:
Brian mentioned diluting dyes. Can I dilute Fiebings oil dye with water? I assumed not sense it's an oil based dye but I could easily be wrong.


Fiebing's makes a product call Dye Reducer that can be used to dilute the oil dyes, I wouldn't think water would work very well.

Your project is turning out very nice.

Ron
Thanks I'll have to try get some of that. Oh and I should mention, your website was very helpful.

I also spent a lot of time looking an Brian's work.

Nothing will get you inspired to make your own scabbard more than looking at other people's scabbards.
Nathaniel C. wrote:

Brian mentioned diluting dyes. Can I dilute Fiebings oil dye with water? I assumed not sense it's an oil based dye but I could easily be wrong.


I've always used water to dilute regular Fiebings dye. never had a problem with that. Just try it on a small piece of scrap leather.

Cheers,

J

PS: mind you I use the regular alcohol based Fiebings...not the "oil" based ones...wonder if there is much of a difference there.
Update:

I tried dyeing the belt a lighter tone but it came out as almost the same hue as the scabbard. I wanted a two tone look for contrast though so I decided to go darker with the belt. It's "mahogany" which I actually really like. It's a nice dark brown with almost a hint of red or even purple.

Oh and as an aside to the issue earlier when the scabbard expanded and didn't fit anymore. That's completely gone. The sword is actually a little on the tight side now. I still have some polishing and sharpening to do to the blade so that may loosen things up a bit. Hopefully it will be the perfect fit when I'm done.


The buckle is cut out of barstock, the tongue is made out of 16 gauge steel, and the plate is 18 gauge. I used nails to make the rivets. They worked pretty well but I had to anneal them first.


Nathaniel,

I've been watching your project progress with great interest. You have have managed to produced one damn fine scabbard and leave this forumite green with envy. Your attention to detail is noticeable; the stitching, lacing, chape and belt are all well executed. You even had to go and make your own buckle! :cool:
I think the dyeing on the belt made a world of difference. I know it wasn't quite according to plan, but I really like how those colors turned out.
Definitely something to be proud of.
If you ever decide to make a second one, you should try experimenting with some simple tooling designs.
Thanks.

I would like to try my hand at tooling sometime soon. As neat as I think this scabbard turned out, making something like this usually just makes me want to go on and make an even better one. It's very addictive. So hopefully I'll get to do another soon and that may very well include some tooling but I should probably practice a little first.
Go to page Previous  1, 2

Page 2 of 2

Jump to:  
You cannot post new topics in this forum
You cannot reply to topics in this forum
You cannot edit your posts in this forum
You cannot delete your posts in this forum
You cannot vote in polls in this forum
You cannot attach files in this forum
You can download files in this forum


All contents © Copyright 2003-2006 myArmoury.com — All rights reserved
Discussion forums powered by phpBB © The phpBB Group
Switch to the Full-featured Version of the forum