Posts: 1,377
Mon 13 Sep, 2010 6:30 pm
Small project: modified Hanwei Cromwell mortuary sword
A few weeks ago I acquired a pre-owned Hanwei Cromwell mortuary sword. The previous owner had used it for HEMA practice, therefore it had been blunted and there was a lot of wear to the painted hilt and metal scabbard fittings. Additionally, the scabbard was dyed black, but had been scuffed as it was frequently wore at faires.
Given the sword's very used condition I thought it would make for a fun project sword. I kept things simple since I do not have tools or skills for handiwork. Since much of the black and gold paint had worn off I decided to remove the rest of the paint from the hilt and scabbard fittings. I applied a paint remover gel and let it site for a few hours. I then used a paint remover cleaning agent to, uh, remove the paint remover. This process helped remove most of the blade paint, but ghostly footprints of gold paint remained, as did some stubborn black paint on the inside of the guard. At first I accepted the results as good enough. However, after a few days I decided that I really wanted a clean metal hilt, and a unique mortuary hilt rather than a faded Cromwell. I then applied Break Free CLP and scrubbed the remaining paint off with a Scotch Brite pad. I then gave the sword a wipe with a clean dry cloth, and a final wipe with a silicone-impregnated gun & reel cloth. I treated the scabbard leather with Pecard Antique Leather Dressing. It darkened the scuffs and gave the black portions a nice luster that adds to the used/antiqued look of the overall package.
Once I had all my materials the process took only a few hours (2 of which were for the paint remover to do its work). The metal does not seem to be one that will ever have a bright shine, but that is fine since I like the used antique look it has now. I hope to re-sharpen the blade in the future after I get some instruction on the process. The Cromwell seems like a decent sword for the money (new or used). It makes compromises in terms of construction and materials, but that is to be expected in its price point.
I am happy with how the hilt and scabbard fitting turned out. I feel that I have a unique used-looking mutions grade mortuary sword at an attractive price.


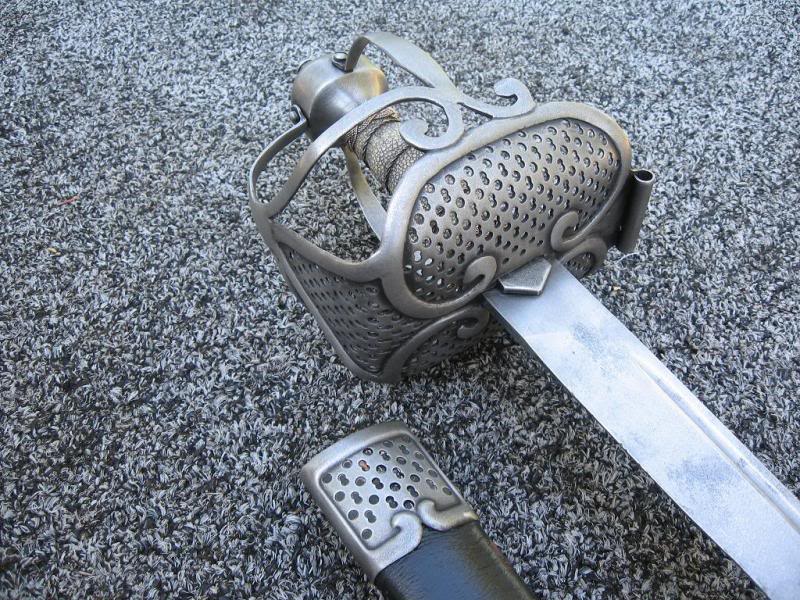
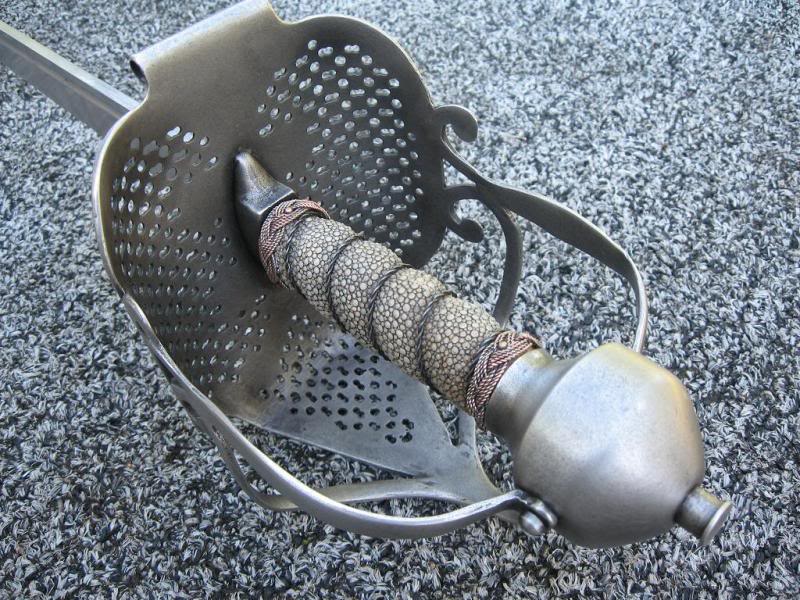
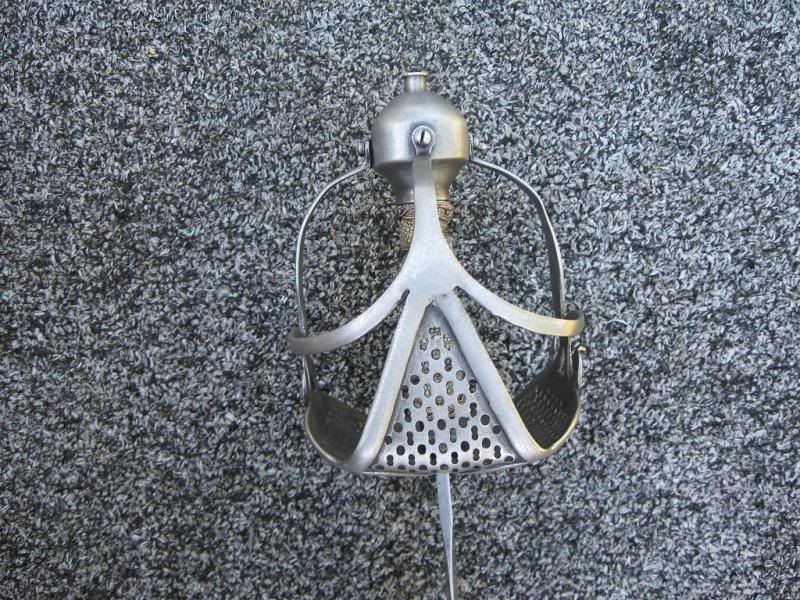
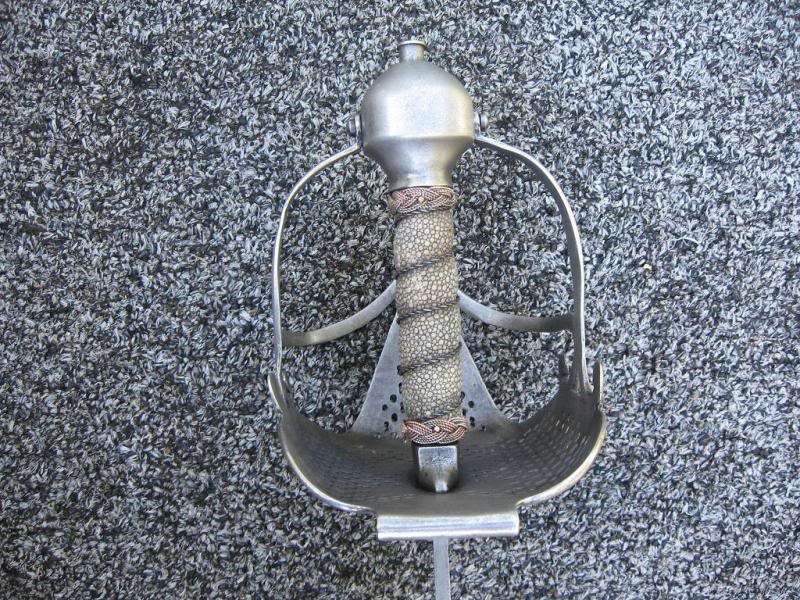
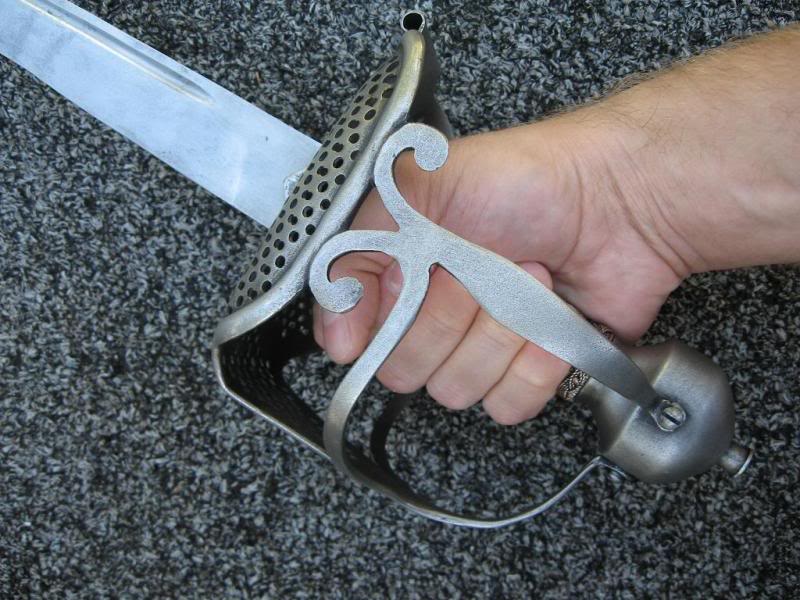
Last edited by Jonathan Hopkins on Mon 13 Sep, 2010 6:38 pm; edited 1 time in total
Posts: 11,553 Location: San Francisco
Mon 13 Sep, 2010 6:36 pm
Wow. A completely different looking sword. What a transformation!
Posts: 834
Mon 13 Sep, 2010 6:46 pm
Hello
I like it:-) Good job!I was thinking of, reworking one, with a deferent blade,as I thought the tang on the Hanwie blade was rather thin.What did you think of the tang?
Posts: 487
Mon 13 Sep, 2010 10:02 pm
Hummmmm....Cromwell in closet......scotch bright pad and paint remover....seems my Saturday is now spoken for!! Great job, Jonathan. Looks outstanding!
Posts: 4,393 Location: Northern California
Mon 13 Sep, 2010 10:20 pm
That sword looks a lot better without the paint. The shape of the hilt comes to the front, after hiding behind all the ornamentation.
Posts: 8,310 Location: Montreal,Quebec,Canada
Mon 13 Sep, 2010 11:42 pm
Looks really good as campaign worn but well taken care of.
The little of the blade I can see in close up doesn't look too banged up considering it was used as a blunt and it should be easy to re-sharpen without having to deal with deep dings of notched blade. ( I'm assuming that the rest of the blade is close to the same ).
The heat treat of the blade must be good otherwise it would look a lot more like a saw blade if it was used hard in training.
I'm curious also about the size of the tang ? If the sword survived heavy use the tang may be adequate even if it looks thin ?
Posts: 1,086 Location: Austin TX
Tue 14 Sep, 2010 1:47 am
Nice patina on that hilt.
I'd give a spray of salt and white vinegar on the blade (especially the fueller) and hilt to bind those together, other than this the sword looks really good.
Cheers,
J
Posts: 1,377
Tue 14 Sep, 2010 5:51 am
Thank you for your comments! I like it better sans paint. As Roger said, it brings out the details of the hilt, and makes the sword a bit more unique. This might be a nice, simple project for ECW living history for a budget-minded re-enactor who is not ready for a custom sword but does not want to have the same Hanwei as everyone else.
I did not remove the hilt so I did not see the tang. This is because I did not need to do so in order to remove the paint, and also because I would be afraid that it might not go back together as planned! The blade must have a decent temper since the previous owner used it for HEMA practice against Albion Maestro Line swords. For now I will accept that the tang is good enough for my purposes.
Julien, thank you for your suggestion. I will concoct a salt and vinegar spray and give the blade some age, too. I was not sure how the hilt would look after removing the paint, but now that it has an aged look I think some age should be added to the blade. The blunted edge is a bit uneven, which is something I actually like about it. I hope to keep the slight undulations in the edge after sharpening to enhance the used look. Some of my 18th century and early 19th century pieces have uneven edges after years of repeated sharpening, so it is an aesthetic with which I am familiar. :)
Just a few comments on the sword apart from this little project--
This is a solid sword with no looseness or rattling even after a few years of HEMA use. The weight and balance is not too far from that of an English dragoon's sword c.1740-50 in my collection (which I see as a good thing). This alone makes me happy with the purchase.
Some materials and design elements miss the mark in the historical accuracy category. It has been a while since I have had face time with a period mortuary sword, but I believe that like most replicas the basket is over-sized. The tang button looks very modern as it is a perfect cylinder. The knuckle bow lacks the graceful curve of the original and is bent at a nearly 90 degree angle. The blade (which is very stiff, by the way) is a completely different shape from that of the original Drogheda sword. The scabbard seems to be metal (or fiberglass?) covered with leather. The scabbard only grips the sword's langets, so the fit is not tight and the tip rattles around inside. The throat of the scabbard is mounted backwards (the frog button/stem should face outward rather than inward).
In spite of its historical flaws it is a nice sword and easy to change my simply re-finishing the hilt. One could blue or brown the hilt, or file/remove parts of the hilt to make the sword even more unique.
Thank you all for your comments!
Jonathan
Posts: 1,377
Tue 14 Sep, 2010 5:57 am
| Jean Thibodeau wrote: |
| The little of the blade I can see in close up doesn't look too banged up considering it was used as a blunt and it should be easy to re-sharpen without having to deal with deep dings of notched blade. ( I'm assuming that the rest of the blade is close to the same ) |
Oh, yeah... There are no notches in the blade, and the blunt portion is relatively thin so sharpening should not be too great an undertaking! :)
Posts: 1,001 Location: Roanoke,Va
Tue 14 Sep, 2010 6:35 am
nice job there indeed Jonathan....good to finally see some photos after hearing about it for a good while now ;)
As far as taking it apart...no real biggie.....I've had mine taken down and put back together rather easily.
cheers,
Bill
Posts: 630 Location: Tucson
Tue 14 Sep, 2010 12:48 pm
Sorry to come in late to the chorus Jonathan but that looks good!!
I have always liked the pierced design on the Cromwell sword. That looks like a good sword for an Ironside! TR
Posts: 1,968 Location: Nipmuc USA
Tue 14 Sep, 2010 2:02 pm
Hi Jonathan,
Does a magnet stick to the various fittings? I ask, as I have a Hanwei spontoon and while the threaded socket and blade are magnetic, the tails/langets of socket are very neatly welded on and are non-magnetic stainless. Of course, I was completely done with fitting that before checking to see if I could easily rusticify the color to age it.
Cheers
GC
Posts: 552 Location: San Jose, CA
Tue 14 Sep, 2010 4:54 pm
I own one of those Cromwell's. I dulled the edge and rounded the tip to use in side-sword classes. It's held up pretty well to jarring impacts with other blades, but I have few suggestions.
1) Lock-tite the screws and pommel nut (tang nut) since these loosen up with use. I used blue lock-tite since this allows me to possibly remove the screws in the future.
2) If you use the sword as a blunt practice sword I'd hammer the edge up to harden it.
I also noticed when I disassembled it that the grip is plastic covered with ray skin and the scabbard gets looser as it used more and is most definitely fiberglass.
For the money it's a good sword to get new, but you could probably get a better made practice blade than I did of the type from Darkwood or A&A. For me, it's filled a nice niche in my practice sword lineup.
Posts: 466
Tue 14 Sep, 2010 7:25 pm
He wants to sharpen it, so I don't think he needs to hammer the edge.
Also, I wanted to me-too and say I like the sword without the paint as well. However, we all say this with our modern eyes. Wouldn't the paint have been preferred in period?
Posts: 1,001 Location: Roanoke,Va
Tue 14 Sep, 2010 7:44 pm
| Colt Reeves wrote: |
He wants to sharpen it, so I don't think he needs to hammer the edge.
Also, I wanted to me-too and say I like the sword without the paint as well. However, we all say this with our modern eyes. Wouldn't the paint have been preferred in period? |
the original Cromwell Drogheda is black lacquered (japanned) but the majority of mortuary hilts were not painted at all. Heat treated or chemical gun blueing may be avenue's the help keep the rust at bay..........
Posts: 1,377
Wed 15 Sep, 2010 4:18 pm
Thank you for the nice comments!
Glen, I will try a magnet and report back! :)
Posts: 487
Sun 19 Sep, 2010 9:36 pm
Monkey see.......
Well, after having ben inspired, I attacked my Cromwell this evening and was delighted in the change! I want to thank Jonathan for the inspiration. I can honestly say that the Cromwell has suddently gone from one of my least favotite pieces to one that I will now display rather than let it sit hidden in the closet. Removing the browning and the decorative gold paint has made quite a difference as Johnathan's pictures attest. My method differed from his only in not using any paint remover and going straight to using various grits of sanding sponges to get down to the base metal. As I have examined the piece in the white, I think it's pretty evident that the Hanwei process involved casting, not blacksmithing. I could see no evidence of hammer marks, etc but the quality of the finish on the iron was evidently an artifact from the casting process. Although I'm not satisfied with the finish, I think an evening or two with 400-800 grit emory paper will get past most of the minor pitting in the casting.
Also, Donny Shearer once told me that if you heat the throat of the scabbard gently, the glue detaches and one can turn the throat around so that the locket is facing outwards. At the risk of losing the scabbard (yes, it is fiberglass with a leather covering), I'm going to give it a try. The worst that can happen is that I have a scabbard making project in front of me with the metal fittings from the original scabbard. I'll give that a try in the next week or so and report back on the results.
Again, thanks, Jonathan for the inspiration to do a little "improving" on the original product!
Posts: 455 Location: Thailand
Mon 20 Sep, 2010 5:22 am
So now that the finish is kaput, is anyone going to add some detailing with files, chisels, or Dremel?? Those unadorned side bars and branches look awfully plain. Maybe just round them a little?
--ElJay
Posts: 1,377
Mon 20 Sep, 2010 5:39 am
A Dremel is on my Christmas wish list. :)
Posts: 1,377
Mon 20 Sep, 2010 5:44 am
Re: Monkey see.......
| GG Osborne wrote: |
| Again, thanks, Jonathan for the inspiration to do a little "improving" on the original product! |
I am glad you tackled this, too! :) I hope you will share some photos of your final product. In hindsight I did not need the paint stripper. I was just not sure how well I would be able to remove it with just an abrasive, so I used the paint stripper just in case. I am fine with the rough finish, but as ElJay suggests, I think I may round out the side bars with a Dremel at some point. I am not sure, though.
You
cannot post new topics in this forum
You
cannot reply to topics in this forum
You
cannot edit your posts in this forum
You
cannot delete your posts in this forum
You
cannot vote in polls in this forum
You
cannot attach files in this forum
You
can download files in this forum


