| Author |
Message |
Elling Polden

|
 Posted: Mon 28 Jun, 2010 3:39 am Post subject: Posted: Mon 28 Jun, 2010 3:39 am Post subject: |
 |
|
Looks very nice!
My group uses shields pretty much identical to yours, including the 8mm thickness.
However, we have never bothered with arm padding. A regular glove on your left hand is enough to prevent scraped knuckles, and the elbow really isn't an issue. Judging from "Reitershield", it is rare on the orginals, and if it is present, it is just a leather patch under the front handgrip, not the full length padded thing seen on modern reproductions.
the back of my 60X90, complete with frayed rawhide;

"this [fight] looks curious, almost like a game. See, they are looking around them before they fall, to find a dry spot to fall on, or they are falling on their shields. Can you see blood on their cloths and weapons? No. This must be trickery."
-Reidar Sendeman, from King Sverre's Saga, 1201
|
|
    |
 |
Thomas R.

|
| Posted: Sat 03 Jul, 2010 4:26 am Post subject: |
|
|
Hi Sander,
I have been following your shield-making-process with great interest. I myself finished recently an infantry-shield. However, I didn't build the copus itself, but bought it. But perhaps I can assist you concerning the paintjob. I went to a local shop, specialized in paint and told em, what I intend to do: painting a shield, which will be put to use against swords. So the shopowner declared, that indeed acrylic paint is a. sturdy and flexible on canvas and b. can be sprayed with an matte fixing-spray to make it waterproof. I recommend the use of a red color not too bright. I bought crimson (karmesin) red and zincwhite (zinkwit/blanc melange). I didn't use any gesso. The paint adhered very well. The zincwhite doesn't cover the red very well, but if you paint the white portions first, its no problem to use the red color on top of it, approx. two layers of red will do the trick. At last I sprayed a matt varnish (Marabu vernis mat) on top of the paint and rawhide. I have to take it to the test, but I thought this information might be of use to you.
Hope to read about your project, soon again,
Best regards,
Thomas
 Attachment: 100.14 KB Attachment: 100.14 KB
http://maerenundlobebaeren.tumblr.com/
|
|
|
|
|
Sander Marechal

|
| Posted: Sat 03 Jul, 2010 9:34 am Post subject: |
|
|
Thanks Thomas, that's great information. It looks like you did a neat paint job on your shield.
It will be at least a week before I can continue with my shield. At the moment I am producing a whole stack of shield blanks for my reenactment group. Next weekend we're going on a training and kit manufacturing camp where we will canvas them all.
|
|
 |
|
Sander Marechal
|
| Posted: Fri 23 Jul, 2010 3:28 pm Post subject: |
|
|
It's time for an update. For the last few weeks I've been churning out shield blanks for my reenactment group and helping people cover them in canvas. Also, I've made myself a new shield. It's slightly taller and has a shallower curve. It's covered in three layers of thick painter's canvas and it's ready for paint. So, I have some questions.
What kind of paint should I use? And what primer, if any? I have been to a few paint shops and read some tutorials and so far I have gotten three options.
1) Use textile paint, no primer. It should work for most textiles but I don't know how it works on closely woven painter's canvas. Also, I don't know how much strength this kind of paint adds.
2) Use latex-y wall paint. It remains flexible when dry so it won't chip when struck with weapons. Also, any DIY store can mix up a gazillion colours. Optionally prime it with a standard, universal primer (the stuff you use on smooth metal or plastic surfaces)
3) Prime with gesso or universal primer and use an acryllic paint. Cover in many layers of varnish to prevent chipping (e.g. the really hard Glitsa varnish used on wooden stair steps).
Does anyone have any opinions or suggestions? I'm a little worried that textile paint won't add much strength like other lypes of paint provide. With the acryllic and varnish option I'm afraid my shield will look too smooth and shiny. That may be applicable for a fancy tournament shield used in the 14th/15th century but I can't imagine that common soldiers in the crusades had such shields.
Pics of my new shield will follow!
|
|
|
|
|
Thomas R.
|
| Posted: Fri 23 Jul, 2010 4:33 pm Post subject: |
|
|
Hi Sander,
first of all, why did you use expensive artists canvas and not ordinary linen in rough optic? As I stated above: My shield is covered in one (1) layer of rough linen. Its painted without any gesso or primer with a matte acrylic paint and sprayed with matte varnish. It doesn't look shiny and quite comparable to other shields painted in contemporary tempera (pun on words intended  ) From the first sword fight, the shield got some minor dents, the fabric wasn't torn, the paint didn't chip. Maybe some of the varnish was scrubbed of, but thats a matter of seconds, spraying a new layer of varnish onto the surface. ) From the first sword fight, the shield got some minor dents, the fabric wasn't torn, the paint didn't chip. Maybe some of the varnish was scrubbed of, but thats a matter of seconds, spraying a new layer of varnish onto the surface.
Regards,
Thomas
http://maerenundlobebaeren.tumblr.com/
Last edited by Thomas R. on Fri 23 Jul, 2010 4:35 pm; edited 1 time in total
|
|
|
|
|
Ron Reuter

Location: Southern Indiana Joined: 04 Oct 2007
Posts: 56
|
| Posted: Fri 23 Jul, 2010 4:33 pm Post subject: |
|
|
| Sander Marechal wrote: |
Does anyone have any opinions or suggestions? I'm a little worried that textile paint won't add much strength like other lypes of paint provide. With the acryllic and varnish option I'm afraid my shield will look too smooth and shiny. That may be applicable for a fancy tournament shield used in the 14th/15th century but I can't imagine that common soldiers in the crusades had such shields.
Pics of my new shield will follow! |
Looking forward to seeing your pics!
All the shields on my website are just primed with regular latex primer and finished with an eggshell (not quite flat, but not really shiny) finish latex wall paint. This is just to give you something to compare it to.
One thing to keep in mind, most latex paints (I am pretty sure all of them now), don't contain latex, they are actually acryllic paints. (I have been out of the industry for 15 years so it could be something totally different now :>)
You probably wouldn't have to use a primer, but I do as it probably sticks just a tad better, and does a pretty good job filling in the canvas.
Ron
|
|
|
|
|
Sander Marechal
|
| Posted: Sat 24 Jul, 2010 1:30 am Post subject: |
|
|
| Thomas R. wrote: | | first of all, why did you use expensive artists canvas and not ordinary linen in rough optic? |
Two reasons. First off, I got it for free. A friend had quite a large piece left after covering his shield. Just enough to do the outer layer of my shield. The inner layers on my shield are cheaper and thinner canvas, like a thick T-shirt material. The outer layer is like jeans material thickness and stiffness (note: It's really hard to glue on. It's woven very close so the glue and water mixture has trouble penetrating it).
Second: I don't know how strong my shield is, so I wanted to cover it thickly to make it stronger. So far I have been making my shields out of 4mm birch plywood like the test shield on the previous page of this thread. Turns out I had some bad luck. Stores aren't selling it any more. It's being phased out. They now only carry 3.6mm and 5.5mm. I have driven to every DIY store in my area buying up the remaining stock of 4mm sheets and I had just enough for the shields of my reenactment group.
So, for my own shield I had to source a new kind of plywood. On page 2 of this thread I mentioned that I bought some 4mm Okoume plywood because it would supposedly hold it's shape better. Well, it doesn't. And I don't think it's as strong as birch (it's really light. It's the wood that cigar boxes are made out of). So I decided that I would not sell Okoume shields to other people and use the piece I had for my own shield, hoping that it would not break too fast.
I'm going to experiment with 5.5mm birch ply for the next batch of shields.
| Quote: | | As I stated above: My shield is covered in one (1) layer of rough linen. Its painted without any gesso or primer with a matte acrylic paint and sprayed with matte varnish. It doesn't look shiny and quite comparable to other shields painted in contemporary tempera |
That sounds promising, thanks.
@Ron, thanks for the info as well.
| Quote: | | You probably wouldn't have to use a primer, but I do as it probably sticks just a tad better, and does a pretty good job filling in the canvas. |
I've been told that in the paint shop. They told me that I wouldn't need to use a primer on the front where the canvas still feels like fabric and will hold paint really well. But on the back side there are a lot of areas where the canvas feels like plastic because of the dried glue covering the pieces that were folded over from the front. They advised me to prime those areas at the very least.
|
|
|
|
|
Thomas R.
|
| Posted: Sun 25 Jul, 2010 1:49 am Post subject: |
|
|
| Sander Marechal wrote: |
I've been told that in the paint shop. They told me that I wouldn't need to use a primer on the front where the canvas still feels like fabric and will hold paint really well. But on the back side there are a lot of areas where the canvas feels like plastic because of the dried glue covering the pieces that were folded over from the front. They advised me to prime those areas at the very least. |
That sounds reasonable. You should perhaps rough the plastic like region a bit up first? I would use a fine grained sand paper before I add the primer.
If you are experimenting with gesso, I am very interested in your experiences. I can't imagine how a thick gesso made of chalk and glue will hold up against a sword blow. I think it will just break off the shield. So I am really interest in it. If it holds well, I am thinking about making a second knightly shield.
Greets,
Thomas
http://maerenundlobebaeren.tumblr.com/
|
|
|
|
|
Sander Marechal
|
| Posted: Sun 25 Jul, 2010 3:31 am Post subject: |
|
|
Yesterday I went strolling from paint shop to paint shop, carrying my shield around, in search of more information. At about the sixth shop I visited I finally found someone knowledgeable about how paints are mixed and how they dry.
There is a significant difference between acrylic paints used by artists and acrylic wall paints that are mixed and sold at the DIY store. Acrylic paints used by artist dry up being water resistant and remain flexible, thanks to the acrylic resin used as a binder. Wall paints on the other hand are not real acrylic paints. They contain some acrylic resin but also several other binders. When wall paint dries it will harden. When struck, it will crack like an egg shell, though it will not chip like those glossy wood paints do.
Also, I found a DIY store that sells real acrylic artist paint mixed to color like they do with wall paint. Downside is that it's almost four times as expensive as regular acrylic artist paint.
I have picked up several other useful pieces of information along the way.
The owner of the artist paint shop told me that I would probably not need to prime my shield, not even the plastic-y back. But he recommended gesso if I wanted to prime it anyway.
A female artist in the shop overheard that conversation and whispered me a quick tip she uses on her paintings: Don't use gesso as a primer. It's way too expensive. Use standard white wall/ceiling paint for the same effect.
The owner of the wall paint shop (who knew the difference between wall paint and artist paint) recommended against both gesso and wall paint as a primer. Both will crack when struck, even when covered with acrylic artist paint. He suggested that a primer wasn't really necessary, only to conserve paint (a liter or paint will only cover half as much when used on an unprimed, absorbing surface like canvas). He suggested using whatever artist paint I had left to apply a first coat to my shield. Then cover it in paint using the right color.
Also, you get lots of interesting reactions when you're walking around town carrying a large shield on your back

|
|
|
|
|
Thomas R.
|
| Posted: Sun 25 Jul, 2010 4:02 am Post subject: |
|
|
It never occured to me, to use wallpaint. I looked for artists paint from the start on...  but good to know now that there is a huge difference. but good to know now that there is a huge difference.
http://maerenundlobebaeren.tumblr.com/
|
|
|
|
|
Ron Reuter
Location: Southern Indiana Joined: 04 Oct 2007
Posts: 56
|
| Posted: Sun 25 Jul, 2010 1:51 pm Post subject: |
|
|
| Sander Marechal wrote: |
There is a significant difference between acrylic paints used by artists and acrylic wall paints that are mixed and sold at the DIY store. Acrylic paints used by artist dry up being water resistant and remain flexible, thanks to the acrylic resin used as a binder. Wall paints on the other hand are not real acrylic paints. They contain some acrylic resin but also several other binders. When wall paint dries it will harden. When struck, it will crack like an egg shell, though it will not chip like those glossy wood paints do.
|
mmm.. my experience with latex paint has been much different. I have painted cloth sheets for backdrops and after years the paint is still flexible and I can roll the sheets up and unroll them without the paint cracking. I also have not had any cracking of the paint on my shields, and we hit pretty hard. We only use wood wasters, not sure what a steel sword would do. Just to show you I am not nuts :>).. here is a guy that also paints his backdrops using latex paint. http://super.nova.org/DPR/DIY02/
Just paint a little on some cloth, let it dry, and see how flexible it is. Of course I use it mainly because it is cheap and so am I :>)
Again, I am not even close to being an expert on paint, but I just wanted to share my experiences with it.
Ron
|
|
|
|
|
Chuck Russell

|
| Posted: Sun 25 Jul, 2010 2:01 pm Post subject: |
|
|
|
i used a white flat house paint as the primer. then I used acrylic paint and then some acrylic sealer for my nice heater shield.
|
|
 |
|
Sander Marechal
|
| Posted: Sun 25 Jul, 2010 3:39 pm Post subject: |
|
|
| Quote: | | mmm.. my experience with latex paint has been much different. |
It may depend on the type of wall paint. The expensive mixed-to-color acrylic paint I found was also branded as wall paint. As I understand it, wall paint that is graded for outside use as well as inside use contains much more acrylic resin and remains more flexible. The cheap DIY mix-to-color stuff sold over here (e.g. Histor, Flexa, the standard varieties) are only suitable for inside use and dry up much harder. At least, that's the explanation I got from the guy at the wall paint shop.
I realised I have used the expensive acrylic wall paint once before when painting my bedroom walls. My girlfriend and I wanted a nice deep, dark red (like red wine, even darker). The standard stuff (Flexa IIRC) didn't take well and dried too lightly (our bedroom looked like a red light district, even after three layers of the stuff). The problem is that the base for Flexa and Histor is white. It's hard to mix that to very dark colours. We spent 80 Euro on a five liter can of the expensive stuff (Wyzenol it's called I believe) and it worked much better. It's base colour is transparent instead of white.
I still have some left (and plenty of the cheapo Flexa left). I could try out both on a piece of cloth like you suggested.
|
|
|
|
|
|
Karl Randall
|
| Posted: Sun 25 Jul, 2010 6:27 pm Post subject: |
|
|
| Quote: | | To avoid excessive springback you might try and steam the shield blank first. It takes extra work but it may solve your problem. |
I have also found that the addition of a third layer minimized the level of spring-back. Obviously with 4mm ply this might be getting to be a bit much, but if you used 2mm ply, or layers of wood veneer (pricey, but oh so nice) then you are good to go. It also is (potentially) much easier than steaming, especially if you plan to steam an entire layer as one piece.
Beyond three layers and you don't really minimize spring-back further, but if you want a thicker shield body then that is of course possible.
|
|
|
|
|
Bjorn Hagstrom

|
| Posted: Mon 26 Jul, 2010 12:58 pm Post subject: |
|
|
Tonight I have made my first batch of gesso (hide glue, water and chalk) it is cooling on the balcony as we speak...I will let you know how the first coat turns out on my linen facing. Then, if it is not a complete disaster I will mix oil paint from lineseed oil and pigments. I'll keep you posted. And need to charge the camera..
There is nothing quite as sad as a one man conga-line...
|
|
|
|
|
Sander Marechal
|
| Posted: Mon 02 Aug, 2010 1:56 am Post subject: |
|
|
Time for a small update. This is my latest shield. It is shaped a little bit different than the other one I made and sold. It's longer, with a shallower curve on the side and a flat top instead of a slightly rounded top. I am currently painting it with a first coat of acrylic paint. It definitely needs a second coat before the varnish goes on.
Originally I intended to strap the shield first and then paint it so that I could paint the rivet heads as well. I have changed this around. Next weekend there is a big fair in The Netherlands (Castlefest) and I want to bring my shield. I don't have the time to rivet it properly before the fair so I'm going to use bolts and nuts to temporarily secure the strapping. Later I will replace these with proper rivets. So, I am painting the shield first so that taking out the bolts will not damage the paint later on.
The colours I used are Titanium White (PW6) which supposedly closely matches the historical Lead White, and Caramine Red (PR23). This is supposed to resemble Kermes Red.
Attachment: 123.85 KB
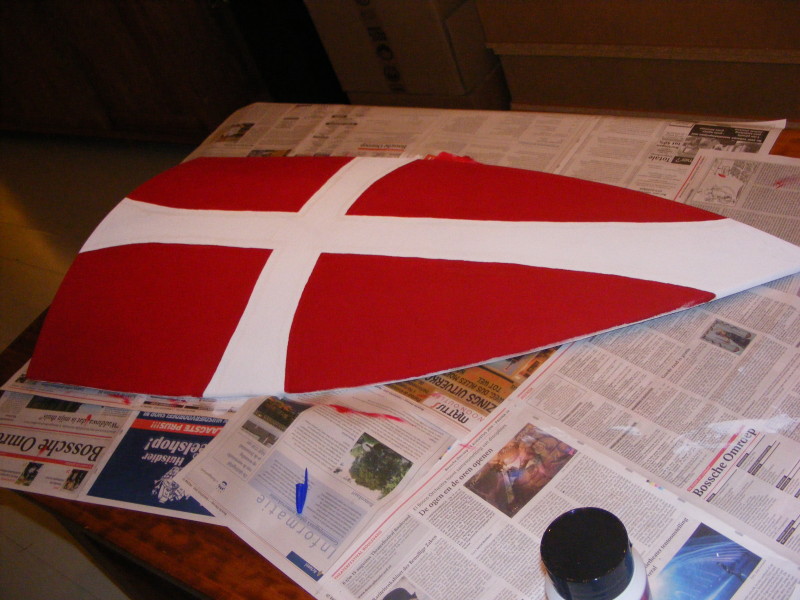
New shield with one coat of paint almost done.
|
|
|
|
|
Thomas R.
|
| Posted: Mon 02 Aug, 2010 2:23 am Post subject: |
|
|
Hi Sander,
it seems as if you did the red portions first, as you got problems to get the white covering the red edges well, if I judge it right? White usally doesn't cover that well other colours. It's good that you chose titanium and not zinc white, as zinc white is more translucent than titanium (which is very bright, maybe even a bit too bright). The overall design looks great. Can't wait to see it strapped and fully combat-ready.
Have a nice day,
Thomas
http://maerenundlobebaeren.tumblr.com/
|
|
|
|
|
Sander Marechal
|
| Posted: Mon 02 Aug, 2010 2:38 am Post subject: |
|
|
| Thomas R. wrote: |
it seems as if you did the red portions first, as you got problems to get the white covering the red edges well, if I judge it right? |
No, the white portions were painted first. I first drew the design on the shield with wax pencil (used for marking fabric) and then traced it in white with a small brush. Then I filled it in using a bigger brush. I did the same for the red portions. The faint shimmering outline you see in the white cross is where the white outline from the small brush and the strokes from the bigger brush overlap, so that portion already has two layers. The red portions have the same problem but it's much harder to see.
I have tested a bit on the back of the shield and two layers give a good enough covering that the outline should disappear. I'm planning on doing the second coat tonight so all should be well after that.
|
|
|
|
|
|
Lael Jones
Location: USA, IL Hooppole Joined: 28 Jul 2010
Posts: 9
|
| Posted: Mon 02 Aug, 2010 4:02 pm Post subject: |
|
|
|
I'm definitely making one of these.
|
|
|
|
|
Sander Marechal
|
| Posted: Wed 04 Aug, 2010 2:25 pm Post subject: |
|
|
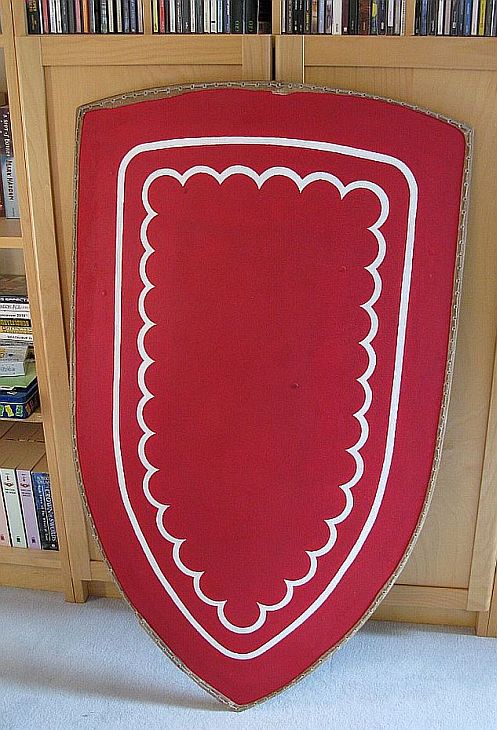
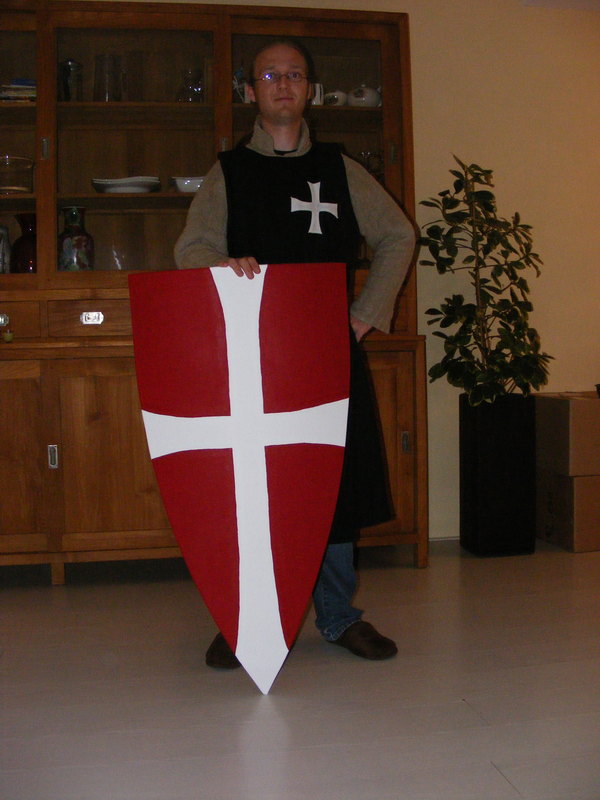
Here it is with two layers of paint and a layer of matte varnish. The white cross looks very bright but that's because of the flash photography. I'm trying it out for looks with my 13th century surcoat. Tomorrow I am going to put some temporary strapping on so I can take it to the Castlefest fair this weekend. Just the arm straps and no guige strap. I'll be putting them on with normal bolts and nuts. At Castlefest I'm going to have a word with some smiths about forging me some historic looking rivets and riveting my shield properly (with guige strap of course).
Attachment: 88.84 KB
|
|
|
|
|
|
|
You cannot post new topics in this forum
You cannot reply to topics in this forum
You cannot edit your posts in this forum
You cannot delete your posts in this forum
You cannot vote in polls in this forum
You cannot attach files in this forum
You can download files in this forum
|
All contents © Copyright 2003-2024 myArmoury.com — All rights reserved
Discussion forums powered by phpBB © The phpBB Group
Switch to the Basic Low-bandwidth Version of the forum
|

