| Author |
Message |
|
Luke Zechman
Location: Lock Haven Pennsylvania Joined: 18 Jan 2009
Posts: 278
|
 Posted: Mon 02 Aug, 2010 2:00 pm Post subject: Posted: Mon 02 Aug, 2010 2:00 pm Post subject: |
 |
|
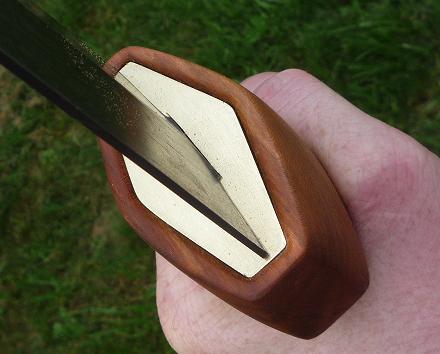
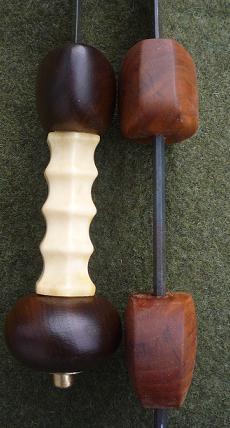
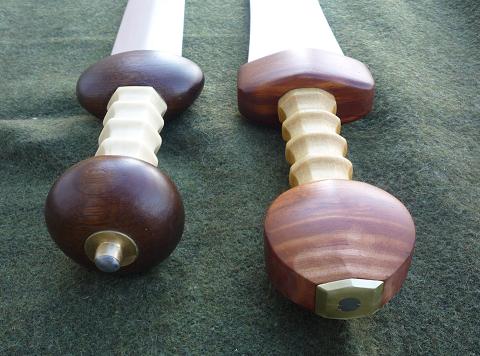
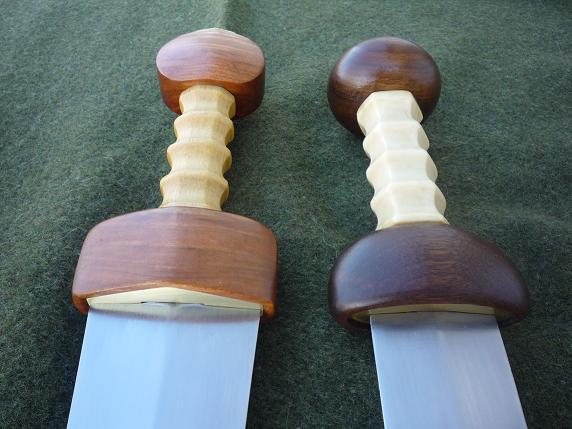
Progress. Cross pieces, and pommel have been fitted to the tang. I included a picture showing the side profiles to show the tapers towards either end of the hilts. So far I have done everything by hand with help here and there from my drill and Dremel tool. Included a picture showing the fit around the tang where it and the blade meet. Everything is snug. I need to manufacture a washer and peen block, and find a bone to make the grip.
 Attachment: 37.53 KB Attachment: 37.53 KB
Attachment: 32.89 KB
Attachment: 48.65 KB
|
|
  |
 |
|
Luke Zechman
Location: Lock Haven Pennsylvania Joined: 18 Jan 2009
Posts: 278
|
| Posted: Thu 05 Aug, 2010 12:43 pm Post subject: |
|
|
The grip is shaped. I shaped it out of some very lightly colored Hickory that I have. The cross section is octagonal. I still need to drill it out to receive the tang.
Attachment: 55.03 KB
|
|
|
|
|
|
Luke Zechman
Location: Lock Haven Pennsylvania Joined: 18 Jan 2009
Posts: 278
|
| Posted: Sun 08 Aug, 2010 11:48 am Post subject: |
|
|
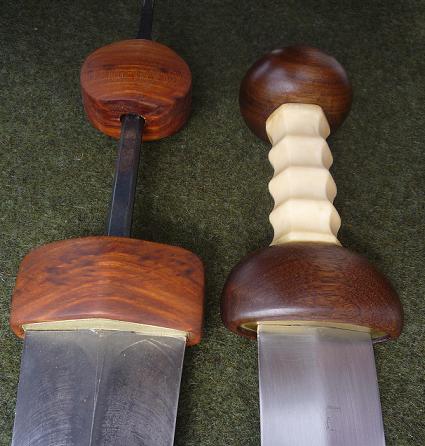
For the most part the hilt is built. I have included a picture of the grip fitted onto the tang, after some soaking in linseed. The color has changed, and is no longer offensive white. I think if and when I do a Mainz style blade that I will do the entire hilt in hickory, because it is tough and lightly colored. I have made a washer for under the peen block that will complete the form of the pommel. Now I just need to polish and sharpen the blade, followed by a peen.
Julien,
As a response to an earlier comment. Sorry I am so late. I am classically trained in art (drawing more specifically). I have a standard four year bachelors degree in traditional art, so I hope I should be able to draw.  Either way it is something i have been doing all my life. Thanks for the compliment. Either way it is something i have been doing all my life. Thanks for the compliment.
I am still working on the photography aspect of all this. I have a sub par camera. This picture still doesn't do the cherry any justice.
Attachment: 50.27 KB
[ Download ]
|
|
|
|
|
|
Luke Zechman
Location: Lock Haven Pennsylvania Joined: 18 Jan 2009
Posts: 278
|
| Posted: Wed 15 Dec, 2010 8:30 am Post subject: |
|
|
Hello everyone,
I have been tied up in a professional semester, and have not had much time to get on these projects I have strewn about my room. Good news is that I am only 4 months from being a certified biology teacher. Christmas break is two days away, and I plan to finish this gladius. I have had a little time to work on the polish of the blade, and the hilt pieces have been finished and ready fro months now. All I need to do now is decide on a peen block that will compliment the design, finish up on the blade (final stage polishing and sharpen), and assemble. Looking forward to constructive feedback, and to have another finish sword. Check back soon.
Happy Holidays ALL!
|
|
|
|
|
|
Luke Zechman
Location: Lock Haven Pennsylvania Joined: 18 Jan 2009
Posts: 278
|
| Posted: Tue 21 Dec, 2010 12:17 pm Post subject: |
|
|
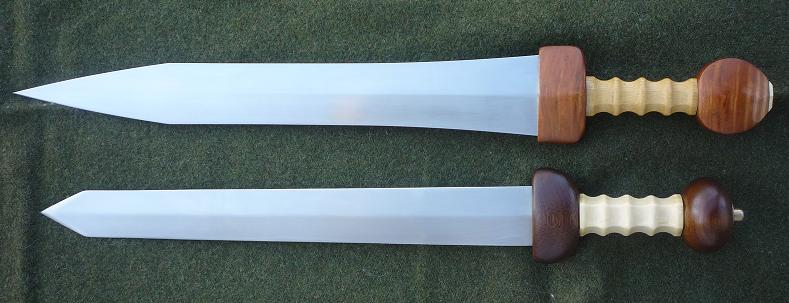
I assembled the fulham gladius today. I ran into some problems peening the sword. Initially I had a collar around the protruding tang. I peened it down. and the pommel and grip had some torsion play. I was mad. I hacked the peen block in half with a hack saw, and started over. This time I just peened it into the washer at the end of the hilt. The hilt is tight with no wiggle or movement. I ended up splitting the end of the peen a little, so it does not fit into the recess perfectly. The peen is thick enough for me to fell comfortable swinging this little sword. I was thinking about filling in the little gaps of the peen area with some solder. Would this work?
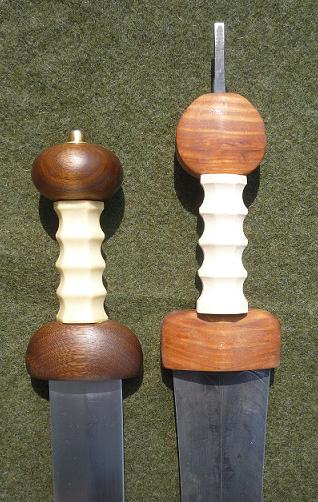
I pictured the fulham next to its sister sword the pompei that you are probably all familiar with. I lined up the junction of the blade and hilt to show the length differences in both blade and hilt. Right now the POB is about 4.5inches from the hilt. This will creep back a little bit when i finish polishing and sharpening the blade. The tip is still quiet thick, and will lose some substantial weight.
Attachment: 56.1 KB
Attachment: 49 KB
Attachment: 54.63 KB
|
|
|
|
|
|
Matthew Amt
|
| Posted: Tue 21 Dec, 2010 8:25 pm Post subject: |
|
|
Hey, looking good! I like the shape on your Mainz blade. Looks like that's all coming out nicely. No point in worrying about the peened end of the tang, and no way you'd be able to get solder to adhere without enough heat to burn the wood. If there are any sharp or catchy bits, just give them a few strokes of a tiny file and call it even.
Now you need scabbards, ha!
Congrats and Vale,
Matthew
|
|
 |
|
|
Luke Zechman
Location: Lock Haven Pennsylvania Joined: 18 Jan 2009
Posts: 278
|
| Posted: Sun 26 Dec, 2010 11:43 am Post subject: |
|
|
Thanks Matthew. I do not really know a whole lot about soldering, so the advice is appreciated. I like the way this sword turned out so far. I still need to finish and sharpen the blade. Overall it feels good in hand, and sturdy. I guess I should start working on some scabbards. 
|
|
|
|
|
|
Luke Zechman
Location: Lock Haven Pennsylvania Joined: 18 Jan 2009
Posts: 278
|
| Posted: Tue 27 Oct, 2015 9:50 am Post subject: |
|
|
|
It has been some time since I have worked on this project, and I have a few new questions. I have begun to craft a scabbard for this sword, and was wondering... Would it be completely wrong to have a Pompeii glad jus scabbard where the entire edge of the scabbard is covered by the "gutters"? I know there are examples of Maintz, and Fulham scabbards with fully framed scabbards, but I have yet to see a Pompeii containing this feature. My second question is... Do any roman scabbards contain SPQR?
|
|
|
|
|
|
Matthew Amt
|
| Posted: Tue 27 Oct, 2015 10:13 am Post subject: |
|
|
| Luke Zechman wrote: | | It has been some time since I have worked on this project, and I have a few new questions. I have begun to craft a scabbard for this sword, and was wondering... Would it be completely wrong to have a Pompeii glad jus scabbard where the entire edge of the scabbard is covered by the "gutters"? I know there are examples of Maintz, and Fulham scabbards with fully framed scabbards, but I have yet to see a Pompeii containing this feature. |
It doesn't seem to have been very common. There aren't any clearly Pompeii scabbard parts that have side gutters attached, that I know of. BUT there are a few grave stelae that do seem to show side guttering--if you trust that sort of detail when it apparently conflicts with the archeological evidence!
| Quote: | | My second question is... Do any roman scabbards contain SPQR? |
Hoo, not that I really recall seeing. I could swear I've seen it once on SOMEthing military, but no way my old brain is going to come up with specifics, sorry...
You could dig through the Bishop and Coulston images, but SPQR isn't on any of the sccabbards, that I'm seeing.
http://romanmilitaryequipment.co.uk/figures.htm
Matthew
|
|
|
|
|
|
Luke Zechman
Location: Lock Haven Pennsylvania Joined: 18 Jan 2009
Posts: 278
|
| Posted: Tue 27 Oct, 2015 6:30 pm Post subject: |
|
|
|
Thanks Matthew! I have the wood core finished, and now I'm gathering brass, and looking around for 3oz leather. I wanted to do something that isn't reproduced as often, and as usual, I'm ok with a historically plausible outcome. I always appreciate your knowledge, and am very familiar with many of your informative web pages
|
|
|
|
|
David Lewis Smith

|
| Posted: Wed 28 Oct, 2015 5:33 pm Post subject: |
|
|
I missed this whole project,
It is fantastic,
David L Smith
MSG (RET)
|
|
 |
|
|
|
You cannot post new topics in this forum
You cannot reply to topics in this forum
You cannot edit your posts in this forum
You cannot delete your posts in this forum
You cannot vote in polls in this forum
You cannot attach files in this forum
You can download files in this forum
|
All contents © Copyright 2003-2024 myArmoury.com — All rights reserved
Discussion forums powered by phpBB © The phpBB Group
Switch to the Basic Low-bandwidth Version of the forum
|

