Looks really good. I like the faceted grip. came together very well. can you show us the peen block you finally opted for as I am going to get back to working on mine soon and I am trying to figure out what I want to do on the pommel end as well. tr
Nice work Sean... I want one! I do have to agree with Julien on this one though. Long term project and no buckle? Beutiful work all aside!
I followed your topic. I always learn something new. My compliments, Sean.
Sean - If I were you, my ego would be the size of Texas right now. That is some amazing work. Truly inspirational. For the grip and and scabbard covering, did you use chamois like your other projects, or did you use a different leather?
| Julien M wrote: |
| More shots please!
This might be the best work I've seen from you here Sean... Why stop at the buckle though??? Compared to the amount of work invested in this project this makes little sense to overlook that very last bit :) Anyway...cheers and well done. J Is that belt another dog leash? |
Thanks! I suppose I'll have to make a buckle after all :D It really isn't very difficult, but I want to make sure I can do something appropriate for the sword. Yes, it's another leash! "London Lead," I think it's called.
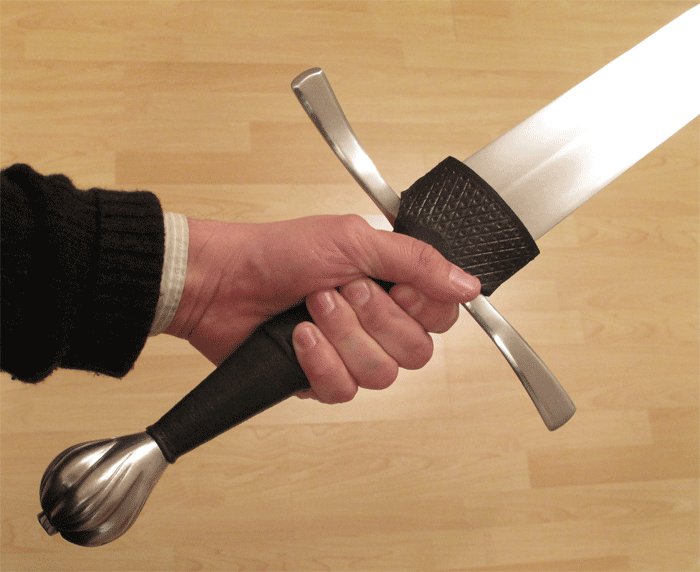
For the photos--any particular details you'd like to see? Did you see the earlier photos of the sword in my hand?
| Thom R. wrote: |
| Looks really good. I like the faceted grip. came together very well. can you show us the peen block you finally opted for as I am going to get back to working on mine soon and I am trying to figure out what I want to do on the pommel end as well. tr |
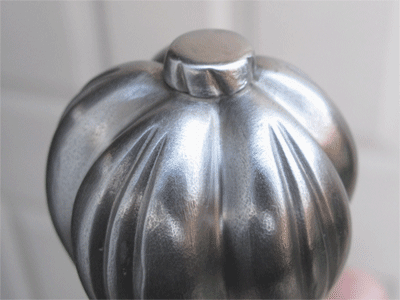
I'll get a shot of the block/nut and post early next week. If you have one of these, you know that the peen is filed to blend with the top of the pommel. I took my peen inspiration from a German two-hand sword with a similar pommel. That sword has a short conical nut with crude roping (not blended with the fluting), so I cut the wings off of a wing nut, filed the design and peened over that. First, though, I used the Dremel cylindrical stone grinding bit to create a level seat for the nut. I just held the Dremel vertically and pressed the bit down over the pommel hole. Simple. Peening was very difficult, even with a hot tang. I think Windlass tangs tend to be very hard, so keep that in mind and leave as little tang to work with as needed. My conical nut got kind of squashed in the process but it still looks reasonable. I filed and sanded the peen so the seam is all but invisible.
| Peter Johnsson wrote: |
| Good work Sean!
You captured style and period nicely. You´ve got a good eye for character. |
Thank you, Peter! I just hope I can do something worthwhile with that Swedish sword project.
An earlier photo, for those viewing the project for the first time:
 Attachment: 182.93 KB

| Josh MacNeil wrote: |
| Sean - If I were you, my ego would be the size of Texas right now. That is some amazing work. Truly inspirational. For the grip and and scabbard covering, did you use chamois like your other projects, or did you use a different leather? |
I'm afraid I do still use waxed and polished (sometimes burnished) chamois for grip and scabbard. :blush: I know it's wrong, but I'm still trying to save cash where I can. For about $15 I can get a chamois that will cover this large scabbard and probably at least six grips this size. The effect isn't too bad, though it precludes tooling. It displays well, and the relatively coarse material takes the glue and dye extremely well (I dye first, by the way). The chappe is top-grain tooling leather because you have to have a relatively thick and stiff material there.
I see. No need to feel ashamed there, Sean. There's nothing wrong with saving money and you are able to get good results out of it. Gratz again on such an awesome project!
Hi Sean,
You should be very proud of your work and the ingenuity with which you realize your projects. I always follow your work with great pleasure knowing without a doubt that it will be a total success at the end.
Bravo and keep up the good work.
Gabriel
You should be very proud of your work and the ingenuity with which you realize your projects. I always follow your work with great pleasure knowing without a doubt that it will be a total success at the end.
Bravo and keep up the good work.
Gabriel
I echo Gabriel's thoughts on this. You do exceptional work, and it's fantastic watching your work.
congratualtions Sean on a very nice modification again. It is always impressive to see in what nice pieces you can turn those "cheapo" MRL swords. But I am with Julien, you will definitely need an appropriate buckle.
Hi Sean,
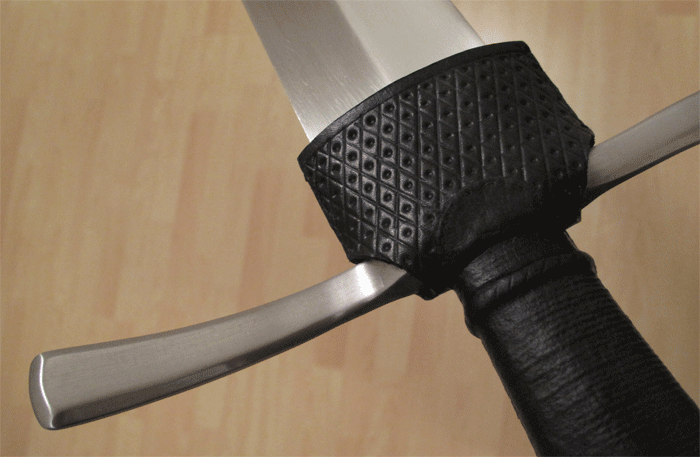
A close shot of the peen block would be nice, a close up of one guard quillon two, the scabbard shape also interest me, as well as the sewing at the back of the scabbard (if there is any).
No rush though :)
Cheers,
Julien
A close shot of the peen block would be nice, a close up of one guard quillon two, the scabbard shape also interest me, as well as the sewing at the back of the scabbard (if there is any).
No rush though :)
Cheers,
Julien
Really nice work as you take mediocre but basically O.K. swords and turn them into very period looking and desirable swords. :D :cool: ( Well, swords mostly, but you do also other types of " upgrades " to other weapons and armour. :cool: ).
Sean...outstanding!
If you ever decide to sell this sword, please let me know.
If you ever decide to sell this sword, please let me know.
Excellent work Sean!
I agree with Julien, I think this is your best piece yet.
I agree with Julien, I think this is your best piece yet.
I think this covers the image requests.
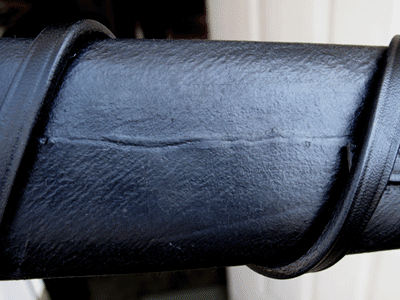
As you can see from my scabbard seam, Julien, my "software" lags behind my "hardware" in this case. The first scabbard I made was much neater. I think I rushed the job here, trimming the leather before it was fully dry. This is one of the major disadvantages of the chamois. It's quite stretchy, and if the leather is still damp enough to stretch during the trimming it creates a wandering line and some rough places. It's fine when completely dry. The part of the seam shown here is an average section. There are some smaller and rougher places near the tip as well as some places where the seam is all but invisible. I'm not sure what I did wrong here. Looks like the leather is buckled or folded under. You need this light to see it clearly or I'd have fixed it. This is all on the back of what to me is primarily a display/safety feature of the project, so I'm not too put out by the problems. Still, I'd like to become a better scabbard maker.
I'm still struggling with peening, but that's largely due to the hardness of the Windlass tangs. We'll see if the Tinker-Hanwei tangs are softer.
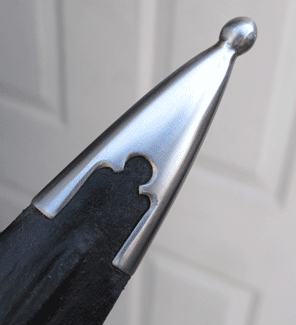
The chape is adapted from the Windlass "Saxon Hilt Sword" scabbard. I shortened it and cut the gothic design. Up close, in the right light, you can see the brass(?) used to braze on the finial.
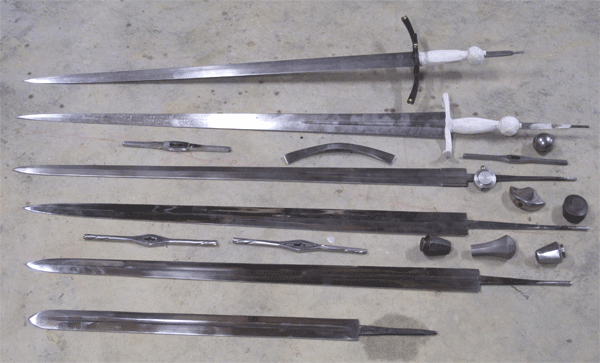
And, last, I thought you DIY folks would be interested in seeing the contents of my toy box. There are a few good possibilities here as well as some things I'm not sure how I'll use: A field sword a la Wallhausen (ca. 1617), an Italian sword a la Agrippa (1553,) a Swedish sword, maybe an Alexandria XVIIIc... Who knows? I'm still pondering the Swedish project, so I might go for one of the single-hand swords next.
 Attachment: 62.78 KB
 Attachment: 64.9 KB
 Attachment: 46.32 KB
 Attachment: 171.21 KB
 Attachment: 135.31 KB
As you can see from my scabbard seam, Julien, my "software" lags behind my "hardware" in this case. The first scabbard I made was much neater. I think I rushed the job here, trimming the leather before it was fully dry. This is one of the major disadvantages of the chamois. It's quite stretchy, and if the leather is still damp enough to stretch during the trimming it creates a wandering line and some rough places. It's fine when completely dry. The part of the seam shown here is an average section. There are some smaller and rougher places near the tip as well as some places where the seam is all but invisible. I'm not sure what I did wrong here. Looks like the leather is buckled or folded under. You need this light to see it clearly or I'd have fixed it. This is all on the back of what to me is primarily a display/safety feature of the project, so I'm not too put out by the problems. Still, I'd like to become a better scabbard maker.
I'm still struggling with peening, but that's largely due to the hardness of the Windlass tangs. We'll see if the Tinker-Hanwei tangs are softer.
The chape is adapted from the Windlass "Saxon Hilt Sword" scabbard. I shortened it and cut the gothic design. Up close, in the right light, you can see the brass(?) used to braze on the finial.
And, last, I thought you DIY folks would be interested in seeing the contents of my toy box. There are a few good possibilities here as well as some things I'm not sure how I'll use: A field sword a la Wallhausen (ca. 1617), an Italian sword a la Agrippa (1553,) a Swedish sword, maybe an Alexandria XVIIIc... Who knows? I'm still pondering the Swedish project, so I might go for one of the single-hand swords next.


Page 4 of 4
You cannot post new topics in this forumYou cannot reply to topics in this forum
You cannot edit your posts in this forum
You cannot delete your posts in this forum
You cannot vote in polls in this forum
You cannot attach files in this forum
You can download files in this forum
All contents © Copyright 2003-2006 myArmoury.com — All rights reserved
Discussion forums powered by phpBB © The phpBB Group
Switch to the Full-featured Version of the forum
Discussion forums powered by phpBB © The phpBB Group
Switch to the Full-featured Version of the forum