| Author |
Message |
Scott S.

|
 Posted: Fri 25 Sep, 2009 1:29 pm Post subject: Posted: Fri 25 Sep, 2009 1:29 pm Post subject: |
 |
|
Thanks for the update Sean!
The pommel looks much "higher-end!" I'd hunted down this thread last week to see if you'd posted any progress and was glad to see the thread had resurfaced.
In answering Luke's question so thoroughly, you answered mine as well, which was: "What do you use to carve into the steel?" I really appreciate how you answer every single question with so much care and consideration.
In general, I think it's amazing how much difference the right finish makes on a sword. After finding out about Scotchbrite pads on this forum, I tracked some down and now my humble MRL classic medieval absolutely glows instead of just throwing off light like a 3D mirror. Without that level of texture, steel just doesn't look like steel to me. Just one of the many things I've learned here over the past few months.
Can't wait to see more!
|
|
  |
 |
Maurizio D'Angelo

|
| Posted: Fri 25 Sep, 2009 4:46 pm Post subject: |
|
|
Hi Sean,
I am very impressed by your way of working. Gold's border is fantastic. 
You know why? Create a style, a style that is yours.
Thank you for your up-dates.
Maurizio
|
|
 |
|
Sean Flynt

|
| Posted: Mon 28 Sep, 2009 7:08 am Post subject: |
|
|
I now have a new option for this project. How about an XVIIIc? Broad blade, wheel pommel and horizontally recurved, ribbon-like cross. We don't see many of these swords. Peter Johnsson made a beautiful example several years ago (see this thread: http://www.myArmoury.com/talk/viewtopic.php?t...t=solingen ). Mine would have a similar pommel but with the cross Oakeshott believes was more common (ca. 1500). My only question concerns the grip. I really like the lines of my most recent bastard sword grip (like that of Peter's XVIIIc) but Oakeshott believed a "sharp swelling" off-center toward the cross was more common. I guess I'll try the components together and see what looks and feels best.
I know the cross will work but I haven't handled the wheel pommel yet. It might be too small. I doubt it would be too light, though.
-Sean
Author of the Little Hammer novel
https://www.amazon.com/Little-Hammer-Sean-Flynt/dp/B08XN7HZ82/ref=sr_1_1?dchild=1&keywords=little+hammer+book&qid=1627482034&sr=8-1
|
|
 |
|
Sean Flynt
|
|
|
|
|
Sean Flynt
|
| Posted: Tue 13 Oct, 2009 12:36 pm Post subject: |
|
|
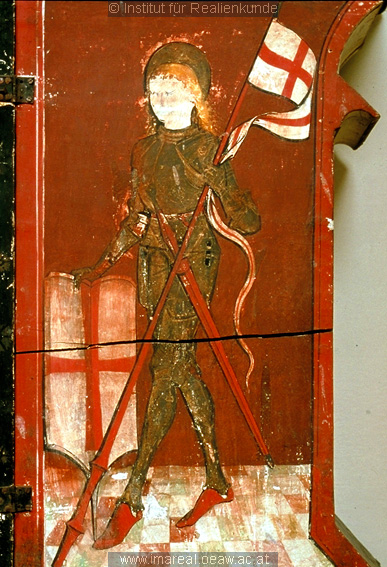
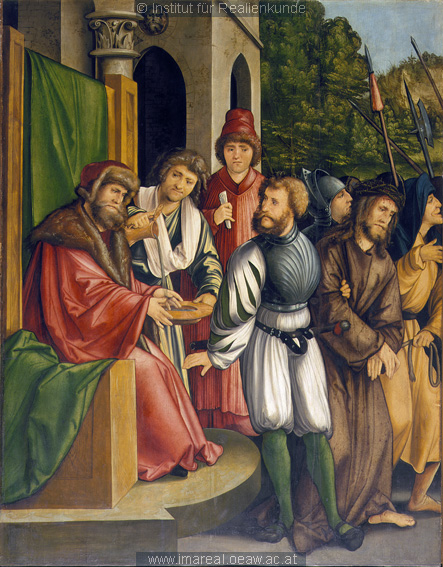
I think this project is finally about to take off. I've had to rule out XVIIIc but I still have a few different choices in cross and pommel. When my last pommel idea arrives this week, I'll make my final decision about at least one of these projects. At the moment, I'm leaning toward south Austrian ca. 1520--hand-and-a-half, recurved ribbon cross (Oakeshott Style 12) and spherical (Type R) pommel, very long tapered grip with tubular chappe, blued furniture. In short--certain (not all) elements of the swords shown below plus a few others combined:
 Attachment: 146.73 KB Attachment: 146.73 KB

Attachment: 171.99 KB
Attachment: 121.37 KB

Attachment: 186.63 KB
Attachment: 192.11 KB

Attachment: 125.44 KB

Attachment: 136.51 KB

-Sean
Author of the Little Hammer novel
https://www.amazon.com/Little-Hammer-Sean-Flynt/dp/B08XN7HZ82/ref=sr_1_1?dchild=1&keywords=little+hammer+book&qid=1627482034&sr=8-1
|
|
|
|
|
Sean Flynt
|
|
|
|
|
Sean Flynt
|
| Posted: Tue 20 Oct, 2009 10:45 am Post subject: |
|
|
Progress! I tried out the writhen pommel with a recurved ribbon cross and immediately knew that this would be the first project. This combination appears to have been common in the period. At this stage I've roughed out the grip and further refined the pommel (MUCH narrower at its base, as was typically the case, historically). If the grip looks slightly undersized at this stage, keep in mind that it will be covered with cord and leather. I have a small amount of refining to do on the core to get things symmetrical and crisp. I know from an earlier experiment that facets are unforgiving. It's hard to judge the bare core but asymmetry and misalignment shows clearly once the piece is wrapped. The cord binding will mitigate some of that, though.
Attachment: 82.23 KB
Attachment: 200.31 KB
Attachment: 194.92 KB
-Sean
Author of the Little Hammer novel
https://www.amazon.com/Little-Hammer-Sean-Flynt/dp/B08XN7HZ82/ref=sr_1_1?dchild=1&keywords=little+hammer+book&qid=1627482034&sr=8-1
|
|
|
|
|
Sean Flynt
|
|
|
|
|
Sean Flynt
|
|
|
|
|
Sean Flynt
|
| Posted: Mon 07 Dec, 2009 8:15 am Post subject: |
|
|
I needed to finish the scabbard core before finishing the sword. I've made progress on that front in the last week or two. Here's the bare core, still needing a bit of light sanding, especially around the mouth. You can see how closely it conforms to the shape of the blade (the blade is on top of the scabbard in the second image below). Whatever else you could say about my scaabards, they're certainly not overbuilt! Maybe I've gone too far in the other direction, but I just don't see a need for anything much heavier than this. The thin walls have the added advantage of flexing slightly, which allows a very nice fit--secure but still easy to draw.
There are no risers yet, but it will eventually have two--the medial ridge and the horizontal suspension/chappe stop below the mouth. The gray foam held together with electrical tape is an unfinished pattern for the chappe. It has to be quite rough at this stage because there's no riser yet, the dyed leather will shrink and the core is bare. Scabbard and chappe have to progress together from this point forward in order get a good fit between them.
NOTE: The cross isn't square in these images--the hilt is just loosely assembled for the photo.
Attachment: 51.1 KB
Attachment: 53.16 KB
Attachment: 147.88 KB
-Sean
Author of the Little Hammer novel
https://www.amazon.com/Little-Hammer-Sean-Flynt/dp/B08XN7HZ82/ref=sr_1_1?dchild=1&keywords=little+hammer+book&qid=1627482034&sr=8-1
|
|
|
|
|
|
Luke Zechman
Location: Lock Haven Pennsylvania Joined: 18 Jan 2009
Posts: 278
|
| Posted: Mon 07 Dec, 2009 3:16 pm Post subject: |
|
|
Sean this project is really starting to come together. I am amazed at the core you have made. i think once it is wrapped it will be plenty sturdy. I am in the process of planning for a projects scabbard core and was wondering the basics of how you achieved this. The main thing I was wondering was what is a good tool to use for getting the cavity where the blade will fit hallowed out. Right now all i have is a small gouge and a 1/2 chisel. I think a sureform will work well for rough shaping the outside, followed by some sanding.
I can't wait to see this project finished. Looks fantastic so far!!!!!
|
|
|
|
|
Sean Flynt
|
| Posted: Mon 07 Dec, 2009 7:46 pm Post subject: |
|
|
This is something I really struggle with, Luke. I find the scabbard core to be the hardest part of this work. Most of what I know I've learned here and from studying paintings from the period. I'm certainly not an expert. For me, a Surform tool is by far the most important tool in this work. I find the short one to be more useful than the long ones. The interior kills me. I had to take this core apart a couple of times after gluing to remove more material. Fortunately, after you've cut the profile there's not much surface area for the glue to grab, so if you can get the halves separated a little bit you can carefully pry them apart (I forced a tapered dowel into my core until it popped loose at the bottom. That's about the only way the halves are going to come apart, and they don't get that kind of internal, expanding force in use.
For the interior I use the broadest, sharpest chisel I have, working across the grain. That will take a long time, but it's a neat, easily controlled process. I typically also use a Dremel bit that looks like a Morgenstern--a tiny elongated club with metal spikes all over it. That thing makes wood evaporate, but it can get away from you in a hurry and it makes a HUGE mess. Respirator/mask and eye protection are 100 percent required. That's not for final work. For that, you still need a broad chisel and various grades of sandpaper. Of course, you need to try the fit of the blade as you work. This is not easy to do because you need to clamp the halves together, and the tension on the clamps will make the fit seem much tighter than it really is.
The Surform work on the outside is paradise compared to the inside. As you, know, that tool is deep magic for shaping a soft wood like poplar. I either chisel or jigsaw the profile of the scabbard after I've glued it, leaving about .25" around the outline of the blade I've drawn on the core. Then I use the Surform to evenly take that down to about 1/8". Then it's just a matter of creating a lenticular section. A center line on the scabbard helps ensure symmetry. I think that chamfering (swamping?) the scabbard mouth is a good idea too--so that the very edge of the mouth is thinner, creating a sort of ramp effect to help guide the blade in.
I use hemp twine for the risers. Dampen it in water then saturate with wood glue. When its dry on the scabbard you can easily trim out irregularities. It becomes like a soft wood.
-Sean
Author of the Little Hammer novel
https://www.amazon.com/Little-Hammer-Sean-Flynt/dp/B08XN7HZ82/ref=sr_1_1?dchild=1&keywords=little+hammer+book&qid=1627482034&sr=8-1
|
|
|
|
|
Jason Mather

|
| Posted: Mon 07 Dec, 2009 8:34 pm Post subject: |
|
|
I am in the process of making a scabbard and I have found scrapers to work quite well. I have actually made several scrapers just for this work. Just buy stock furniture scrapers from Rockler or any woodworking supply house and regrind and burnish the scraper to suit your profile. I can take pictures of the rejiggered tools if anyone is interested.
To be nobody but yourself in a world that's doing its best to make you somebody else, is to fight the hardest battle you are ever going to fight. Never stop fighting.
|
|
|
|
|
|
Jason Daub
|
| Posted: Mon 07 Dec, 2009 9:25 pm Post subject: |
|
|
Sean, looking at the pictures of your scabbard core I would think that the small contour plane and bronze spokeshave sets from Lee Valley might be a much faster and more accurate way of working on these for you. These little tools were designed for patternmaking and carving and should work quite well. You can find them both here http://www.leevalley.com/wood/page.aspx?c=1&cat=1&p=50230 It is quite amazing how well these tools work to quickly shape wood. Jason is also right about scrapers, they are inexpensive, easy to reshape into nearly any contour you need and when burnished to a good burr will peel a shaving off of a wood like poplar almost as if you were using a plane.
'I saw young Harry, -with his bevor on,
His cuisses on his thighs, gallantly arm'd,-
Rise from the ground like feather'd Mercury,
And vaulted with such ease into his seat,
As if an angel dropp'd down from the clouds,
To turn and wind a fiery Pegasus,
And witch the world with noble horsemanship.'
|
|
|
|
|
Sean Flynt
|
|
|
|
|
Julien M

|
| Posted: Tue 08 Dec, 2009 11:29 am Post subject: |
|
|
Hey Sean,
That's a great looking woodcore in my book. The grip is neat and clean as usual, and you managed to do very well with the facets. I notice the tiny incisions on the raisers...something that I have been tempted to do quiet often too (but somehow never did for fear of ruining the all thing)). I'd love to see you handle better quality leather on your future scabbards and projects, even if you achieved great results on your previous ones by using just chamois. Have you tried to get your hands on cheap veg tan?
looking forward to see more.
J
|
|
|
|
|
Sean Flynt
|
| Posted: Tue 08 Dec, 2009 12:01 pm Post subject: |
|
|
| Julien M wrote: | Hey Sean,
That's a great looking woodcore in my book. The grip is neat and clean as usual, and you managed to do very well with the facets. I notice the tiny incisions on the raisers...something that I have been tempted to do quiet often too (but somehow never did for fear of ruining the all thing)). I'd love to see you handle better quality leather on your future scabbards and projects, even if you achieved great results on your previous ones by using just chamois. Have you tried to get your hands on cheap veg tan?
looking forward to see more.
J |
Thanks, Julien. No top grain leather yet, apart from the chappe. Yes, I'm still cheap and lazy! I have two more scabbards to make for nicer swords--a re-do of my Dürer in 2010 and an EBE Katzbalger some time in 2011 or 2012--and might spend for the good stuff for those projects.
The "roping" (for lack of a better term) of the grip risers was really just an afterthought. I wondered how well those would take an impression so I used (I think) a small, dull chisel to just press those into the leather without measuring. They're not uniform, but I think this gives them an authentic look. I'm going to try the same technique with at least the horizontal scabbard riser, too.
I'm going to decorate this chappe more than I have in the past. It'll have a diamond-and-circle pattern common in the period, maybe some gilding, too. I'd really like to do that kind of work for a scabbard but the thin leather I use doesn't allow it except on the risers. That, to me, is the best argument for slightly thicker leather. I think the chamois is probably sufficient to secure the core.
-Sean
Author of the Little Hammer novel
https://www.amazon.com/Little-Hammer-Sean-Flynt/dp/B08XN7HZ82/ref=sr_1_1?dchild=1&keywords=little+hammer+book&qid=1627482034&sr=8-1
|
|
|
|
|
Sean Flynt
|
|
|
|
|
Sean Flynt
|
|
|
|
|
Sean Flynt
|
| Posted: Tue 05 Jan, 2010 8:59 am Post subject: |
|
|
The grip is finished! Well, I need to use some paste wax on the little flaps that secure the chappe, but otherwise it's done. The design on the chappe is a common German/Austrian design of the period. I did that freehand with a very dull chisel  First, I glued a short section of balsa wood to the blade of the chisel, parallel to the edge and just above it. That way, all you have to do is make the first impression and then align the edge of the wood with the previous impression. No measuring, no guidelines, etc. Very fast and simple! For the "dot" stamp I used a nail set. First, I glued a short section of balsa wood to the blade of the chisel, parallel to the edge and just above it. That way, all you have to do is make the first impression and then align the edge of the wood with the previous impression. No measuring, no guidelines, etc. Very fast and simple! For the "dot" stamp I used a nail set.
Now I can finish the scabbard, refine the seating of the cross, make the peen block/nut and assemble. All of the hard work is complete!
Attachment: 167.57 KB
-Sean
Author of the Little Hammer novel
https://www.amazon.com/Little-Hammer-Sean-Flynt/dp/B08XN7HZ82/ref=sr_1_1?dchild=1&keywords=little+hammer+book&qid=1627482034&sr=8-1
Last edited by Sean Flynt on Wed 06 Jan, 2010 1:14 pm; edited 1 time in total
|
|
|
|
|
|
|