| Author |
Message |
Brian K.
Industry Professional

Location: Salt Lake City, Utah Joined: 01 Jan 2008
Posts: 727
|
 Posted: Mon 31 Aug, 2009 9:20 am Post subject: Posted: Mon 31 Aug, 2009 9:20 am Post subject: |
 |
|
Nice work Julien, now you need a chape!
Brian Kunz
www.dbkcustomswords.com
|
|
   |
 |
Sean Flynt

|
|
|
|
|
Julien M

|
| Posted: Mon 31 Aug, 2009 11:18 am Post subject: |
|
|
Thanks for the feedback guys. I agree Sean, it should make sense that this suspensions settings works best with longuer swords . I've seen plenty of one handler and messer in art carried that way though.
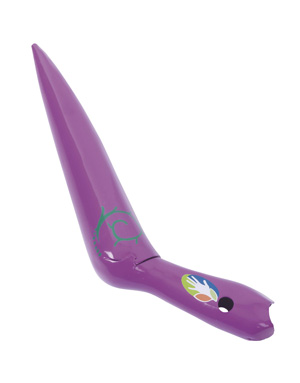
Brian, I DO need a shape! After months I haven't come up with a satisfying solution. I have ideas though (bright I don't know but I'll never know for sure until I try). Leo of Tod stuff already agreed on making a shape for me, but I doesn't keep me from thinking about ways to do it myself  and the latest I tought about it that thing below: a carbon steel dirt cheap dibber (5 euros)...the catch is, those sell in France...while in the uk, british people being such passionate gardeners, they have much fancy ones with a shape I could not use for that purpose (not to mention they are 5 times more expensive). I'd chop the tip of, sand it, hammer a bit it to make it more oval...and with luck, who knows...might even work! and the latest I tought about it that thing below: a carbon steel dirt cheap dibber (5 euros)...the catch is, those sell in France...while in the uk, british people being such passionate gardeners, they have much fancy ones with a shape I could not use for that purpose (not to mention they are 5 times more expensive). I'd chop the tip of, sand it, hammer a bit it to make it more oval...and with luck, who knows...might even work!
Cheers!
J
 Attachment: 12.09 KB Attachment: 12.09 KB
|
|
|
|
|
Julien M
|
| Posted: Mon 31 Aug, 2009 11:55 am Post subject: |
|
|
One more thing,
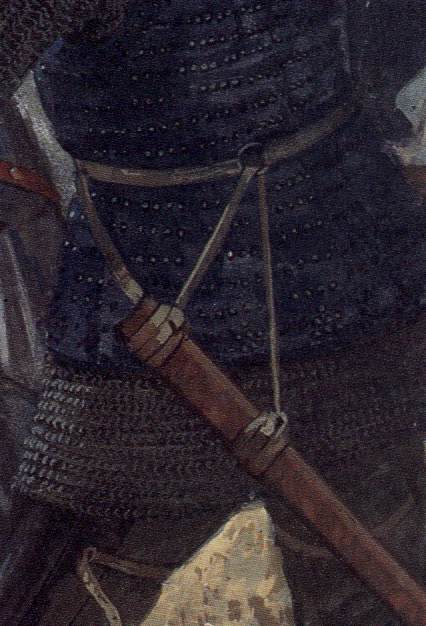
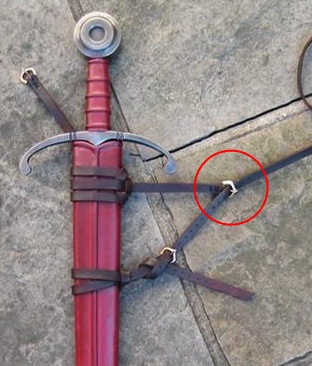
I might replace the buckle circled in red by a brass ring such as the one featured on this Osprey picture below. The leather strip tends to twist a bit in the buckle when the belt is worn and having the 3 bits of leather coming together in a ring would correct that.
J
Attachment: 42.66 KB
Attachment: 55.16 KB
Last edited by Julien M on Tue 01 Sep, 2009 9:47 am; edited 1 time in total
|
|
|
|
|
Julien M
|
| Posted: Tue 01 Sep, 2009 9:42 am Post subject: |
|
|
One question though: how do you prevent the leather knot (especially the one at the mouth) to slide up the scabbard (when there is no raiser to stop it?) My design is not compromised because the leather knot is stopped by the raiser at the mouth, but i wish it would stay 6 cm or so below (as on the pict above really). I've tried wetting the leather, redoing the wrap tighter, but when it dries, it is not long before it gradually slides upwards. Glue seems somehow heretic as the scabbard wrap is very good quality leather.
Any ideas would be welcome
Cheers,
J
|
|
|
|
|
Brian K.
Industry Professional
Location: Salt Lake City, Utah Joined: 01 Jan 2008
Posts: 727
|
| Posted: Tue 01 Sep, 2009 9:49 am Post subject: |
|
|
The leather suspension band's should be put on as tight as possible. I know on mine once I'm done it takes a great deal of strength to move them, but I also use wider bands and heavier leather. Even less wide would hold just the same.
Perhaps the type of leather you used is susceptible to stretching? I use cowhide veg tanned leather, approximately 6 to 7 oz weight, so it doesn't stretch.
Looking back at your pictures, it doesn't appear as though they are tight enough. Also, try and keep the bands together. Eliminating any space between the bands will help eliminate any movement.
Brian Kunz
www.dbkcustomswords.com
|
|
|
|
|
Dan Dickinson
Industry Professional

|
| Posted: Tue 01 Sep, 2009 2:14 pm Post subject: |
|
|
Julien,
What I do is to tie the knots a little bit further down the scabbard than you want them. Then when they're tied, you force them where you want them...and they naturally tighten up nicely. I hope this helps,
Dan
|
|
|
|
|
|
Hadrian Coffin
Industry Professional
Location: Oxford, England Joined: 03 Apr 2008
Posts: 404
|
| Posted: Tue 01 Sep, 2009 8:24 pm Post subject: |
|
|
I just tie it until I am 99% happy with its space and hang, then I glue and tie it (I have never been 100% happy with anything, but I guess I'm a bit of a perfectionist). Some people I know add a stitch to the "ends" to keep the knot from loosening (I saw a rivet once also, but in my opinion it looked out of place). I have never used, but have heard if you use something similar to hot glue if you ever decide to pull it off it leaves very little in the way of a mark.
Best,
Hadrian
p.s. Did you rub "paste wax" into your grips at the end? You never mentioned it, but it really improves the final appearance. If you are interested you can buy it at a household supply store (they sell it at the grocery store where I live). People use it to finish wood and stuff, it works great on grips. I have heard, but could be wrong, that this is what Albion uses. People often assume they use beeswax, but (I heard) it is actually paste wax.
Historia magistra vitae est
|
|
 |
|
Julien M
|
| Posted: Wed 02 Sep, 2009 1:30 am Post subject: |
|
|
Hi guys,
Thanks for taking the time to advise me on this.
Brian, I use strips of quality veg cowhide too (3mm thick, I don't have a clue how it translates in Oz ). The leather tends to stiffen rather than strench. Once it is stiff, it can be moved along the scabbard core. The core is tappering a bit so your advice seems sensible Dan. So I'll redo the knot, tighter, and I'll start a bit further down on the scabbard then will push it up.
Are you talking about that stuff Hadrien? (neutral color I'm suppose?)
http://tooltray.com/decorating-&-wood-car...n=Shopping
I used lexol to finish leather, but I wouldn't mind giving that a shot, seems cheap enough and I had to import lexol from the USA at great cost... What does i improve in terms of finish?
Cheers,
J
|
|
|
|
|
|
Hadrian Coffin
Industry Professional
Location: Oxford, England Joined: 03 Apr 2008
Posts: 404
|
| Posted: Wed 02 Sep, 2009 10:39 am Post subject: |
|
|
Yep that seems to be it. Loads of different brands, but they all seem to be the same parafin wax in turpentine. The stuff I use says "neutral". It darkens the colour ever so slightly, seals it, hides the seem, and seems to slightly harden it. I used to just seal it with lexol or various other leather products, or beeswax, but paste wax is by far my favourite. Lexol seemed to soften the leather and over time make the ridges wear away. Beeswax had to be warmed rubbed on and then melted, it often made the ridges formed by the string far less aparent, and it would shrink leather so often the whole grip would move leaving a patch of bare wood.
Best,
Hadrian
p.s. I love watching your progress, each piece gets better and better.
Historia magistra vitae est
|
|
|
|
|
Sean Flynt
|
| Posted: Wed 02 Sep, 2009 11:11 am Post subject: |
|
|
After I tied my knot I found that it didn't lie flat enough. I just tightened inch by inch, pulling up a bit here and pulling on the next bit, all the way through the knot. Did that twice, at which time it was very tight and not slipping at all. Of course, my chappe sits flush with a riser and the riser prevents the knot from moving up. By the way, when I first tied the knot, I placed it an inch or two below its desired location, then pushed it up into place. This helps you get a tight fit because you're moving from the narrower part of the scabbard to the wider part. I probably should have gone a few inches lower.
-Sean
Author of the Little Hammer novel
https://www.amazon.com/Little-Hammer-Sean-Flynt/dp/B08XN7HZ82/ref=sr_1_1?dchild=1&keywords=little+hammer+book&qid=1627482034&sr=8-1
|
|
|
|
|
Julien M
|
| Posted: Mon 25 Apr, 2011 11:26 am Post subject: |
|
|
Well, it's been a while since I've posted on this thread!
This project being still in progress, I'll give a brief update. I could have bought a custom scabbard shape for it, but having decided long ago that I should do it myself and being stubborn at that...I just left things pending until I found a way to make these bloody shapes myself.
So here is my wip on it. It's rough an not finished in any way, but the hard part is definitely done.
It's made of a rolled sheet of carbon steel,cold hammered to the shape of a cone (I cut lines along the tip in several places and hammered it in order make it taper to a point). I then made a paper mock up of the shape and picked a design, then used a permanent marker to reproduce it on the actual shape. Then some dremel time to carve the inside patern (it's not the hard part, I was done in 15 minutes).
Next I need to figure out soldering, and I'll be able to add a knob at the tip (there are some ball head screw out there on the web, that's what I intend to use), and then I'll fill those incisions at the tip to make them disappear.
At last some workbench time!...thank god for easter and for the royal mariage
J


|
|
|
|
|
|
David Sutton
|
| Posted: Wed 27 Apr, 2011 3:37 pm Post subject: |
|
|
Thats looking pretty good Julien. I like the fancy cut design, I bet a medieval scabbard-maker would have given his eye teeth for a dremel! looking forward to seeing it welded and cleaned up. How are you going to attach it to the scabbard, glue or just a friction fit?
'Reserve your right to think, for even to think wrongly is better than not to think at all'
'To teach superstitions as truth is a most terrible thing'
Hypatia of Alexandria, c400AD
|
|
|
|
|
Julien M
|
| Posted: Fri 29 Apr, 2011 6:18 am Post subject: |
|
|
At last! My scabbard shape is done!...a bit of plumber solder and a few passes on a belt grinder did the trick. I will refine the inside pattern and the final polish but you get the idea. Interestingly enough the tip formed on its own during the soldering, due to the metal running on the inside (thanks gravity!). Finally I will have to clean up the mess done by previous attempts at fitting a shape...resulting in scratching the leather at the tip. I managed to make a very close fit all around, which was the difficulty here, as the scabbard was made without giving much thought to the shape. Now I will plan ahead and adapt the scabbard tip to the shape rather than the other way around. I left the back seam a bit visible rather than drown it in solder, because most original shapes are left that way.
It might not look like much, but I am very happy with the result: scabbard shapes have been my headache since I started making scabbards a few years ago...and I now have a process to make them. I'll do one for my crecy scabbard soon.


|
|
|
|
|
Sean Flynt
|
|
|
|
|
Julien M
|
| Posted: Sun 26 Jan, 2014 7:29 am Post subject: |
|
|
Old thread, and old project!
The last thing I wanted to do on this sword was to redo the peening, since I less than impressed with the assembly gen 2 choose.
The factory sword features what looks like a thick rondel, shaped like what I can best describe as a thick shuriken.

I dremeled the rondel on one side, to avoid damaging the tang. After I removed this (it's peened on top), I was surprised to find a threaded tang, all the way down the wooden grip (I could not see if there was evidence of welding, as I never dismounted the wooden grip). The pointy rondel was in fact a screw on piece securing the pommel, not some fancy addition.
This was a very bad surprise, but explained why the pommel had become loose (it moved around it's axis). One hole at the bottom, one at the top. Epoxy at the base of the base of the pommel, and this rondel at the top, which is bent to follow the curve of the pommel - that's all that prevents the pommel from spinning on itself.
Anyway I was left with an issue: how to peen the sword ensuring the pommel would not spin? This proved to be much more complicated that expected. To do it properly I had to weld the top hole, closing it completely. I had to drill a new hole, and file the tang square, as well as the pommel hole, ensuring a very tight fit (to allow the pommel to be hammered down, with no possible movements. That I managed. After, the hot pinning was a walk in the park. I did counter sink the pommel, and could have sanded flush...but I like it that way (all the antique swords I have see up close did have a visible peen). Hope you like the result.

I think I've taken this sword as far as I could. A great platform to experiment really. I'll refresh the dye on the scabbard and straps, clean up the hilt and blade, will epoxy the scabbard shape, and will move on to bigger projects!
Cheers,
J
|
|
|
|
|
Luka Borscak

|
| Posted: Sun 26 Jan, 2014 12:51 pm Post subject: |
|
|
|
These weird hilt construction methods are the main thing I didn't already buy some of the lower price range pieces. Your peen looks nice, good job.
|
|
|
|
|
Dean F. Marino

Location: Midland MI USA Joined: 24 Aug 2011
Posts: 229
|
| Posted: Sun 26 Jan, 2014 2:28 pm Post subject: |
|
|
WRT Leather dye... in particular, Fiebings....
NEVER buy a jar of this (other than Black), and directly use it on something you care about . Most Leather crafters will cut Fiebings about 50% with denatured alcohol, then dye a SCRAP as a test piece. The 50% trick also allows you to slowly build the color UP if you desire to do so - and results in a far more uniform dye job.
Shoe polish? Wonderful stuff - for shoes. Atom Wax, or Eco-Flo Ultrasheen (which many claim is nothing but Mop 'n Glo Floor wax) are very good at protecting your leather from weather, and have a MINIMAL darkening effect. More traditional? Bees wax, Bees wax and kerosene (also available as Snow Seal, used for boots), various oils... but be warned that MOST of these will darken your leather.
In edhil, hai edhil. In edain, hai edain.
|
|
|
|
|
Julien M
|
| Posted: Sun 26 Jan, 2014 2:56 pm Post subject: |
|
|
Thanks Luka.
Dean I never had major issues with Fieblings Dyes. As you say dilution is key, and for red especially.
Applied directly on leather with turn something closer to oxblood, and is a perfect shortcut for disaster.
I might investigate more historical ways to dye leather at some point, but I have more pressing things I want to try first (etching, silver soldering and more!).
As far as shoe polish goes, I won't typically use such expedients. In this particular case the leather used for the grip was old it had taken a dark shine. The scabbard was a fresh top grain hide. As a result there was a contrast though the same technique was applied to both. That leather shoe finish did the trick to even both, and I still use it to enhance red dyes occasionally - don't see a problem with it really as the end results works well in my opinion. I use beeswax to seal afterwards.
|
|
|
|
|
|
B. Pogue
Industry Professional
|
| Posted: Mon 27 Jan, 2014 10:53 am Post subject: |
|
|
| Luka Borscak wrote: | | These weird hilt construction methods are the main thing I didn't already buy some of the lower price range pieces. Your peen looks nice, good job. |
This is no longer the case for the Legacy Arms swords: http://casiberia.com/blog/5/legacy-arms-medie...el-peening
I have one of the latest batch here for photography and it is properly peened.
Blake
|
|
 |
|
|
|
You cannot post new topics in this forum
You cannot reply to topics in this forum
You cannot edit your posts in this forum
You cannot delete your posts in this forum
You cannot vote in polls in this forum
You cannot attach files in this forum
You can download files in this forum
|
All contents © Copyright 2003-2024 myArmoury.com — All rights reserved
Discussion forums powered by phpBB © The phpBB Group
Switch to the Basic Low-bandwidth Version of the forum
|


