| Author |
Message |
Brian K.
Industry Professional

Location: Salt Lake City, Utah Joined: 01 Jan 2008
Posts: 727
|
 Posted: Wed 22 Jul, 2009 1:45 pm Post subject: Posted: Wed 22 Jul, 2009 1:45 pm Post subject: |
 |
|
Here is my tip:
Whenever I have to match a color, I delute my source to a lighter shade and then apply. Once dry I can see how much more I need to go darker and do so until I've matched the shade. It's easy to go darker, but impossible to go lighter, once already applied.
Feibings makes a nice delution solution to mix with your colors.
Brian
As for correcting your current problem, you can always go darker with the grip. Personally I like ox blood over red.
Brian Kunz
www.dbkcustomswords.com
|
|
   |
 |
|
Zach Gordon
|
| Posted: Wed 22 Jul, 2009 2:15 pm Post subject: |
|
|
|
I have to say I agree with Brian, I think that darker color looks much, much better then the uber bright red. But maybe that's just me. Oh if you give it that bright fire-engine red won't it just darken to the "oxblood" color over time with oil and sweat and stuff?
|
|
|
|
|
Julien M

|
| Posted: Thu 23 Jul, 2009 6:42 am Post subject: |
|
|
Hi guys,
Thanks for your feedback.
Brian, I really appreciate the tip and will certainly use it for future projects. It was a while since I worked on a scabbard and even if I was done with this one much more quickly than the first, I fully measure the quality of your work now that I have tried my hands at these.
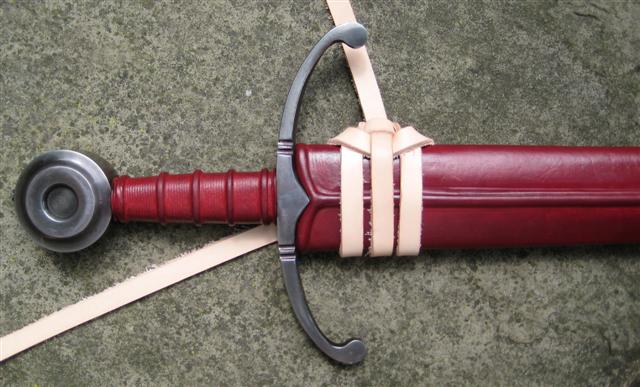
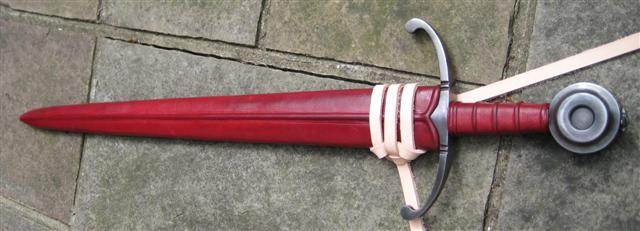
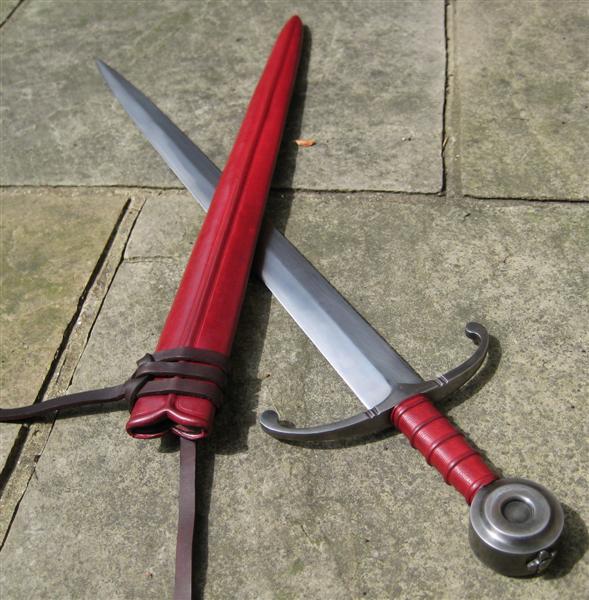
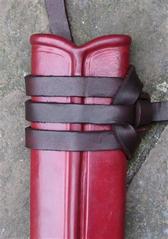
I did try to dilute the red colour, but did it in a very crude way (basically dipping the stuff in water before each pass, but I ended up with uneven applications (and thats no surprise on the scale of a all scabbard, though this technique worked well with the grip since I ended up with that bright red (yeah, "fire engine" red Zach  . I have to say I loved this contrast initially, but I am aware that there is no fix and going brighter once the dye is applied is no option. . I have to say I loved this contrast initially, but I am aware that there is no fix and going brighter once the dye is applied is no option.
So what I did is: darken the red grip, and used my red shoe cream to even both...and it worked as the oxblood turned to a beautiful scarlet red. Now I have nothing against oxblood, that's the colour I chose for my Crecy grip and scabbard. But in the meantime I also worked on an oxblood coustille. Every sword I approach is somehow turning oxblood...a personal curse it seems So I'm happy I avoided that this time.
Also I agree with you Sean. Some fieblings dyes seem to be more potent than others...so easier to work with than others. Oxblood, black and dark brown are quiet forgiving. Red is quiet a nightmare and blue turns bronze on a whim (depending on what leather you use surely).
I have nothing against using shoe polish or cream Nathan. I'm off the "whatever works" school and would gladly try printer ink of even my girlfriend lipstick if I though it had a chance to work Its not ideal but I remember Peter Johnson recommending it in some case (was for a grip though if I remember correctly) on this very forum once. I think it does a good job at complementing the dye sometimes. I have discarded chamois though; as it happened to sweat the dye even long after it should have been dry, leaving dirty hands after handling. I'm sure it all depends on what you use to do the finish though (that eco flo from tandy apparently does a good job, but all I have is lexol and it doesnt work at all). To my opinion, chamois is still a very good material to start with, inexpensive and elastic, it is much more easy to use than veg tan (especially on tapering grips). Anyway, all my grips are veg tan now, and the leather I used for this scabbard is carving veg tan (a piece with imperfections and stains but still good quality leather), and the dye was fielblings. So I guess none of the materials are to blame for messing things up, but I only .
Let me know what you think of these below, I'm quite happy with it in the end.
Cheers,
J
 Attachment: 55.28 KB Attachment: 55.28 KB
Attachment: 34.06 KB
Attachment: 29.85 KB

Last edited by Julien M on Thu 23 Jul, 2009 7:07 am; edited 2 times in total
|
|
|
|
|
Sean Flynt

|
|
|
|
|
Julien M
|
| Posted: Thu 23 Jul, 2009 7:27 am Post subject: |
|
|
Thanks Sean!
Yes the belt will be contrasting, either dark brown or even black.
As yourself, I make a point of making everything myself, and using only budget stuff if possible. But I admit the shape issue is giving me headaches so I did commission Tod to make the shape of my crecy scabbard, but I am very unsatisfied with that solution, which feels like giving up (even if I'm sure the shape will be awesome). But I fear my computer desk will not suffice to try on metal work...and with a kid to be delivered in 5 month, it will be even worse!! Sometimes you randomly come across some object you can modify to fit such purposes, and I was kind of waiting for that to happen (I remember looking at women leather boots in the tube while making my first grip, thinking "this might do, wonder if that's tin enough" . But I didn't find anything that might be used to fit the end of a scabbard properly.
I love what you did with your last project buckle wise. I'll probably go for something very similar, as I have a handful of very crude copper or bronze buckles. I just need to fit a small plaque of metal and a rivet like you did.
J
|
|
|
|
|
Sean Flynt
|
| Posted: Thu 23 Jul, 2009 9:03 am Post subject: |
|
|
| Julien M wrote: | Thanks Sean!
Yes the belt will be contrasting, either dark brown or even black.
As yourself, I make a point of making everything myself, and using only budget stuff if possible. But I admit the shape issue is giving me headaches so I did commission Tod to make the shape of my crecy scabbard, but I am very unsatisfied with that solution, which feels like giving up (even if I'm sure the shape will be awesome). But I fear my computer desk will not suffice to try on metal work...and with a kid to be delivered in 5 month, it will be even worse!! Sometimes you randomly come across some object you can modify to fit such purposes, and I was kind of waiting for that to happen (I remember looking at women leather boots in the tube while making my first grip, thinking "this might do, wonder if that's tin enough" . But I didn't find anything that might be used to fit the end of a scabbard properly.
I love what you did with your last project buckle wise. I'll probably go for something very similar, as I have a handful of very crude copper or bronze buckles. I just need to fit a small plaque of metal and a rivet like you did.
J |
Ha! When I was first trying to figure out what to use for grips I went to the local thrift store and got some trashy red women's boots from ca. 1990. I did not pursue that line of inquiry, but the looks I got while shopping made the exercise worthwhile. 
You could make a cone of metal with just some tapered pliers, light hammer small 25 lb anvil. A bench vise is always helpful but you do need a stable bench for that.
As for the buckle. The buckle I made for my sword belt is a bent nail. The tongue is a smaller bent nail. The rivet is an even smaller nail. The buckle plate is 22 ga. steel snipped with hand shears. A small set of cheap files cleans everything up nicely.
-Sean
Author of the Little Hammer novel
https://www.amazon.com/Little-Hammer-Sean-Flynt/dp/B08XN7HZ82/ref=sr_1_1?dchild=1&keywords=little+hammer+book&qid=1627482034&sr=8-1
|
|
|
|
|
Nathan Robinson
myArmoury Admin


|
|
 |
|
Brian K.
Industry Professional
Location: Salt Lake City, Utah Joined: 01 Jan 2008
Posts: 727
|
| Posted: Thu 23 Jul, 2009 9:26 am Post subject: |
|
|
You're a UK based scabbard/custom making business waiting to happen!
Chapes are probably the biggest obstacle in a scabbard makers path. Working with metal is a skill that takes a lot of practice. It's also far more difficult to design a chape to fit an already made scabbard, than to make a scabbard to fit a already made chape. I always make my scabbards to fit a pre-existing chape.
You could make a leather chape, and with a little refinement & tooling they look pretty good.
Good luck!
Brian Kunz
www.dbkcustomswords.com
|
|
|
|
|
|
Ben Sweet
|
| Posted: Thu 23 Jul, 2009 2:09 pm Post subject: |
|
|
Wow! What an improvement you have made to that sword. 
|
|
|
|
|
|
Ole W.
Location: Norway Joined: 21 Jan 2009
Posts: 15
|
| Posted: Thu 23 Jul, 2009 2:23 pm Post subject: |
|
|
You did a great job on this sword and scabbard! The colour fits the sword and scabbard perfectly (they look as if they have been soaked in blood), and the multiple risers add aesthetical value as well as improving the handling of the weapon. Once again, great work!
Are you planning to add a chape? Have you received the chape for your Crecy scabbard yet?
|
|
|
|
|
|
Ed S.
Location: San Diego Joined: 08 Apr 2009
Posts: 86
|
| Posted: Thu 23 Jul, 2009 3:29 pm Post subject: |
|
|
|
This is one of the nicest upgrade projects I have ever seen. It really looks very professional; I can't find a single flaw (though I'm sure you can ). I have been eying that same sword for a while and, after seeing how nice it can potentially look, I have decided to get one for myself. Again, nice job!
|
|
|
|
|
Julien M
|
| Posted: Sat 25 Jul, 2009 6:06 am Post subject: |
|
|
Hi guys,
Thanks a lot for your feedback and constant support. Your inputs and advices are crucial to me and it is here on myArmoury that I gather motivation (and inspiration) to take on such projects. Without this community I would probably still be eyeing some dodgy marto sword as if it was the holy grail
| Brian K. wrote: | | You're a UK based scabbard/custom making business waiting to happen! |
Again, thank you Brian. I am a long way from that yet I'm sure! I might do some commissioned work from time to time as I did for M. here on this forum, depending on whatever time my brand new job leaves me ( yeah...more responsibilities...so less time to wander about swords in and out of the office) Working for someone else is certainly a great opportunity to improve as you refuse compromises you would have accepted for yourself (not to mention that you get to handle many swords!)
I will add a shape Ole, but it might take some time to get it done. I won't go leather, as this little metal tip "balances" the all thing to me. I haven't sent my scabbard to Tod yet, I'll have to give him a ring someday. To be honnest I'd love to bring it in myself, meet Tod and see his workshop Anyway he said he'd be available to do it around October.
Ed, if you buy one of those, you are in for a ride There is much to do to make it acceptable to average/good standards. In many ways I think better of windlass sword costing much less...so you may be very disappointing when opening the box (I was)...depending on your initial expectations of course.
Sean, I will invest in more equipment for sure, a B&D workmate is on the top of my list, as well as one of those handy benchtop belt grinders, a small anvil and a blowtorch. Since I saw how great your last project turned, I too want to mess around with hilts and metal parts! (And guess what...there is a high chance this will be the well known windlass type XIV too...might be interesting to see what different choices we make for that sword).
All the best,
J
edit: couple of shots with the dyed belt. Dark brown works well I think.
Attachment: 72.51 KB
Attachment: 12.92 KB
|
|
|
|
|
Julien M
|
| Posted: Sun 26 Jul, 2009 5:31 am Post subject: Buckles! |
|
|
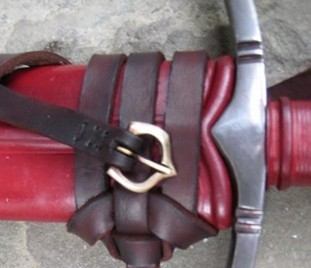
Added buckles this morning.
I'm not sure which suspension system I'm going to go for. I'm hugely tempted to go for something very similar to Sean last project, a simple lace going around the waist. I'll have to check period art to be sure. If you want to throw me a couple of period art picts or example here feel free to do so. To be honnest, I've never been much concerned about wearing the sword, I have no use for this. But I want to have to feeling this project is fully completed.
Below is a shot with a fitted brass buckle. It was originally bronze antique finished, but I cleaned it off as I find the brass shine more attractive with the red overall tone. Got 10 of those for less than a pound here:
http://www.getdressedforbattle.co.uk/acatalog...ckles.html
Hope you like it,
J
Attachment: 30.85 KB
|
|
|
|
|
|
Patrick Kelly
|
| Posted: Tue 28 Jul, 2009 5:07 pm Post subject: |
|
|
Julien,
You've taken a mediocre sword and turned it into something very nice indeed. Well done.
|
|
 |
|
Sean Flynt
|
|
|
|
|
Julien M
|
| Posted: Wed 29 Jul, 2009 2:56 pm Post subject: |
|
|
Thanks chad, much appreciated!
| Sean Flynt wrote: | | That will be very interesting! On your mark...get set... |
Interesting indeed! and yes that's official, the type XIV it is Got lucky as a fellow european forumite happened to be selling his. I plan on reshaping the cross or at least try (not simply remove a bit of material here and there as I did for the Henry V), appleseed edge (or full edge reshape with a belt grinder if I get one), new grip, blueing this, antiquing that etc... I also plan to build a scabbard from scratch, and I'm tempted to try balsa wood coated with fiberglass core...not sure yet.
Cheers,
J
|
|
|
|
|
|
Hadrian Coffin
Industry Professional
Location: Oxford, England Joined: 03 Apr 2008
Posts: 404
|
| Posted: Wed 29 Jul, 2009 4:42 pm Post subject: |
|
|
If you do get a belt grinder be sure to practice on scrap metal a LOT before you start on the blade. Windlass edges are thin and will heat up very fast. What I would suggest is to place a 2X4 in a vise narrow side up, put the blade on the 2X4 and tape/clip/tie the tang down. Then put some sandpaper on a block of wood, and standing belly to the tip or belly to the tang, drag the sandpaper changing your angle slightly every so often until it has a nice sharp edge then polish with increasing grades to your desired finish. Depending on the angles you use you can completely reshape the whole edge geometry...
Love what you did to that Henry V,
Best,
Hadrian
|
|
 |
|
|
Derek K
|
| Posted: Thu 06 Aug, 2009 10:15 am Post subject: |
|
|
|
Julien, just wanted to say how impressed I am by your customization of this sword! I have the same one myself and, not having the resources to pay someone like Brian Kunz (who did the re-wrap for me) to make it a new scabbard and being tempted by the challenge, I've planned for some time to re-cover the sheath and possibly antique the fittings. I like the sword itself but it and the scabbard still have that production look. A stumbling block has always been ordering the expensive leather, since I'll need to buy a piece much larger than necessary. Anyway, this thread and your work on the Henry V have inspired me - it's great to see what someone has done with the very sword I have. Congrats on the excellent job!
|
|
|
|
|
Jean Thibodeau

|
| Posted: Thu 06 Aug, 2009 10:20 am Post subject: |
|
|
| Patrick Kelly wrote: | Julien,
You've taken a mediocre sword and turned it into something very nice indeed. Well done. |
Yup, what Patrick said ! It now looks " right " and 300% better. 
You can easily give up your freedom. You have to fight hard to get it back!
|
|
|
|
|
Julien M
|
| Posted: Mon 31 Aug, 2009 8:48 am Post subject: |
|
|
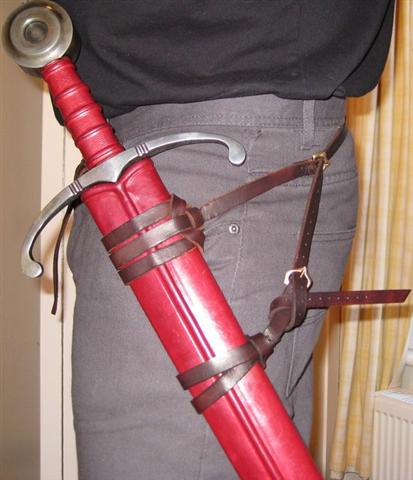
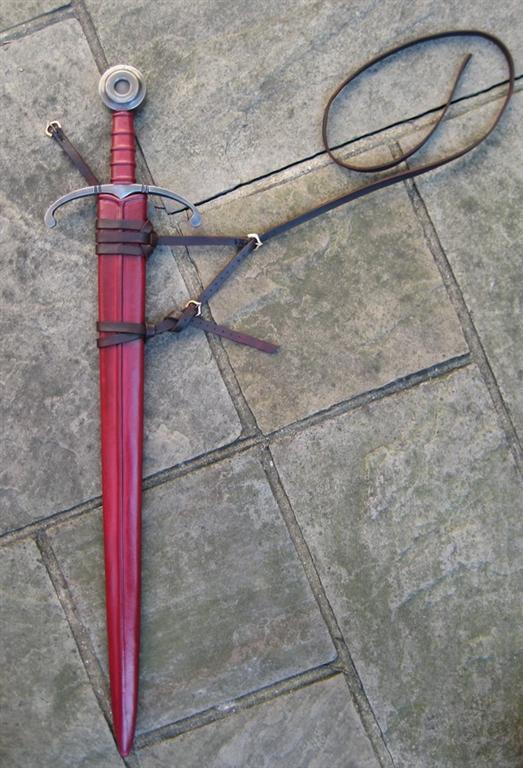
I finally found time to complete a suspension system for this sword.
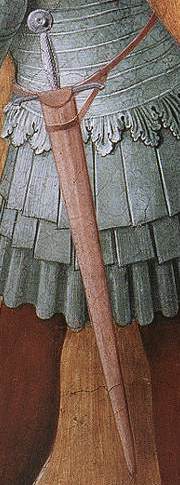
Initially I planned to use something very similar to what Sean did for his latest long sword: a single suspension point, the sword worn loose around the waist. If we rely on period art, this was a common, elegant but yet simple way to wear the sword during the XV century. But as T Capwell (curator at the Wallace collection) said when interviewed for "timewatch" on the subject of armour: "it is a very physical subject"...well that also applies to designing suspensions for a sword...until you wear the thing, you can only guess. So I first completed a belt system with one point of fixation only, close to the scabbard mouth, then I put it on to test the fit. Like Sean, I was surprised how well such a loose string of leather could do a good job at holding the sword comfortably and safely. But on the other hand, I found the drawing of the sword to be slightly impractical, as the sword stands vertically when attached that way, so any attempt at grabbing the handle made me kind of dig under my armpit so to say, and twisting my wrist a little bit to reach it. In short, I realized that this could be improved if the sword had a slight inclination forward, allowing for a quick grab....so there came the second suspension point.
Pictures are below, as well as the period art I use as a base for that project.
Now to the shape and the all package will be complete.
Let me know what you think.
Cheers,
J
Attachment: 22.11 KB
Attachment: 36.32 KB
Attachment: 74.93 KB

Attachment: 79.85 KB
|
|
|
|
|
|
|
You cannot post new topics in this forum
You cannot reply to topics in this forum
You cannot edit your posts in this forum
You cannot delete your posts in this forum
You cannot vote in polls in this forum
You cannot attach files in this forum
You can download files in this forum
|
All contents © Copyright 2003-2024 myArmoury.com — All rights reserved
Discussion forums powered by phpBB © The phpBB Group
Switch to the Basic Low-bandwidth Version of the forum
|

