Sword in the German style of ca. 1550-1600
This sword traveled a long, long road. The blade is by Angus Trim, and was originally mounted with an English basket hilt of ca. 1550. It was a dodgy match, stylistically, so I separated them. The pommel and cross are adapted from an old WS "scottish backsword." Lots of work on the cross--shortening it, taking out the vertical "S" curve, adding as much horizontal curve as I thought it could take, removing the inboard ring. The cross was mounted on a short-lived project and the pommel, too, had a past life on a proto-mortuary sword project.

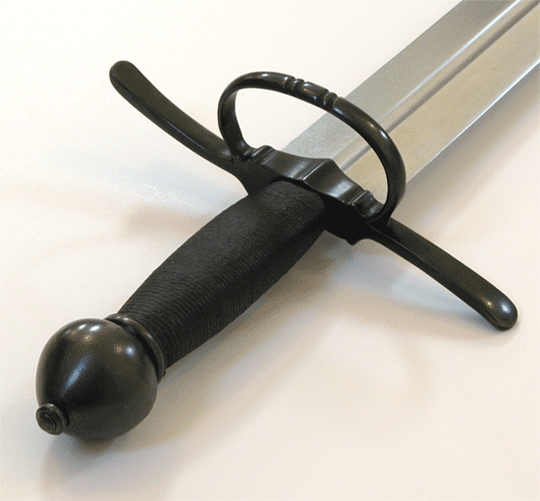
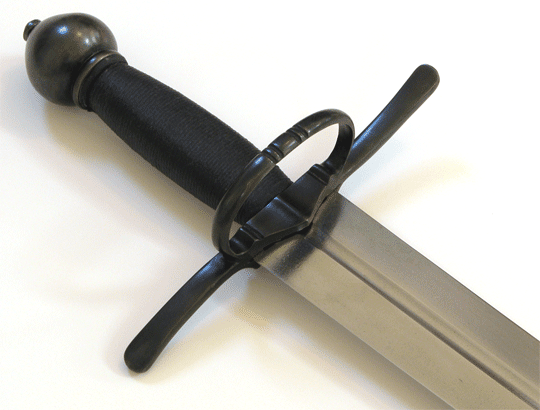
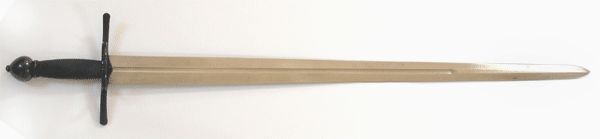
My original idea was to make a riding sword in the Italian style of ca. 1530, with an elaborate grip of ferrules and bars. Some of those swords were blued and gilded, so I blued the furniture but realized that the piece suddenly resembled German military swords of the last half of the 16th c. I finished the piece in that style and I'm pleased with the result. This is a cut-oriented sword, with a POB just under 5" below the cross. That seems to be reasonable for a cutting sword, and the overall light weight makes the piece surprisingly handy. Feels like I should use it with a buckler or target.

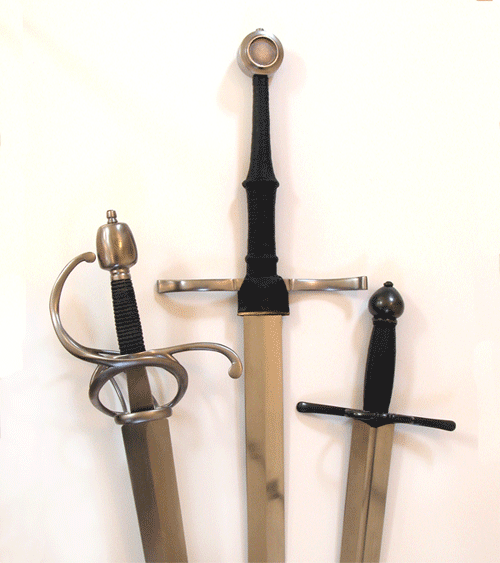
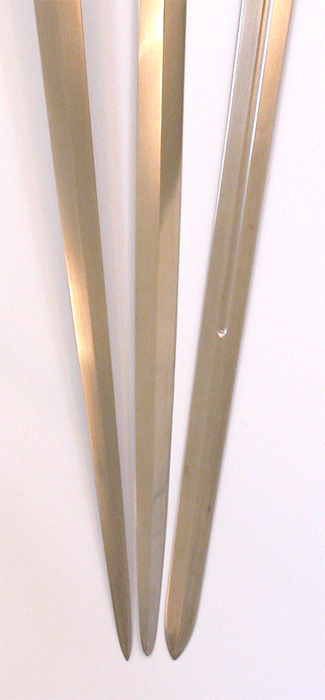
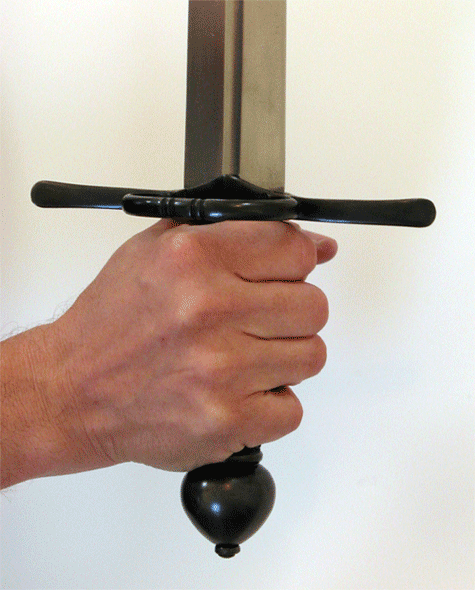
The sword is shown below next to the other reproduction swords in my collection--all German now. The other two pieces shown are my newly-acquired A&A Town Guard sword and my customized A&A Dürer. The tips are aligned in this photo, so you can get some sense of scale. The last photo shows the tips of the three blades for comparison.


 Attachment: 144.92 KB
sword1.gif


 Attachment: 102.79 KB
sword2.gif


 Attachment: 142.89 KB
sword5.gif


 Attachment: 143.65 KB
sword6.gif


 Attachment: 35.23 KB
sword3.gif


 Attachment: 143.61 KB
sword4.gif

That looks fantastic, Sean! You really have gift for taking these DIY projects and making them into something really nice.
Sean, that's an outstanding transformation. Did you do the rainguard on the Durer as well? That's an excellent addition to that sword and I wish we saw more of them on modern replicas.
Patrick Kelly wrote:
Sean, that's an outstanding transformation. Did you do the rainguard on the Durer as well? That's an excellent addition to that sword and I wish we saw more of them on modern replicas.


Thanks! Yes, I got some great information about rain guards here (including a very helpful line drawing of a surviving example) and made one as part of the new grip for that sword.

Info on rain guard construction:
http://www.myArmoury.com/talk/viewtopic.php?t...light=rain


Photos of my Dürer project:
http://www.myArmoury.com/talk/viewtopic.php?t...ht=d%FCrer

I recently gilded the lower edge of my rain guard because I've seen that kind of decoration in paintings of this period. I rubbed off part of it to see how stable it is (not very) and haven't gotten around to removing it or re-doing it. These are very easy to make, by the way, but it certainly helps to do the work along with a new grip.
Between that and the Sallet you've surely been busy Sean!

Great work and very impressive finish on both. I especially like the blueing (blackening...) on that one. Looking at your work gets contagious as usual and it's inspiring me to try it on one of my hilts too. Did you use the Birchwood Casey Gun Bluing kit I hear about in the forum to achieve such a mate black color?

Cheers and looking forward to see more.

J
Oh and another question, do you still use chamois leather for your grip wrap, or did you use for veg tan?
I used the Birchwood-Casey PermaBlue product for this piece and the sallet. It's very, very easy to use and gives great results, especially with repeated applications. Just be sure to use a good engine degreaser first.

I used only one application of PermaBluefor this hilt because the product tends not to streak on such a small surface area. Repeated apps on a large surface seems to eliminate streaks by bringing everything to the same depth of color. It's important to have light machine oil (I use sewing machine oil) standing by for application as soon as you've rinsed the blued parts. They'll start to rust almost immediately, otherwise. The oil gives the finish great depth and color. If the oil is uneven in places you can get the illusion of streaking or splotching, but adding more oil or just rubbing with a cloth to give better coverage will solve that problem. I got the best results by repeatedly oiling and rubbing.

Notice that the peen is blued, too. I blued the pommel nut, peened, filed and sanded the tang, then degreased and blued the peen in place. No problem. It should be possible to blue an entire hilt without dismantling a sword. You'd just have to get finicky with the degreasing and probably mask some areas with oil or tape.

Yes, I still use chamois for grips. I don't think I've seen anything but veg tanned. When I buy it at the department store I look it over as much as possible to make sure it's the thickness I want and has a smooth side. Typically, thickness and surface varies on a given piece. I use proper leather dye these days and it makes a world of difference. I treat the finished grip with weatherproofing wax for shoes.

By the way, the cord impression on this grip is the neatest I've ever achieved. The key is to use synthetic nylon twine and a plain leather-over-wood grip construction. If you use cord under the leather, the effect won't be quite as neat. I think this is why Albion grips are so attractive--no cord under the leather. That changes the feel of the grip, though. Not quite as springy and shock-absorbing.
Frankly, I love this sword. I can't believe you got impression it makes from the parts you used. Great combination and concept.


Sean Flynt wrote:
By the way, the cord impression on this grip is the neatest I've ever achieved. The key is to use synthetic nylon twine and a plain leather-over-wood grip construction. If you use cord under the leather, the effect won't be quite as neat. I think this is why Albion grips are so attractive--no cord under the leather. That changes the feel of the grip, though. Not quite as springy and shock-absorbing.


Albion has cord under their grips on their Museum Line offerings. They also apply a cord over-wrap (as they do on the Next Generation line swords) to get the "impressions". This means the ML offerings have an extra step. I believe they use (or did at one time, at least) a natural fiber cord (perhaps hemp?) in their grips.
Beautiful work Sean. Looks like a very pleasant marrying of high-performance blade and artistic hilt components. Great job!
Sean....I can't believe you chopped up the Scottish back-sword!!! ;( (just kidding of course...maybe it will make mine even more valuable since it 's one of the remaining few - yes Nathan ...I still have it & the dagger)

Seriously though.....very nice work all around as always. I know what joy these types of projects bring you.


cheers,

Bill
Albion's leather is probably a bit thicker than what I'm using, and that would make for a neater grip even with cord-wrapped core. Then, of course, they actually know what they're doing and do it every day. :D
Sean Flynt wrote:
Albion's leather is probably a bit thicker than what I'm using, and that would make for a neater grip even with cord-wrapped core. Then, of course, they actually know what they're doing and do it every day. :D


You don't give yourself credit. While I realize that the process of making this stuff is often one of trying and retrying (part of learning), the results are impressive to those of us looking in. You're building quite the body of work here.
William Goodwin wrote:
Sean....I can't believe you chopped up the Scottish back-sword!!!


I have to tell you that I also chopped several inches off the distal end of the backsword blade after already shortening an inch or so from the base. I wish I hadn't, because that project was a bit of a dead end. Now I need to find a use for a short, fullered backsword blade. Maybe a rugger, if I hack off the tang and work just with the blade. With a bit more cutting it'd be perfect for a dirk, but I'm not really into dirks.

In the interest of the hobby, I should also admit that I screwed up two projects this week, too. :lol: I discovered (the hard way) a small flaw in some steel I was stressing without benefit of heat, and got so excited by my success at making real tubular rivets that I split a knife grip scale while setting the second of three rivets. That's two more lessons learned, though.

Page 1 of 1

Jump to:  
You cannot post new topics in this forum
You cannot reply to topics in this forum
You cannot edit your posts in this forum
You cannot delete your posts in this forum
You cannot vote in polls in this forum
You cannot attach files in this forum
You can download files in this forum


All contents © Copyright 2003-2006 myArmoury.com — All rights reserved
Discussion forums powered by phpBB © The phpBB Group
Switch to the Full-featured Version of the forum