Go to page 1, 2, 3  Next

Birth of a Celtic longsword
Since the Celtic sword thread has been popping back up again, I thought I would post this.

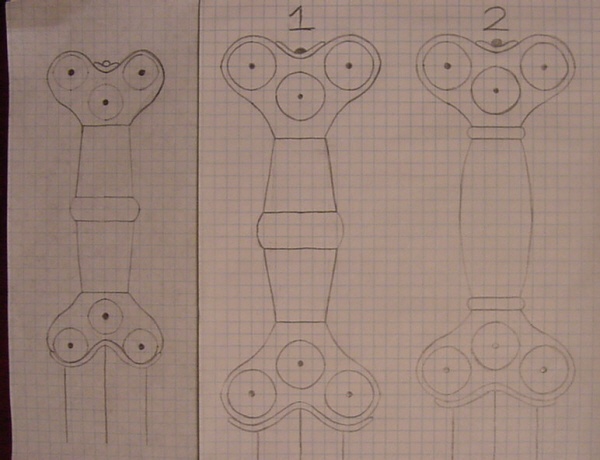
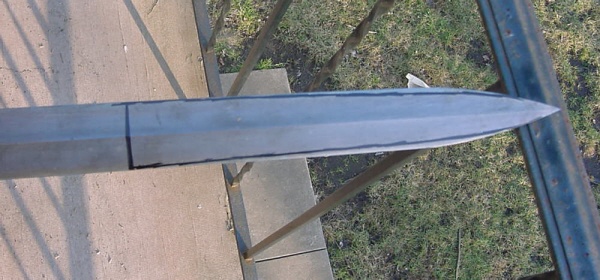
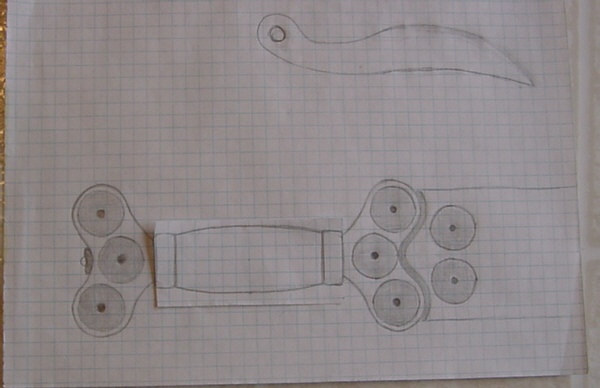
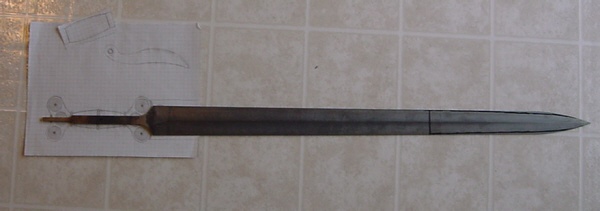
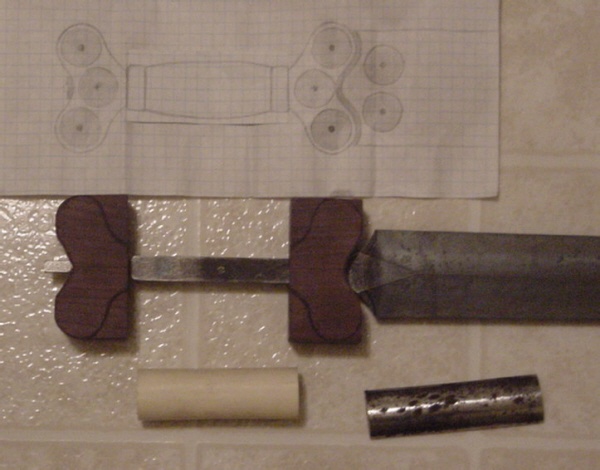
It's basically a stage by stage view of the creation of my custom Celtic longsword.

Please note: the sketches and photos are Shane's work, copyright 2003-2004. Please ask Shane's permission if you wish to reproduce or use these?

Some time back, I had custom ordered a La Tene II(B) Celtic longsword with iron rivet decoration, based upon several period examples. After the smith dropped the ball, my friend Shane Allee and I began discussing how one might bring this type of sword to fruition. It's a type that both of us liked, and since Shane is now the official Shop Munkey for Rick Barrett, it seems like the project could actually happen.

It started with a bunch of rough sketches and discussion of them, carefully planning features and proportions with reference to existing originals.[/b]


 Attachment: 72.67 KB
celticdrafts.jpg


Last edited by Nathan Bell on Mon 22 Mar, 2004 9:24 am; edited 1 time in total
the blade
For the blade, we will be using an Albion La Tene II blade blank. This blank has been heat treated, but will be significantly hand ground. One of the chnages will be to give the tip a subtle, graceful profile taper in the last 1/3 of the blade, as seen on many La Tene II B originals.

At the Albion gathering last month, Peter Johnsson aided Shane by marking the general type of taper, directly on the blade.


 Attachment: 78.08 KB
tip redesign.jpg

The rough hilt design is chosen....


 Attachment: 54.63 KB
MVC-003F.jpg

A first stage "overall" idea of size and proportion;


 Attachment: 31.14 KB
rivethilt redue.jpg

Basic components are chosen: bone, black walnut wood, wrought iron.


 Attachment: 73.2 KB
inprogress shot1.jpg

Things begin to take shape
The components begin to take shape. Shane also begins to experiment with the size options for the rivet decoration.

That's about as far as we have made it so far, more news and pictures as I receive them!


 Attachment: 42.85 KB
inprogress shot2.jpg

Interesting post idea.

Look forward to the next stages.
Nice Sword Nathan
I was wondering if you were going to have to send the sword out for heat treating again after grinding it. How would that affect the tip? Just soem curious questions.

Joel
Re: Nice Sword Nathan
Joel Whitmore wrote:
I was wondering if you were going to have to send the sword out for heat treating again after grinding it. How would that affect the tip? Just soem curious questions.

Joel


Geez, I dunno. :wtf: I will leave that to the experts. I figure if it needs heat treating again, Shane and/or Rick will know. I reckon that since they are working out of Rick's shop, they have some method to either heat treat there or have somebody to send it off to, however they do the other blades....

Shane, and certainly Rick would know. I know Rick is currently really busy with the new baby. Maybe Shane will pop by and expound upon how that will work?
huuuuuuhhh! (Homeresque drooling noise)
I am slowing becoming fascinated with Celtic swords. you have to post pics of that little beauty when it's finished, and a full review too! :D
Re: Nice Sword Nathan
Joel Whitmore wrote:
I was wondering if you were going to have to send the sword out for heat treating again after grinding it. How would that affect the tip? Just soem curious questions.

Joel


Nathan,
As long as you are careful and keep cooling the blade in water every few passes on the grinder there is no problem. Just be extra careful with the point and edge. Using fresh sharp belts also help avoiding heat build up. The temper of the blade as it is now should survive fine.
I am sure Rick and Shane can tell you some useful tricks how to do this effectively ;)
Oh, no--must have overstated somewhere above. :surprised:

My contributions to the project are quite modest---the basic idea and enthusiasm, a bit of research help, some mutual collaboration on design details...

The rest is pretty much Shane, one of his first tries at the sword/cutler realm, with help and advice of those such as Rick and Peter!

The "we" came in because of how communicative Shane is, keeping me informed, and allowing me to be so active throughout the building process!
Just made it back from a show this weekend and was suprized to see it back up the list.

Looks like Peter pretty much covered it, there shouldn't be any problem at all tweaking the profile of the tip. I'll also be grinding the center line on up at the base of the blade as well. Then the entire blade surface will be ground to get the final finish and then the final edge will be put on it as well with the grinder. We keep a water barrel/bucket under or by the grinder to catch dust and to keep things cool.

Not much new to say about the sword though, things have been very crazy the last couple weeks. At this point I pretty much have to get on the grinding and shape the guard plate to give it the double curve, then I can move on with the hilt more. I did grind it down roughly to shape, but just didn't have it in that last picture. I'm still not happy with the domed rivets, the look ok in profile, but might need to be a higher dome. After the hilt starts coming together more I'll be able to tell what I need to do with them.

I did pick up some round stock buffalo horn this weekend that might be part of grip for another one of these I'll be working on after this one. Might get grinder crazy on that one and make it lenticular in cross-section, just to be different and they were common enough.

Shane
The decorative rivets are fitted into the guard, and shaping of the guard progresses


 Attachment: 28.61 KB
rivet hilt upper guard.jpg


 Attachment: 50.87 KB
rivet hilt upper guard2.jpg

do the rivets go all the way through the wood ? how are they attached?
Well, those are just setting in place in the pic. *G* What you see at this point are just three domes that I have dished out. When I go to attach them, I'll drill a very small hole in the top of each one, steel rod will run through the guards and will be peened over the top holding the dome in place. I did a sample piece with this construction and have photos, however I'm currently out of town so it will be next week before I can post them.

Shane
Rivet samples...

Will look like this, roughly


 Attachment: 25.75 KB
rivet sample1.JPG


 Attachment: 33.02 KB
rivet sample2.JPG

thanks
cool, thanks thats a great idea
Pictures??
I just digged up this topic using "search".

And now I have some questions about it?
First I want to know if there are some pictures of trhe finnished sword??
And the next question is can whe get some inside information about the thoughts and desisions that went into this project? Consurned archeological examples, sizes and dimentions.

Folkert
Very cool stuff. I guess I missed this topic the first time around. Thanks, Folkert, for digging it up.

I, too, am interested in seeing how this project continued/was finished.
Go to page 1, 2, 3  Next

Page 1 of 3

Jump to:  
You cannot post new topics in this forum
You cannot reply to topics in this forum
You cannot edit your posts in this forum
You cannot delete your posts in this forum
You cannot vote in polls in this forum
You cannot attach files in this forum
You can download files in this forum


All contents © Copyright 2003-2006 myArmoury.com — All rights reserved
Discussion forums powered by phpBB © The phpBB Group
Switch to the Full-featured Version of the forum