| Author |
Message |
|
Travis C.
|
 Posted: Thu 08 Nov, 2007 4:40 pm Post subject: my first scabbard with better photos Posted: Thu 08 Nov, 2007 4:40 pm Post subject: my first scabbard with better photos |
 |
|
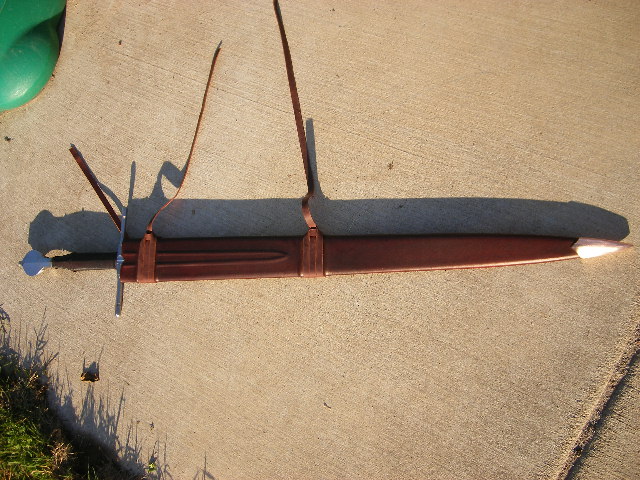
Well this is my first scabbard. It is for my Albion Viceroy. I used many of the posts and photos on this website in order
to accomplish this. Total build time: about 28 hours not including time spent on finding and shopping for materials
and tools, etc. This does include all prep time, though.
Here's my step-by-step process:
*Used two planks of 36" X 6" X ¼" Spanish cedar. This was all that the wood store had that day in this dimension.
(I believe that this ultimately led to a slightly less rounded shape, but also saved me a lot of wood-working time.)
*Laid my sword down on the middle of each plank and traced the shape, then drew another line parallel about ¼" away
from the first line. Drew "depth-lines" lines that represented the thickness of the blade on the edges and on the top end
of the planks to mark how deep I needed to hollow it out.
*Used a dremmel and 80 grit sanding blocks to hollow out the shape. This was the most drudging aspect of the
whole project and took about 8-9 hours one day. The rest of the project was rather enjoyable.
*Once I was satisfied that the sword fit inside with the shapes clamped together every 8 inches, I cut out the rounded
hilt shape on top of each half and sanded it. I slid a piece of paper under the Viceroy's hilt to use as the
pattern for this.
*I put three coats of linseed oil on the inside halves, let it dry, then glued the two halves together with the sword inside.
I let it all dry overnight.
*Used the skill-saw to cut about 1/3" away from the outside drawn line for a basic shape of the wood core.
The skill-saw came very much in handy and was $30 well-spent.
*With the core in a vise and with leather strips for padding, I used a carpenter's plane to round out the shape.
Then I placed the wooden core in my lap and used 80 grit sanding block to finish off the rounded shape. This
all went rather quickly.
*Put three coats of linseed oil on the outside and let it dry. (I probably should have used more coats but I was excited
and in a hurry to finish.)
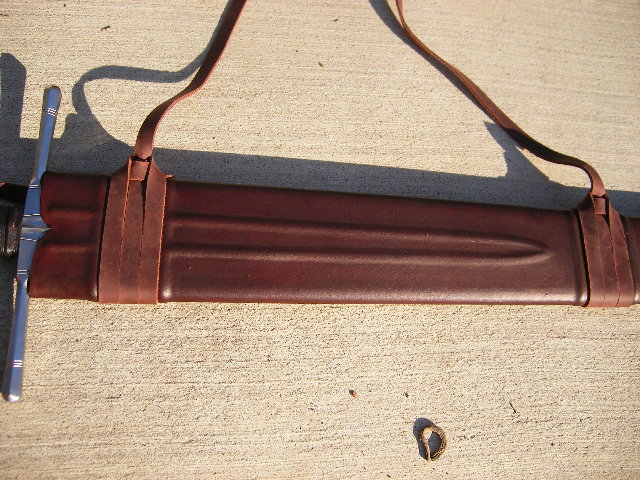
*Laid out the design for the risers and fuller shape on the wood core. I decided to use the small round circular "leather
lace" for this.
I then measured out the lace and cut it. Once I was satisfied, I glued the risers and shapes and let it dry overnight.
I had to glue each piece of leather lace and let it dry a bit before moving on to the next piece of leather
lace. I measured a little less than 2" for the distance between the risers because I knew I wanted to use ½ inch straps
for the harness. This step did not take much work, but took all day because of the drying time.
*Made a pattern on the back of the 2-3oz. rawhide by wrapping a sewing measuring tape around the core at intervals,
and adding the thickness of the leather. Measured every 2 inches (give or take) and marked with dots on the rough side
of the leather. (Mistake made here-see below.) Made a dotted diagram on either side of a straight line, then connected
the dots in a rounded sort of way.
*Cut out the diagram, then punched little holes every ¼ inch using leather punch tools. I made the pattern ½ inch longer
at the tip and 1 inch longer at the top, because I knew the leather would shrink a bit.
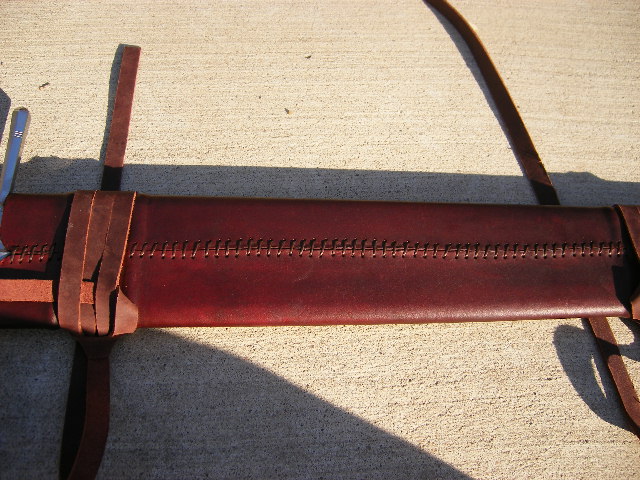
*Made the leather very damp, then sewed it up tightly starting from the tip. Every 6 inches or so, I brushed some
watered down glue onto the wood surface. Without stopping, after it was sewn up, I used a smooth laminated chopstick to sort of emboss
the leather by pushing down all around the leather lace to make the risers and fuller shape. I then pressed down all
the remaining areas of the leather and on the sides of the scabbard to round it off better, basically everywhere except
the leather lace parts. This part of the project was fun, but I think it is important to do this immediately after sewing.
You may have to dampen the leather some more during this. I then set it aside and let dry overnight.
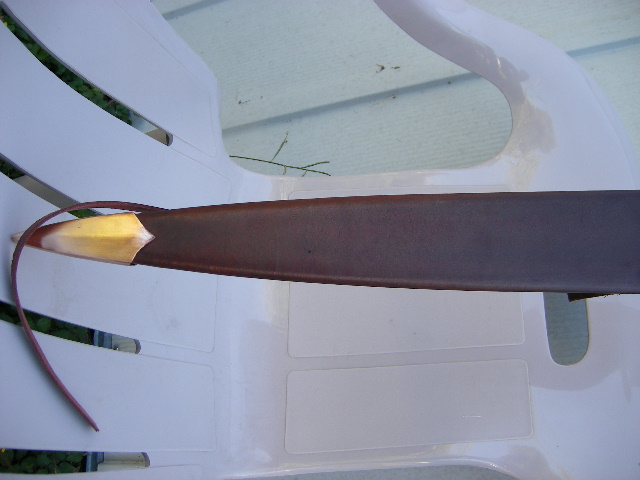
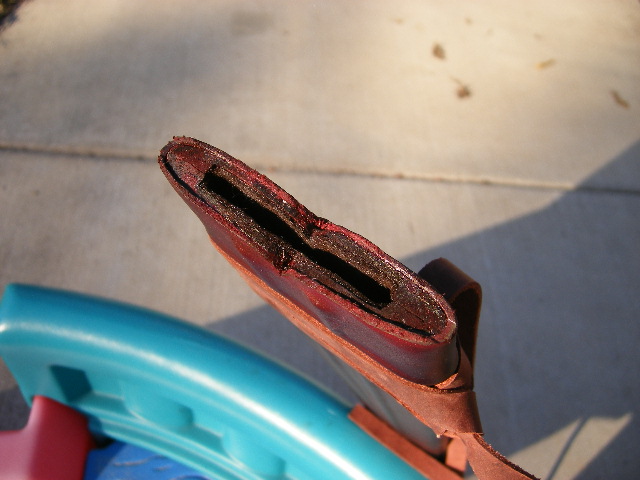
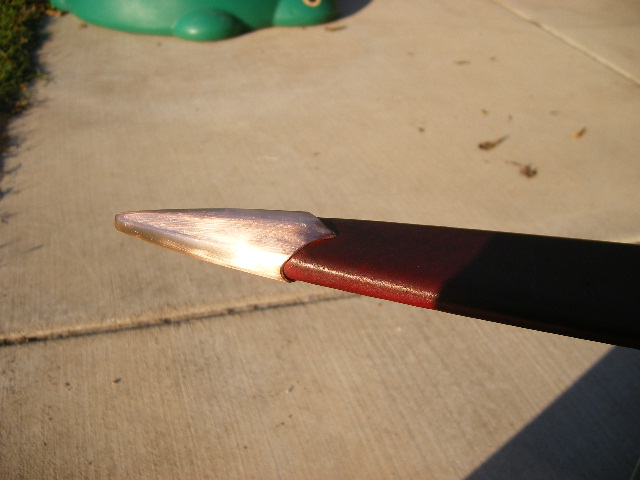
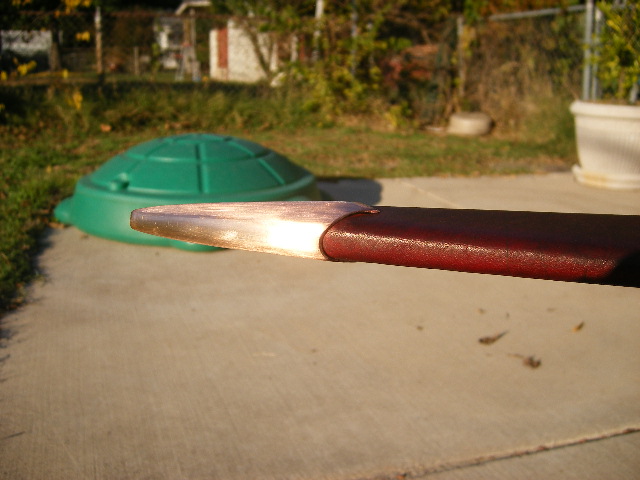
*I used the bronze chape from the Albion moat sale. This item was too big, so I had to do a lot of cutting, grinding on
the wheel, filing, and a bit of bending. I used a crème-brule torch to soften it a bit while the edge of the chape was in a
vice to slowly bend it a bit to make a better fit. It still did not fit so I had to sand the edges of the tip of the leather
scabbard. Then it was still a little off, so I slid it on and slammed the tip of the scabbard hard onto the kitchen floor
several times to force it on so that it looked ok. This all took about 3 hours and was fairly painstaking.
*I then carefully cut the top of the leather to match the shaped wooded part in order to match the swords hilt. About 3 hours.
*After this the sword fit loosely in the scabbard, so I carefully cut some felt and glued it inside the mouth of the scabbard- about 3 inches deep-and inserted the sword to make a tight fit. ( I may have been lucky here because the Viceroy has
that square flat ricasso. ) Hobby Lobby sells felt squares in different thicknesses and colors.
*I dyed the scabbard with Fiebing?s acrylic based maroon leather dye. I used many coats. About 30 minutes.
*I used ½ inch straps from Tandy Leather store for the harness and belt. They come pre-dyed in brown in the 60 inch-length, cut thin.
**But, I am having trouble finding buckles and strap-ends for the ½ inch size straps. I want something similar to
the photos of the Regent or the Viceroy scabbards on the Albion website. Maybe I should have made the straps
bigger like ¾ inches because it seems there is more in this size to choose from on the internet. But I thought the ½ inch size would look nice and possibly more historical. Does anyone have any ideas on where I could get buckles or strapends to fit ½ inch belts??
Mistakes made: Just before I glued the two hollowed out wood planks together, I forgot to mark the exact spot at the
end of the glued wood planks where the sword tip sits inside. Once glued, I had to guess the precise spot of
the hollowed-out sword tip area, and I was afraid that I might over-sand and mess it up. Also, when I measured the
wood core with the measuring tape, I over-measured. I thought I should add a few millimeters to account for the
risers and fuller shape, but this was a mistake. While I was sewing I realized it was going to be too loose so I cut off a
bit here and there to make it a tighter fit. This is why my stitching is a bit wavy. Also, after I sewed up the leather and
let it dry, I touched it way too much, and I think that this is why there are dark spots on it after dyeing.
Again, I want to thank all of you who posted your previous scabbard projects. It was because of your previous
postings that I was able to do this by myself.
 Attachment: 99.11 KB Attachment: 99.11 KB
Attachment: 90.95 KB
Attachment: 122.04 KB
Attachment: 119.2 KB
Attachment: 124.92 KB
Attachment: 89.76 KB
Attachment: 94.43 KB
Last edited by Travis C. on Sun 11 Nov, 2007 7:00 am; edited 7 times in total
|
|
  |
 |
|
Roy Robinson Stewart
|
| Posted: Thu 08 Nov, 2007 5:44 pm Post subject: |
|
|
Pictures ?
( please )

|
|
 |
|
|
Travis C.
|
| Posted: Thu 08 Nov, 2007 5:53 pm Post subject: my apparent photos problem... |
|
|
Well, I got my four photos all cropped and compressed down to the 45-55kb range per photo. It still won't work, and the message I am getting says, "Sorry, but the maximum filesize for all attachments has been reached" or something similar. I tried to add just one of these 48kb photos and it gave me the same message. I will try to work on it tomorrow, unless anyone knows what I am doing wrong.
Travis
|
|
|
|
|
Chad Arnow
myArmoury Team


|
| Posted: Thu 08 Nov, 2007 7:16 pm Post subject: Re: my apparent photos problem... |
|
|
| Travis C. wrote: | Well, I got my four photos all cropped and compressed down to the 45-55kb range per photo. It still won't work, and the message I am getting says, "Sorry, but the maximum filesize for all attachments has been reached" or something similar. I tried to add just one of these 48kb photos and it gave me the same message. I will try to work on it tomorrow, unless anyone knows what I am doing wrong.
Travis |
Travis,
When you post a message or reply, there is a link on the posting page where you can view the file limits for each forum. If your 48 KB photo is over the pixel dimensions allowed, you'll get that message.
You may also want to check the User Attachment Control Panel in your profile. If you've uploaded more than your limit allows, you may also get a similar message. The account attachment limits are spelled out on this page.
ChadA
http://chadarnow.com/
|
|
 |
|
Greyson Brown

|
| Posted: Thu 08 Nov, 2007 7:55 pm Post subject: |
|
|
I hope you can get the attachment issue sorted out, as I would really like to see this. I, too bought some of the Albion moat sale chapes (in steel), and in the end decided that it would be less work to make my own rather than trying to get them to fit. Mike had warned me that they are awfully big; I just didn't understand how honest he was being.
As for buckles and strap ends, I know there are more sources out there than I have found, but I have used Raymond's Quiet Press several times and like their stuff fairly well for most things. I have also found a few other websites, but I have not ordered from any of them, so I can't really comment on them. Still, it might be worth looking at Gaukler Medieval Wares, Fettered Cock Pewters, Jell Dragon (I believe I have read that they are fairly slow on orders, though), Steel Mastery, Talbot's Fine Accessories, and/or Windrose Armoury. Again, I don't have any experience with any of these other than Raymond's Quiet Press.
Be carefull, this stuff can be addicting.
-Grey
"So long as I can keep the path of honor I am well content."
-Sir Arthur Conan Doyle, The White Company
|
|
|
|
|
Nathan Robinson
myArmoury Admin

|
|
|
|
|
Matthew D G

|
| Posted: Fri 09 Nov, 2007 2:04 pm Post subject: |
|
|
Nice sheath Travis!  What color is it? kinda looks brown but in the right light it looks like ox-blood. It looks good with either color What color is it? kinda looks brown but in the right light it looks like ox-blood. It looks good with either color 
|
|
|
|
|
Henrik Bjoern Boegh

Location: Agder, Norway Joined: 03 Mar 2004
Posts: 386
|
| Posted: Sat 10 Nov, 2007 6:32 am Post subject: |
|
|
Beautiful scabbard, Travis! Keep up the good work!
Cheers,
Henrik
Constant and true.
|
|
|
|
|
Jack W. Englund

|
| Posted: Sat 10 Nov, 2007 8:46 am Post subject: |
|
|
Travis, thank you posting this. I am currently planing a new sheath for my "hunting sword" ( back mounted) I am also planing on making a sheath for my Basket hilt. Your "how to" has answered a lot of my ???
BTW, you mention using cedar. Will you have a problem with it "rusting" the blade. ( cedar contains "tannin" ( white ceder less than red.)
Jack
|
|
|
|
|
|
Travis C.
|
| Posted: Sun 11 Nov, 2007 6:37 am Post subject: my first scabbard |
|
|
Thank you for all the compliments and encouragement. It is definitely addictive. I am already thinking about starting another one.
Matthew-- I used Fiebings maroon acrylic based. I just kept brushing on coat after coat until the bottle was almost empty.
Jack--Yup, I think using the cedar was a mistake. I have already had to buff off a couple of rusty looking spots.
Luckily it only takes a couple of seconds for me because I have one of those "buffing erasers" that have impregnated
metal grit or something similar (got from a fencing store), but I think next time I will definitely spend more time looking
for a different kind of wood, and not be in suce a hurry. It's not too bad, but I will DEFINITELY have to avoid leaving it in
the scabbard by the fireplace for long periods. Do those tannins ever evaporate out or go away?
|
|
|
|
|
Jack W. Englund
|
| Posted: Sun 11 Nov, 2007 9:04 am Post subject: Re: my first scabbard |
|
|
| Travis C. wrote: | Jack--Yup, I think using the cedar was a mistake. I have already had to buff off a couple of rusty looking spots.
Luckily it only takes a couple of seconds for me because I have one of those "buffing erasers" that have impregnated
metal grit or something similar (got from a fencing store), but I think next time I will definitely spend more time looking
for a different kind of wood, and not be in suce a hurry. It's not too bad, but I will DEFINITELY have to avoid leaving it in
the scabbard by the fireplace for long periods. Do those tannins ever evaporate out or go away? |
Travis, Just a couple of things.
1. "Spanish cedar" is not CEDAR but is related to mahogany. ( Being from the PNW, I am used to working with cedar ) I assumed that this Wood was of the same family, SORRY
2. Did some research (incl. talking with a "master" cabinet builder.) This wood is NOT recomended to be used as you did. (it is used very often as wood for humidors) Here is why -
a. Retains MOISTURE. b. weeps sap (often.) c. contains a volitable oil ( the cedar like aroma.) ( 2 sites)
http://www.humidor-guide.com/humidor-spanish-cedar-1-1.php3 http://www.hibdonhardwood.com/hibdon/woodspecies/spanishcedar.htm
I will pm you about poss. woods that might work.
Jack
|
|
|
|
|
Greyson Brown
|
| Posted: Sun 11 Nov, 2007 11:23 am Post subject: |
|
|
Poplar can be found fairly easily and is one of the more poplar (diliberately misspelled in an attempt to be funny  ) choices for scabbard cores. I've used it without any problems. ) choices for scabbard cores. I've used it without any problems.
That's a nice looking scabbard; keep up the good work.
-Grey
"So long as I can keep the path of honor I am well content."
-Sir Arthur Conan Doyle, The White Company
|
|
|
|
|
|
Travis C.
|
| Posted: Mon 12 Nov, 2007 12:59 pm Post subject: wood |
|
|
|
Great news --after some searching I found some poplar in all the right lengths and thicknesses at a large "Lowes" store of all places. It's in a section called "project wood.' They had sections of poplar, red oak, and pine. And it was very reasonably priced. I got poplar for my next scabbard project, but has anyone ever used red oak?
|
|
|
|
|
|
D. Michael McIntyre
Location: USA Joined: 12 Nov 2007
Posts: 6
|
| Posted: Mon 12 Nov, 2007 8:42 pm Post subject: Re: wood |
|
|
| Travis C. wrote: | | They had sections of poplar, red oak, and pine. And it was very reasonably priced. I got poplar for my next scabbard project, but has anyone ever used red oak? |
Oak and iron are not a good combination where appearance of the wood matters. It turns black, due to some kind of reaction between tannins in the wood and the iron. I'm not sure if this relationship would adversely affect the iron itself, but considering that Lowe's red oak project wood is notoriously overpriced anyway, and you're going to be covering the thing with leather, I wouldn't waste the money.
Poplar is probably good enough for your purposes. It's not very hard, and the color can be ugly, but it's easy to work, and pretty much inert as far as moisture and chemical reaction issues. If you want to go with something harder, I think I'd try soft maple for its easy working properties, and being plenty hard enough for the job. I'm not aware of any place you could buy this in "project wood" form though, so you'd likely have to start with thicker, rougher stock.
I just surfed in here recently, and registered to answer this message before lurking as long as I usually do, so please forgive me if I just made a fool of myself in some way.
Good luck on future projects. That's a beautiful scabbard! You might be able to salvage the poor wood choice by coating it with shellac. I'd buy some Bullseye shellac in either blond or orange (orange is the more "antique" variety), thin it about 50/50 with denatured alcohol, and pour a little of the resulting mixture down into the scabbard very carefully. Cap the top, swirl it around to coat everything, and drain the excess. Then let it dry thoroughly, which might take a long time down in the bottom of such a long, narrow recess. It probably wouldn't do too much to affect the moisture retention properties of the wood, but it would seal any volatile aromatics and keep them from escaping to the inside. Shellac can be used to seal sappy spots, smoke damage, and a host of other things, plus it's cheap and easy. Might be worth a try, but be careful not to get it on the outside so you don't ruin that beautiful exterior.
|
|
|
|
|
|
|
You cannot post new topics in this forum
You cannot reply to topics in this forum
You cannot edit your posts in this forum
You cannot delete your posts in this forum
You cannot vote in polls in this forum
You cannot attach files in this forum
You can download files in this forum
|
All contents © Copyright 2003-2026 myArmoury.com — All rights reserved
Discussion forums powered by phpBB © The phpBB Group
Switch to the Basic Low-bandwidth Version of the forum
|

