just one more question....
on albions site it mentions a bronze grip MAY be avalbile? does it look like this will still be an option?
| David Stokes wrote: |
| just one more question....
on albions site it mentions a bronze grip MAY be avalbile? does it look like this will still be an option? |
I would like to have a bronze grip on the Valkyrja, just like the Sountaka sword, but we need to work out the practical issues with that as it involves a few new techniques in casting, finishing and mounting.
If it works out the way we want, the Valkyrja will be offered with a hollow bronze grip, possibly as an option to the regular wood grip.
Hello Peter,
If you are up to a post on the subject I would be very interested in reading of your thoughts on this issue of the hollow bronze grip. As a non-sword maker and even a non-mechanical person, this seems like it would create a sword with a less durable grip than the more typical sandwiched wood core method.
At the same time I know that my impression is not accurate as the ancients would not have chosen a hilt assembly that it less than optimal. So I am interested in hearing about your thoughts on the hilt assembly of the hollow gripped blade balanced with the issue of durability.
By the way it was cool to read of your consideration of the issue of the silver hilted historical specimen.
Thanks very much and the hilt component waxes look great.,
Jeremy
Hi Jeremy,
A hollow grip can be mounted either with mechanical fit towards the pommel and guard: lugs or countersunk holes. Such a mounting would be secure and strong even if there is nothing filling the void inside the grip (depending of the fit of course).
You can also fill the inside of the hollow grip with a wooden core, very similar to a normal wood/cord/leather grip, only that with the bronze grip the outside is made first.
A third possibility is to fill the hollow bronze grip with cutlers pitch. This method is used extensively on Indian swords.
It is a matter of finding the right recepy for the pitch, or make do with modern epoxy resin.
I don´t know what method was used for the Sountaka sword. To me it looks like the grip is flush to the guard and pommel. Could be a compression fit of some kind, but there is nothing to tell what kept the grip from shifting. Countersunk lugs or a filler? I don´t know.
What method that is going to be used on the Valkyrja is not decided yet. I am carving the components for either a wooden core, or a resin fill. Both would work in theory and neither would pose a problem for resiliency. It is a matter of finding out what method is most satisfying to use in the Albion workshop.
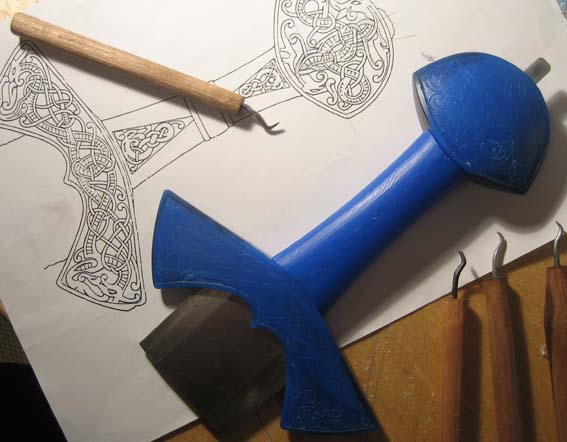
Here is a snapshot of the complete hilt, unfinished, but mounted. The grip is yet just a basic shape, without carvings or riser in the middle. It gives you an idea of the proportions and overall shape, however. You might compare to the orignal Sountaka hilt on the drawing in the pic.
 Attachment: 59.08 KB
A hollow grip can be mounted either with mechanical fit towards the pommel and guard: lugs or countersunk holes. Such a mounting would be secure and strong even if there is nothing filling the void inside the grip (depending of the fit of course).
You can also fill the inside of the hollow grip with a wooden core, very similar to a normal wood/cord/leather grip, only that with the bronze grip the outside is made first.
A third possibility is to fill the hollow bronze grip with cutlers pitch. This method is used extensively on Indian swords.
It is a matter of finding the right recepy for the pitch, or make do with modern epoxy resin.
I don´t know what method was used for the Sountaka sword. To me it looks like the grip is flush to the guard and pommel. Could be a compression fit of some kind, but there is nothing to tell what kept the grip from shifting. Countersunk lugs or a filler? I don´t know.
What method that is going to be used on the Valkyrja is not decided yet. I am carving the components for either a wooden core, or a resin fill. Both would work in theory and neither would pose a problem for resiliency. It is a matter of finding out what method is most satisfying to use in the Albion workshop.
Here is a snapshot of the complete hilt, unfinished, but mounted. The grip is yet just a basic shape, without carvings or riser in the middle. It gives you an idea of the proportions and overall shape, however. You might compare to the orignal Sountaka hilt on the drawing in the pic.
I see the guard is going to be a bit shorter, more like the original, than on the sketch on Albion's website(s) - which is a good thing, as it removes the one thing that displeased me about the design. :D
Can't wait to see this one in bronze.
Can't wait to see this one in bronze.
im already saving muh pennies....
this one is gonna be a show girl!
this one is gonna be a show girl!
This is going to be one Humdinger of a sword :!: This might just be a "Must" for my collection!
Looking to be absolutely "Grand"!
Bob
Looking to be absolutely "Grand"!
Bob
Peter sent along a few update photos of the guard wax:
[ Linked Image ]
[ Linked Image ]
He has put so much time into this that it is almost frightening.
Best,
Howy
[ Linked Image ]
[ Linked Image ]
He has put so much time into this that it is almost frightening.
Best,
Howy
WOW!!
This is going to be a stunningly magnificent piece when it is finished.
I liked the look of the pommel, but the guard really jumps out at me.
For some reason, the lines of the relief really have character and charisma. :D
I think the design is really captivating.
This is going to look like a sword a king would have at his side.
Another work in progress report.
Work has been done on the left hand beast on one side of the guard, defining outline and beginning to add 3-d effect.
At present the result looks like this.
As you see, the surface is still rough and not all detail is yet added. It is on its way, though :)
Attachment: 63.71 KB
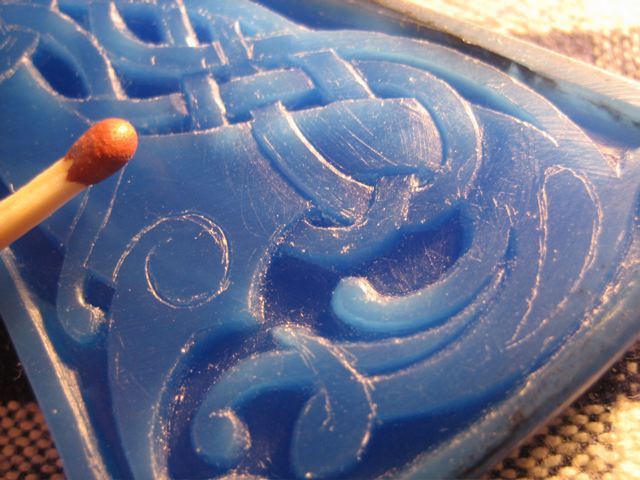
match added for scale.
Work has been done on the left hand beast on one side of the guard, defining outline and beginning to add 3-d effect.
At present the result looks like this.
As you see, the surface is still rough and not all detail is yet added. It is on its way, though :)
match added for scale.
Yeah, that's pretty cool. I have been waiting on buying another Albion Viking model to see how this one looks when done. I think it will all be worth the wait.
Peter,
How do you insure that the depth of the carving in the "negative space" around the raised areas is the same?
Or is it different in different areas?
If the depth is the same, are you visually checking it or using some kind of measuring device?
Also, do you have to take into consideration the strength of the material that the piece will be made out of when planning the design and depth of relief?
Does the depth of the relief affect the overall strength of the finished piece?
Again, very nice work!
One of the scraping tools has a width of 1.5 mm that is the same as the plunge of the background. The can be used to check once in a while. To keep the background at a constant depth has been what has taken most experiments and training. The negative outlining areas are quite a bit more demanding to carve than the actual intertwining of the dragon beast.
The pattern also need to have a bit of release, or the new poured wax can get damaged as it is taken out of the mold: all cuts into the backgrund need to slope slightly.
Overall strength of the guard is not compromised by the pattern. It is a sturdy peice of bronze and the cut outs of the pattern actually help to lighten the guard. As the pattern is rather deep, I might end up reducing total weight as much as 20 grams.
If the shape of the guard was more delicate, you might be wise to adjust the cut out with the integrity of the piece in mind.
I doubt it is a great problem, though.
I attach a photo of the tools most frequently used. The needle is used for scribing and initial outlining, the scrapers are used to carve away the background and to sculpt the knotwork. The largest scraper is 3 mm (used to plane the widest areas) and the smallest is 0.8 mm wide (used to reach the depth of the narrow cut outs). I also use a small pointed "knife" to define corners and scrape small details.
These tools are inspired by the nice set of hand made wax scrapers that Jody useds in his workshop at Albion.
He has introduced me to some of the joys of wax carving.
During the many attempts to complete this project I have tried different methods and tools for the carving. In the end, simple home made scarpers have prooved to be most versatile and effective. This crude set is just cold hammered gas welding rod set in pen sized hafts of cherry. I keep them sharp with 3M micron paper glued to a wooden paddle. Next time I make some wax tools I will make them from drill rod that can be hardened. That way the edge will be more precise and leave less scratches in the cut surface of the wax.
Attachment: 46.26 KB

The pattern also need to have a bit of release, or the new poured wax can get damaged as it is taken out of the mold: all cuts into the backgrund need to slope slightly.
Overall strength of the guard is not compromised by the pattern. It is a sturdy peice of bronze and the cut outs of the pattern actually help to lighten the guard. As the pattern is rather deep, I might end up reducing total weight as much as 20 grams.
If the shape of the guard was more delicate, you might be wise to adjust the cut out with the integrity of the piece in mind.
I doubt it is a great problem, though.
I attach a photo of the tools most frequently used. The needle is used for scribing and initial outlining, the scrapers are used to carve away the background and to sculpt the knotwork. The largest scraper is 3 mm (used to plane the widest areas) and the smallest is 0.8 mm wide (used to reach the depth of the narrow cut outs). I also use a small pointed "knife" to define corners and scrape small details.
These tools are inspired by the nice set of hand made wax scrapers that Jody useds in his workshop at Albion.
He has introduced me to some of the joys of wax carving.
During the many attempts to complete this project I have tried different methods and tools for the carving. In the end, simple home made scarpers have prooved to be most versatile and effective. This crude set is just cold hammered gas welding rod set in pen sized hafts of cherry. I keep them sharp with 3M micron paper glued to a wooden paddle. Next time I make some wax tools I will make them from drill rod that can be hardened. That way the edge will be more precise and leave less scratches in the cut surface of the wax.
Well..., great questions and an excellent response, thanks gents for answering questions that would have taken me far too long to formulate and ask.
Cheers
Jase
Cheers
Jase
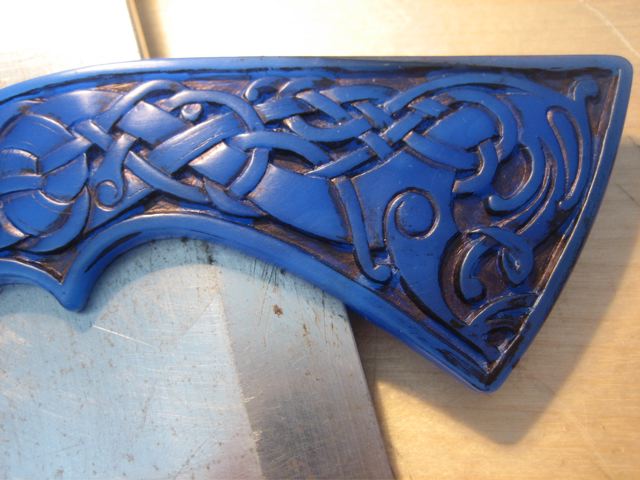
Here is one side of the guard in almost completed finish. I will stil add some decorative lines in the main bodies. A little marking dye is added to better show the pattern. It looks a little sloppy, but you might get the idea of what the pattern might look like cast in bronze with the background and cut lines darker and high spots polished.
Attachment: 55.23 KB
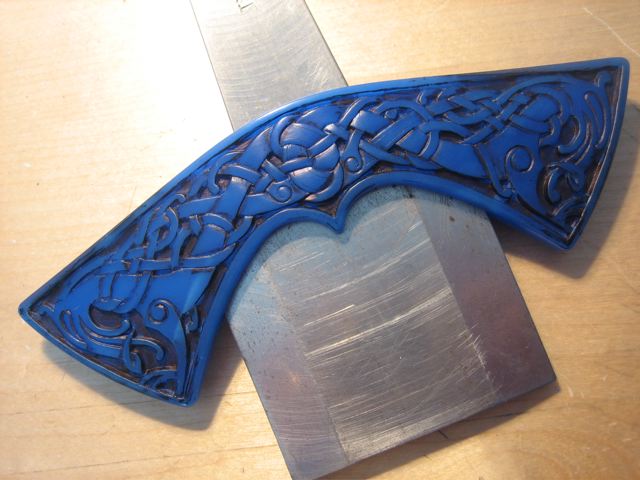
Attachment: 57.56 KB
OK Peter,
That last set of photos just forced my hand! I just placed a preorder for what I can tell is going to be a benchmark piece for Albion. The relief carving is impressive in wax. In bronze it will be incredible. I would not normally buy something without seeing the finished product, but with this one I'll make an exception. Your dedication to this one and attention to detail has convinced me.
Thanks!
Nathan
That's just breathtaking, Peter. I will probably not buy the sword for various reasons, but I may just sit and look at pictures of the hilt for hours. I'm glad to see that all of the stops and starts with this one are paying off, because that is absolutely beautiful.
-Grey
-Grey
WOW! This is shaping up to be a very impressive piece. The waxes look fantastic. Please keep the progress shots coming, it's fascinating to see the development of this sword.
Peter, May I say what an incredible job you are doing on the waxes. I ordered the sword in March and it is so good to see your progress pictures. I never expected the sword to look quite so beautiful and your waxes are really well done. Thank you very much. I don't mind the wait at all after seeing your pictures.
All the best,
Peter.
All the best,
Peter.
| David Stokes wrote: |
| im already saving muh pennies....
this one is gonna be a show girl! |
Me, too. It'll be beautiful.
Page 2 of 3
You cannot post new topics in this forumYou cannot reply to topics in this forum
You cannot edit your posts in this forum
You cannot delete your posts in this forum
You cannot vote in polls in this forum
You cannot attach files in this forum
You can download files in this forum
All contents © Copyright 2003-2006 myArmoury.com — All rights reserved
Discussion forums powered by phpBB © The phpBB Group
Switch to the Full-featured Version of the forum
Discussion forums powered by phpBB © The phpBB Group
Switch to the Full-featured Version of the forum