Go to page Previous  1, 2, 3, 4, 5, 6, 7, 8, 9  Next

Some more blades, this time entirely self-made. Cutlass and cut-and-thrust sword are sharp, messer is a blunt. Unfortunately neither of these can be called very good since

- cut-and-thrust has no distal taper. While it is light, has a good balance and can deliver a pretty nasty cut, it would be much better if the blade was thinner and wider at the point. Or, if it had a longer blade, it could become a good rapier. Unfortunately my possibilities were limited by the size and shape of steel I had (this blade was made by stock removal).

- cutlass has too little distal taper and therefore is rather heavy for its size. The blade was also made by stock removal.

- messer is point-heavy and overall weight of around 1.2 kg is probably too much for such weapon. But it was intended to be that way from the very beginning because I needed a relatively short blade that could deliver a powerful cut to use as a side arm in reenactment events when my primary weapon is something two-handed. All metal parts were forged.


 Attachment: 30.21 KB
[ Download ]

 Attachment: 34.27 KB
[ Download ]
Well I made this viking axe out of a cheap brand modern wide bladed axe, a large hickory handle + a couple of hours...

[ Linked Image ]

Black parts are oil burnt with linseed oil. The axe is very sharp and retains a high edge hardening after careful stock removal with cooling. The ugly bit at the top was me slipping with the sledgehammer during wedging. Seems to have caused no structural problems within the axe handle as it cuts wood and metal nicely so i've let it be.

The original was found in Skåne, but there's also a very similar axe fond in Norway.
Wow, so much cool stuff on this thread. Heres my contribution, some axes I made. All done with welding and stock removal. No forging, unless you count heating up the eye part and bending it. :p They are all made of mild steel, no heat treatment.

[ Linked Image ]

[ Linked Image ]
[ Linked Image ]

[ Linked Image ]

[ Linked Image ]

(the last one is upside down)


And just for fun, the first axe I ever made, back when I was 17 and had no clue what a real battle axe would be like. Heavily inspired by Conan and roleplaying games, its made of 10 mm steel, with 30 mm thick solid steel haft. It weighs in at a whopping 20 lbs.

[ Linked Image ]

[ Linked Image ]
I been wanting to raise a helmet for a while so after I picked up Patrick Thaden Raising a Sallet http://talbotsfineaccessories.com/books/metalwork.html I thought that I would give it a try.It is still in progress and is too large a circumference to historically correct, but should do OK for my new WMA sparing helmet.

16gauge mild steel
heat source MAPP gas ( next time a acetylene set up or a forge)
lots of hammering

mackenzie


 Attachment: 53.96 KB
son of lumpy.JPG


 Attachment: 65.54 KB
side of lumpy.JPG


 Attachment: 88.86 KB
lumpy top.JPG

Never tried this myself but it looks geometrically symmetrical and pretty good for a first attempt. :D :cool:

Maybe some of our armorers could give you some constructive feedback and as for size I guess it's difficult to estimate what size sheet of steel will give the right sized bowl ?

Well next time you may end up using too small a sheet and maybe the third attempt will be perfect ?

I guess there may be patterns out there to take some of the guesswork out of it, but good to see this project.
I don't think that circumference depends much on the size of the sheet. Well, if the sheet is too small then of course you can't make the helmet big enough. But if the sheet is too large then you simply make the helmet deeper and then cut off the excess. Or cut off some metal in the middle of raising process. So it's better to start off with a large sheet.
here's a flanged mace I've made recently


 Attachment: 70.76 KB
[ Download ]
Those big old washers?
yeah, there 3.25 inch diameter dock washers
Jean Thibodeau wrote:
Never tried this myself but it looks geometrically symmetrical and pretty good for a first attempt. :D :cool:

Maybe some of our armorers could give you some constructive feedback and as for size I guess it's difficult to estimate what size sheet of steel will give the right sized bowl ?

Well next time you may end up using too small a sheet and maybe the third attempt will be perfect ?

I guess there may be patterns out there to take some of the guesswork out of it, but good to see this project.


I think that Aleksei is correct. If you look at some of the later historic bascinets they look to be made from a single sheet of iron alloy raised to cover from top of the head to almost the shoulders.

Raising gives you the ability move the metal around, thinning it in some places and thickening others. In my half finished pot, circumference at the bottom is smaller then the circumference of the sheet I started with because I tried to pull the metal back to the peak is some places & push and bend the metal to center void.

I guess I should stop being lazy and keep heating and hammering until I get what I want. :)
Aleksei Sosnovski wrote:
I But if the sheet is too large then you simply make the helmet deeper and then cut off the excess. Or cut off some metal in the middle of raising process. So it's better to start off with a large sheet.


Makes sense to me. ;) :D :cool:
Here are my two blades that I made while on Owen Bush's excellent knife making course!

Top one is a seax with a hamon the bottom one is a Wharncliffe style blade.
As I would not have enough time to do filework while on the course, we made sure that the tang would be soft enough to file.
I am very happy with how they are turning out so far, next up is to extend the filework into the blade as far as I can, then make grips and scales for both.


Raised from single sheet in 16 gage.
Well I did some hammering on this a while back and today I took some pictures. It is pretty much like it was before but bit smaller and with a better peak. I am keeping it "rough from the hammer" as some of my hammer marks are pretty deep and grinding them out would make the metal it too thin.

I have just taken it out of the oven after heat blueing it to a dark purple my photograph doe not do a very good job of catching the colour.

I need to build the liner and attach the maile.

I have banged metal but I have not raised a helmet top before. I am pretty happy with this one so far.

mackenzie


 Attachment: 89.67 KB
skullcap top.JPG


 Attachment: 84.89 KB
skullcap side.JPG


 Attachment: 75.74 KB
skullcap blued.JPG

Some of my more recent projects.

Norman style belted Gaddhjalt
The Z-loop holding the scabbard can be seen on Sancho IV:s burial sword from late 1200s, but the earliest record is from an image in Ivar the Boneless life biography (art is from 11th century, but depicing mid 8th century when he lived). Several similar attachment methods can also be seen in the Bayeux tapestry. The belt is a typical Norman fork tounge style. Feels like a western revolver holster riding yout hip when strapped on, a perfect part of your body.

[ Linked Image ]

3 pieces make the belt, Z-piece, belt with strap holes and belt with fork tounge. They're stitched together with a peculiar seam seen on the Sancho IV sword.

[ Linked Image ]

[ Linked Image ]

Scabbard is pine core, oval hollowed and lined with lambs pelt with a firm but light grip. The draw is quick but the blade won't fall out if you hold it upside down. The core is covered with calf leather stitched end to end and water shrunk and casein glue laminatinated to the core for extra durability.

[ Linked Image ]

The blade is a sharp full tanged Hanwei Tinker line Viking replacement blade fitted with my own hand made Gaddhjalt fittings.

[ Linked Image ]


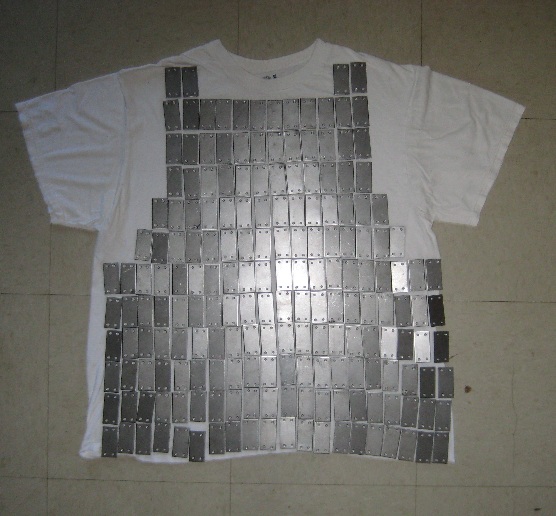
Gjermundbu maille research and production
This image mostly shows the punched from plate solid rings, but also some riveted together weave. These are tinly links almost like jewelry.

[ Linked Image ]

[ Linked Image ]


Mass produced pakistani boar hunting spearhead modified to leaf shape, then mounting as parted spear for easy transport
Some simple cooled re-grinding and re-sharpening was required.

[ Linked Image ]

The shaft is ash. A thin walled welded steel tube was used for the connecting socket and a pin locks it in place. Another pin holds the spearhead in place on the shaft. Total lenght is 2. 9 meters. Even with the connecting socket and long length It still feels light and agile.

[ Linked Image ]

[ Linked Image ]


Viking axe from Skåne find

[ Linked Image ]


Here's some other stuff I did a few years ago.

Knotwork belt
A wet moulded knotwork belt, celetbrating knotwork art throughout the ages. Inspired by Aidan Meehans most excellent book "The Dragon and the Griffin".

[ Linked Image ]

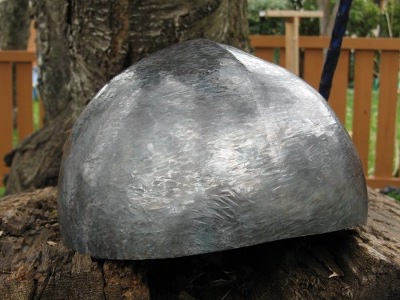
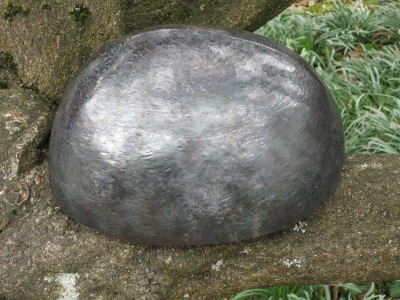
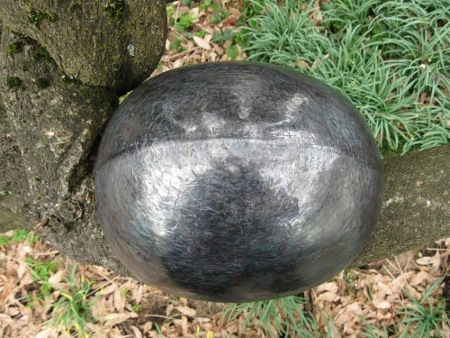
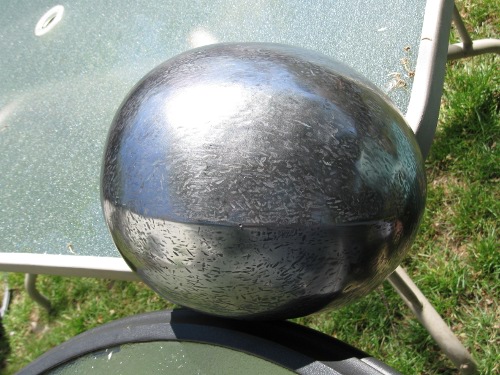
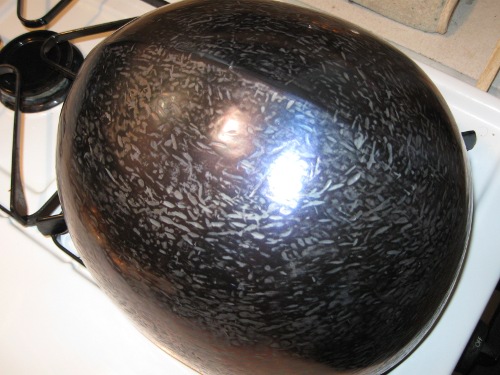
The "Mums-mums" shield boss
Cold raised work in 18 gauge steel plate.

[ Linked Image ]

My friends call it the sponge cake mould. I call it the "steel Mums-mums" (swedish cookie sized chocolate covered foam candy/pastry in the same shape). Anyway, I never finished it. Needs fine grinding and polishing.

People usually think this boss is just welded, no big deal, but then they look for telltale seams and there are none. Over the years whenever armourmaking students of mine want to take the short cut of electric or gas welding I toss this in their lap to demonstrate what can be done with raising, even cold raising from a single piece. Puts things into perspective.
Is this boss really raised? Looks dished to me, there are too few hammer marks near the edge.

Dishing and raising are fundamentally different techniques though used to achieve same results. I mastered dishing well enough to be able to make rather deep couters and poleyns without any problem, but am still unable to do any significant raising. I wonder if it is due to the lack of proper raising hammer, have to forge one someday as it is impossible to get one for a reasonable price here.

Anyway, this boss looks impressive but I think that in reality it's not as difficult project as it looks. It's not deep and these flutes require more patience than skill.
For cross peen hammers - raising hammers - take a look at places that sell auto body supply. Two of the hammers I have used are from cheap auto-body supply stores. (Canadian Tire and Princess Auto here in Canada). I expect you could even grind one out of another hammer perhaps starting with a geologists hammer to get the useful length.
Nice gaddhjalt on that H/T, Johan!
just getting started
here's an idea I've been rolling around for a long time, and I've finally had the time and space to do it. About half way done with the mis en place so to speak. Here is the initial setup against an XL tee.


 Attachment: 101.91 KB
IMG_5255.JPG

Some "3eal Talent"! While I do not currently have a place to forge, quench and temper steel, it's been a treat and a pleasure to look at the work of others. Besides - have no formal training but something that I do seem to have a talent for is to take a heavy lifeless sword, grind it and even hollow grind. My first ever was a Del Tin type X viking sword that I believe was made for a reenactor, it was 5/16" thick on either side of the fuller from guard to the end of the fuller. 3 weeks of grinding on a bench sander in my spare time. I changed it from a bar of steel that was dead in the hand and very heavy, transforming it into a lively Viking sword with an incredibly sharp blade. With a gradual thickness taper down to 3/32 at the distal end. I bought it second hand from Kult of Athena and brought it back a month later to show Ryan. He was totally shocked as I told him I had never even ground a knife before.
Oh, I am NO competition for the most of you guys but it was nice to learn I seem to have a natural talent in balancing and putting life into otherwise dead bladed swords. The other Del Tin I bought for my wife was a very lively sword though I ground it to be lighter for her to wield.
I just finished transforming a Windlass one hander Migration sword into a lively near razor sharp (distal half of blade). Removed a lot of excess weight and a smooth tapering of the thickness.
I really enjoy doing this and hope someday to be able to create works of art that you all have, some of which have astounding talent! All of you should be Very Proud of yourselves!
I'd love to apprentice in a certain sword, dagger, polearm and armor shop up in that winter time frigid city of Minneapolis and. Learn from a few artisans! LOL! Gee I wonder where that might be?

Congratulations Guys, Splendid Pieces!

Bob
I made this billhook in a couple of hours at my brother's friend's dad's forge. Not much to look at, but I'm fairly pleased for my first time at the forge. I'm not sure what to do about a handle. I have some black walnut I was going to use, but now I seem to recall hearing that that didn't reach Europe until the seventeenth century. So now I'm at an impasse.

http://www.flickr.com/photos/bullets4brains/6...hotostream

http://www.flickr.com/photos/bullets4brains/6...otostream/
Go to page Previous  1, 2, 3, 4, 5, 6, 7, 8, 9  Next

Page 5 of 9

Jump to:  
You cannot post new topics in this forum
You cannot reply to topics in this forum
You cannot edit your posts in this forum
You cannot delete your posts in this forum
You cannot vote in polls in this forum
You cannot attach files in this forum
You can download files in this forum


All contents © Copyright 2003-2006 myArmoury.com — All rights reserved
Discussion forums powered by phpBB © The phpBB Group
Switch to the Full-featured Version of the forum