Go to page 1, 2  Next

My New Proto-Mortuary Sword
Also my first hilt. I adapted the blade and pommel from an MRL "Scottish Backsword". I made everything else. This was a great education, and although it isn't perfect it met my goals. A few quick snaps are posted below. Sorry about the rotten lighting--I was in a rush.

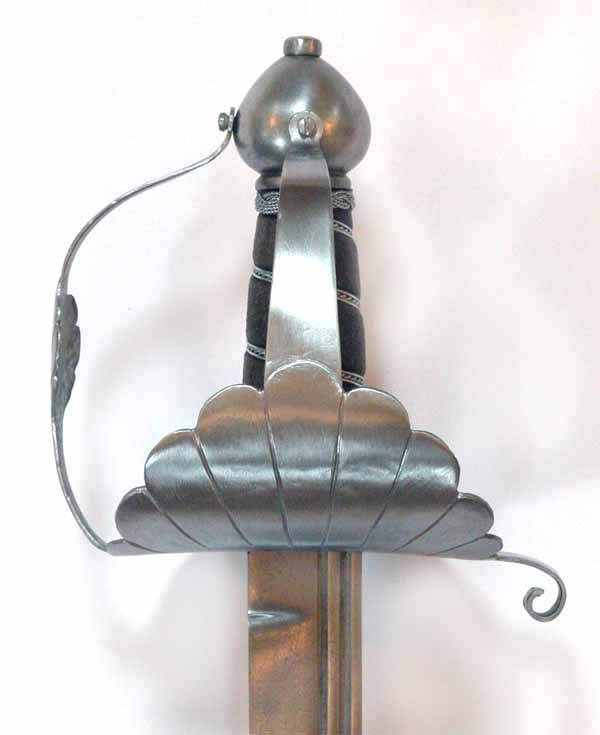
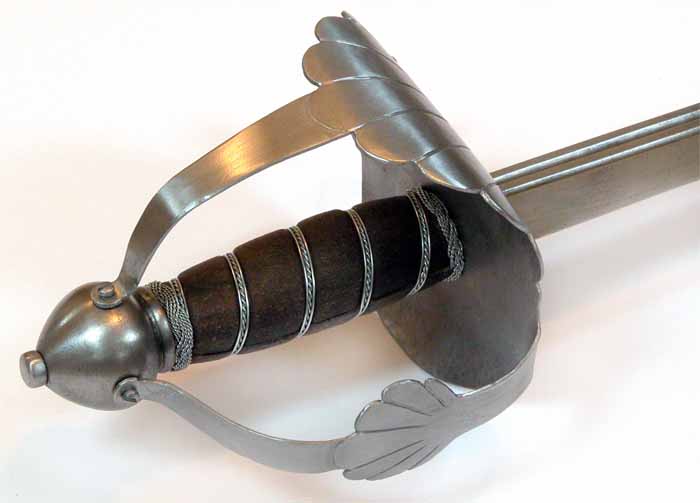
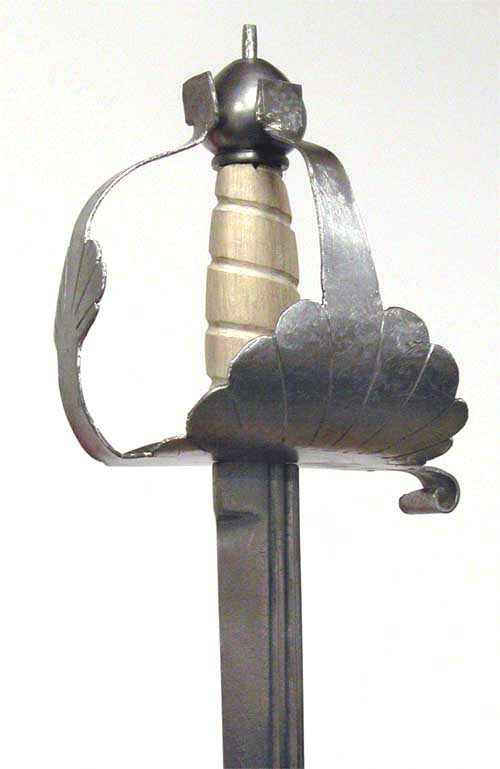
The hilt isn't based on a particular original weapon. Rather, it combines elements of several documented proto-mort hilts. It actually has less in common with my Eljay hanger hilt than with several weapons shown in Mazansky. That's intentional--I didn't want two identical hilt styles in my collection and I didn't want to just parrot Eljay's work. Plus, Eljay made his hilt for a hanger blade and I wanted to match my hilt to a narrow backsword blade.

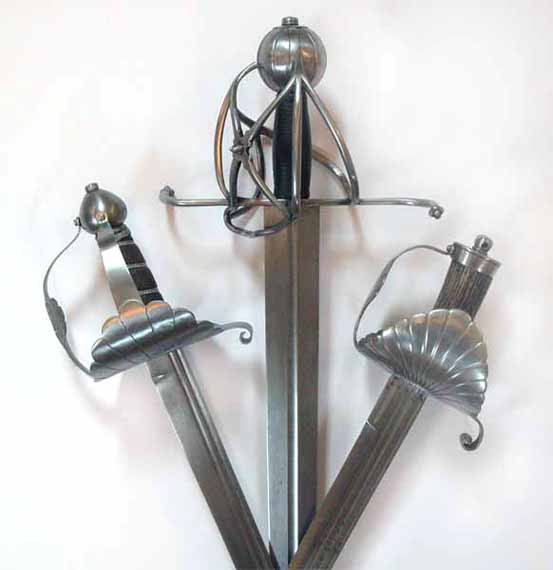
I'll do a few things differently if there's a "next time," but I'm reasonably pleased with this as a first effort. I could have fixed a few minor problems but ultimately just had to declare it done and move on (I'm racing my son, expected in late August). The last photo below shows the P-M with its English cousins to give a sense not only of scale but also the design differences between the hanger and P-M hilt design.


 Attachment: 55.76 KB
close.jpg


 Attachment: 57.65 KB
angle.jpg


 Attachment: 35.89 KB
long.jpg


 Attachment: 58.15 KB
group.jpg

Very nice! I wish I had the skill to do such work.
Smashing work, Sean! I hope there is a next time. It looks like what Mazansky has classified as a Type VA, having a side knuckle guard and frontally asymmetrical (?) hilt. Very nice!

JGH
Gary A. Chelette wrote:
Very nice! I wish I had the skill to do such work.


Thanks! I actually didn't start this project with most of the skills I needed to complete it. Here's the list of "firsts" for me on this project:

• Research, design and mock-up a hilt
• Cut sheet steel
• Shape steel with hammer and light anvil
• Shape steel with Dremel, files and other abrasives
• Drill through pommel
• Shorten blade
• Make a spiral grip
• Bind a grip with wire
• Make and install turk's head knots
• Drill and tap pommel for terminal screws

I had made pommel nuts before, peened tangs and wrapped grips. I had carved grips from "scratch," but not spirals. Everything else I just figured out as I went along.
Sean,


You done well ...young grasshopper!!! Very nice indeed............so when do I get my complimentry regular "mortuary".....for test purposes you understand of course :D


Again.....brilliant job....and I guess it was worth the sacrifice of you Scottish back-sword.


Cheers,

Bill
Jonathan Hopkins wrote:
It looks like what Mazansky has classified as a Type VA, having a side knuckle guard and frontally asymmetrical (?) hilt.


That's it. I originally planned to add the teardrop-shaped slots commonly seen on that type--and might do that later--but Eljay said not all hilts of this type have slots. With that absolution, I decided to move on without slots. :lol:
Very nice work, Sean. The folks at Windlas shold be jealous of what you've done with this blade.

You mentioned that you shortened the blade. Any details on that you care to share? (Mostly I'm just curious how much and how it changes the piece; I understand the technical proccess). The blade does not look obviously shortened, so you did a good job on it.

-Grey
William Goodwin wrote:
....so when do I get my complimentry regular "mortuary"..... :D

I guess it was worth the sacrifice of you Scottish back-sword.


I'll send you one just as soon as I get production up to one hilt per week ;)

Yeah, I loved the blade and pommel of the backsword, but the guard and grip always seemed wrong. Now I have to figure out what to do with the old guard. I thought about getting a footed-ball pommel and long, narrow Oakeshott Type XVIII blade--make a light German hand-and-a-half sword. I might do that, but not for awhile.
I like it, it looks like you did a really nice job. Having the patience and determination to see a project like this through when you have to figure it out bit by bit is an accomplishment in itself. It takes a special kind of stubbornness.
I made an attempt at a mortuary hilt not too long ago, but the material got uncomfortably thin in some areas as I dished and spread it so I scrapped it. I recently got a copy of Mazansky's book and am fascinated to the point of obsession with the proto-mort's, and the "Hilts based on pierced side rings" shown in the last chapter particularly.
Greyson Brown wrote:
Very nice work, Sean. The folks at Windlas shold be jealous of what you've done with this blade.

You mentioned that you shortened the blade. Any details on that you care to share? (Mostly I'm just curious how much and how it changes the piece; I understand the technical proccess). The blade does not look obviously shortened, so you did a good job on it.

-Grey


Funny you should say that. My realistic goal (as opposed to my fondest hope) was that I'd come up with the quality of design I'd expect to get if MRL made a proto-mort hilt. I think I actually exceeded that expectation, if only by a little. There's no reason MRL couldn't make this weapon and offer it in the $225 range. The guard is so simple...

As for the length--It's shortened from the base of the blade, so you can't see any difference. The weapon feels great, too. I orginally thought I'd mount this blade on my EBE basket hilt. To do that I had to lengthen the tang by taking an inch or so of the ricasso. The blade looked wonderful on that basket but the tang was just too thin and I didn't want to use shims where it passes through the cross. So, I jdecided on the proto-mort project and just drilled through the MRL backsword pommel so I'd have tang to peen. This in-progress photo shows how much extra tang I needed to get through the large sperical pommel of the EBE basket hilt (what you see protruding plus approx. half the height of the pommel). By the way, I didn't peen this whole bit of tang. I cut it down to just above the level of the nut before peening. The original tang end was much thicker than this and threaded. I ground it down to the smaller size for the EBE pommel and nut.


 Attachment: 57.22 KB
download.jpeg


Last edited by Sean Flynt on Fri 08 Jun, 2007 9:03 am; edited 2 times in total
Justin King wrote:
Having the patience and determination to see a project like this through when you have to figure it out bit by bit is an accomplishment in itself. It takes a special kind of stubbornness.


That's probably the single greatest challenge on a project like this. I was working on this an average of 10 minutes per day for a couple of months (some days nothing, some days more). It can be maddening to have to do things that way.

Justin King wrote:
I made an attempt at a mortuary hilt not too long ago, but the material got uncomfortably thin in some areas as I dished and spread it so I scrapped it.


I used 16 ga. because it was what Lowe's had on the shelf. Slightly heavier would have been better. I had no trouble with the hammer and anvil shaping (this is all cold work, by the way), but got a bit nervous while adding relief above the central lobe of the shells. Doing that and cleaning up the file marks got those areas quite thin. That's one reason those areas are not as well finished. As you can see from the photos, I didn't do a great job cleaning up the hammer marks of the main shell either, again in part because I was worried about thinning the steel too much. I guess planishing would be a better solution, but I don't have a stake and I'm working with a baby anvil anyway.
Sean Flynt wrote:

I had made pommel nuts before, peened tangs and wrapped grips. I had carved grips from "scratch," but not spirals. Everything else I just figured out as I went along.


I tried my hand once at turning dagger handles. No one warned me about turning ebony and my first try was a less than I ever wanted handle.
But I tried again and made two more handles from all that ebony cause I promised people. I'm not very good at it, but I did it.
My attempt started with 1/8" sheet, but I had to cut it out with the side knuckle-guards aimed forward, paralell to the main knuckle guard, and then try to bend them back to go straight down towards the pommel. It may be salvageable but the steel is pretty thin at the inside of the bend I had to make. I may go back to it some day since there is some time wrapped up in it already.

Gary, I have turned ebony and several other hardwoods on a metal lathe, it works surprisingly well with the rigid and eminently controllable cutting tool. If you have ever turned metal you would be delighted at how deep a cut you can take on hardwood without even slowing the machine down. After trying this, turning steel is like watching paint dry...wake me up when I reach the end of the cut!
I'd like to try turning, maybe for a spatha grip or rondel dagger grip, but the variation in shape from top to bottom on most sword grips requires hand carving. I've tried chisels, Dremel sanding bit, another bit that looks like the head of a morgenstern, block planes and a Sur-Form tool. For detail work such as facets, It's hard to beat sharp chisels and sandpaper. For this grip, with more rounded surfaces, I roughed out the basic shape with a craft knife and chisel, then refined with the Sur-Form. For the spiral, I just wound a string up the grip, marked its line with a pencil and went to work with a craft knife. The trick is to get the spirals just deep enough to accept the binding after the leather is on. I got them too narrow and shallow at first because I neglected to account for the thickness of the leather wrap. Sandpaper is great for details. Here's the grip at approximately the halfway mark. Notice that the top is of round section, the middle is slightly oval and the bottom is very oval. There's still lots of material to remove at this point, so this is significantly thicker than the final grip. You can see the striations left by the coarse cutting of the Sur-Form tool.


 Attachment: 59.76 KB
grip.jpg

Hey Sean...

Very nice work... Especially considering all the firsts!

Makes me want to try hammering some steel sheet :D

ks
Kirk Lee Spencer wrote:

Makes me want to try hammering some steel sheet :D

ks


You should, Kirk, you should! It's worthwhile just to get a small sheet and ball peen hammer and just experiment with shaping. I'm already thinking about what else I might be able to do. Make a bevor, maybe. My little $25 anvil is still serving well, but I'm not sure how well it would work with stakes, or what stakes are available. I might have to be creative when it comes to planishing. Maybe a sledge hammer face....

NOTE: In this photo I'm holding my hand out of the way for photography. When actually working I was holding the steel at the 9 o'clock position, as viewed from this angle, and applying downward pressure at the hammer line to help bend the area I was hammering.


 Attachment: 87.92 KB
download-1.jpeg

Sean;

Good work, lad! Thanks for posting the photo's of the process and of the finished product! Now you just have to get your production up to one hilt a week like you "promised" Bill G.! :D

Cheers!

Gordon
That's beautiful, congratulations.
Martin Wilkinson wrote:
That's beautiful, congratulations.


Thanks, Martin and everybody!

Now I move on to the German Bastard Sword....
Sean Flynt wrote:
Now I move on to the German Bastard Sword....


I'm not trying to be a kill-joy, Sean, but I think your German Bastard Sword is going to look really funny with a proto-mortuary hilt. :p

-Grey
Go to page 1, 2  Next

Page 1 of 2

Jump to:  
You cannot post new topics in this forum
You cannot reply to topics in this forum
You cannot edit your posts in this forum
You cannot delete your posts in this forum
You cannot vote in polls in this forum
You cannot attach files in this forum
You can download files in this forum


All contents © Copyright 2003-2006 myArmoury.com — All rights reserved
Discussion forums powered by phpBB © The phpBB Group
Switch to the Full-featured Version of the forum