Antiquing Experiment
Here are several photos showing the results of my first experiment in artificially aging a brass sword hilt.

This was a very instructive exercise, with very pleasing results. As I’ve said elsewhere, I think folks who collect antique edged weapons would be well-advised to do some experimentation of their own to see what’s possible.

The photos are as follow:

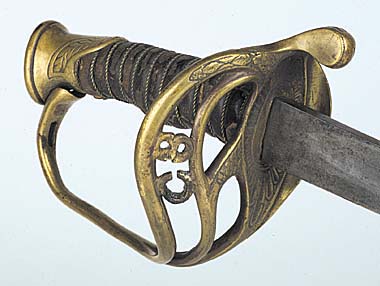
Image #1 shows the hilt of an AUTHENTIC Confederate “floating CS” Staff and Field Officer’s sword attributed to the firm of Leech & Rigdon (Memphis Novelty Works), ca. 1861-1863. Confederate weapons are rare and highly prized, and this sword likely would sell for tens of thousands of dollars, and would sell for much more if it has good provenance, engraved owner’s name, etc. For this reason, confederate swords are especially prone to forgery.

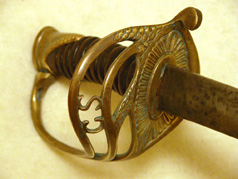
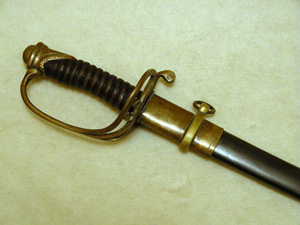
Image #2 shows my antiqued version of a very common and inexpensive modern replica of the Leech & Rigdon sword shown in image #1. Often referred to as a “Shelby Sword” because the type was worn by CS General Joe Shelby of Missouri, it may be found in various levels of quality and price. The maker of my replica is unknown, but the sword looks very much like the misnamed “Cavalry officer’s sword” sold by Atlanta Cutlery for approximately $140. I have seen identical replicas in the $100 range. I purchased this sword with a bullion sword knot and exceptional, accurate and hand-stitched officer’s sword belt for $150 (+$30 for fast shipping) through an Ebay auction. Hilt needed repeening and is now very tight. I stripped the grip of its brass wire and faux leather wrap, carved another turn of the spiral to take it farther up under the pommel cap, then sanded, polished, stained and sealed the grip (some CW swords did have wire-wrapped, polished wood grips, and, in any case, many surviving examples have lost both wire and leather wrap. Albaugh notes that the "floating CS" example shown in his book has a grip not carved but rather wrapped with a heavy cord under leather and wire binding.)
Follow this link and scroll down to read details of the very simple ammonia fuming process that created this very authentic-looking brass patina:
http://www.myArmoury.com/talk/viewtopic.php?t=1032

Follow this link to see commercial photos of an identical replica in new condition:
http://www.collectorsarmory.com/shelby_sword.htm

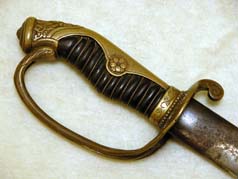
Image #3 shows the sword in its blued steel scabbard.

Image #4 shows a section of the antiqued blade of the replica. I sanded the blade to remove the etched “frosting” and generally soften the edges of the etching. After light sharpening (many historical American Civil War swords were never sharpened at all, so I’ve walked the middle path with the replica), I sprayed the steel with a vinegar and salt solution (using an old kitchen cleaner spray bottle). After 24 hours I scrubbed the blade with fine-medium steel wool.


 Attachment: 24.33 KB
l&r.jpg


 Attachment: 27.12 KB
cs2 copy.jpg


 Attachment: 31.73 KB
cs1copy.jpg


 Attachment: 96.6 KB
cs3copy.gif


Last edited by Sean Flynt on Mon 07 Feb, 2005 2:04 pm; edited 7 times in total
For reference, here's the replica alongside an authentic brass-hilt sword from my collection--both photographed under the same less-than-ideal lighting. FYI: The antique is a Japanese Army company-grade officer's parade sword from the first half of the 20th century.

The final photo is a close view of the replica. This shows the depth of the patina as well as the verdegris that typically develops after the ammonia fuming process. The verdegris can be removed without damaging the patina, and I knocked off a bit of the verdegris with steel wool just prior to making this photo.


 Attachment: 12.86 KB
js1 copy.jpg


 Attachment: 31.73 KB
cs1copy.jpg


 Attachment: 112.04 KB
csclose.gif

By the way, folks interested in American Civil War edged weapons should consider these two sites essential:

Frohne's Historic Military "fake sword" page: http://modoc1873.com/faksworlook.html
This page offers another example of an antiqued replica L&R, and provides a behind-the-scenes look at a challenge to its representation as authentic on Ebay. Frohne seems to be leading the charge in exposing Ebay auctions of spurious CW items--especially forged documents, but also small items such as buckles, shot glasses, buttons, etc. Click on his "Ebay Fakes" button and learn just how devious forgers can be.

Hendershott Museum Consultants: http://www.garyhendershott.com
Type "sword" into the search box and you'll get 176 CW items, many of which appear to be the finest available. Fantastic reference. Hendershott's site offers very informative articles as well.
I've decided to sell or trade the very fine and accurate replica confederate officer's sword belt that came with this sword. Details are here:
http://forums.swordforum.com/showthread.php?s=&threadid=31774
For what it's worth....I once antiqued a blade and had very good results. I built a Bowie for a friend who wanted a knife that looked old. I finished and polished the blade and guard, drilled the rivet holes in the full tang, and had a sweet looking knife ready to be assembled. Then I dug a hole, put the knife in it, covered it up, then poured pickle juice on it. YES....I said pickle juice. Vinegar and salt. Walked off and left it for two weeks. When I dug it up, the thing had a crust in it about a half inch thick. I carefully flaked it off, then brushed off the remaining rust with my wire wheel grinder. I neutralized the rust and assembled the knife with hickory slabs from an old axe handle and brass pins. The thing looks like it should be under glass in a museum, but it is now only a few years old. Gonna try a Gladius blade soon....see if I can fool any big boys. P.S....My friend tells people the knife came from the 1800's and they all believe him. Then he tells the truth about it and they are flabbergasted. Mission accomplished.
Pickle Juice! Classic. At one point, I considered making a slurry of used cat litter and applying it to the steel. Fortunately, the vinegar and salt works very well, although it makes me hungry for potato chips.
You know, I've wondered if there should be some sort of informal standard of marking that we antique-ers should adopt in order to prevent our work from someday being represented as authentic. I've considered inconspicuously engraving the blade with the last two digits of the year of antiquing ('04). Maybe on the back of the blade near the guard. Our effforts wouldn't fool serious collectors, but they might fool some folks with more money and enthusiasm than research skills.
A very good source and guide for those wishing to antique sword furniture is The Colouring, Bronzing, and Patination of Metals: a Manual for the Fine Metalsmith and Sculptor, by Richard Hughes.

The book is fairly pricey, but is a wealth of information on the treatment of metals, including colour plates of the treatments. Many libraries hold it in their collections, however, especially college libraries.

-- Carl Croushore
Thanks for the tip, Carl! I'll bet I can get that through interlibrary loan.
My pleasure, Sean. I own the book (my student's wallet said OUCH! at the time :eek: ), but I needed it for my metalsmithing classes at Penn State. I know we have it at the library here (as I work in circulations ;) ), so ILL should reap you a copy.

I will post a thread of books on metalsmithing for the site members a little later. Perhaps it will come in handy for those with an interest in bladesmithing or the making of sword furniture.

-- Carl Croushore
I know this is an ancient thread. A recent discussion about fake antique swords reminded me to post a link to my Instant Antique article for folks who stumble on this page looking for information about the processes involved:
http://www.myArmoury.com/feature_antique.html
Thank you very much for posting the article, Sean. Funny, I was thinking just today about doing some antiquing, the article was very informative and will save me alot of time!

Ken
I had some fun with antiquing, or at least making a mess :D taking some cues from the article, I thought that I would practice on a cheapie wall-hanger I had just recieved from Bud-K. I had purchased the sword because of it's similarity with a sword in the LOTR Weapons and Warfare book, and thought to see if I could make it a bit more unique. The blade is stainless steel, so I concentrated on the pommel, hilt, crossguard, throat, scabbard and chape. Most of the metal parts seemed to be cheap chrome covered white metal, but I am not sure. The scabbard is black plastic over a thin wooden core. I started with the scabbard first.

I painted the black scabbard with black paint, and then covered it with a weathered wood cracking medium, and then used instant age varnish, which gave the appearance (hopefully) of long aged weathering. I then covered the hilt, which is black aluminum, with a stitched on leather cover. Then I put a small amount of vinegar on the leather. After that I used a mixture of pure vinegar, sea salt, and mustard, in which I soaked strips of cloth, which I then wrapped around the metal parts and then stuck the stinking mess back in it's packing box and left it for a day.

One day later, all the chrome was gone, I had a good green patina going on, and after a bit of cleaning, it looks more like something that had been buried and less like some cheap wall hanger. A very fun experiment, and I want to thank Sean for posting the article that inspired it.

Ken

Page 1 of 1

Jump to:  
You cannot post new topics in this forum
You cannot reply to topics in this forum
You cannot edit your posts in this forum
You cannot delete your posts in this forum
You cannot vote in polls in this forum
You cannot attach files in this forum
You can download files in this forum


All contents © Copyright 2003-2006 myArmoury.com — All rights reserved
Discussion forums powered by phpBB © The phpBB Group
Switch to the Full-featured Version of the forum