| Author |
Message |
Greyson Brown

|
 Posted: Mon 06 Nov, 2006 6:42 am Post subject: Posted: Mon 06 Nov, 2006 6:42 am Post subject: |
 |
|
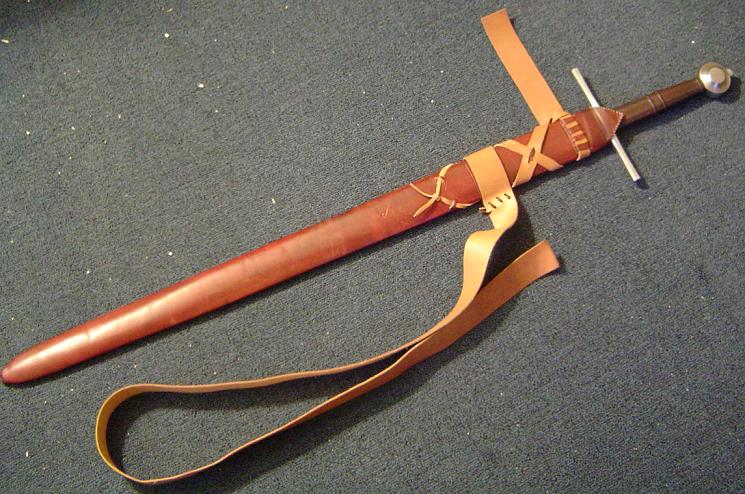
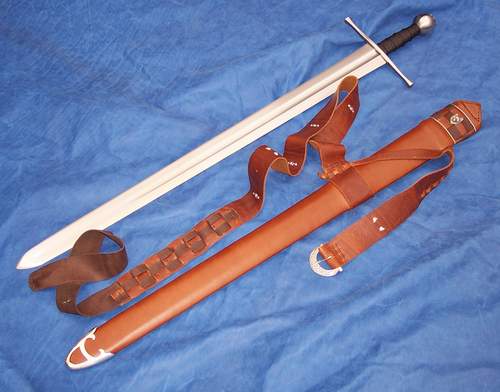
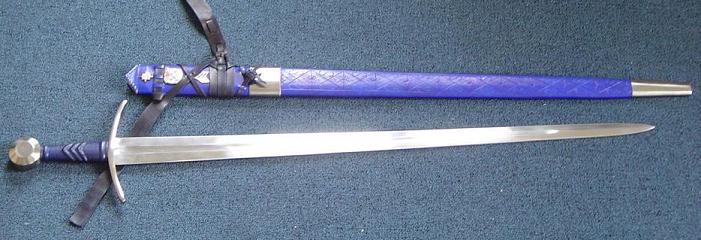
I spent this weekend working on scabbards. I finished up one for my Albion Steward. Well, mostly finished; it still needs a chape and a buckle. I intend to forge both of those when I get a chance, but that may not be until this summer. I have to run, but I'll post some more thoughts/ info on this scabbard when I get a chance.
-Grey
P.S. sorry for the bad picture quality. I haven't had the chance to do better shots yet.
 Attachment: 85.05 KB Attachment: 85.05 KB
Attachment: 55.61 KB
Attachment: 58.91 KB
"So long as I can keep the path of honor I am well content."
-Sir Arthur Conan Doyle, The White Company
|
|
  |
 |
Greyson Brown
|
| Posted: Mon 06 Nov, 2006 9:26 am Post subject: |
|
|
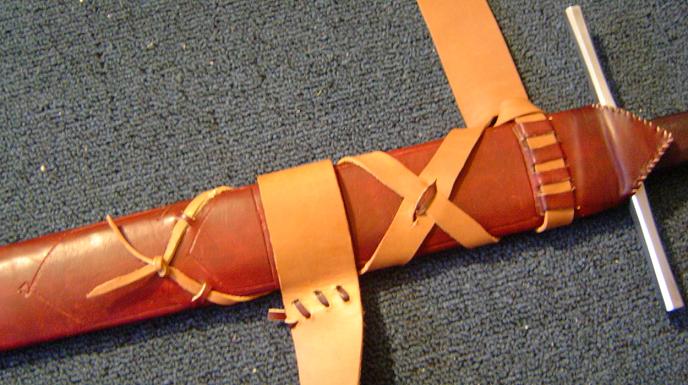
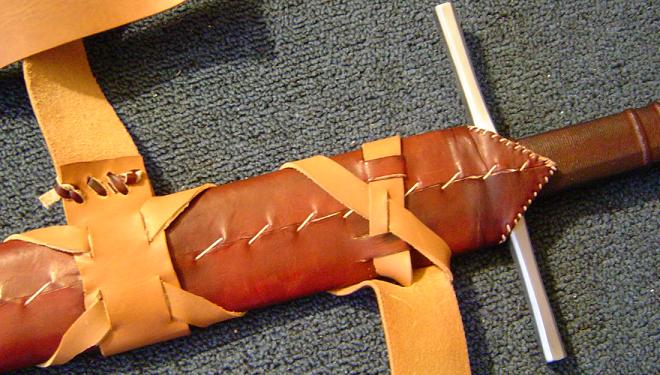
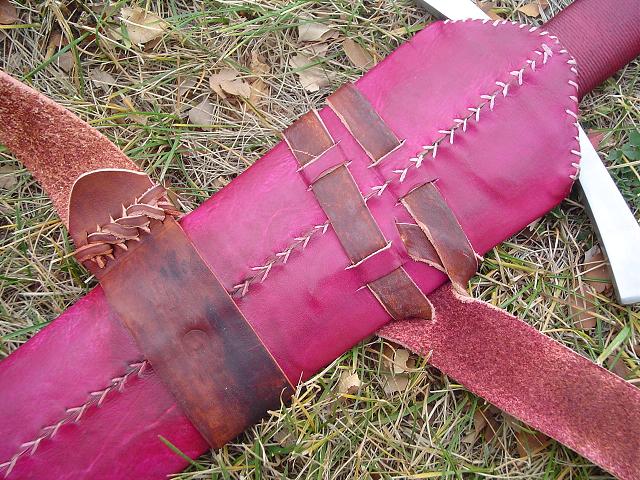
This scabbard differed from my previous ones in that it was constructed with a single needle stitch, the inside of the triangular flap is lined with a seperate piece of leather rather than folding over the the edge, and the use of an integral belt. I also did some very basic incising on this scabbard. I'm pretty happy with the way this piece turned out. I've met with some mixed reactions on the color scheme, and it isn't exactly what I had envisioned (the body of the scabbard is noticably more red in person), but it works. The only thing I'm dissatisfied with on this one is that the lower belt could have fit tighter around the scabbard. I'll blame some of that on uncertainty because of the lacing that holds the belt closed, but mostly it was just me being sloppy. It functions, and I'm not going to re-do it now, but it is something to look out for on future projects.
-Grey
"So long as I can keep the path of honor I am well content."
-Sir Arthur Conan Doyle, The White Company
|
|
|
|
|
Greyson Brown
|
| Posted: Fri 17 Nov, 2006 5:58 pm Post subject: Big Ugly |
|
|
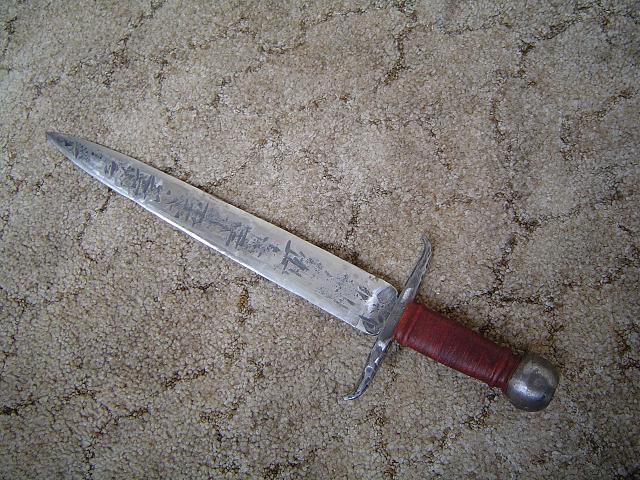
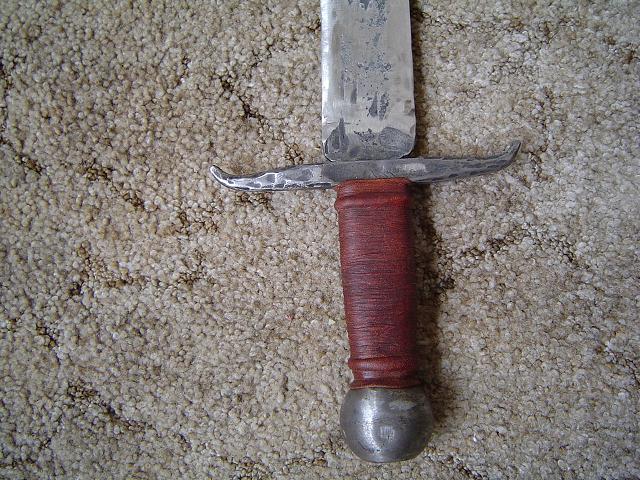
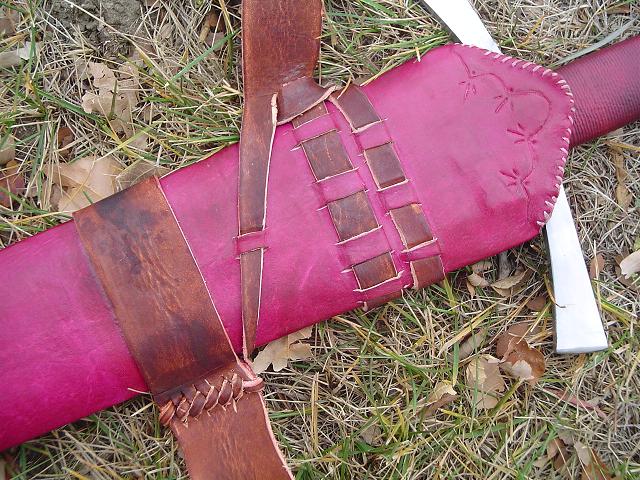
Caveat: I am not proud of this piece. It is ugly, but I wanted to share it anyway as it might be of interest.
I actually made this dagger almost four years ago, but I did some more work on it this last weekend. The blade is forged from an automobile leafspring and the pommel is a 1 3/4 inch trailer hitch ball. It was inspired by MRL's Coustile, which I could not afford at the time (college was expensive). The blade and guard were forged during the 2002 Fort D.A. Russel Days at Warren Airforce Base (a part of the Cheyenne Frontier Days), and the piece was assembled in my father's shop when I got home.
In order to get the length I wanted in the blade, I used the cross peen on my hammer quite a bit. This is what caused the deep linear hammer marks running across the blade. The more triangular shaped marks are just proof that I have no hammer control (I do have the excuse that after two 10 hour days of hammering, I expect to have less than stellar hammer control), and demonstrate what happens when one allows the hammer to roll a bit (or comes down at an angle), thus striking with the corner of the hammer face. Because this piece was hardened and tempered in the field (literally the parade field at Warren AFB), the heat treating could be a bit uneven, but it should not be anything that would have a tangable effect. It is quite stiff but will still flex a bit. The blade was originally ground to a hexagonal cross-section, and at that point I gave up on it. The leafspring material is rather stout stuff and didn't much like being hammered or ground and I didn't have a lot of patience, so I chose to assemble the dagger and go do my homework instead.
The guard was pretty straight forward. I tapered and bent the ends and then used the tang of the dagger as my drift for making the hole in the guard. The guard was not inletted (though it really needed to be to hide the hideous shoulders on the blade). It does fit fairy tight, though, as I pinched in the sides of the guard while the metal was still hot.
To make the pommel, I cut the threaded portion off of a trailer hitch ball (the threads had been bent anyway) and drilled a couple of holes for the tang. Filing away the extra material so that I could get the tang into the pommel ate up the little bit of motivation I had not devoted to grinding the blade. The happy upside to this is that, purely by accident, the pommel fit tightly enough that it is wedged into place. Since the grip was made from a single block of wood, the whole assembly was cold peened. And that is how it stayed until last weekend...
When I was home, I tried to correct some of the grinding that I had done previously. I gave the blade a much more lenticular cross-section, and tried to reduce the obviousness of the ricasso that laziness had originally inspired. This was a bit tricky because the piece was assembled, and I did not want to take it apart. In the end, I fixed the problem a little, but not to the extent I wanted. I considered trying to put a fuller in the blade to hide some of the hammer marks, but I chose not to. I could not have had the fuller end inside the guard as I would want, and anything I could do to make the fuller terminate at the guard would just look tacky. Also, the fuller would have to be inordinately wide in order to hide those marks. Ultimately, I just had to accept the fact that this piece will never look the way I really want. It was a good learning experience, and I think I could make something a lot nicer now (especially since I have friends who will let me use their trip hammers). I didn't bother with sharpening this dagger. The edges are thin enough that it could be easily sharpened, so I may do so in the future. We'll see.
While I was at it, I went ahead and wrapped the grip. I used chamois on this one, as I had it (the pig skin I used on my SL Knightly sword was still in Kansas), and this piece really isn't worthy of nicer leather anyhow.
So that is Big Ugly as it stands now, and it is likely to stay that way unless I really decide I simply cannot live with it looking the way it does. I didn't think to do a lot of measurements, but here are some estimated stats:
Blade length: 14 inches (almost exactly, this was the only defined dimension at the start of the project)
Blade width: about 2 inches
Overall Length: really close to 20 inches
Weight: heavy; that pommel is no joke. I would guess 2 3/4 pounds
Point of Balance: 1/4 inch from guard
Blade thickness at guard: 5mm (I actually measured this)
Blade thickness 1/2 inch from tip: 2mm
So, now that you have been subjected to the whole story (or hopefully just read the interesting parts), here are the pictures:
-Grey
Attachment: 92.92 KB
Attachment: 94.03 KB
Attachment: 61.45 KB
"So long as I can keep the path of honor I am well content."
-Sir Arthur Conan Doyle, The White Company
Last edited by Greyson Brown on Sat 18 Nov, 2006 6:51 am; edited 2 times in total
|
|
|
|
|
Greyson Brown
|
| Posted: Fri 17 Nov, 2006 6:08 pm Post subject: |
|
|
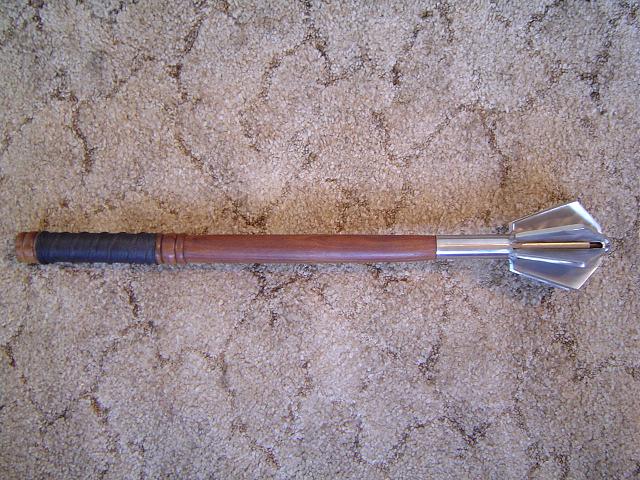
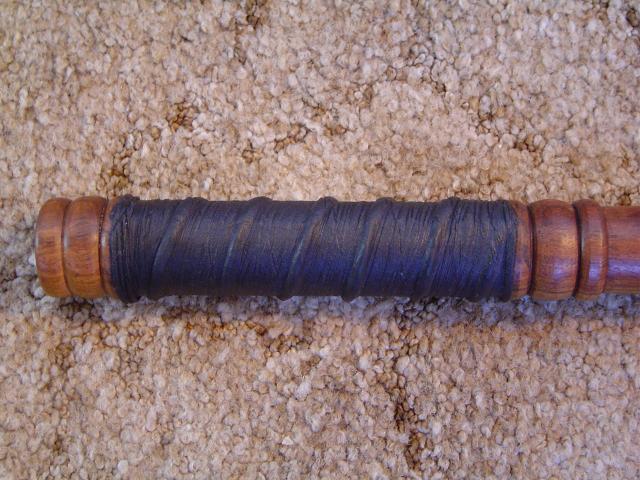
My other project this weekend was to take pictures of the MRL River Tames Mace that I rewrapped the grip on. This work was actually done last Christmas, but I never got the pictures taken. The original leather can be seen in the hands-on review, as this is the reviewed piece.
-Grey
Attachment: 84.75 KB
Attachment: 66.21 KB
"So long as I can keep the path of honor I am well content."
-Sir Arthur Conan Doyle, The White Company
|
|
|
|
|
Merv Cannon

|
| Posted: Fri 17 Nov, 2006 6:41 pm Post subject: Re: Greyson Brown's Projects |
|
|
| Greyson Brown wrote: |
As I mentioned in the Poitiers scabbard thread, I have to have a safety class before I can use the on-post wood shop, and that class is not offered again for a couple of weeks, so the outside of this piece was shaped entirely with hand tools. I used my 1 inch chisel, a bastard cut file, and some sandpaper in order to do all of the shaping. The scabbard ended up a little thicker than it really needs to be (the scabbard walls are .1 - .125 inches thick), but not too terrible.
-Grey |
Hi Greyson.........Howz the Army been treating you ? Hope you've neen doing well in all things ! Nice scabbard, mabye when you get out you can go work for Albion ! So you used a chisel and file to shape the outside ? gee....you got a lot of patience....should have tried a Beaver on a stick ! So...how did you shape the 'V' groove in the inside ? Same way ?
BTW...did you see that photo I found on the web... http://www.myArmoury.com/talk/viewtopic.php?t=8336
Cheers !
Merv ....... KOLR
http://www.lionrampant.com.au/
"Then let slip the dogs of war ! "......Woof !
|
|
 |
|
Richard Fay

|
| Posted: Fri 17 Nov, 2006 9:40 pm Post subject: |
|
|
Hello all!
Greyson,
Nice job on the MRL mace!
Having another look at it has made me consider getting it some time. I wasn't sure about this piece because of some of the less-than-perfect attributes, but there aren't that many affordable maces out there, and still fewer appropriate for the 13th or 14th century. Your work on the grip has made me rethink the possibilities of putting this back on my wish-list!
Don't worry about your dagger! I once bought one of those dagger blades from Atlanta Cutlery, a brass cross, a pommel, and a block of wood in an attempt to construct my own dagger. Should have been easy, right? I managed to cut the threads in the end of the tang, but my drill bit would not make it through the pommel. I know I did something terribly wrong, and probably hardened the brass as I tried to work on it. I managed to get the cross on, but the shoulders didn't quite fit right; I had filed them too much, and there was a curved gap. I did manage to get a fairly decent grip core on the thing, and them screwed and epoxied on some sort of spare knob for a make-shift pommel (the original pommel ended up in the garbage). I don't remember what I next did to the abomination, but I ended up ruining it when I tried to rework it a while after I had completed it. The whole thing ended up in the trash! 
I'm a lot of things, but I'm no metal worker! I guess I should just stick to writing and drawing!
Maybe I am a fool after all!  
Stay safe!
"I'm going to do what the warriors of old did! I'm going to recite poetry!"
Prince Andrew of Armar
|
|
|
|
|
Bruno Giordan

|
| Posted: Sat 18 Nov, 2006 2:34 am Post subject: |
|
|
Greyson, you are a pretty good cordwainer, and I envy you for that.
As for the coustille, ita takes time to complete handmade pieces.
You could still smooth it with a couple of weekends before a grinder.
It is fun, after all.
The shape of the cross is nice, yoou just need grinding.
My coustille is a bit more than halfway now, i have spent a lot of my precious spare time grinding and polishing.
My blademaking teacher told me that I could be lucky if I could do three pieces per year.
Obviously this happens also because I don't have a shop, I live in a flat.
I guess this is your case, so working leather is possibly a more productive choice.
|
|
|
|
|
Greyson Brown
|
| Posted: Sat 18 Nov, 2006 6:28 am Post subject: Re: Greyson Brown's Projects |
|
|
| Merv Cannon wrote: | | Greyson Brown wrote: |
As I mentioned in the Poitiers scabbard thread, I have to have a safety class before I can use the on-post wood shop, and that class is not offered again for a couple of weeks, so the outside of this piece was shaped entirely with hand tools. I used my 1 inch chisel, a bastard cut file, and some sandpaper in order to do all of the shaping. The scabbard ended up a little thicker than it really needs to be (the scabbard walls are .1 - .125 inches thick), but not too terrible.
-Grey |
Hi Greyson.........Howz the Army been treating you ? Hope you've neen doing well in all things ! Nice scabbard, mabye when you get out you can go work for Albion ! So you used a chisel and file to shape the outside ? gee....you got a lot of patience....should have tried a Beaver on a stick ! So...how did you shape the 'V' groove in the inside ? Same way ?
BTW...did you see that photo I found on the web... http://www.myArmoury.com/talk/viewtopic.php?t=8336
Cheers ! |
That entire project was done with a folding limb saw, 4 chisels, a file, some sand paper, and my Swiss Army knife (I was using the saw on that before I borrowed the limb saw). The inside was done with the chisels and then sanded smooth. It takes me right around an hour to shape the outside of a scabbard when I can use the wood shop (I have since made it to the safety class, so that is possible). Shaping the outside of this one took about 2 1/2 hours. Yes, the beaver on a stick might have been faster, but I didn't want the hassel of trying to explain my way around the no pets in the barracks rule. 
-Grey
"So long as I can keep the path of honor I am well content."
-Sir Arthur Conan Doyle, The White Company
|
|
|
|
|
Greyson Brown
|
| Posted: Sat 18 Nov, 2006 6:45 am Post subject: |
|
|
Richard:
The new grip does definately help the mace, but it is still a heavy piece. I won't try to dissuade anyone from getting it, but I am not inclined to give it my full endorsement, either.
Sounds like your dagger project was similarly frustrating. Brass does work harden, and heating it might have helped a bit, but I really haven't worked with brass enough to offer good advice. I can tell you that one does get better with more practice, and if you try again you will have the benefits of your previous mistakes to give you some insight on the next project. Your not a fool; you were brave enough to try something outside of your comfort zone and it didn't work. That happens. Most people just have more sense than I do, and don't share those mistakes publicly.  I have been reminded several times in the last week that one of the most important parts of these projects is being willing to take some risks. Some times it doesn't work, but when it does, it can often be a very important breakthrough. The greater the risk, the greater the benefit. I have been reminded several times in the last week that one of the most important parts of these projects is being willing to take some risks. Some times it doesn't work, but when it does, it can often be a very important breakthrough. The greater the risk, the greater the benefit.
Bruno:
Thank you. Wrapping grips really isn't that hard, and if you give it a try, I suspect you will be surprised with the results.
You are right that hand made things take a lot of time (I think I have 12-15 hours just in forging the blade; possibly triple that on the rest of the project). The real problem with this piece is that I didn't take that time, and assembled it before it was finished. That makes it harder to go back and fix it later.
I could probably grind it to the point where this blade is smooth, but the hammer marks are so deep that it would be about 1mm thick along its entire length. There isn't a real happy solution, and I think I will end up with a lot nicer product if I just put this one in the "humble pile" and use the knowledge gained on another piece. I would like to do something more historically based, anyway.
-Grey
"So long as I can keep the path of honor I am well content."
-Sir Arthur Conan Doyle, The White Company
|
|
|
|
|
Jean Thibodeau

|
| Posted: Sat 18 Nov, 2006 8:37 am Post subject: |
|
|
Greyson;
Grinding away all the obvious hammer marks might give you an O.K. looking dagger with an even finish but that effort might be better applied to future daggers as you learn from previous " mistakes " or impatience.
I do like the rough nature of your dagger and any finishing should be light cleanup and not hiding the hammer work.
There must have been a temptation for non arm specialist blacksmiths to make a quick and dirty dagger for themselves or for a small fee for the local peasantry ? Even if frowned upon by " swordguilds " laws against non-members to make or market knives swords or armour. ( Depends on period and place and how strictly these laws were applied. )
In any case can you imagine a young apprentice smith facing a whole life of making horse shoes or farm implements NOT sneaking a little personal dagger or knife project at least once early in his career.
So your dagger could be credible as one of these little personal projects ? Oh, maybe a little hand file work on the guard would be compatible with the kind of decoration a proud ( but less than expert ) maker might be tempted to add ?
You can easily give up your freedom. You have to fight hard to get it back!
|
|
|
|
|
Greyson Brown
|
| Posted: Sat 18 Nov, 2006 3:38 pm Post subject: |
|
|
| Jean Thibodeau wrote: | | In any case can you imagine a young apprentice smith facing a whole life of making horse shoes or farm implements NOT sneaking a little personal dagger or knife project at least once early in his career. |
In a lot of ways, that is what this project is. Most of my smithing has been for the local museum and other public events. People don't want to stand there for 15 hours watching some guy beat on a piece of metal that he claims is going to be a dagger some day (well, most people anyhow; one young guy did spend about 8 hours watching this particular project. His parents were glad because it meant they knew where he was ). As a result, I have spent a lot of my time making small things like nails, s-hooks, and when I'm lucky, fire stikers (folks think those are pretty cool once you actually make a spark with it; until then, it's just an s-hook bent the wrong way). This project was born out of frustration with that tedious routine (and of course, my love for swords).
-Grey
"So long as I can keep the path of honor I am well content."
-Sir Arthur Conan Doyle, The White Company
|
|
|
|
|
Jean Thibodeau
|
| Posted: Sat 18 Nov, 2006 3:59 pm Post subject: |
|
|
Greyson;
A little aging " patina " and or bluing might make your dagger an attractive and interesting display piece.
I sort of like it.  maybe you see what it could have been without it's flaws while I see it having character because of the flaws and some limited work done to it adding some detailing like a bit of file work like I mentioned before. maybe you see what it could have been without it's flaws while I see it having character because of the flaws and some limited work done to it adding some detailing like a bit of file work like I mentioned before.
( The old glass half full or half empty thing ! )
I could see a few file lines in a close group on each side of the guard leaving a plain surface the width of the blade and for most of the rest of the guard on each side of the 2 to 5 parallel and closely spaced file lines. ( Hope this is not too hard to follow ...... a drawing would be clearer. )
You can easily give up your freedom. You have to fight hard to get it back!
|
|
|
|
|
|
Patrick Kelly
|
| Posted: Sat 18 Nov, 2006 7:57 pm Post subject: |
|
|
Greyson,
I think that's a great job on that scabbard. Well done!
(I was driving past Fort Riley on Wednesday, on my way home from picking up a new patrol car and thought about calling you for lunch but home beckoned.)
|
|
 |
|
Jared Smith

|
| Posted: Sun 19 Nov, 2006 6:23 am Post subject: |
|
|
Greyson,
The next obstacle looks like a chape.
Are you going to try to make your own? If so, a lot of us would be interested in seeing the process!
Absence of evidence is not necessarily evidence of absence!
|
|
|
|
|
Greyson Brown
|
| Posted: Sun 19 Nov, 2006 12:33 pm Post subject: |
|
|
Jean:
There are several little things I could do. It might be something to do between other projects. Either way, I appreciate the encouragement.
Patrick:
Thanks; I am pretty happy with this scabbard, though there is still room for improvement.
You should have given me a call. I would definately like to have lunch with you. Of course, I also understand the strong beckoning power of home.
Jared:
I'm going to have to wait a bit on chape making, but I can guarantee that you will see it eventually. I would also like to make my own buckles.
-Grey
"So long as I can keep the path of honor I am well content."
-Sir Arthur Conan Doyle, The White Company
|
|
|
|
|
Greyson Brown
|
| Posted: Wed 06 Dec, 2006 10:15 am Post subject: |
|
|
I had originally not intended to post pictures of this scabbard now, as I suspect people are getting a bit tired of seeing all my scabbards, but I decided to go ahead and share this one anyway. 
This scabbard is for my Albion Sherriff, and I decided that I wanted to try to replicate the suspension that seems to have been very common at the time Type XIV swords were popular. I based my work on the brass of Sir Robert de Bures, but similar suspensions are shown on nearly all brasses and effigies between about 1280 and 1330. Russ Ellis used the Trumpington brass as the basis for the his scabbard along similar lines.
This is the one by Russ Ellis (Just a note: this scabbard belongs to Jean Thibodeau, so it is built for a left handed person)
I think it is very interesting to see the differences between Russ's and my interpertations of this style. Some of that is definately the result of us using different sources, but some of it is just how two different people solve the same problems. I had forgotten about Russ's scabbard, and only re-found it after I had finished mine. I can't help but wonder how mine would have been different if I had looked at his while planning for my own.
I did make some foolish mistakes on this piece. I cut the slits in the cover leather too long where the belt laces through, and I really should have cut the slits in the lower belt as flat ovals (thus removing some material), this would give it a more finished look. I also need to start making some effort towards finishing the edges on my belts, as that is something I have not bothered with so far. On the plus side, I really like how the incised scallop work at the throat came out, and the dye is evenly applied (the beeswax, however, is not, which is what makes the dye look a bit uneven in these pictures).
My Sherriff has a magenta grip which has darkened considerably with time (I really like the color now, but was not so hot on it out of the box). The dye on the scabbard did not come out as dark as I had hoped, so they do not match, but the scabbard is surprisingly close to the color of the grip when it was new. Hopefully they will start to match a little better with age.
Thanks for looking.
-Grey
Attachment: 33.38 KB
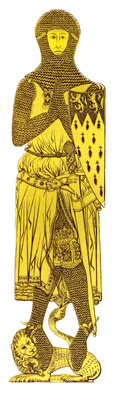
A picture of the de Bures brass from GothicEye.com
Attachment: 119.19 KB
Attachment: 96.2 KB
Attachment: 94.35 KB
Attachment: 115.43 KB

"So long as I can keep the path of honor I am well content."
-Sir Arthur Conan Doyle, The White Company
|
|
|
|
|
|
Kenton Spaulding
|
| Posted: Wed 06 Dec, 2006 11:32 am Post subject: |
|
|
Looks good Grey, very good actually. I think you did a really nice job matching up the scabbard color to the grip color on your Sheriff. That magenta color gives the whole rig a nice little sense of flare, which I think complements the rather simple design of the Sheriff.
I have my winter break coming up, which gives me about a month at home without much to do, and I'm intending to finally get around to finishing my Gaddhjalt scabbard. Out of curiousity, what type of thread/lace did you use to stitch up the back? Also, what did you do to create that dye color? I'm looking for a color similar than that for the body (or belt, haven't quite decided yet) of my scabbard, probably a bit darker than yours, but close.
Thanks for your help, and keep up the good work.
Kenton
|
|
|
|
|
Henrik Bjoern Boegh

Location: Agder, Norway Joined: 03 Mar 2004
Posts: 386
|
| Posted: Wed 06 Dec, 2006 11:44 am Post subject: |
|
|
Greyson, your scabbards look lovely! You seem to put the right spirit into the making of your pieces. I also like the look of your mace.
Cheers,
Henrik
Constant and true.
|
|
|
|
|
Greyson Brown
|
| Posted: Wed 06 Dec, 2006 12:53 pm Post subject: |
|
|
I just used the natural thread from Tandy Leather. It comes in a 25 foot length, of which I have only used about half so far. This stuff might be a bit on the heavy side (doesn't have any size description from Tandy, and I haven't tried to measure it), so if you find something that works, but is a little more slender, let me know. As for the dye, bought Fiebing's dark red, but I think I ended up with more oxblood on the leather. I used a rag, rather than the supplied dauber, to apply the dye, but I didn't bother to rinse out the oxblood or dark brown that was still on there from my Steward scabbard. If you wanted to get this color or slightly darker, I think I would try to mix about 1/3 oxblood with 2/3 dark red. Of course, it is always easier to apply a light coat and then add more as needed. And, as most products advise, try it on a scrap piece or inconspicuous area first.
-Grey
"So long as I can keep the path of honor I am well content."
-Sir Arthur Conan Doyle, The White Company
|
|
|
|
|
Greyson Brown
|
| Posted: Sat 06 Jan, 2007 1:01 pm Post subject: |
|
|
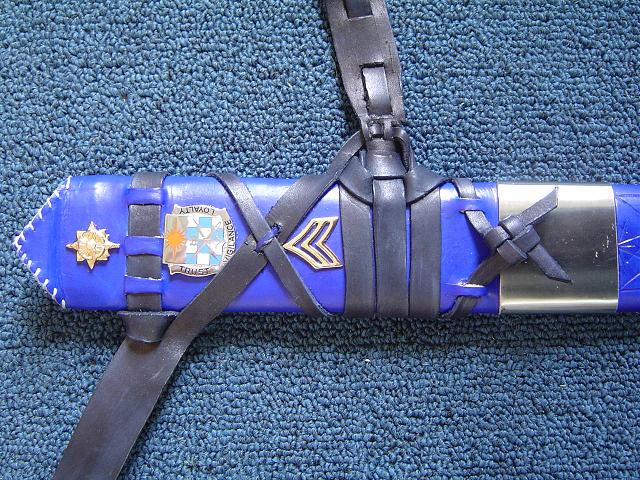
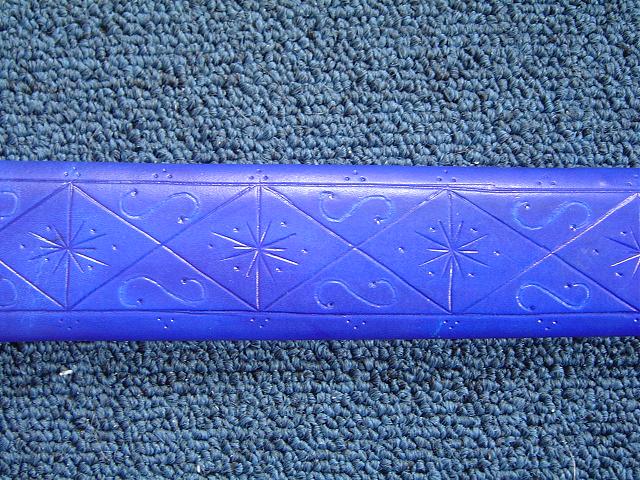
As some of you know, the unit that I have been in for most of my military carreer inactivated (I know, that's not a word, but the military insists otherwise). Since I'm not the Commander or First Sergeant, I didn't get a fancy plaque or anything, so I decided that I would make my own 101st Military Intelligence Battalion commemorative sword and scabbard. I decided to use my MRL European Sword for this project as I rather like the sword, but it is not quite historical. This way I have a piece that I like and is special to me without feeling that I have vandalized a good piece. I used the locket and chap from the oiginal MRL scabbard, and added (from top to bottom, or left to right in the picture below) the Military Intelligence branch insignia, the 101 MI Battalion crest, and Sergeant's rank to the throat. I mixed suspensions on this one. The top portion is the earlier laced style while the bottom belt is wrapped in the fashion of a 15th century longsword belt. It worked OK, but I don't think I would do that again. Lastly, I did some decorative incising on the lower portion of the scabbard. I intend to put a modern (probably nickle plated) buckle on this belt, but I just haven't gotten around to it. I also re-wrapped the grip on the sword and included three chevron-shaped risers to match the Sergeant's rank on the scabbard.
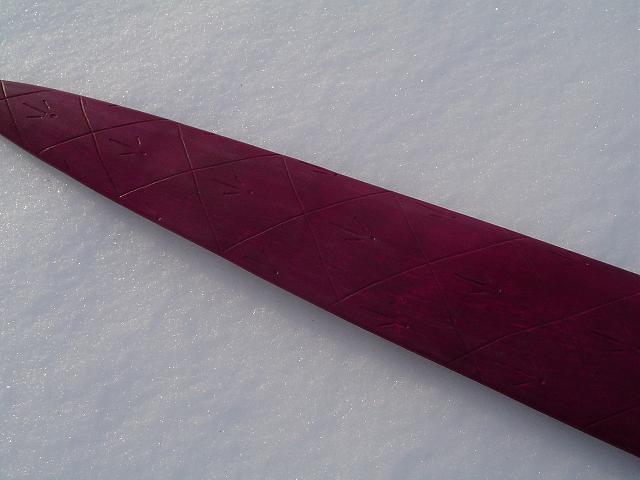
Inspired by the incising on the 101 MI scabbard, I revisited my Sherriff scabbard and added some decoration there. I think it makes this scabbard look much more finished (of course, a chape and buckle would help with that, too).
-Grey
Attachment: 110.77 KB
Attachment: 107.64 KB

Attachment: 100.58 KB
Attachment: 30.72 KB
Attachment: 68.11 KB
"So long as I can keep the path of honor I am well content."
-Sir Arthur Conan Doyle, The White Company
Last edited by Greyson Brown on Fri 19 Jan, 2007 7:44 am; edited 1 time in total
|
|
|
|
|
|
|
You cannot post new topics in this forum
You cannot reply to topics in this forum
You cannot edit your posts in this forum
You cannot delete your posts in this forum
You cannot vote in polls in this forum
You cannot attach files in this forum
You can download files in this forum
|
All contents © Copyright 2003-2026 myArmoury.com — All rights reserved
Discussion forums powered by phpBB © The phpBB Group
Switch to the Basic Low-bandwidth Version of the forum
|

