| Author |
Message |
Kirk Lee Spencer

|
 Posted: Sat 27 May, 2006 1:32 pm Post subject: Hybrid Cold Steel/MRL Baskethilted Cutlass Posted: Sat 27 May, 2006 1:32 pm Post subject: Hybrid Cold Steel/MRL Baskethilted Cutlass |
 |
|
Hi All…
I finally finished my claidheamh crom. I thought I would share the experience and results with you. I have tried to give
descriptions of what was done for any who are interested. I have put topic headings for each section so you can read
the parts that are of interest.
It all began when I saw a picture of a nice baskethilted cutlass in George Neumann’s “Sword and Blades of the American
Revolution.” I had just purchased a Cold Steel Baskethilted backsword. I really like the CS basket, but the blade was a
little too heavy. It was also too narrow to offset the oversized basket IMO. I also had a MRL Dutch Cutlass that I
purchased from a fellow forumite. I really liked the cutlass blade but did not care much for the clamshell guard (although
it was a good design). So I decided to take the blade off the Dutch Cutlass and put it on the Cold Steel Basket.
The first step was to break down both. The Cold Steel Baskethilt came apart easily as the pommel just screws onto the
tang. The Dutch Cutlass was another matter. It also had a pommel that screwed to the tang, but it was very difficult to
remove. Also the grip was epoxied to the tang. The grip split trying to get it off.
ks
 Attachment: 97.82 KB Attachment: 97.82 KB
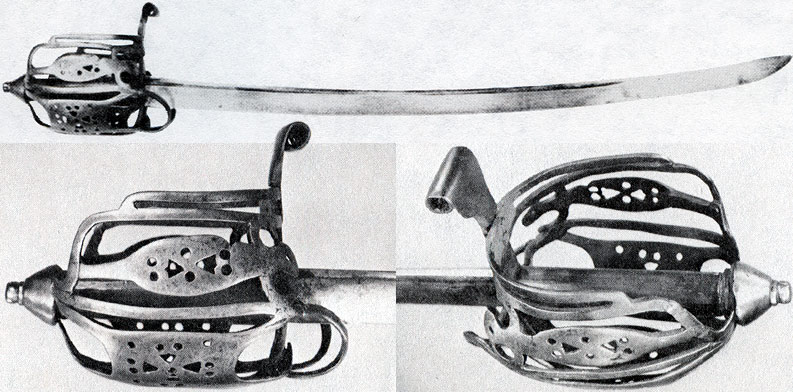
From Neumann's "Swords and Blades of the American Revolution." Original English Baskethilted Hanger 1745-1780. 32 inches Long. Weight 1.9 pounds.
Attachment: 93.8 KB
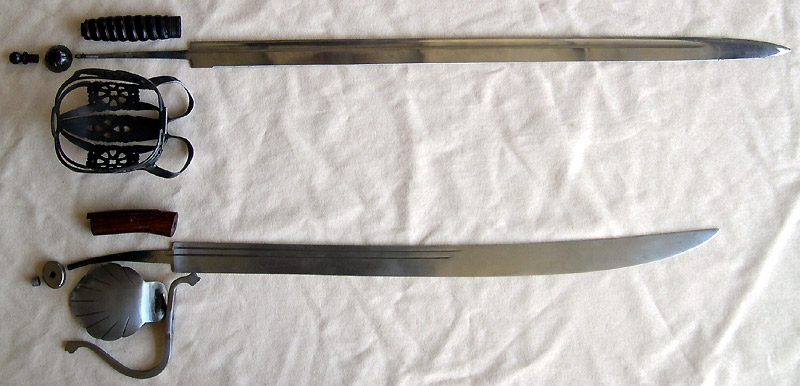
CS baskethilt and MRL Dutch Cutlass disassembled
Attachment: 96.85 KB
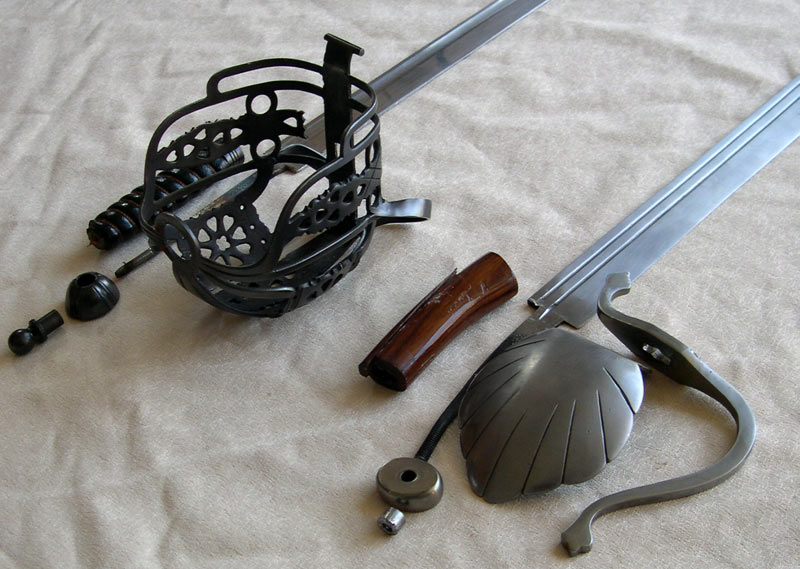
CS baskethilt and MRL Dutch Cutlass Hilts disassembled
Two swords
Lit in Eden’s flame
One of iron and one of ink
To place within a bloody hand
One of God or one of man
Our souls to one of
Two eternities
|
|
  |
 |
Kirk Lee Spencer
|
| Posted: Sat 27 May, 2006 1:39 pm Post subject: |
|
|
Straightening the Tang
Once the swords were disassembled, the next step was to straighten the tang on the Cutlass blade. I wrapped the
blade in a wet towel and put it in the vice. The wet towel was to cool the blade and keep it from over heating and loosing
its hardness. I had my son take a propane torch (he loves to play with fire) and heat the middle section of the tang until it
was a dull red. Meanwhile I took my handy-dandy claw-hammer and tapped gently on the tang until it was straight.
Blade Shaping
I also wanted to reshape the blade a little. It seemed a little too wide at the Cop and needed a little more distal taper. I
also wanted to soften the wedge-shaped cross section. I have a large belt sander I use for woodworking but the belt and
motor is for woodworking and does not work well on metal. So I clamped the blade to a plywood workbench and tried to
shape it with my angle grinder. Every few passes I would wet the blade to keep it cool, although I think I got the tip a little
too hot. You have to be very careful near the tip and edges. These areas can heat up really quickly. I was really careful at
first so that I did not ruin the blade. Eventually I got a little to careless and cut too deep near the edge. So I took my
bastard mill file and reshaped the edge. It really didn’t matter because I was planning on narrowing the blade at the Cop.
But it was a good lesson in how quickly you can gouge a blade while holding a heavy angle grinder. So I put the angle
grinder in my vice and held the blade against the grinding disc, taking very light passes, always keeping the tip and edge
pointed away. After several passes I would wet the blade to keep it cool and use the calipers to keep track of how much
material was being removed. Once the shape of the blade was close to where I wanted it, I used the bastard mill file
to remove most of the grinding marks.
Basket Shaping
I like the Cold Steel basket. It was a little oversized but not too much so. Also the forward guards (loops at the front of the
basket) were too wide. They were out of proportion with the bars of the basket. So I did a little cosmetic surgery. I took a
permanent marker and drew lines on the forward guards to get an idea of the shape and width I wanted. Then I took a
stone grinding wheel on my dremel tool and began to grind away the excess. I ground the forward guard down to a more
proportionate (and a little more period) size. Using the course sanding drum on the dremel, I shaped them and rounded
the edges, then polished it with medium sand paper.
Blade Aging
I put fingernail polish over the threads of the tang to keep them from rusting, covered the rest with vinegar and rock salt
and buried it in the backyard. I let it set for a week or so. When it was removed there were many shallow pits. As I
finished the blade with coarse sand paper most of the pits were removed but a few remain to give the blade a little
character.
Basket Aging
The Basket had a nice gun bluing on the surface. If you have seen my other projects, you know I like the brown look. So I
covered the basket with etchant (ferric chloride) and just let it rust for about a week. This worked to remove the blue and
give the basket very shallow pits. The pits would remain in the hard to get places and would be polished out on the outer
parts of the basket giving a nice contrast in texture.
Basket Browning
I covered the rusted basket in oil and let it set a day. Then I took fine sand paper and polished the outer and inner
surfaces of the basket until it was smooth taking out the rust pits. I then used cold browning solution to get a nice even
brown. Then steelwool was used to lighten the middle areas of the wider components of the basket bars and shields.
Then another layer of browning solution, then lightened the center more with steel wool or very fine sand paper, then
another layer of brown… repeating until I achieved the contrast in the tone of the browning.
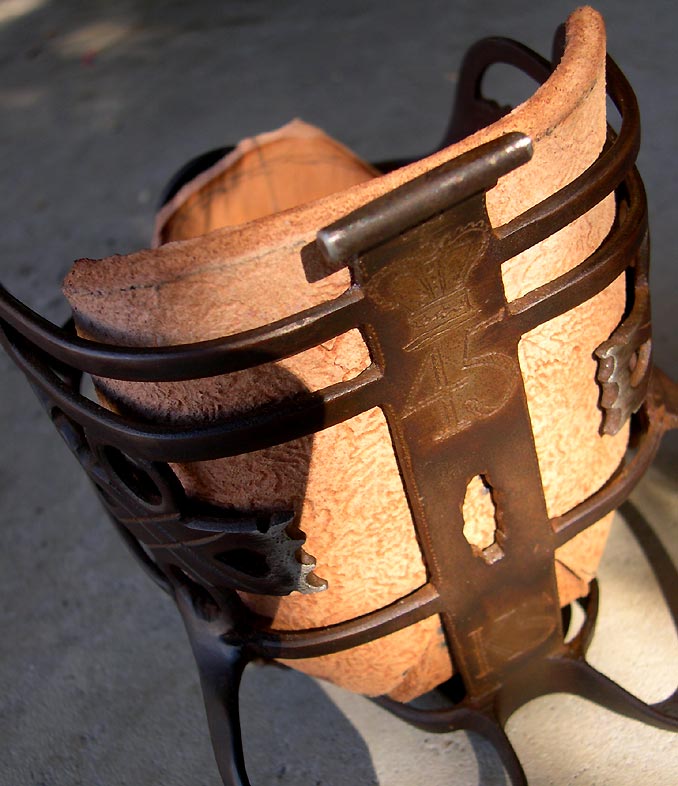
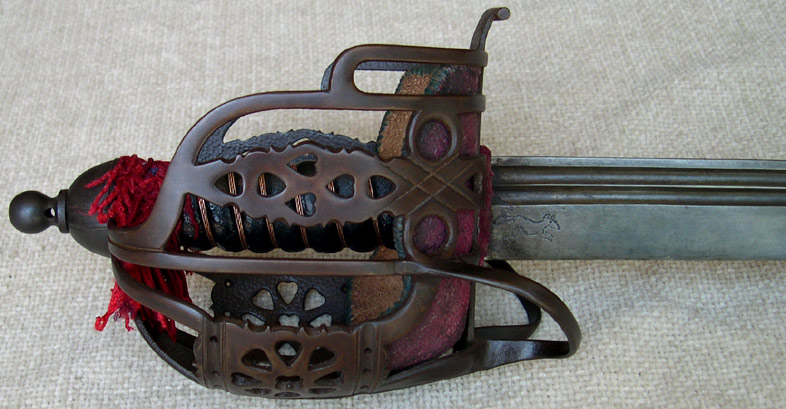
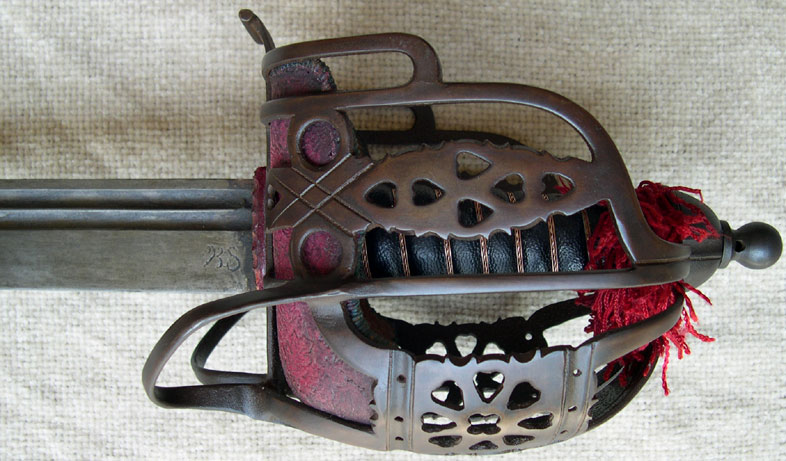
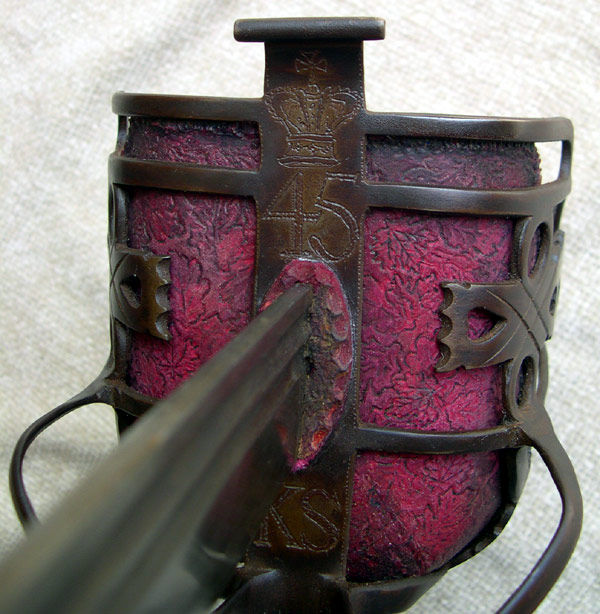
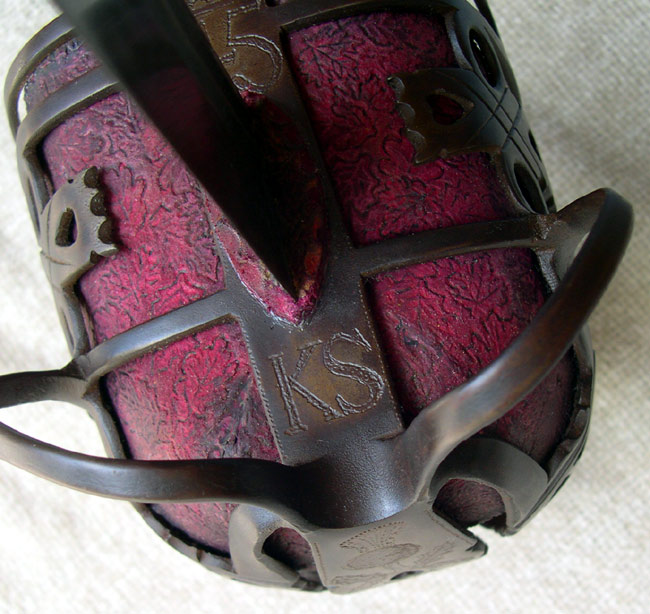
Engravings
I noticed that the bottom plate (main knuckle guard) and the front plate (“quillon block”) were rather plain and
undecorated compared to the other parts of the basket. It was at this point that my love for all things Celtic came into
play. (I’m half Scotch Irish. My granddad was a Duncan). I decided to do a little engraving in the plain areas. I had seen Scottish baskethilts with thistle, crowns and regimental numbers and the initials of the maker. So I took a thin permanent marker
and drew two thistles one large and one small on the main knuckle guard at the bottom of the basket. I gave them each vine
like roots that reached toward the other. On the quillon block I drew a crown similar to one I had seen on
the blade of an original. I also drew the number 45 under the crown. In my mind it stood for the desire and action taken
for Scottish liberty in 1745. Or it could simple be a regiment number. Below the blade on the quillon block I drew the
initials KS. Not sure why… just liked the look of it J. With the tip of a diamond bur on my dremel, I engraved along the lines
I had drawn. For the straight lines of the numbers and letters I took a steel 6 inch ruler and clamped it along the
straight sections of the letters and numbers I had drawn. I used it as a guide for the dremel tool. (I didn’t trust my ability
to freehand a straight line.) It worked really well. Using fine sandpaper I polished these areas again and used the layers
of cold browning as described earlier to recreate the light to dark tones in these areas.
ks
Attachment: 96.05 KB
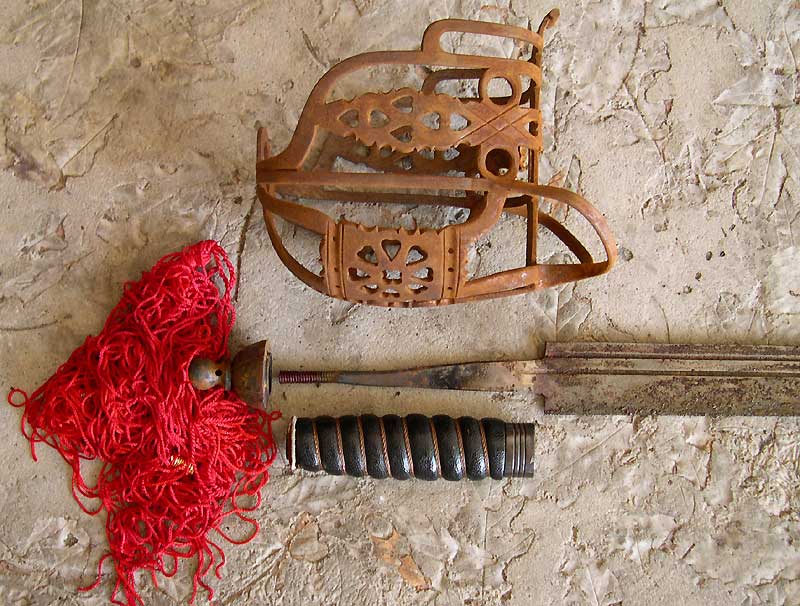
Rusted Basket and Blade Showing Straightened Tang
Attachment: 98.35 KB
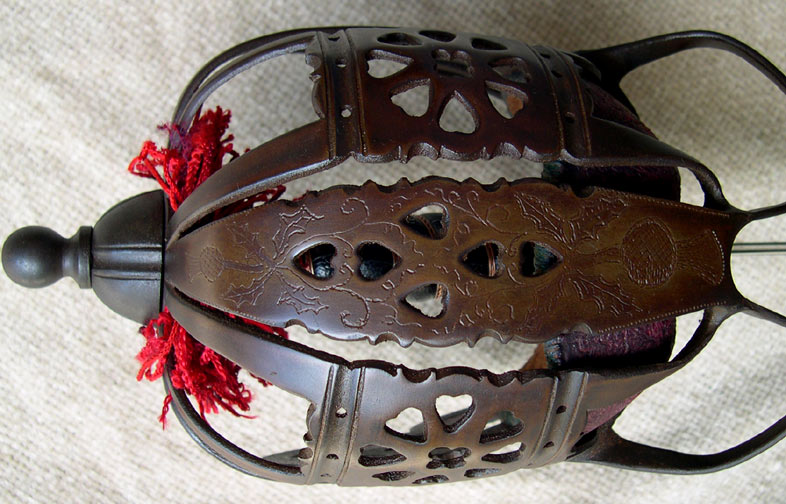
Main Knuckle Guard with Thistle Engraving
Attachment: 97.53 KB
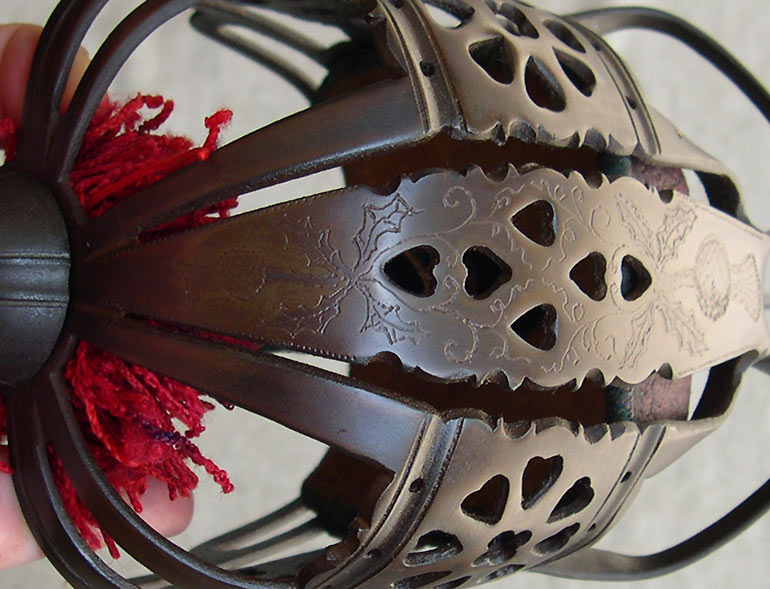
Close-Up of Thistle Engraving on Main Knuckle Guard
Two swords
Lit in Eden’s flame
One of iron and one of ink
To place within a bloody hand
One of God or one of man
Our souls to one of
Two eternities
|
|
|
|
|
Kirk Lee Spencer
|
| Posted: Sat 27 May, 2006 1:47 pm Post subject: |
|
|
Fitting It All Together
Several things had to be done to get the cutlass blade married to the basket. After the tang was straightened, the
pommel nut on the basket had to be drilled out and retapped to match the threads on the tang of the cutlass. It was the
first time I had ever done it and was really more simple than I thought. The key is to go slow and not try to force it. The
hole in the quillon block and grip had to enlarged to accept the cutlass tang. This was done with a long cylindrical
grinding stone in my dremel…. The kind used for sharpening chainsaw blades. The wood of the grip was cut out using a
cutting bit (like a drill bit but the edges are inverted so that it cuts laterally). So I finally got it all put together. I looked great
but not perfect. The basket, while proportional to the blade, was a little oversized for my hand, the grip was too long and
the sword was painful to use as my hand kept pushing into the bars of the front of the basket. Also the open spaces
between the bars at the front of the basket would allow the point of an opponent’s sword to easily puncture the hand. So I
decided to make a liner for the basket.
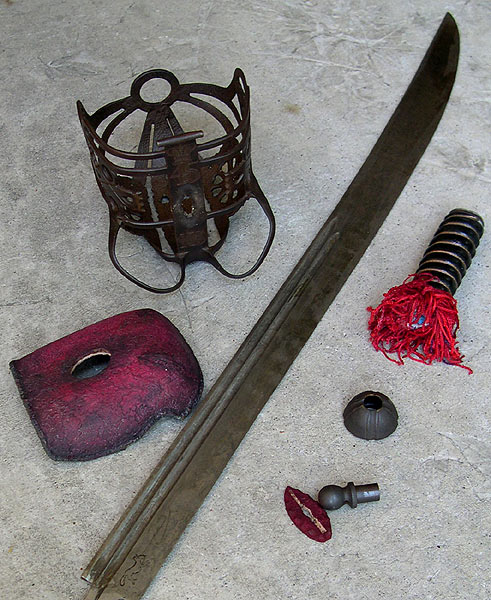
Attachment: 94.14 KB
Materials Used for the Basket Liner
Two swords
Lit in Eden’s flame
One of iron and one of ink
To place within a bloody hand
One of God or one of man
Our souls to one of
Two eternities
|
|
|
|
|
Kirk Lee Spencer
|
| Posted: Sat 27 May, 2006 1:52 pm Post subject: |
|
|
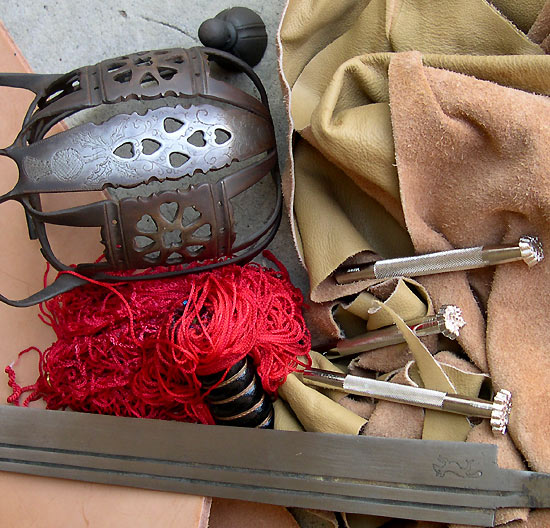
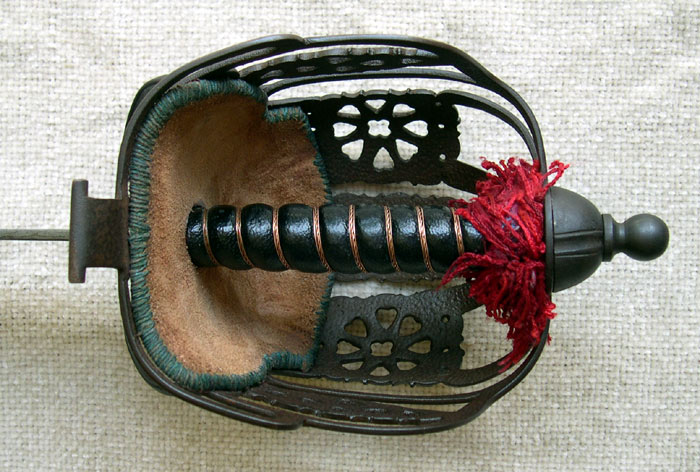
Basket Liner
The solution to these problems was to make a thick leather liner for the basket. I had heard that thick leather could be
boiled to make it pliable and could be shaped to fit and then baked in an over to harden it. I took a piece of paper and
pushed it into the basket and cut it along the upper edge of the basket. This gave me a template to show how large a
piece of leather I would need. So I made my way to the leather store and found the bin of remnant saddle leather. I
placed the paper template over the pieces of leather until I found a piece large enough. I asked the lady at the counter
about boiling and shaping leather. She said you could boil it or you could just let it set in water overnight. The result is
the same. She also said you don’t need to bake it just let it dry in the object that you want it to retain the shape. I took the
paper template, placed it on the leather and traced around it then took a large pair of scissors and cut it out leaving extra
around the edges for later adjustments and for any possible shrinkage. I then soaked this piece of leather in water over
night. The next day I tried to force it into the basket. The leather was too thick. My first attempt was to score the inside of
the liner with a sharp knife to try to get it to bend into place. This did not work.
I had removed the thin felt lining that had come with the sword because I did not like the look of a full lining. I wanted to be
able to see the grip (which was very well done) through the bars of the basket. So I really did not need such a big piece
of leather. I cut the edges off leaving a “tail” that would connect the front of the liner to the pommel to help keep it from
shifting. I later found that the leather was hard enough when it dried to shape that it would not shift so I eventually cut this
tail off.
To figure out how to shape such tick leather to fit into the front of the basket, I made another paper template and cut slits
allowing the paper flaps on the side to overlap and conform to the shape of the front of the basket. Once I found a
template that worked I used it to get an idea of where to cut the slits in the leather. Then it was just a matter of trimming
the sides of the slits until they matched up and butted together when the leather was placed inside the basket. As can be
seen, I got a little too impatient and cut the slit a little too much. I got the leather to fit but there was a gap. Later I would
epoxy wedges of leather I cut out with an exacto knife into the gap to try and hide my mistake. More on the liner later.
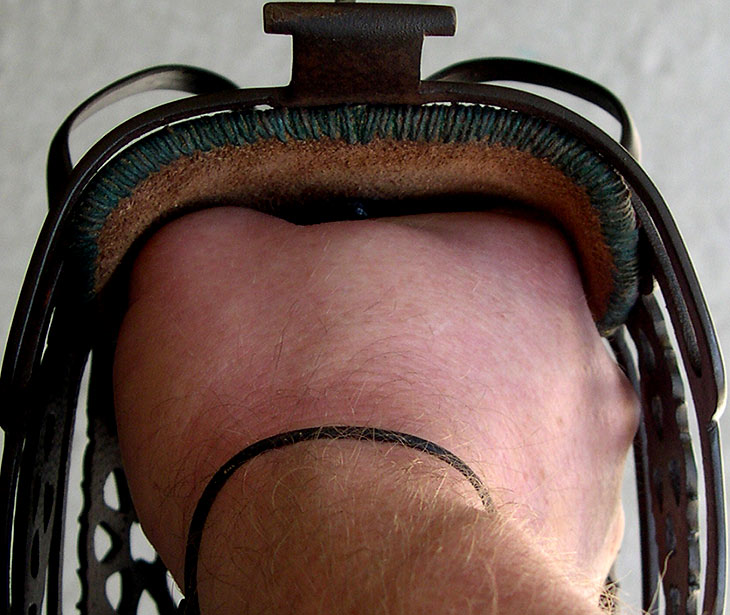
Shortening the Grip.
The Grip was about half an inch too long for my hand. The liner would shorten the grip about a quarter inch in the front. I
could also shorten the grip from the back by adding a thick ring of fringe. This is seen on some Scottish baskethilts and
supposedly helped to cushion the hand in this area. I ground the metal furrell at the front of the grip to provide the gap for
the ring of fringe. The fringe came from graduation tassels from the college where I teach. I made rings of blue cotton
thread the diameter of the end of the grip and just tied the individual fringe strings around the thread. I made several of
these and then epoxied them to the end of the grip. There has to be an easier way to do this but I could not figure it out. I
remember that fringe that came with it was already sewn into a ring but I threw it out along with the
felt basket liner. When I was tying all those knots I wished many times I had kept it.
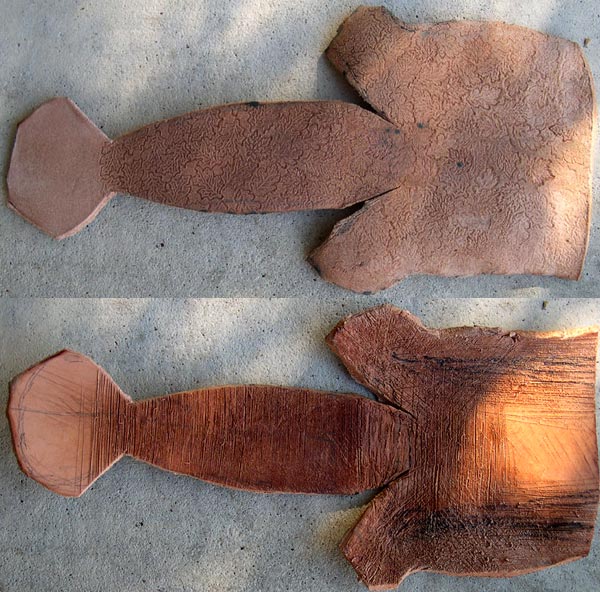
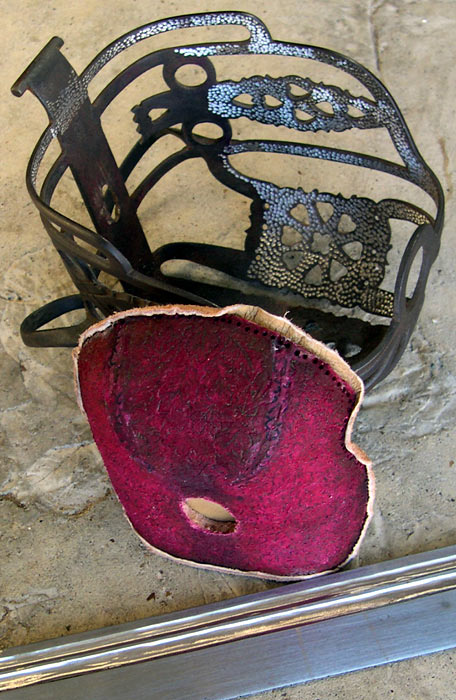
Embossing the Liner
The outside of the leather liner look very plain to me compared to the decoration on the hilt. So I decided to emboss the
front of the liner. I really like the look of fallen leaves especially as it relates to the perennial Jacobite attempts at Scottish
liberty (it was only after the fact I learned that the oak leaf was an early symbol of Scottish liberty). So I wetted the surface
of the liner until the leather had a soft dough-like sticky feel to it. Then I used the lead shaped punches I had bought at
the leather store to punch leaf shapes deep into the leather.
Attachment: 98.49 KB
Rough Cut Basket Liner with Embossing
Attachment: 73.2 KB
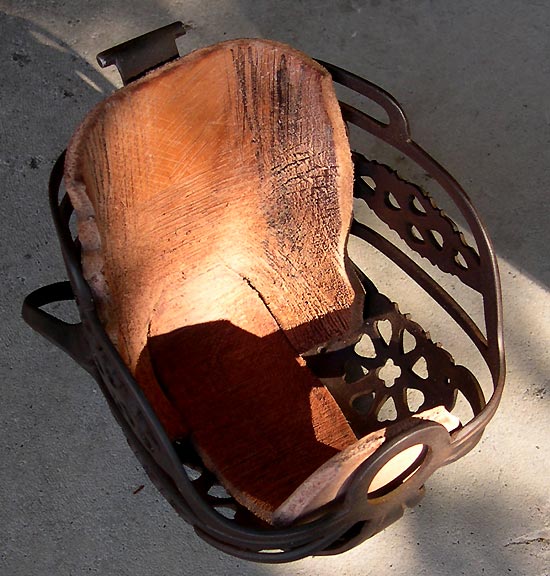
Liner in Basket from Back
Attachment: 83.33 KB
Liner in Basket from the Front
Two swords
Lit in Eden’s flame
One of iron and one of ink
To place within a bloody hand
One of God or one of man
Our souls to one of
Two eternities
|
|
|
|
|
Kirk Lee Spencer
|
| Posted: Sat 27 May, 2006 2:03 pm Post subject: |
|
|
Shaping the Liner
I then placed the liner inside the basket and trimmed off the excess leather. I let it dry in place inside the basket until the
leather was hard. At this point I made leather shims to patch the gaps in the slits at the bottom of the liner and expoxied
the slit closed. Once the liner was in place and I was satisfied that it fit well I took a pen and made a mark on the liner
through the hole in the quillon block where the tang passes through. I then put the forward end of the grip on this mark
and drew a circle. I took a large drill bit and drilled out holes inside the circle and then took an exacto knife and trimmed
the edges of the hole until the forward end of the grip passed through the liner. Red leather dye was used to stain the
outer surface of the liner. I took a very thin black marker outlined the recessed portions of the leaves to make the pattern
more obvious from a distance.
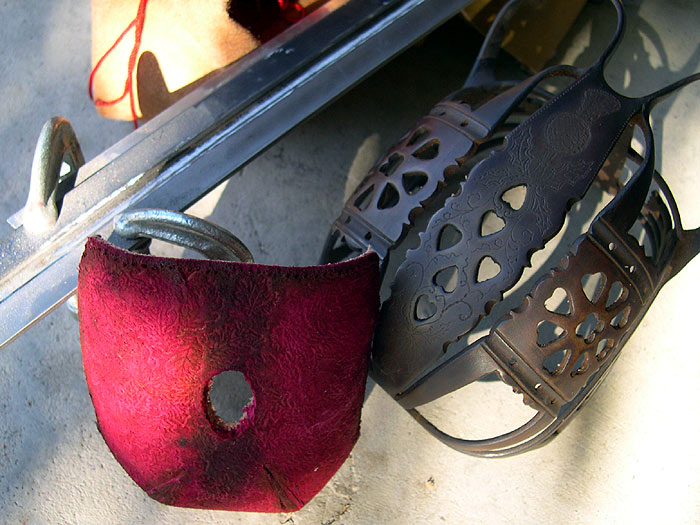
Lining the Liner
I wanted the inside of the liner to be lined with a softer leather with the original buff color. I had seen this on many original
basketliners… red outer layer and buff inner layer with some form of colorful thread as a binding along the edges. The
problem is that the leather of the outer liner was very thick. It would certainly stop the tip of an opponents sword and it was
thick enough to take up about a quarter of an inch of the long grip. However, there was no way I was going to get a
glover’s needle through it. So I found the smallest drill bit I could find and used my dremel tool to drill holes along the
edge. With the coarse sanding drum I ground the inner edge of the leather to give it a nice rounded shape and reduce
the depth of the holes. While I had the sanding drum I also ground out the pressure points on the inside of the liner to
make a custom fit for my hand. (See ground contours in photo.) I then took some leather cement (I think it was
called “barge”) and coated the inside of the leather liner. I used this particular cement because it said it would not
harden. I pressed the thin suede leather into the cement and smoothed it out and held it in place until it began to set. I
was careful not to get any of the cement into the holes. I did not glue the edges yet I left them loose. I would come back
and trim them after the cement had set. After a couple of days, and the cement was cured, I folded the suede leather
over the edge and took a pen and drew a line on the outside of the suede just where the holes were. I then t rimmed along
this line with a pair of scissors. I put a drop of super glue on the inside and outside of the edge of the thick outer liner in
a small area, only about half an inch. I folded the suede over the edge and held it down for a minute or so until it set in
that small area. I then moved over a half inch or so and did the same… continuing all the way around the liner. I let this
set for a day and then took the drum grinder on my dremel and rounded the edge of the suede leather. It was hardened
with the super glue. I then took some blue linen thread, and using a large glovers needle and a pair of needle nose
pliers, I sewed the binding around the edges making sure the tip of the needle found the holes I had drilled. You can
break the eye out of a lot of glover’s needles if you do not pull straight and steady. If you twist or pull to the side
the needle will break and you will have to start over or try to patch it at that point.
Attachment: 97.11 KB
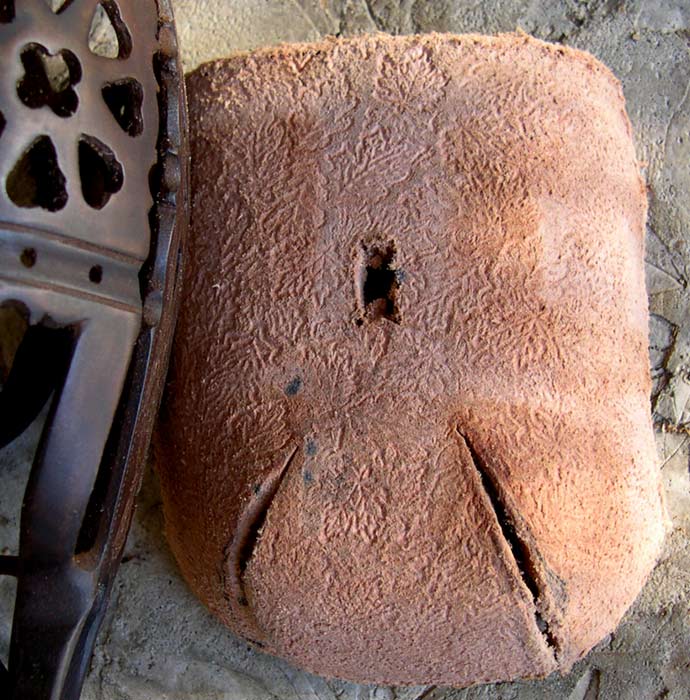
Basket Liner Cut to Fit Outside
Attachment: 97.76 KB

Basket Liner Cut to Fit Inside Note Contours
Two swords
Lit in Eden’s flame
One of iron and one of ink
To place within a bloody hand
One of God or one of man
Our souls to one of
Two eternities
|
|
|
|
|
Kirk Lee Spencer
|
| Posted: Sat 27 May, 2006 2:12 pm Post subject: |
|
|
Fullers
Another part of the sword that I wanted to improve was the fullers. They were simply two shallow grooves engraved in the
side of the blade… they appeared as almost an afterthought. And on the inboard side of the blade they were not even
straight. The fullers on period pieces were much larger and added a sense of architecture to the blade. I had never
tried to grind fullers, so I was somewhat afraid to give it a try. Although the process is time consuming, it turned out to be
easier that I had expected. I took two flat steel bands I bought at home depot and clamped them to the blade. I would
use them as guides, thinking I could just grind out a channel in between. They did work well as guides to provide a
straight original fuller channel, however, it was impossible to cut the fuller right up next to the edge of the guides. I tried to
cut into these corners with smaller grinding bits like the chainsaw sharpening bit. It was hard to maintain a constant
depth. So I just got rid of the steel bar guides.
I found that if you push the grinding stone in a particular direction it is less likely to jump out of the fuller groove you are
grinding. (I believe it is when the bit is cutting toward the center of the groove.) If you try it you will see what I mean. If you
find the right cutting direction it is somewhat easy to cut a straight groove even with out the guides. I drew a straight line
with a marker to see what I was grinding toward. Once you get the edges straight a cylindrical or conical grinding stone
can be used to shape the bottom of the fuller. To polish the bottom of the fuller I took a section of oak dowel that roughly
matched the shape of the fuller and wrapped coarse sand paper around it and ran it up and down the fuller. What this
showed me was the gouges I had left trying to cut into the edge of the steel guides earlier. The gouges showed the
grinding marks and the higher areas were smooth. So I kept deepening the fuller trying to get the gouges out.
Resanding, seeing more gouges, regrinding, etc. I finally got most out and the others were so shallow they are
unnoticeable, especially since I decided not to polish the fullers I just left the grinding marks. I knew that I was going to
darken the blade with mustard so it really did not matter. I think that if you remove the guides once the fuller groove is
started and grind evenly along the edges you will not get the gouges I got. It was primarily where I used the chainsaw
sharpening grinder and tried to freehand along the guides.
Attachment: 98.83 KB
Liner Dyed Red. Note: clamped fuller guides on blade
Attachment: 97.94 KB
Liner With Holes and Suede Rolled Along Edges
Attachment: 98.28 KB
Finished Parts. Note blue binding around the edge of the liner
Two swords
Lit in Eden’s flame
One of iron and one of ink
To place within a bloody hand
One of God or one of man
Our souls to one of
Two eternities
|
|
|
|
|
Kirk Lee Spencer
|
| Posted: Sat 27 May, 2006 2:20 pm Post subject: |
|
|
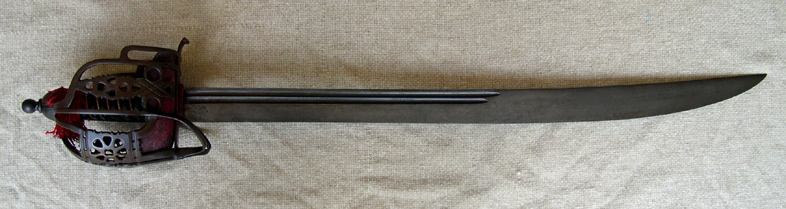
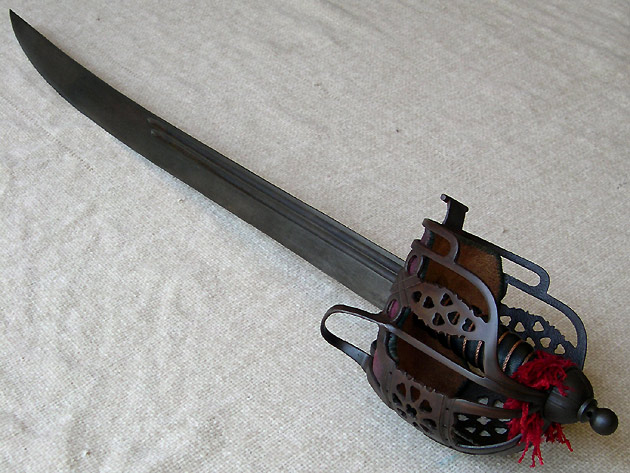
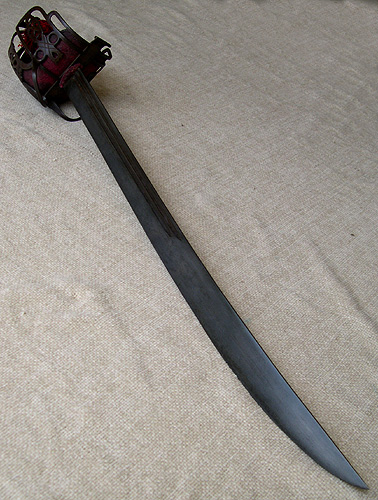
And now for some photos of the finished work.
Statistics:
Overall Length: 34.5 inches
Blade Length: 27.75 inches
Blade Width: 1.6 inches
Center of Balance: 3.7 inches
Basket Width: 4.9 inches
Pommel Lenth: 1.75 inches
Grip Length: 4.75 inches
Weight: 2.75 lbs
ks
Attachment: 96.63 KB
Attachment: 98.33 KB
Attachment: 97.19 KB
Two swords
Lit in Eden’s flame
One of iron and one of ink
To place within a bloody hand
One of God or one of man
Our souls to one of
Two eternities
|
|
|
|
|
Kirk Lee Spencer
|
| Posted: Sat 27 May, 2006 2:22 pm Post subject: |
|
|
A few more at a different angle.
ks
Attachment: 97.22 KB
Attachment: 98.57 KB
Attachment: 97.25 KB
Two swords
Lit in Eden’s flame
One of iron and one of ink
To place within a bloody hand
One of God or one of man
Our souls to one of
Two eternities
|
|
|
|
|
Kirk Lee Spencer
|
| Posted: Sat 27 May, 2006 2:24 pm Post subject: |
|
|
Close up of blade engraving...
ks
Attachment: 98.53 KB
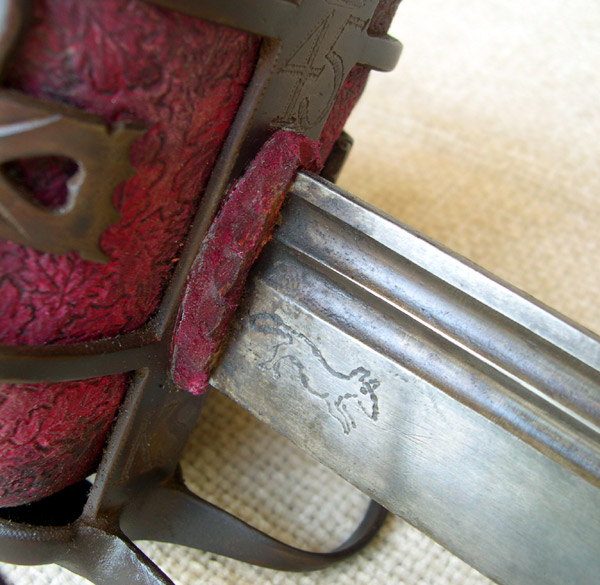
Attachment: 98.76 KB
Attachment: 98.04 KB
Two swords
Lit in Eden’s flame
One of iron and one of ink
To place within a bloody hand
One of God or one of man
Our souls to one of
Two eternities
|
|
|
|
|
Kirk Lee Spencer
|
| Posted: Sat 27 May, 2006 2:27 pm Post subject: |
|
|
Three more... one showing the sword in hand.
ks
Attachment: 98.12 KB
Attachment: 96.77 KB
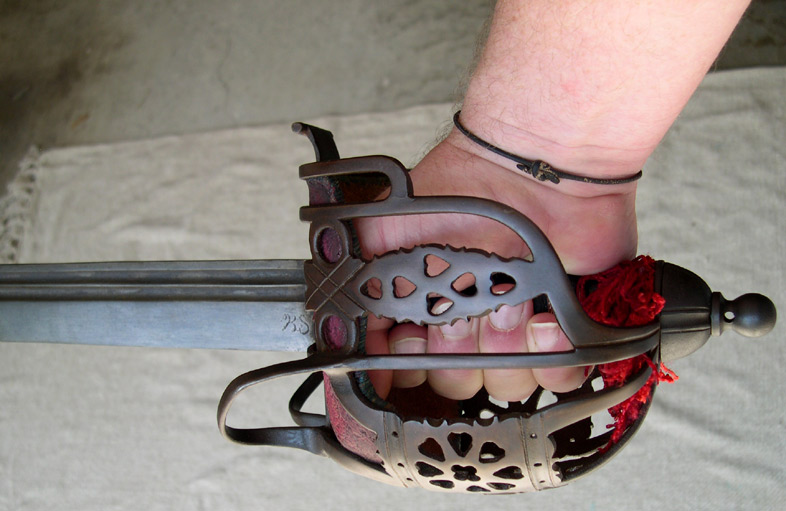
Attachment: 98.54 KB
Two swords
Lit in Eden’s flame
One of iron and one of ink
To place within a bloody hand
One of God or one of man
Our souls to one of
Two eternities
|
|
|
|
|
|
J. Bedell
|
| Posted: Sat 27 May, 2006 2:32 pm Post subject: |
|
|
very nice. Thats some impressive work.
-James
The pen may be mighter, but the sword is much more fun.
|
|
  |
|
|
David Martin
Location: Southeastern Pennsylvania Joined: 11 Apr 2005
Posts: 166
|
| Posted: Sat 27 May, 2006 6:21 pm Post subject: |
|
|
Thank you so much for posting this! The finished result is absolutely beautiful. I very much appreciate your taking the time to document how you achieved this look. I'm going to save this thread for future reference.
My hat is off to you, Mr. Spencer. Congratulations on a job well done!
|
|
|
|
|
Jean Thibodeau

|
| Posted: Sat 27 May, 2006 6:31 pm Post subject: |
|
|
Impressive on every level.  You could turn this into book form and make money selling the books to pay for more projects. One book or one chapter in a large how to book. You could turn this into book form and make money selling the books to pay for more projects. One book or one chapter in a large how to book.  I'm not joking you should do it! It's that good! I'm not joking you should do it! It's that good!
Maybe you should get in touch with Chivalry Bookshelf ?
You can easily give up your freedom. You have to fight hard to get it back!
|
|
|
|
|
Gordon Frye

|
| Posted: Sat 27 May, 2006 7:50 pm Post subject: |
|
|
Kirk;
Nice little hanger! Just right for a Grenadier of a Royal Regiment... er, wait, perhaps not, what with all those thistles and that "45" on there. Or perhaps the 45th Regiment of Foote? 
I always liked those full-basketed Grenadier hangers, they're just too cool for words, glad you made that one to pester us with! Great stuff, and thanks for posting the whole process!
Allons!
Gordon
"After God, we owe our victory to our Horses"
Gonsalo Jimenez de Quesada
http://www.renaissancesoldier.com/
http://historypundit.blogspot.com/
|
|
  |
|
|
GG Osborne
|
| Posted: Sat 27 May, 2006 9:28 pm Post subject: Inspiration!! |
|
|
|
Kirk..... Thanks for the great article and documentatioin for the project. It was very impressive. In fact, you've inspired me to take on a project that I have wanted to do for a while, that is to make a basket-hilted, saber-bladed "back sword" ala the famous portrait of Alastair Mor Grant, the Champion of Grant, or the Peniculk sketches. Now that you have illustrated how to alter the basket, I obviously need a blade. Since I don't have a machine shop, I need to find a blade that is easily adaptable to the need. I noted where Donnie Shearer, the Mad Piper, made a Napoleonic period piece out of a - presumably - Cold Steel Blucher or British 1796 calvary saber. However, the blade is not right for the pre-1745 period, IMHO. Does anyone have a suggestion? Again, thanks Kirk for the inspiration!! Fine job.
|
|
|
|
|
Thomas Hoogendam

|
| Posted: Sun 28 May, 2006 2:58 am Post subject: |
|
|
That looks fantastic!! This really should become an article for the Features section.
Very impressive.
|
|
|
|
|
|
Geoff Wood
|
| Posted: Sun 28 May, 2006 7:56 am Post subject: |
|
|
Wonderful stuff yet again Mr. Spencer
tjhanks for sharing
Geoff
|
|
|
|
|
Robert Zamoida

|
| Posted: Sun 28 May, 2006 8:18 am Post subject: |
|
|
Wow, awesome job Kirk!
Rob Zamoida
"When your life is on the line, you want to make use of all your tools. No warrior should be willing to die with his swords at his sides, without having made use of his tools."
-Miyamoto Mushashi, Gorin no Sho
|
|
|
|
|
|
Shae Bishop
|
| Posted: Sun 28 May, 2006 9:16 am Post subject: |
|
|
|
Incredible work! I have always loved the look of basket hilts with curved blades. The craftsmanship is excellent. A beautiful piece.
|
|
|
|
|
Henrik Bjoern Boegh

Location: Agder, Norway Joined: 03 Mar 2004
Posts: 386
|
| Posted: Sun 28 May, 2006 12:37 pm Post subject: |
|
|
Hi Kirk,
I've been waiting to see the results of this home-improvement project and I am VERY IMPRESSED!
You truely are skilled! It looks lovely! All the details! Congratulations!
Now, you should send this to Nathan and see it published as a myArmoury article!
Have you and plans of making or improve a scabbard for it?
Cheers,
Henrik
Constant and true.
|
|
|
|
|
|
|

